Speed up layout slicing in Photoshop
When creating an html page layout, sometimes you have to deal with a lot of similar images. For example, it fell out to typeset a photo album. It is necessary to cut about twenty “previews”, then name them all and save. Routine.
In order to quickly deal with all this - we use a few tricks.
Select one picture with the Slice Tool . And then, without departing from the checkout , press Alt and drag the slice to the next patient. If necessary, adjust the shape of the slice. Twenty seconds - and everything is cut:

Each slice must have its own, unique and sane name. To do this, we need to double-click on the slice and call the Slice Option . But, if we want to accelerate, then it would be more correct to cut everything first, and name the slices already in Save for Web .
Why? Because in this case we will have to do fewer actions: click on the slice, press Tab and, voila, get into the name of the slice. While in normal mode, we have to either press Tab four times , or drag the mouse back and forth.
However, we have a whole regiment of images, which, most likely, will need to be given a name of the form some-name- [n] . And in this case, you can not get into the settings of the slice at all.
Select the slices we need and click on the main button - Save . In the preservation specify Selected Slices and choose from the list Settings item Other ...

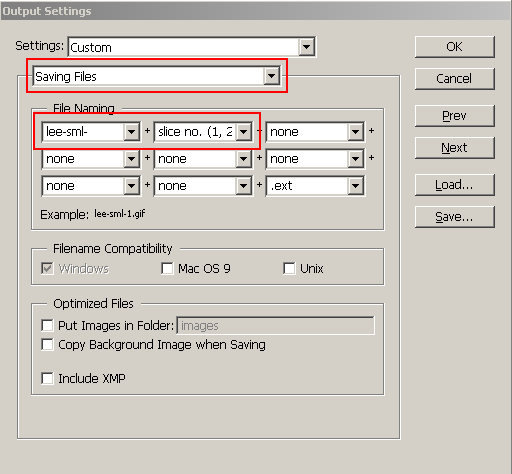
In the Output Settings go to the section Saving Files and is convenient for us to construct a file name. The designer is serious, there are a lot of details, so no one will leave offended.
Having a firm hand you will spend no more than a minute on all this action and get a pack of pictures. And it’s hard to dream of more.
In order to quickly deal with all this - we use a few tricks.
Cutting
Select one picture with the Slice Tool . And then, without departing from the checkout , press Alt and drag the slice to the next patient. If necessary, adjust the shape of the slice. Twenty seconds - and everything is cut:
Preservation
Each slice must have its own, unique and sane name. To do this, we need to double-click on the slice and call the Slice Option . But, if we want to accelerate, then it would be more correct to cut everything first, and name the slices already in Save for Web .
Why? Because in this case we will have to do fewer actions: click on the slice, press Tab and, voila, get into the name of the slice. While in normal mode, we have to either press Tab four times , or drag the mouse back and forth.
However, we have a whole regiment of images, which, most likely, will need to be given a name of the form some-name- [n] . And in this case, you can not get into the settings of the slice at all.
Select the slices we need and click on the main button - Save . In the preservation specify Selected Slices and choose from the list Settings item Other ...
In the Output Settings go to the section Saving Files and is convenient for us to construct a file name. The designer is serious, there are a lot of details, so no one will leave offended.
Having a firm hand you will spend no more than a minute on all this action and get a pack of pictures. And it’s hard to dream of more.