About connecting and working with Winstar text OLED displays
Line (or text) displays are intended for the delivery of text information in the form of lines. They are of several types (primarily LCD or self-luminous OLED), and usually in their marking there are numbers 1202, 1602, 1204 or similar, indicating the number of lines (in examples 2 or 4) and characters in each line (12 and 16) . There are single-line displays of this type, but in the following presentation we focus on the more commonly used two-line displays.
The majority of these displays are compatible with the HD44780 controller (Hitachi). The most popular (at least in our country) displays of this variety are produced by Winstar. Moreover, LCD varieties (the name begins with the letters WH, for example, WH1602) are one-on-one compatible with the HD44780 command system, and OLED types (the name begins with WEH, for example, WEH001602) have an improved WS0010 controller. Unfortunately, or fortunately, we’ll deal now.
Unlike the ones we examined earliergraphic displays based on the ks0108 controller, character generator in lowercase displays built-in. Moreover, for us, the main difference between the WS0010 and the standard HD44780 is the presence of several (four) code tables for displaying multilingual text. The HD44780 has only one such table, which is why companies have to sell a separate type of display in each region. WS0010-based OLED displays do not require regional breakdowns, which is much more convenient. But not to the user: by default, the ENGLISH_JAPANESE table is turned on in WEH displays, and to enable Russian characters, you need to switch it to ENGLISH_RUSSIAN.
The standard LiquidCrystal library (supplied with the Arduino IDE), of course, knows nothing about the four tables, and therefore requires straightening, at least in this regard. But not only: in the end, it would be possible to do with the English language. However, the initialization procedure is noticeably different for the WS0010, and if it is not corrected, the display will show that every time it starts.
For some reason, Winstar displays have a large deficit in terms of intelligible documentation (as you may have noticed, this is generally a characteristic feature of Chinese products). It is worth pointing out where you can download more or less complete documentation without any errors: here on the LCD (WH1602) with an HD44780 controller, here on the OLED displays (WEH1602), here on the WS0010 controller separately (we will refer to it later) . And here, if you are interested, there is a detailed description of the HD44780 controller in Russian.
To control the lowercase displays on the HD44780 and its analogs, the standard LiquidCrystal library, which is traditionally included in the Arduino IDE of all versions, is quite suitable. To display the Russian text, there is its version of LiquidCrystalRus , which surprisingly works well in all modern versions of the Arduino IDE (it says that the author correctly approached the conversion of UTF-8 characters). But to adapt for OLED displays on the WS0010 controller, you still need to make corrections. In the future, we will mock this library and therefore we will rename it LiquidCrystalRus_OLED, so as not to be confused with the usual one. To simplify the task, we will not rename the functions, because the initialization will be the same as for the original LiquidCrystalRus.
The changes are as follows:
1. Sincethe Russian-English table in WS0010 (see page 9 for the datasheet on WS0010 using the link above) is number 2, then to switch to it you need to set the two least significant bits FT1 and FT0 in the FUNCTION SET command to set it to state 10 (0x02). (In LCDs with one code table, these bits, by the way, are not used at all). To do this, in the LiquidCrystalRus_OLED.cpp file, look for the place (line 96 of the file) where the value of the _displayfunction variable is set . In both lines of its initialization (lines 97 and 99) add an append " | = 0x02 ".
2. Next, you need to fix the initialization delay after turning on the power. For HD44780, it should be no more than 40 ms (see the documentation on the links above). The library uses the function for this.delayMicroseconds (50000) (line 120 of the LiquidCrystalRus_OLED.cpp file ). For the WS0010 controller, you need to have a delay ten times longer - at least 500 ms (see the last page of the datasheet at the link above). This requirement is so carefully hidden (the files with the English-language documentation on Winstar displays “lost the font” in precisely this part), that it seems that few people have thought of it until now. Therefore, we replace this line with 32 delay repeats of 16 ms each:
3. In addition to this (see also this last page of the datasheet), after this delay, when turning on four-wire, you need to send an empty command five times in a row (0x00). Since the Arduino is significantly faster than the display controller, commands should be given with an intermediate delay. They need to be inserted a little further in the text of the begin function, where it is specifically about 4-bit inclusion (line 147 of the LiquidCrystalRus_OLED.cpp file ).
4. But this is not the end. The original ENGLISH_RUSSIAN table has a degree icon(code 0xEF). The option is extremely unsuccessfully executed graphically (too large), so instead I prefer to use a bold upper point (code 0xDF) - it is much more like a degree in the usual style. It could be entered in the form of a code (better than the octal "\ 337"), but the trouble is - trying to simplify the function of replacing codes of Russian letters with codes in the character generator table, the author of the library, based on the UTF-8 encoding (see the previous article ), introduced a replacement condition for any code greater than 0x80 ( LiquidCrystalRus :: write function ). Since our 0xDF is clearly greater than 0x80, when you specify the character "\ 337" in the line of code, an empty space will be displayed instead, because it does not correspond to any Russian letter.
Unfortunately, the standard createChar () functionwhen I tried using it to create my own degree icon, I entered the display in a complete stupor, from which it could only be removed by reloading the program. What I need to deal with additionally and I will be grateful if someone will tell me what is the matter. So the character generator cannot be edited in our capabilities, but we can exclude the 0xDF character we need from the condition. To do this, replace the existing condition (see the text of the write function ) with the following:
5. Finally, the crossed out zero on this display is not so striking as on graphic LCD screens. Nevertheless, in the same write function, I introduced the replacement of the zero code (0x30) with the code of the letter “O” (0x4f). Those who wish can return the crossed out zero back by simply deleting or commenting out the replacement line (line 308 of the modified LiquidCrystalRus_OLED.cpp file ).
The updated library can be downloaded from the link at the end of the article.
Now everything seems to be tweaked, you can connect. The connection of the WEH001602BG display (16 characters, screen length 100 mm) to the Arduino is shown in the following figure:
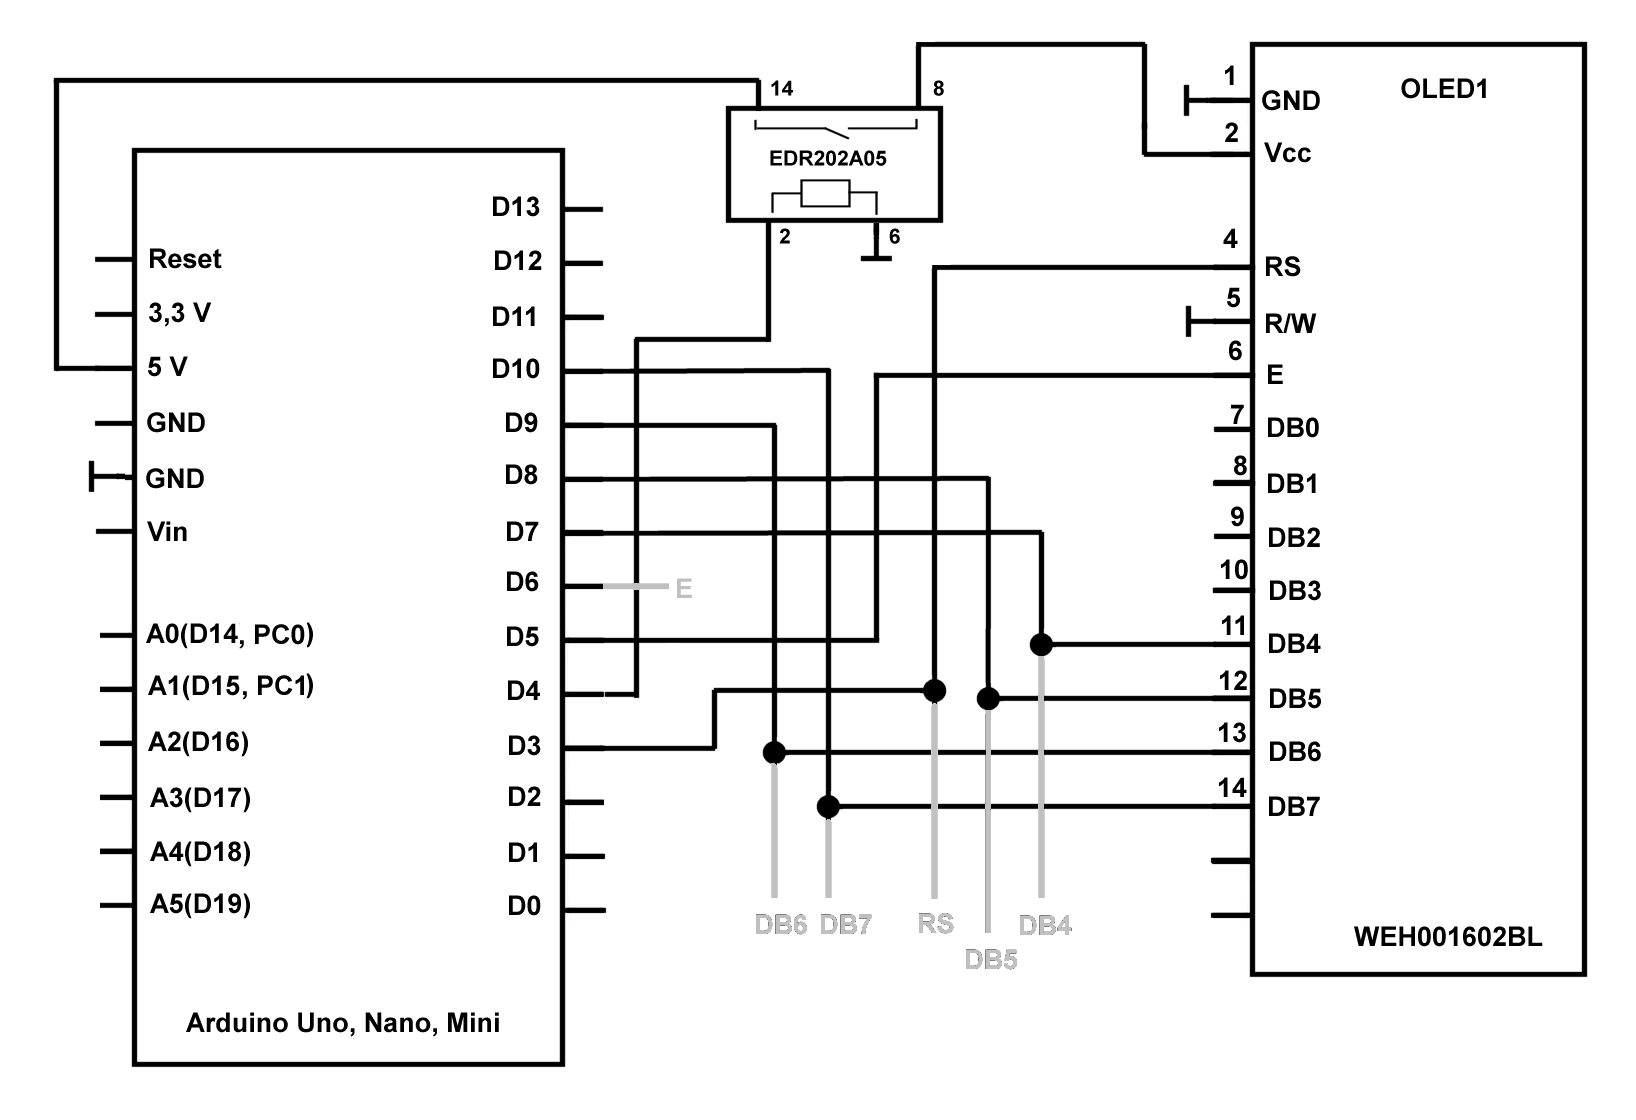
The Arduino pins to which the RS, E, DB4-DB7 display pins are connected should be indicated when the display is initialized:
If desired, you can connect two or even more displays in any interface option (eight- or four-wire). In this case, data lines and RS can be shared. The choice between displays in this case is made through terminal E, which for different displays is connected to different Arduino terminals (the connection lines of the second display are shown in gray on the diagram, terminal E of the second display here is connected to pin 6 of the Arduino). Of course, in this case, you need to create two copies of the library (for example, OLED1 and OLED2), in which all the outputs are the same, except for E. Moreover, the displays can be of different configurations and sizes (8x2, 16x2, 12x2, 12x4, etc. .). This also applies to conventional LCD displays on the HD44780.
And why is there a relay for power? The main drawback of the WS0010 is the lack of hardware "rezet". In HD44780, the built-in rezet may be justified - the author does not have enough experience with LCD screens to say for sure. But Winstar, trying to follow the standard in its development, clearly could not cope with this task. Rebooting the controller without turning off the power leads to the appearance of any turbidity on the display, and you can get rid of it only by juggling the power of the entire circuit and initializing the display from scratch.
In addition, the display when turning off / on the power can confuse the lines in places. The people claim that a full 8-bit inclusion (instead of 4-bit) helps, but it worked even worse for me. They also persistently insist that in hypothetical “new batches” all this has already been fixed, but it is hard to believe (what kind of “new” batches are we talking about when Winstar has released OLED displays since 2008 , and I had displays of 13 and 14 years release?).
Relay and set to artificially reset the display when rebooting the Arduino without turning off the power. This reliably eliminates garbage on the screen. The power of the display (or displays) is turned on separately through this relay, which is switched on from the free Arduino pin (in this case, pin 4) at the beginning of the setup procedure, when the controller is already operating stably. And before turning on the relay, it’s nice to give an additional delay of 1000 ms (see sketch below). The indicated relay EDR202A05 is a reed relay, the winding current is 10 mA, therefore it is quietly controlled from the Arduino output.
As for the confusion between the lines when turned on, in addition to the above changes in the initialization procedure, this effect perfectly relieves the power of the entire circuit from a sufficiently powerful (at least 1-2 A) external source with a stable voltage under load of at least 7.5 volt. This dependence on nutrition is, obviously, a source of discrepancies in many publications, where many authors claim that everything works fine for them. In this case, the display (or displays) can be connected through the Arduino internal stabilizer (pin 5V of the board), or they can be connected via a separate stabilizer, but the main thing is that the input voltage of the stabilizer should be stable enough regardless of power surges at the moment of switching on.
To check, I sent a demo sketch, Proba_Rus_Liquid_Crystal_OLED , simulating a calendar clock display with an external temperature sensor:
All the characteristic changes in the library mentioned above are applied here. The program also shows how to make the colon blink in the hours: minutes using the blink () function . Note that a new output in the same position destroys the blinking of familiarity, and when updating it, you have to resume it again, having previously set the invisible cursor to the same position 13 in the zero line. With a real clock update, it may be easier to update only the numbers at positions 11-12 and 14-15, leaving the blinking colon intact.
The results of the output of the example are shown in the photo:
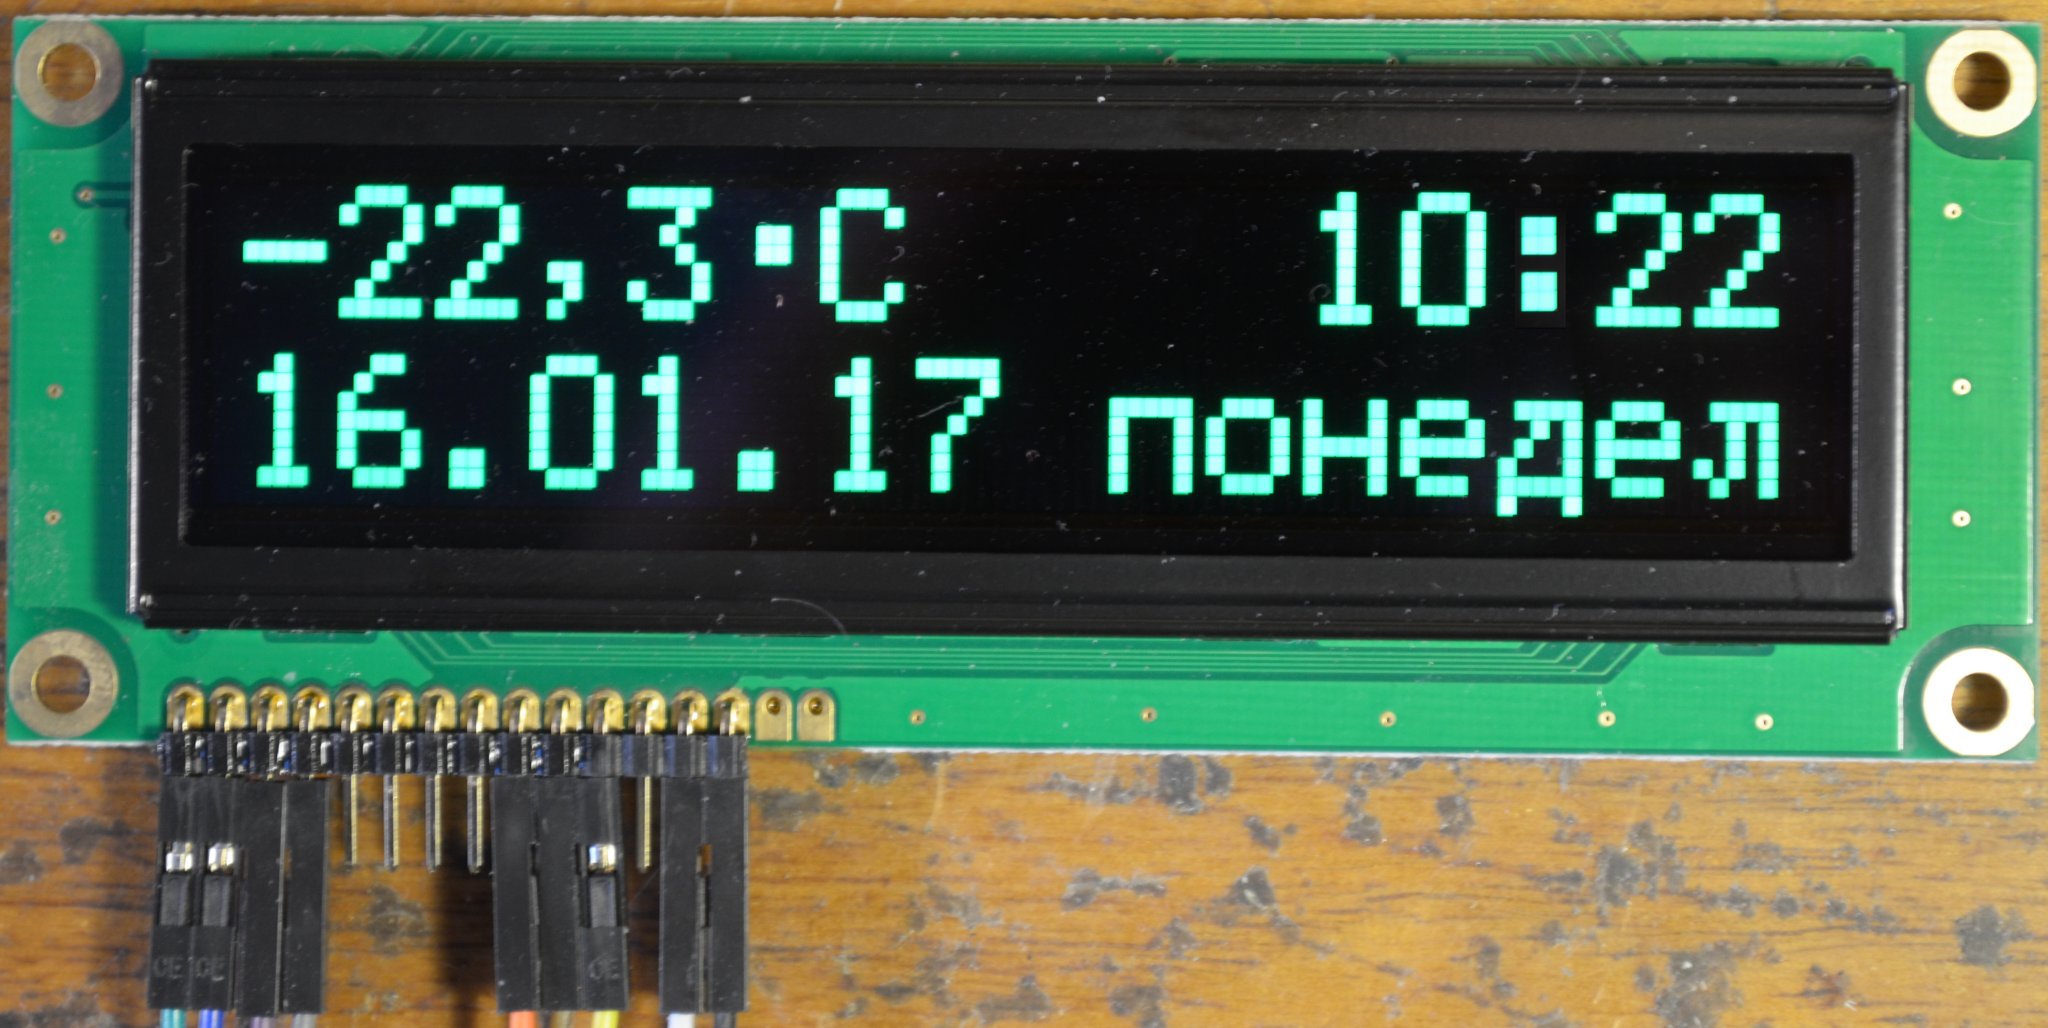
It should be noted that the photo does not convey the glow of the green OLED display (in this case). In fact, it is a deep green color, with a wavelength shorter than the usual 568 nm in LED displays (seven-segment or matrix). Why do the latter against the background of OLED seem "faded", and their combined application is difficult.
The WS0010 has a graphical mode, and Winstar graphical OLED displays (such as WEG010016) also have this controller. Someone noticed that they even have the same matrix. In my opinion, trying to apply a graphic mode on a text line display is rather pointless: the line display has hardware-set dark spaces between characters and lines that make the picture extremely unaesthetic (see numerous examples of such attempts).
One final note: on the durability of Winstar OLEDs. In datasheets, the time is indicated 100,000 hours, that is, 11 years. Nevertheless, one of the displays of the 13th year of release (yellow glow) to the present moment (winter of the 16th) has sharply lost brightness in me. It is funny that the rest from the same (green) and later (yellow and green 14 years old) party do not show any signs of dying. Therefore, with certainty, I do not presume to say anything, but just in case, I advise you not to solder the displays into the board, but to install them on the connectors, so that in case of which it could be replaced without problems.
You can download the archive with a free library and an example from here .
UPD: there was a solution to the problem of a stable start without manipulating power:
https://geektimes.ru/post/287234/
The majority of these displays are compatible with the HD44780 controller (Hitachi). The most popular (at least in our country) displays of this variety are produced by Winstar. Moreover, LCD varieties (the name begins with the letters WH, for example, WH1602) are one-on-one compatible with the HD44780 command system, and OLED types (the name begins with WEH, for example, WEH001602) have an improved WS0010 controller. Unfortunately, or fortunately, we’ll deal now.
Unlike the ones we examined earliergraphic displays based on the ks0108 controller, character generator in lowercase displays built-in. Moreover, for us, the main difference between the WS0010 and the standard HD44780 is the presence of several (four) code tables for displaying multilingual text. The HD44780 has only one such table, which is why companies have to sell a separate type of display in each region. WS0010-based OLED displays do not require regional breakdowns, which is much more convenient. But not to the user: by default, the ENGLISH_JAPANESE table is turned on in WEH displays, and to enable Russian characters, you need to switch it to ENGLISH_RUSSIAN.
Learn more about the ENGLISH_RUSSIAN table.
No standard encoding works there: in the font table (see the documentation on the links below) in general there are only Cyrillic characters that are different in writing from Latin. The very idea of saving on Cyrillic glyphs identical to Latin in style is not new - once there was the DKOI-8 encoding, which was very late even introduced into the standard (see GOST 19768-93 ). But it was invented in the framework of the EU program, and, accordingly, is based on the IBCDIC ibiem encoding, therefore it does not coincide with any modern ones in which the ASCII table is always taken as the basis (the first 127 characters). Therefore, in text displays similar to those considered, their proprietary encodings are invented, the compatibility of which with ASCII in the English alphabet is strictly respected.
The standard LiquidCrystal library (supplied with the Arduino IDE), of course, knows nothing about the four tables, and therefore requires straightening, at least in this regard. But not only: in the end, it would be possible to do with the English language. However, the initialization procedure is noticeably different for the WS0010, and if it is not corrected, the display will show that every time it starts.
Other features
Note at the same time that Winstar OLED displays have hardware capabilities that are not reflected in the official documentation (or reflected, but not too clearly). By soldering the jumpers available on the displays, you can do quite a lot of interesting things. For example, you can read about how to work with WEH displays through the SPI interface (more precisely, “SPI type”) here , and how to enable brightness adjustment support (via pin 3) - here. But do not rush headlong into the possibility of connecting via a serial interface: the number of connections decreases slightly compared to four-wire switching, and you still need to look for a ready-made library on this topic. If you really need to reduce the number of wires, then an excellent option is to connect via I2C with an intermediate controller (see, for example, at the end of this article ).
For some reason, Winstar displays have a large deficit in terms of intelligible documentation (as you may have noticed, this is generally a characteristic feature of Chinese products). It is worth pointing out where you can download more or less complete documentation without any errors: here on the LCD (WH1602) with an HD44780 controller, here on the OLED displays (WEH1602), here on the WS0010 controller separately (we will refer to it later) . And here, if you are interested, there is a detailed description of the HD44780 controller in Russian.
Leveling the LiquidCrystal library
To control the lowercase displays on the HD44780 and its analogs, the standard LiquidCrystal library, which is traditionally included in the Arduino IDE of all versions, is quite suitable. To display the Russian text, there is its version of LiquidCrystalRus , which surprisingly works well in all modern versions of the Arduino IDE (it says that the author correctly approached the conversion of UTF-8 characters). But to adapt for OLED displays on the WS0010 controller, you still need to make corrections. In the future, we will mock this library and therefore we will rename it LiquidCrystalRus_OLED, so as not to be confused with the usual one. To simplify the task, we will not rename the functions, because the initialization will be the same as for the original LiquidCrystalRus.
The changes are as follows:
1. Sincethe Russian-English table in WS0010 (see page 9 for the datasheet on WS0010 using the link above) is number 2, then to switch to it you need to set the two least significant bits FT1 and FT0 in the FUNCTION SET command to set it to state 10 (0x02). (In LCDs with one code table, these bits, by the way, are not used at all). To do this, in the LiquidCrystalRus_OLED.cpp file, look for the place (line 96 of the file) where the value of the _displayfunction variable is set . In both lines of its initialization (lines 97 and 99) add an append " | = 0x02 ".
2. Next, you need to fix the initialization delay after turning on the power. For HD44780, it should be no more than 40 ms (see the documentation on the links above). The library uses the function for this.delayMicroseconds (50000) (line 120 of the LiquidCrystalRus_OLED.cpp file ). For the WS0010 controller, you need to have a delay ten times longer - at least 500 ms (see the last page of the datasheet at the link above). This requirement is so carefully hidden (the files with the English-language documentation on Winstar displays “lost the font” in precisely this part), that it seems that few people have thought of it until now. Therefore, we replace this line with 32 delay repeats of 16 ms each:
for (int i = 0; i <=31; i++) delayMicroseconds(16000);3. In addition to this (see also this last page of the datasheet), after this delay, when turning on four-wire, you need to send an empty command five times in a row (0x00). Since the Arduino is significantly faster than the display controller, commands should be given with an intermediate delay. They need to be inserted a little further in the text of the begin function, where it is specifically about 4-bit inclusion (line 147 of the LiquidCrystalRus_OLED.cpp file ).
4. But this is not the end. The original ENGLISH_RUSSIAN table has a degree icon(code 0xEF). The option is extremely unsuccessfully executed graphically (too large), so instead I prefer to use a bold upper point (code 0xDF) - it is much more like a degree in the usual style. It could be entered in the form of a code (better than the octal "\ 337"), but the trouble is - trying to simplify the function of replacing codes of Russian letters with codes in the character generator table, the author of the library, based on the UTF-8 encoding (see the previous article ), introduced a replacement condition for any code greater than 0x80 ( LiquidCrystalRus :: write function ). Since our 0xDF is clearly greater than 0x80, when you specify the character "\ 337" in the line of code, an empty space will be displayed instead, because it does not correspond to any Russian letter.
Unfortunately, the standard createChar () functionwhen I tried using it to create my own degree icon, I entered the display in a complete stupor, from which it could only be removed by reloading the program. What I need to deal with additionally and I will be grateful if someone will tell me what is the matter. So the character generator cannot be edited in our capabilities, but we can exclude the 0xDF character we need from the condition. To do this, replace the existing condition (see the text of the write function ) with the following:
if ((value>=0x80)&&(value!=0xdf))5. Finally, the crossed out zero on this display is not so striking as on graphic LCD screens. Nevertheless, in the same write function, I introduced the replacement of the zero code (0x30) with the code of the letter “O” (0x4f). Those who wish can return the crossed out zero back by simply deleting or commenting out the replacement line (line 308 of the modified LiquidCrystalRus_OLED.cpp file ).
The updated library can be downloaded from the link at the end of the article.
Connection
Now everything seems to be tweaked, you can connect. The connection of the WEH001602BG display (16 characters, screen length 100 mm) to the Arduino is shown in the following figure:
The Arduino pins to which the RS, E, DB4-DB7 display pins are connected should be indicated when the display is initialized:
// RS, E, DB4, DB5, DB6, DB7
LiquidCrystalRus OLED1(3, 5, 7, 8, 9, 10);
If desired, you can connect two or even more displays in any interface option (eight- or four-wire). In this case, data lines and RS can be shared. The choice between displays in this case is made through terminal E, which for different displays is connected to different Arduino terminals (the connection lines of the second display are shown in gray on the diagram, terminal E of the second display here is connected to pin 6 of the Arduino). Of course, in this case, you need to create two copies of the library (for example, OLED1 and OLED2), in which all the outputs are the same, except for E. Moreover, the displays can be of different configurations and sizes (8x2, 16x2, 12x2, 12x4, etc. .). This also applies to conventional LCD displays on the HD44780.
And why is there a relay for power? The main drawback of the WS0010 is the lack of hardware "rezet". In HD44780, the built-in rezet may be justified - the author does not have enough experience with LCD screens to say for sure. But Winstar, trying to follow the standard in its development, clearly could not cope with this task. Rebooting the controller without turning off the power leads to the appearance of any turbidity on the display, and you can get rid of it only by juggling the power of the entire circuit and initializing the display from scratch.
In addition, the display when turning off / on the power can confuse the lines in places. The people claim that a full 8-bit inclusion (instead of 4-bit) helps, but it worked even worse for me. They also persistently insist that in hypothetical “new batches” all this has already been fixed, but it is hard to believe (what kind of “new” batches are we talking about when Winstar has released OLED displays since 2008 , and I had displays of 13 and 14 years release?).
Relay and set to artificially reset the display when rebooting the Arduino without turning off the power. This reliably eliminates garbage on the screen. The power of the display (or displays) is turned on separately through this relay, which is switched on from the free Arduino pin (in this case, pin 4) at the beginning of the setup procedure, when the controller is already operating stably. And before turning on the relay, it’s nice to give an additional delay of 1000 ms (see sketch below). The indicated relay EDR202A05 is a reed relay, the winding current is 10 mA, therefore it is quietly controlled from the Arduino output.
As for the confusion between the lines when turned on, in addition to the above changes in the initialization procedure, this effect perfectly relieves the power of the entire circuit from a sufficiently powerful (at least 1-2 A) external source with a stable voltage under load of at least 7.5 volt. This dependence on nutrition is, obviously, a source of discrepancies in many publications, where many authors claim that everything works fine for them. In this case, the display (or displays) can be connected through the Arduino internal stabilizer (pin 5V of the board), or they can be connected via a separate stabilizer, but the main thing is that the input voltage of the stabilizer should be stable enough regardless of power surges at the moment of switching on.
Check
To check, I sent a demo sketch, Proba_Rus_Liquid_Crystal_OLED , simulating a calendar clock display with an external temperature sensor:
Display example WEH1602
#include
// initialize the library with the numbers of the interface pins
// RS, E, DB4, DB5, DB6, DB7
LiquidCrystalRus OLED1(3, 5, 7, 8, 9, 10);
#define RelayPin 4 //вывод 4 - обмотка реле
void setup() {
delay (1000);
pinMode(RelayPin, OUTPUT);
digitalWrite(RelayPin, HIGH); //включаем питание дисплея
delay (500);
  OLED1.begin(16,2); //16 символов 2 строки
  OLED1.clear();
  OLED1.setCursor(0,0); //верхняя строка, нулевая позиция
  OLED1.print("-22,3\337C"); //10 град Цельсия
  OLED1.setCursor(11,0); //верхняя строка, 11 позиция
  OLED1.print("10:22"); //время
  OLED1.setCursor(0,1); //нижняя строка нулевая позиция
  OLED1.print("16.01.17 понедел"); //дата 16 января понедельник
  OLED1.setCursor(13,0); //верхняя строка, 13 позиция ":"
  OLED1.blink(); //мигаем двоеточием
   delay(1000);
}
void loop() {
/* Здесь не забывать при смене показаний на дисплее
 каждый раз устанавливать курсор на позицию двоеточия 13,0
 и снова вызывать blink
*/
}
All the characteristic changes in the library mentioned above are applied here. The program also shows how to make the colon blink in the hours: minutes using the blink () function . Note that a new output in the same position destroys the blinking of familiarity, and when updating it, you have to resume it again, having previously set the invisible cursor to the same position 13 in the zero line. With a real clock update, it may be easier to update only the numbers at positions 11-12 and 14-15, leaving the blinking colon intact.
The results of the output of the example are shown in the photo:
It should be noted that the photo does not convey the glow of the green OLED display (in this case). In fact, it is a deep green color, with a wavelength shorter than the usual 568 nm in LED displays (seven-segment or matrix). Why do the latter against the background of OLED seem "faded", and their combined application is difficult.
The WS0010 has a graphical mode, and Winstar graphical OLED displays (such as WEG010016) also have this controller. Someone noticed that they even have the same matrix. In my opinion, trying to apply a graphic mode on a text line display is rather pointless: the line display has hardware-set dark spaces between characters and lines that make the picture extremely unaesthetic (see numerous examples of such attempts).
One final note: on the durability of Winstar OLEDs. In datasheets, the time is indicated 100,000 hours, that is, 11 years. Nevertheless, one of the displays of the 13th year of release (yellow glow) to the present moment (winter of the 16th) has sharply lost brightness in me. It is funny that the rest from the same (green) and later (yellow and green 14 years old) party do not show any signs of dying. Therefore, with certainty, I do not presume to say anything, but just in case, I advise you not to solder the displays into the board, but to install them on the connectors, so that in case of which it could be replaced without problems.
You can download the archive with a free library and an example from here .
UPD: there was a solution to the problem of a stable start without manipulating power:
https://geektimes.ru/post/287234/