IRotary project
- Transfer
In which the phone with a dialer receives electronics for work in mobile networks and can work as it was intended.
This is a three-part project description, which I was supposed to write as a solemn completion of the project itself, but since I too delayed this moment, I decided to describe the entire project as one coherent presentation.
If anyone remembers, I am a very angry person. I burn easily by talking, but now there is no good way to express my annoyance. I miss the old time when it was possible to shake the phone with a handset over the device in order to relieve the tension - but mobile phones do not give such an opportunity. And I set out to create a mobile phone with a dialer.
This is how iRotary was born
IRotary project

Krasotulya
I started with the purchase of an old school real telephone with a rotary dialer - just the one I used as a child. I chose a glorious orange color so that the beauty of iRotary would not yield to the ambitiousness of the project.
The photo was taken from that very phone on the first day of purchase, with cables and everything else. It looks just as good today, although it has 50% fewer wires — which is good with mobile phones.
The whole project cost me $ 150 for parts and $ 2000 for the development time - it took two full days to assemble, and stretched out for several months of all sorts of actions, waiting for parts, using spare parts, waiting for the next parts, etc. The first step, of course, was to extract all the unnecessary and replace it with everything that was needed.
Step 1: First, wah!

Imagine what to say with such a club!
The best candidate for interfaces with the old dialer is, of course, the Arduino. He will also be responsible for working with GSM. It is ideal for reading dialer pulses and converting them into an integer number, which can then be used to dial a number.
Communications are handled without problems by the GSM shield. This is a peripheral device that connects to the Arduino (on the streets we call it “shield”). It is very easy to program, it comes with a library with most of the necessary functions - reading SMS, sending and receiving calls, sending DTMF, and so on.
The next step was to write the code to convert the set to numbers. The dialer works like this: after the forced rotation, it starts rotating back, it touches the switch once for each dialed number. This means that if you dial three, the switch will send three signals, since three numbers will pass by it. To determine the dialed number, you just need to count how many times the switch has been open and closed.
This was easy to do with the following code, which simply increments the variable each time the voltage from the switch changes from low to high:
voidreadPulses(){
    char pinPulse = digitalRead(PIN_PULSE);
    if (pinPulse == HIGH && edge == 0) {
        pulses++;
        edge = 1;
    } elseif (pinPulse == LOW && edge == 1) {
        edge = 0;
    }
}
All you need to do next is to collect the numbers and make a call when the number of digits reaches 10. In Greece, all the numbers are ten-digit, with the exception of phone sex numbers, the code for which I will add later.
Adding numbers to the line in turn is a simple process, done by the following code.
voidreadDialing(){
    char digit;
    bool finalDigit = false;
    char pinDialing = digitalRead(PIN_DIALING);
    if (pinDialing == 1 && dialing == 0) {
        digit = getDigit();
        if (digit != -1) {
            number += (int)digit;
            showNumber(number);
            if (number.length() == NUMBER_LENGTH) {
                dialNumber(number);
            }
        }
    }
    dialing = pinDialing;
}
He has not yet sent the call, because the shield has not yet been connected - this was already the next step. Here is a prototype at work:
He earned a good straight away, even with the old, dilapidated apparatus, which I found for prototyping. The dialer is amazingly accurate, and it should be so, otherwise you could not get there, and not find out about it until some dude answered you, and you call your girlfriend and you decide that she changes you , and roll up the scandal, but in reality it's just a switch of swagger. That is why the number of divorces dropped sharply after entering digital tonal dialers. In addition, reduced violence against people with a large number of zeros in the rooms.
Step 2: who does not risk, that is not GSM-it
The next step after the successful recognition of numbers is to add the ability to make calls via mobile communication. I connected the shield with the Arduino and added the code necessary for the calls:
voiddialNumber(String number){
    call.Call(numArray);
}
Exciting.
Although it is so simple, it was very cool, because most of the functionality of the mobile phone (dialing and calling) was ready. Here's how it works:
At this step, I met several difficulties. The first is where to place an Arduino with a shield in the phone, since there was practically no space because of the components of the phone. To solve this almost unsolvable problem, I had to compromise: I deleted the bell, which still could not be powered from a battery (it needed 50 V), which reduced the authenticity of the device. Why do you need a phone with a dialer, if it can not produce the familiar sound dzzzzzzzzzzzzzzzzzzzzy?
And the inspiration came! The solution was simple: let the phone work in a quiet mode, be polite, so as not to disturb other people, but otherwise - beautiful.
Having solved two problems in one fell swoop, I felt my joy grow. Another problem was that it was necessary to somehow connect the input and output of the shield to the tube. Here excuses will not help, since no self-respecting phone will be deaf and dumb, so I first decided to buy a small microphone and speaker, and put them in the receiver. And I almost ordered it when I suddenly decided: first, I will try the existing microphone and speaker.
I quickly jumped to the drawing board and sketched out the most complicated circuit consisting of a huge number of components: three wires and two connectors. Putting it all together, I inserted the connectors into the inputs and outputs of the shield and made a call.
- Hello! - said my voice.
- Hello! - I answered happily.
- I hear you! - I said to myself.
- And I love you! - sounded the answer.
The test ended with a resounding success. The existing components not only approached the shield, but also produced an authentic rustling sound and feedback, which I managed to forget.
The difference between a mobile phone and such a phone is that the first one does not need to play your voice back through the speaker. Therefore, it seems to you that your voice is quieter than it is (because you plug the ear into the ear), and you shout more - as if you were trying to listen to music with headphones while talking to someone.
And on the old phone you can hear your voice when talking, which is nice and that does not require you to shout at your interlocutor. This is a pleasant effect that we have lost.
Here is the teaser of the final product:
The ringing sounds are not real, but this is Hollywood.
Step 3: go ahead
When the audio, number recognition and GSM started working, it’s time to connect the rest of the controls - a lever, a button and a strange LED thing, a loading indicator.
It is best to do this through events. Arduino doesn't work that way because you constantly need to ask “is the button pressed?” Many thousands of times per second, but the architecture of the events is easy to fake by using a bit of code.
I wanted to pick up the handset from the lever to answer the call if the phone rang, and placing the handset back on the lever interrupted the current call. I also wanted all control signals to be ignored when the handset was on the lever.
This is easy to achieve with machine conditions. This means that there is a variable that contains the current state of the phone - at rest, talking, ringing, dialing, etc. And if there are any events (pressing the button), they can simply check the state of the phone, and either perform the action or not.
Developments
Recognize events as well as numbers. We will check if the state of the button changes, and launch the event only if we detect the change (otherwise we would have triggered the event thousands of times when asked if the button was pressed, and the Arduino would answer yes to thousands of times per second).
#define PIN_BUTTON_HALF 6char buttonHalfEdge = 0;
voidcheckButtonHalfPressed(){
    if (digitalRead(PIN_BUTTON_HALF) == LOW) {
        if (buttonHalfEdge == 0) {
            buttonHalfPressed();
        }
        buttonHalfEdge = 1;
    } else {
        if (buttonHalfEdge == 1) {
            buttonHalfReleased();
        }
        buttonHalfEdge = 0;
    }
}
This button has two states, half-pressed and fully pressed (or half-pressed and completely pressed, if you ask the pessimist). The code defines both states, and other events are handled in much the same way.
The system can be viewed in the next video, where the components are in the case, but it still needs to be plugged into the USB for power.
Beauty!
Step 4: Battery Power

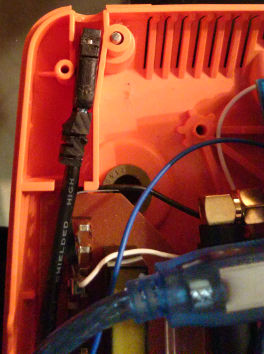
USB-connector for charging the battery
Of course, what would it be for a mobile phone, if it was not mobile? It would not be a mobile phone! So two options for carrying the phone are a small 5-volt battery and a USB charging circuit, or a very, very long cable. Since copper today is worth more than gold, and I am not made of money, I chose the first option.
It requires three components:
- Battery (with a holder, without which it does not work). Obviously, it will power the phone, and it is not obvious to be hidden from the eyes inside the case.
- Charging circuit, one end of which will be connected to the battery, and the other - with a USB connector such as "mother". It will be possible to charge the battery with regular USB charging.
- A regulator (I do not remember the exact name). It will be connected to the battery, and will deprive it of energy, just like kryptonite for batteries. Batteries do not give out the voltage they promise, but instead give out less and less as they are discharged, and this component will allow the Arduino to get an honest 5V, until the battery dies completely.

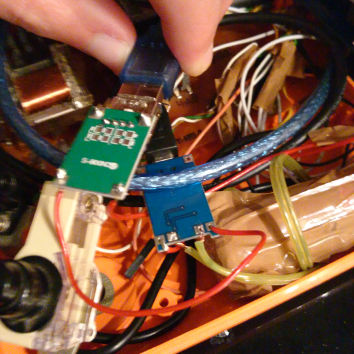
Regulator and charging assembly
Once again, the battery and the regulator are connected to charging. Charging has a USB port (and I used an extension cable to lead it to where the telephone cable was) to be used for charging. The regulator will resolve everything and provide the necessary voltage to the necessary components, so that you can turn the phone on and off during operation, and the voltage will not fall.
You can also charge the included phone, which is convenient. I don’t know how long the battery lasts, I haven’t used it for more than a few hours, but maybe for a couple of days –– you won’t be able to write to your friends from the phone (you need to connect a typewriter). I will try to test it sometime, but for now I’ll just say that the battery lives for months, and you can talk for weeks, and then it will be better sold, or at least quickly collect the required amount on the kickstarter.
Step 5: Step 5 is not.

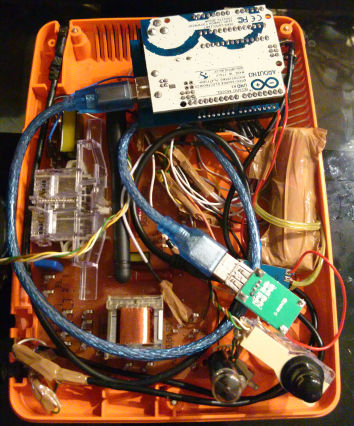
Interiors Assembly
And the project was completed! After pulling the wires and stuffing things into places for which they were not intended, you can close the case, in which everything fits well - unless you shake it.
You can roughly parse the location of the components. Arduino is on the upper right, under it is the shield (you can see the antenna sticking out), the blue USB power cable goes to the controller connected to the battery and the charger going to the mother connector on the upper left. You can see the cables for the microphone and speaker (from the upper right corner to the left).
The schemes on the brown board below are the original schemes of the phone. They are not used, but removing them would be difficult, and perhaps without them the lever (a transparent piece of plastic on the left) would not work, which would be unacceptable.
And here, as promised, the final commercial, in all its final beauty. What a beauty! Be sure to send it to all your friends, even those with whom you have not communicated for a long time. What could be more important than re-chat with old friends thanks to the insane internet project of some guy from Greece? Of course, nothing!
If it hurts you to make your own mobile phone with a dialer, and you think about writing everything from scratch, spending sleepless nights on reverse engineering of my pieces of code, I have good news for you. I posted all the code online, because well, here I am.
github.com/skorokithakis/iRotary
Tell me how much this amazing project has changed your life in the comments on the original article or on Twitter! Smack!
