Custom refactoring tool: Swift
Any engineer strives to make his work process as optimized as possible. As mobile iOS developers, we very often have to work with uniform language structures. Apple is improving developer tools by putting a lot of effort into making it convenient for us to program: language highlighting, auto-completion methods, and many other IDE features let our fingers keep pace with ideas in our heads.

What does an engineer do when the required tool is missing? True, he will do everything himself! Earlier we talked about creating our custom tools, now let's talk about how to modify Xcode and make it work according to your rules.
We took the task from JIRA Swift and made a tool that converts if letinto the equivalent guard let construct .
Since the ninth version, Xcode provides a new refactoring mechanism that can convert code locally, within the same Swift source file, or globally when you rename a method or property that occurs in multiple files, even if they are in different languages.
Local refactoring is fully implemented in the SourceKit compiler and framework, the feature is located in the open source Swift repository and is written in C ++. Modification of global refactoring is currently inaccessible to ordinary people, because the Xcode code base is closed. Therefore, we will dwell on the local history and talk about how to repeat our experience.
What you need to create your own tool for local refactoring:
A bit of theoretical basics before diving into practice. Let's take a look at how the Swift compiler architecture works. First of all, the compiler is responsible for transforming the code into executable machine code.
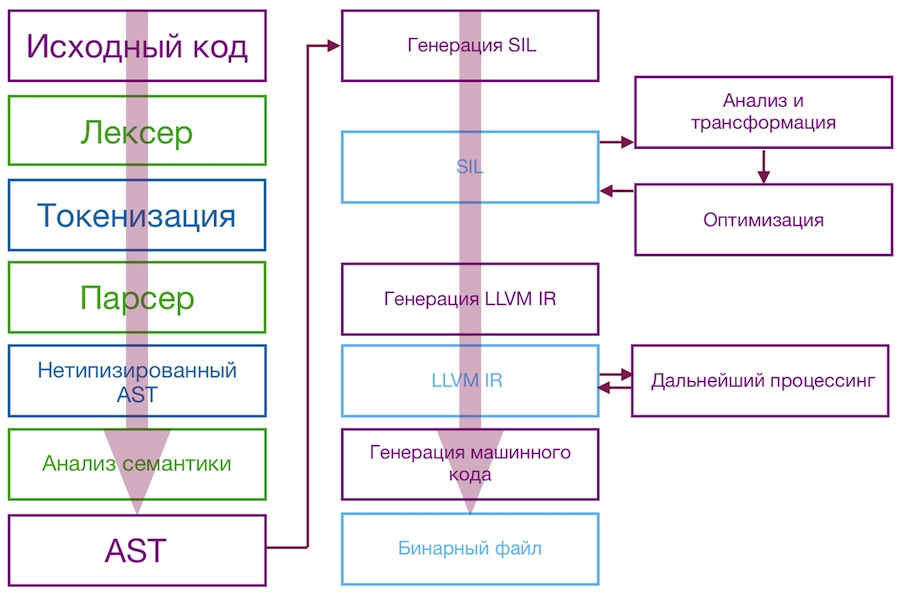
Of the presented stages of transformation, the most interesting for us is the generation of an abstract syntax tree (AST) - a graph in which the vertices are operators and the leaves are their operands.
Syntax trees are used in the parser. AST is used as an internal representation in the compiler / interpreter of a computer program for optimizing and generating code.
After the AST is generated, parsing is performed to create the AST with a type check that has been translated into the Swift Intermediate Language. SIL is converted, optimized, downgraded to LLVM IR, which ultimately compiles into machine code.
To create a refactoring tool, we need to understand AST and be able to work with it. So the tool will be able to correctly operate with parts of the code that we want to process.
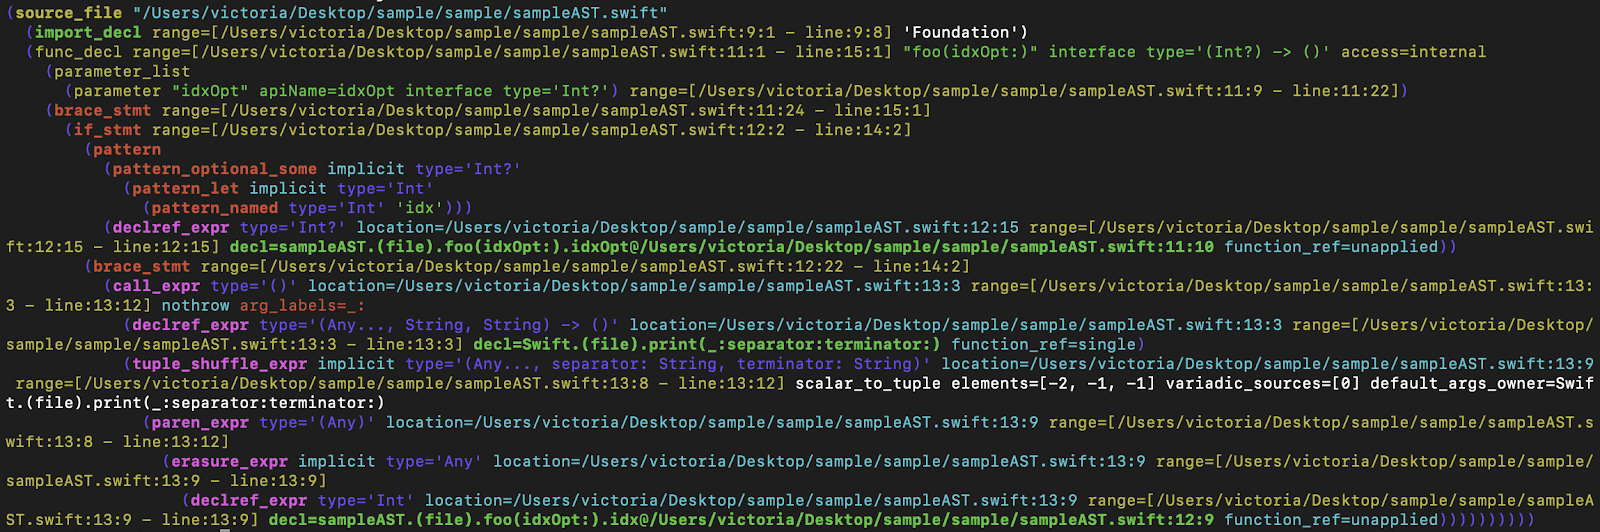
To generate the AST of a file, run the command: swiftc -dump-ast MyFile.swift
The following is the output to the AST console of the if let function , which was mentioned earlier.
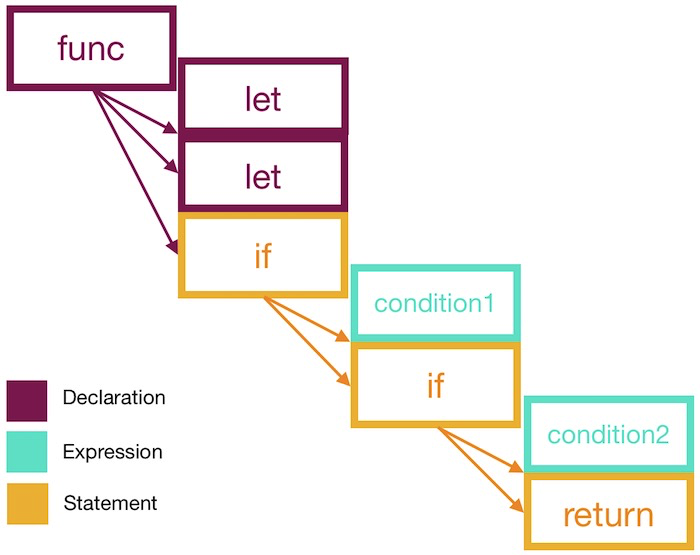
There are three main types of nodes in Swift AST:
They correspond to the three entities that are used in the Swift language itself. Names of functions, structures, parameters are declarations. Expressions are entities that return a value; for example, calling functions. Operators are parts of the language that define the control flow of code execution, but do not return a value (for example, if or do-catch).
This is a sufficient minimum that you need to know about AST for your upcoming work.
To implement refactoring tools, you need specific information about the area of the code that you are going to change. Developers are provided with auxiliary entities that accumulate data. The first, ResolvedCursorInfo (cursor-based refactoring), tells you if we are at the beginning of an expression. If so, the corresponding compiler object of this expression is returned. The second entity, RangeInfo (range-based refactoring), encapsulates data about the original range (for example, how many entry and exit points it has).
Cursor-based refactoring is initiated by the location of the cursor in the source file. Refactoring actions implement the methods that the refactoring mechanism uses to display available actions in the IDE and to perform transformations. Examples of actions based on the cursor: Jump to definition, quick help, etc.
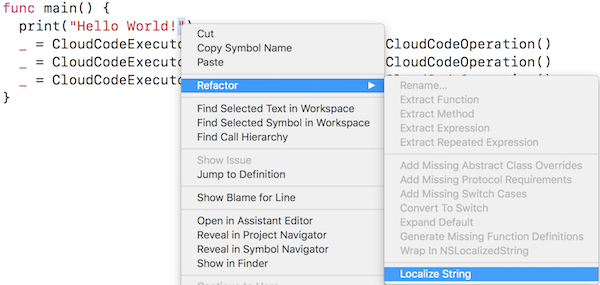
Consider the usual actions from the technical side:
Range-based refactoring is initiated by selecting a continuous range of code in the source file.
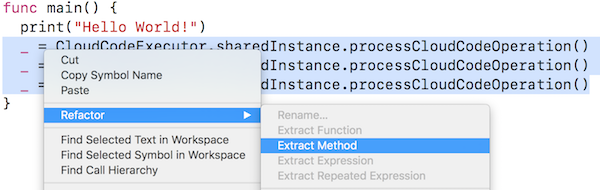
In this case, the refactoring tool will go through a similar call chain described. The difference is that when implemented, the input is RangeInfo instead of ResolvedCursorInfo. Interested readers can refer to Refactoring.cpp for more information on Apple toolkit examples.
And now to the practice of creating a tool.
First of all, you need to download and build the Swift compiler. Detailed instructions are in the official repository ( readme.md ). Here are the key commands for code cloning:
Cmake is used to describe the structure and dependencies of the project . Using it, you can generate a project for Xcode (more convenient) or for ninja (faster) due to one of the commands:
or
Successful compilation requires the latest version of Xcode beta (10.2.1 at the time of writing) - available on the official Apple website . To use the new Xcode to build the project, you need to register the path using the xcode-select utility:
If we used the --xcode flag to build the project for Xcode, respectively, then after several hours of compilation (we got a little more than two) in the build folder, we will find the Swift.xcodeproj file. Opening the project, we will see the familiar Xcode with indexing, breakpoints.
To create a new instrument, we need to add the code with the logic of the instrument to the file: lib / IDE / Refactoring.cpp and define two methods, isApplicable and performChange. In the first method, we decide whether to output the refactoring option for the selected code. And in the second - how to convert the selected code to apply refactoring.
After the preparation done, it remains to implement the following steps:
This development method will take you a lot of time due to the long assembly of components, but the result is immediately visible in Xcode - the way to manually verify it.
To start, let's build the Swift toolchain using the command:
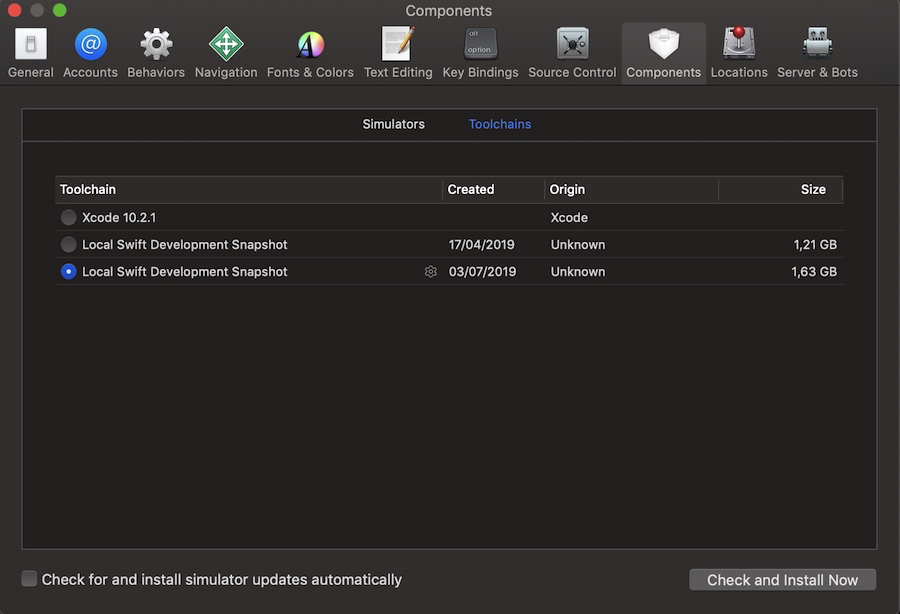
Compiling the toolchain will take even longer than compiling the compiler and the dependencies. The output is the swift-LOCAL-yyyy-mm-dd.xctoolchain file in the swift-nightly-install folder, which you need to transfer to Xcode: / Library / Developer / Toolchains /. Next, in the IDE settings, select the new toolchain, restart Xcode.
Select a piece of code that the tool should process, and look for the tool in the context menu.
If the project was built for Ninja and you chose the TDD path, then development through tests with Ninja is one of the options that will suit you. Cons - you cannot set breakpoints, as in development through Xcode.
So, we need to check that the new tool is displayed in Xcode when the user selects the guard construct in the source code. We write the test in the existing test / refactoring / RefactoringKind / basic.swift file:
We indicate that when highlighting the code between 266 row 3 columns and 268 row 4 columns, we expect the appearance of a menu item with a new tool.
Using the lit.py script can provide faster feedback to your development cycle. You can specify the test suit of interest. In our case, this suite will be RefactoringKind:
As a result, tests of only this file will be launched. Their implementation will take a couple of tens of seconds. More information about lit.py will be discussed later in the Diagnostics and Testing section.
The test fails, which is normal for the TDD paradigm. After all, so far we have not written a single line of code with the logic of the tool.
And finally, the last development method when the project was built under Xcode. The main plus is the ability to set breakpoints and control debugging.
When building a project under Xcode, the Swift.xcodeproj file is created in the build / Xcode-DebugAssert / swift-macosx-x86_64 / folder. When you open this file for the first time, it is better to choose to create schemes manually to generate ALL_BUILD and swift-refactor yourself:
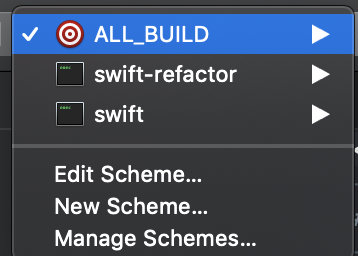
Next, collect the project with ALL_BUILD once, then use the swift-refactor scheme.
Refactoring tool is compiled into a separate executable file - swift-refactor. Help for this file can be displayed using the –help flag. The most interesting parameters for us are:
They can be specified in the schema as arguments. Now you can set breakpoints to stop at places of interest when starting the tool. In the usual way, using the p and po commands in the Xcode console, it displays the values of the corresponding variables.

The isApplicable method accepts a ResolvedRangeInfo with information about AST nodes of the selected code fragment at the input. At the output of the method, it is decided whether to show the tool or not in the Xcode context menu. The full ResolvedRangeInfo interface can be found in the include / swift / IDE / Utils.h file .
Consider the fields of the ResolvedRangeInfo class that are most useful in our case:
To test isApplicable, add the sample code to the file test / refactoring / RefactoringKind / basic.swift .
In order for the test to simulate a call to our tool, you need to add a line in the tools / swift-refactor / swift-refactor.cpp file .

This method is called when a refactoring tool is selected in the context menu. The method has access to ResolvedRangeInfo, as well as in isApplicable. We use ResolvedRangeInfo and write the logic of the code conversion tool.
When generating code for static tokens (regulated by the language syntax), you can use entities from the tok namespace. For example, for the guard keyword, use tok :: kw_guard. For dynamic tokens (modified by the developer, for example, the name of the function), you need to select them from the array of AST elements.
To determine where the converted code is inserted, we use the full selected range using the RangeInfo.ContentRange construct.
Before you finish working on a tool, you need to check the correctness of its work again. The tests will help us again. Tests can be run one at a time or with all available scopes. The easiest way to run the entire Swift test suite is with the --test command on utils / build-script, which will run the main test suite. Using utils / build-script will rebuild all targets, which can significantly increase the debugging cycle time.
Be sure to run the utils / build-script --validation-test validation tests before making major changes to the compiler or API.
There is another way to run all the unit tests of the compiler - through ninja, ninja check-swift from build / preset / swift-macosx-x86_64. It will take about 15 minutes.
And finally, the option when you need to run tests separately. To directly invoke the lit.py script from LLVM, you must configure it to use the local build directory. For instance:
This will run the tests in the 'test / Parse /' directory for 64-bit macOS. The -sv option provides an indicator of test execution and shows the results of only failed tests.
Lit.py has some other useful features, such as timing tests and latency testing. You can view these and other features with lit.py -h. The most useful can be found here .
To run one test, write:
If we need to pull up the latest compiler changes, then we need to update all the dependencies and do a rebase. To upgrade, run ./utils/update-checkout.
We managed to achieve our goal - to make a tool that was not previously in the IDE to optimize the work. If you also have ideas on how you can improve Apple products and make life easier for the entire iOS community, feel free to take up counter-branding, because it's easier than it seems at first glance!
In 2015, Apple uploaded the Swift source code to the public domain, which made it possible to dive into the implementation details of its compiler. In addition, with Xcode 9, you can add local refactoring tools. A basic knowledge of C ++ and a compiler device is enough to make your favorite IDE a little more convenient.
The described experience was useful for us - in addition to creating a tool that simplifies the development process, we obtained truly hardcore knowledge of the language. A slightly open Pandora's box with low-level processes allows you to look at daily tasks from a new angle.
We hope that the knowledge gained will also enrich your understanding of the development!
The material was co-written with @victoriaqb - Victoria Kashlina, iOS developer.
What does an engineer do when the required tool is missing? True, he will do everything himself! Earlier we talked about creating our custom tools, now let's talk about how to modify Xcode and make it work according to your rules.
We took the task from JIRA Swift and made a tool that converts if letinto the equivalent guard let construct .
Since the ninth version, Xcode provides a new refactoring mechanism that can convert code locally, within the same Swift source file, or globally when you rename a method or property that occurs in multiple files, even if they are in different languages.
Local refactoring is fully implemented in the SourceKit compiler and framework, the feature is located in the open source Swift repository and is written in C ++. Modification of global refactoring is currently inaccessible to ordinary people, because the Xcode code base is closed. Therefore, we will dwell on the local history and talk about how to repeat our experience.
What you need to create your own tool for local refactoring:
- Understanding C ++
- Basic knowledge of the compiler
- Understanding what AST is and how to work with it
- Swift source code
- Guide swift / docs / refactoring / SwiftLocalRefactoring.md
- A lot of patience
A little about AST
A bit of theoretical basics before diving into practice. Let's take a look at how the Swift compiler architecture works. First of all, the compiler is responsible for transforming the code into executable machine code.
Of the presented stages of transformation, the most interesting for us is the generation of an abstract syntax tree (AST) - a graph in which the vertices are operators and the leaves are their operands.
Syntax trees are used in the parser. AST is used as an internal representation in the compiler / interpreter of a computer program for optimizing and generating code.
After the AST is generated, parsing is performed to create the AST with a type check that has been translated into the Swift Intermediate Language. SIL is converted, optimized, downgraded to LLVM IR, which ultimately compiles into machine code.
To create a refactoring tool, we need to understand AST and be able to work with it. So the tool will be able to correctly operate with parts of the code that we want to process.
To generate the AST of a file, run the command: swiftc -dump-ast MyFile.swift
The following is the output to the AST console of the if let function , which was mentioned earlier.
There are three main types of nodes in Swift AST:
- declarations (subclasses of type Decl),
- expressions (subclasses of type Expr),
- operators (subclasses of type Stmt).
They correspond to the three entities that are used in the Swift language itself. Names of functions, structures, parameters are declarations. Expressions are entities that return a value; for example, calling functions. Operators are parts of the language that define the control flow of code execution, but do not return a value (for example, if or do-catch).
This is a sufficient minimum that you need to know about AST for your upcoming work.
How the refactoring tool works in theory
To implement refactoring tools, you need specific information about the area of the code that you are going to change. Developers are provided with auxiliary entities that accumulate data. The first, ResolvedCursorInfo (cursor-based refactoring), tells you if we are at the beginning of an expression. If so, the corresponding compiler object of this expression is returned. The second entity, RangeInfo (range-based refactoring), encapsulates data about the original range (for example, how many entry and exit points it has).
Cursor-based refactoring is initiated by the location of the cursor in the source file. Refactoring actions implement the methods that the refactoring mechanism uses to display available actions in the IDE and to perform transformations. Examples of actions based on the cursor: Jump to definition, quick help, etc.
Consider the usual actions from the technical side:
- When you select a location from the Xcode editor, a request is made to sourcekitd (the framework responsible for highlighting, code completion, etc.) to display the available refactoring actions.
- Each available action is requested by the ResolvedCursorInfo object to check whether this action applies to the selected code.
- The list of applicable actions is returned as a response from sourcekitd and displayed in Xcode.
- Xcode then applies the changes to the refactoring tool.
Range-based refactoring is initiated by selecting a continuous range of code in the source file.
In this case, the refactoring tool will go through a similar call chain described. The difference is that when implemented, the input is RangeInfo instead of ResolvedCursorInfo. Interested readers can refer to Refactoring.cpp for more information on Apple toolkit examples.
And now to the practice of creating a tool.
Training
First of all, you need to download and build the Swift compiler. Detailed instructions are in the official repository ( readme.md ). Here are the key commands for code cloning:
mkdir swift-source
cd swift-source
git clone https://github.com/apple/swift.git
./swift/utils/update-checkout --clone
Cmake is used to describe the structure and dependencies of the project . Using it, you can generate a project for Xcode (more convenient) or for ninja (faster) due to one of the commands:
./utils/build-script --debug --xcodeor
swift/utils/build-script --debug-debuginfoSuccessful compilation requires the latest version of Xcode beta (10.2.1 at the time of writing) - available on the official Apple website . To use the new Xcode to build the project, you need to register the path using the xcode-select utility:
sudo xcode-select -s /Users/username/Xcode.appIf we used the --xcode flag to build the project for Xcode, respectively, then after several hours of compilation (we got a little more than two) in the build folder, we will find the Swift.xcodeproj file. Opening the project, we will see the familiar Xcode with indexing, breakpoints.
To create a new instrument, we need to add the code with the logic of the instrument to the file: lib / IDE / Refactoring.cpp and define two methods, isApplicable and performChange. In the first method, we decide whether to output the refactoring option for the selected code. And in the second - how to convert the selected code to apply refactoring.
After the preparation done, it remains to implement the following steps:
- Develop tool logic (development can be done in several ways - through the toolchain, through Ninja, through Xcode; all options will be described below)
- Implement two methods: isApplicable and performChange (they are responsible for access to the tool and its operation)
- Diagnose and test the finished tool before sending the PR to the official Swift repository.
Test tool operation through toolchain
This development method will take you a lot of time due to the long assembly of components, but the result is immediately visible in Xcode - the way to manually verify it.
To start, let's build the Swift toolchain using the command:
./utils/build-toolchain some_bundle_idCompiling the toolchain will take even longer than compiling the compiler and the dependencies. The output is the swift-LOCAL-yyyy-mm-dd.xctoolchain file in the swift-nightly-install folder, which you need to transfer to Xcode: / Library / Developer / Toolchains /. Next, in the IDE settings, select the new toolchain, restart Xcode.
Select a piece of code that the tool should process, and look for the tool in the context menu.
Development through tests with Ninja
If the project was built for Ninja and you chose the TDD path, then development through tests with Ninja is one of the options that will suit you. Cons - you cannot set breakpoints, as in development through Xcode.
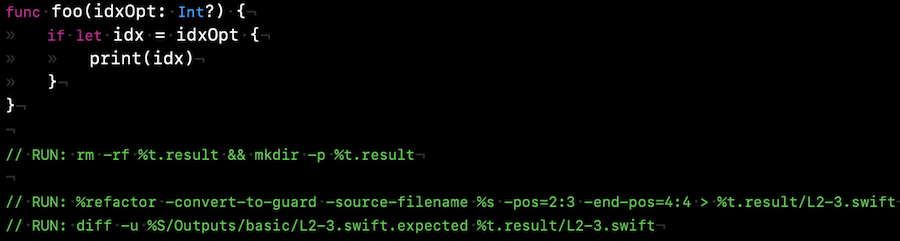
So, we need to check that the new tool is displayed in Xcode when the user selects the guard construct in the source code. We write the test in the existing test / refactoring / RefactoringKind / basic.swift file:
func testConvertToGuardExpr(idxOpt: Int?) {
    if let idx = idxOpt {
        print(idx)
    }
}
//Декларативно определяем условия теста и ожидания.
// RUN: %refactor -source-filename %s -pos=266:3 -end-pos=268:4 | %FileCheck %s -check-prefix=CHECK-CONVERT-TO-GUARD-EXPRESSION
// CHECK-CONVERT-TO-GUARD-EXPRESSION: Convert To Guard Expression
We indicate that when highlighting the code between 266 row 3 columns and 268 row 4 columns, we expect the appearance of a menu item with a new tool.
Using the lit.py script can provide faster feedback to your development cycle. You can specify the test suit of interest. In our case, this suite will be RefactoringKind:
./llvm/utils/lit/lit.py -sv ./build/Ninja-RelWithDebInfoAssert/swift-macosx-x86_64/test-macosx-x86_64/refactoring/RefactoringKind/As a result, tests of only this file will be launched. Their implementation will take a couple of tens of seconds. More information about lit.py will be discussed later in the Diagnostics and Testing section.
The test fails, which is normal for the TDD paradigm. After all, so far we have not written a single line of code with the logic of the tool.
Development through debugging and Xcode
And finally, the last development method when the project was built under Xcode. The main plus is the ability to set breakpoints and control debugging.
When building a project under Xcode, the Swift.xcodeproj file is created in the build / Xcode-DebugAssert / swift-macosx-x86_64 / folder. When you open this file for the first time, it is better to choose to create schemes manually to generate ALL_BUILD and swift-refactor yourself:
Next, collect the project with ALL_BUILD once, then use the swift-refactor scheme.
Refactoring tool is compiled into a separate executable file - swift-refactor. Help for this file can be displayed using the –help flag. The most interesting parameters for us are:
-source-filename= // Исходный файл
-pos= // Начальная позиция
-end-pos= // Конечная позиция
-kind // Тип рефакторинга
They can be specified in the schema as arguments. Now you can set breakpoints to stop at places of interest when starting the tool. In the usual way, using the p and po commands in the Xcode console, it displays the values of the corresponding variables.
IsApplicable implementation
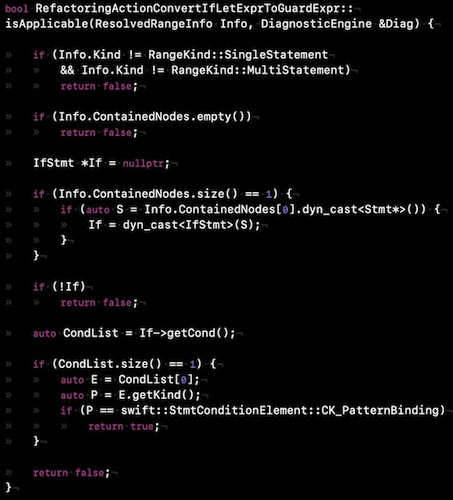
The isApplicable method accepts a ResolvedRangeInfo with information about AST nodes of the selected code fragment at the input. At the output of the method, it is decided whether to show the tool or not in the Xcode context menu. The full ResolvedRangeInfo interface can be found in the include / swift / IDE / Utils.h file .
Consider the fields of the ResolvedRangeInfo class that are most useful in our case:
- RangeKind - the first thing to do is check the type of the selected area. If the area is invalid (Invalid), you can return false. If the type suits us, for example, SingleStatement or MultiStatement, then move on;
- ContainedNodes - an array of AST elements that fall into the selected range. We want to make sure that the user selects the range that the if let construct enters. To do this, we take the first element of the array and check that this element corresponds to IfStmt (the class that defines the AST node of the statement node of the if subtype). Next, see condition. To simplify the implementation, we will output the tool only for expressions with one condition. By the type of condition (CK_PatternBinding) we determine that this is let.
To test isApplicable, add the sample code to the file test / refactoring / RefactoringKind / basic.swift .
In order for the test to simulate a call to our tool, you need to add a line in the tools / swift-refactor / swift-refactor.cpp file .
We implement performChange
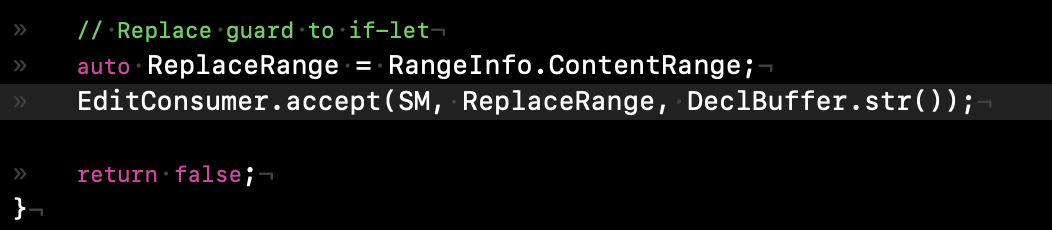
This method is called when a refactoring tool is selected in the context menu. The method has access to ResolvedRangeInfo, as well as in isApplicable. We use ResolvedRangeInfo and write the logic of the code conversion tool.
When generating code for static tokens (regulated by the language syntax), you can use entities from the tok namespace. For example, for the guard keyword, use tok :: kw_guard. For dynamic tokens (modified by the developer, for example, the name of the function), you need to select them from the array of AST elements.
To determine where the converted code is inserted, we use the full selected range using the RangeInfo.ContentRange construct.
Diagnostics and testing
Before you finish working on a tool, you need to check the correctness of its work again. The tests will help us again. Tests can be run one at a time or with all available scopes. The easiest way to run the entire Swift test suite is with the --test command on utils / build-script, which will run the main test suite. Using utils / build-script will rebuild all targets, which can significantly increase the debugging cycle time.
Be sure to run the utils / build-script --validation-test validation tests before making major changes to the compiler or API.
There is another way to run all the unit tests of the compiler - through ninja, ninja check-swift from build / preset / swift-macosx-x86_64. It will take about 15 minutes.
And finally, the option when you need to run tests separately. To directly invoke the lit.py script from LLVM, you must configure it to use the local build directory. For instance:
% $ {LLVM_SOURCE_ROOT} /utils/lit/lit.py -sv $ {SWIFT_BUILD_DIR} / test-macosx-x86_64 / Parse /This will run the tests in the 'test / Parse /' directory for 64-bit macOS. The -sv option provides an indicator of test execution and shows the results of only failed tests.
Lit.py has some other useful features, such as timing tests and latency testing. You can view these and other features with lit.py -h. The most useful can be found here .
To run one test, write:
./llvm/utils/lit/lit.py -sv ./build/Ninja-RelWithDebInfoAssert/swift-macosx-x86_64/test-macosx-x86_64/refactoring/RefactoringKind/basic.swift If we need to pull up the latest compiler changes, then we need to update all the dependencies and do a rebase. To upgrade, run ./utils/update-checkout.
conclusions
We managed to achieve our goal - to make a tool that was not previously in the IDE to optimize the work. If you also have ideas on how you can improve Apple products and make life easier for the entire iOS community, feel free to take up counter-branding, because it's easier than it seems at first glance!
In 2015, Apple uploaded the Swift source code to the public domain, which made it possible to dive into the implementation details of its compiler. In addition, with Xcode 9, you can add local refactoring tools. A basic knowledge of C ++ and a compiler device is enough to make your favorite IDE a little more convenient.
The described experience was useful for us - in addition to creating a tool that simplifies the development process, we obtained truly hardcore knowledge of the language. A slightly open Pandora's box with low-level processes allows you to look at daily tasks from a new angle.
We hope that the knowledge gained will also enrich your understanding of the development!
The material was co-written with @victoriaqb - Victoria Kashlina, iOS developer.