Smart watch with BASIC on physical 6502
- Transfer
- Tutorial
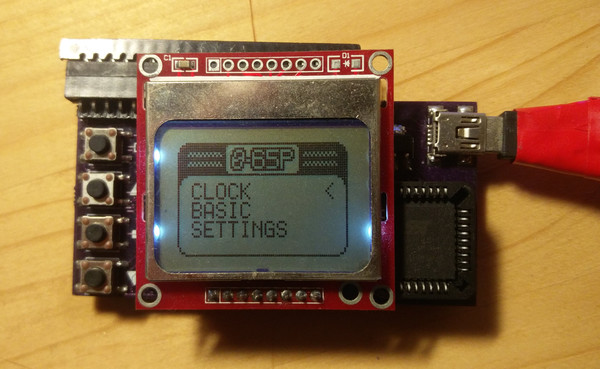
The 6502 processor has been around for over 40 years and is still used in a number of embedded systems. WDC continues to produce 65C02 and 65Cxx series peripheral chips. The author found that they are now available in PLCC and QFP packages, but these chip options are rarely used. Microcircuits in DIP packages are no longer available, since the demand on the part of homemade manufacturers alone is too small. The author decided to make the smallest single-board on 6502, which he can. It is possible that the smallest known home-made single-board processor on this processor (non-self-made and less, for example, Tamagotchi). The result is a device to which you can optionally develop a wrist case with a strap. The display was taken from Nokia 5110, the shell was written with a beautiful interface, and it turned out, perhaps, the only smart watch on 6502.
The watch includes: a 65C02 processor with a clock frequency of 8 MHz, a 65C22 chip, a control LCD and interrogating buttons on the board and an external keyboard, a Nokia 5110 display (84x48 pixels), 32 kB of static RAM, 16 kB of ROM in the address space. The supply voltage is 3.3 V.
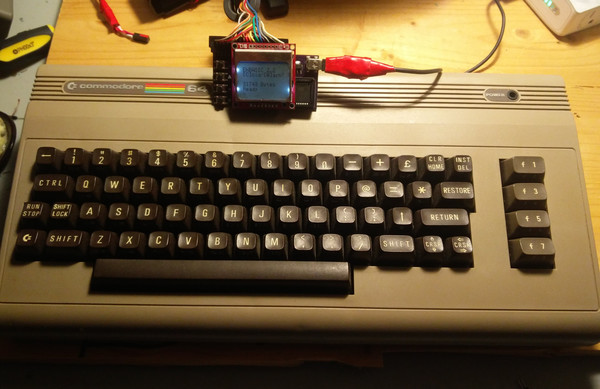
And the most important thing: as a docking station, you can connect the keyboard matrix from Commodore 64 to the connector on the board, getting something similar to Seiko UC-2000 ( review on Habré ):
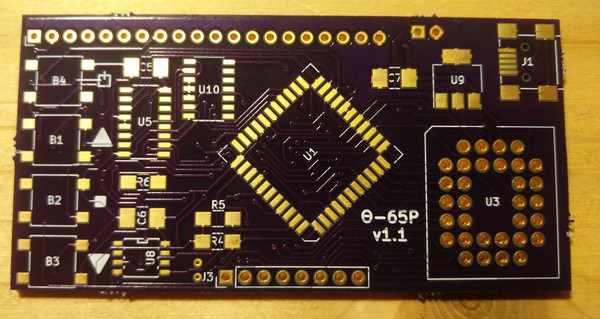
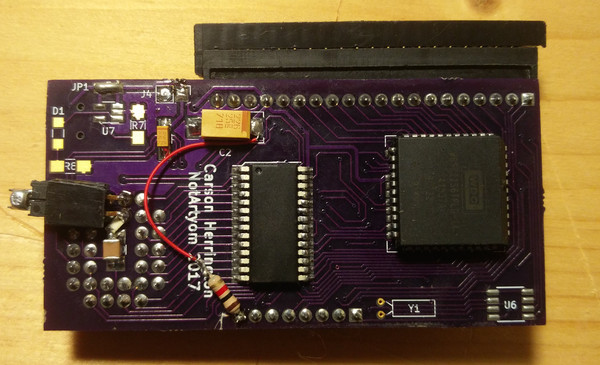
Circuit and topology of the printed circuit board compiled in KiCad. The dimensions of the double-sided board are 3x1.5 inches. All components are SMD, except for the PLCC-panel, as well as connectors for the keyboard and LCD.


The topology in the illustration is not to scale. The appearance of the board before assembly:

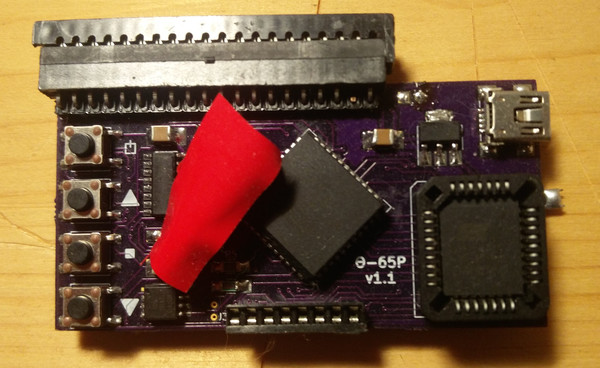
After:
Archive (circuit, boards, firmware, etc.)
On the clock, you can run several built-in applications. One of them, G'Mon (Generic Monitor), is the main development and debugging tool. It allows you to view and edit the contents of the memory in separate cells and fragments, switch to programs, fill in the RAM sections with the specified byte, and move fragments across the address space. The version of the monitor used in the watch is simplified so that in addition to it, EhBasic fits in the ROM. He barely got into it, there are only ~ 100 free bytes left. The interpreter is redone in such a way that it was able to combine with the core. It, in turn, contains all the initialization routines, work with external interfaces, as well as the relationship of all available software. And another application - the main menu.
A significant amount of the kernel is occupied by code that interacts with the LCD from Nokia 5110 via the software-implemented SPI protocol through 6522. The WriteBYTE and Command subprograms send graphic data and commands to the LCD, respectively. Since there is no hardware text mode, procedures for sending characters to the screen are written. The character generator is stored in ROM and is represented by two lookup tables: one for the high byte, the other for the low byte. Together, they indicate the absolute position of the starting character byte in the ROM. The Write routine should be run after the ASCII code is written to the processor battery, and it is also used as the X coordinate for lookup tables. The routine first writes the ASCII code to the screen buffer in memory. Then she searches for the data of the corresponding tile and sets a pointer to it. Displaying 8 consecutive bytes from the pointer, it calls the CCheck subroutine. That programmatically checks the position of the cursor, and if the screen is full, calls the Scroll subroutine, which shifts the image by one text line. Since the author did not implement reading from the LCD controller, the text is indexed according to the position of the cursor and written to the buffer in memory. The Scroll subroutine displays the bottom three lines from the buffer to the top three lines on the LCD, then fills the bottom line with spaces. The remaining routine for working with LCDs is CReturn. It searches through the search table for the initial position of the next line, and if the current line is not the bottom, it increases the cursor position by one. If the bottom line - calls the Scroll procedure, and only then ends. That programmatically checks the position of the cursor, and if the screen is full, calls the Scroll subroutine, which shifts the image by one text line. Since the author did not implement reading from the LCD controller, the text is indexed according to the position of the cursor and written to the buffer in memory. The Scroll subroutine displays the bottom three lines from the buffer to the top three lines on the LCD, then fills the bottom line with spaces. The remaining routine for working with LCDs is CReturn. It searches through the search table for the initial position of the next line, and if the current line is not the bottom, it increases the cursor position by one. If the bottom line - calls the Scroll procedure, and only then ends. That programmatically checks the position of the cursor, and if the screen is full, calls the Scroll subroutine, which shifts the image by one text line. Since the author did not implement reading from the LCD controller, the text is indexed according to the position of the cursor and written to the buffer in memory. The Scroll subroutine displays the bottom three lines from the buffer to the top three lines on the LCD, then fills the bottom line with spaces. The remaining routine for working with LCDs is CReturn. It searches through the search table for the initial position of the next line, and if the current line is not the bottom, it increases the cursor position by one. If the bottom line - calls the Scroll procedure, and only then ends. the text is indexed according to the position of the cursor and written to the buffer in memory. The Scroll subroutine displays the bottom three lines from the buffer to the top three lines on the LCD, then fills the bottom line with spaces. The remaining routine for working with LCDs is CReturn. It searches through the search table for the initial position of the next line, and if the current line is not the bottom, it increases the cursor position by one. If the bottom line - calls the Scroll procedure, and only then ends. the text is indexed according to the position of the cursor and written to the buffer in memory. The Scroll subroutine displays the bottom three lines from the buffer to the top three lines on the LCD, then fills the bottom line with spaces. The remaining routine for working with LCDs is CReturn. It searches through the search table for the initial position of the next line, and if the current line is not the bottom, it increases the cursor position by one. If the bottom line - calls the Scroll procedure, and only then ends. increases the cursor position by one. If the bottom line - calls the Scroll procedure, and only then ends. increases the cursor position by one. If the bottom line - calls the Scroll procedure, and only then ends.
The keyboard is polled through 6522 by the GetKey subroutine. It reads the keyboard matrix line by line and writes bytes to memory. If any bits turn out to be zero, it determines the ASCII code of the pressed key through the lookup table. Basically, the code does not contain cycles in order to work as quickly as possible. Subroutines for converting given bits to indices do not use lookup tables, but as a result, the code turned out to be quite large and inefficient.
Video:
The author no longer works on this firmware, he switched to other projects. He hopes that the code will come in handy for those who want to control the LCD from Nokia 5110 from a single-board to 6502. The corresponding routines can easily be transferred to other software. The most important of these are Write, Write_NS, Command, WriteBYTE, LCDInit, LCDClear, CCheck, CCheck_NS, CReturn, Scroll, and SETCursor. Other useful routines are LCDHome and WriteBMP. It is necessary to place the LCDCursor, GTmp, GTmp5 and GTmp6 variables in memory, as well as the Screen table 84 bytes long. In addition to them, CRTbl, CTableX, and CTableY lookup tables are needed, as well as Char and Char2 bitmaps with all tiles.
If you want to create other sets of tiles, use the templates from the Assets folder. In GIMP, export the bitmap to a .data file in RGB (not RGBX) format. Do not pay attention to the .pal file, and place the .data file in the BitConvert folder from the archive. Run Convert.sh filename.data to get the FONT.bin file, which will be the set of tiles.
