Mendeleev's table on school informatics
- Tutorial
(Control charts)
(Dedicated to the International Year of the Periodic Table of Chemical Elements)
(Last updated on April 8, 2019. List of additions immediately below the cut)
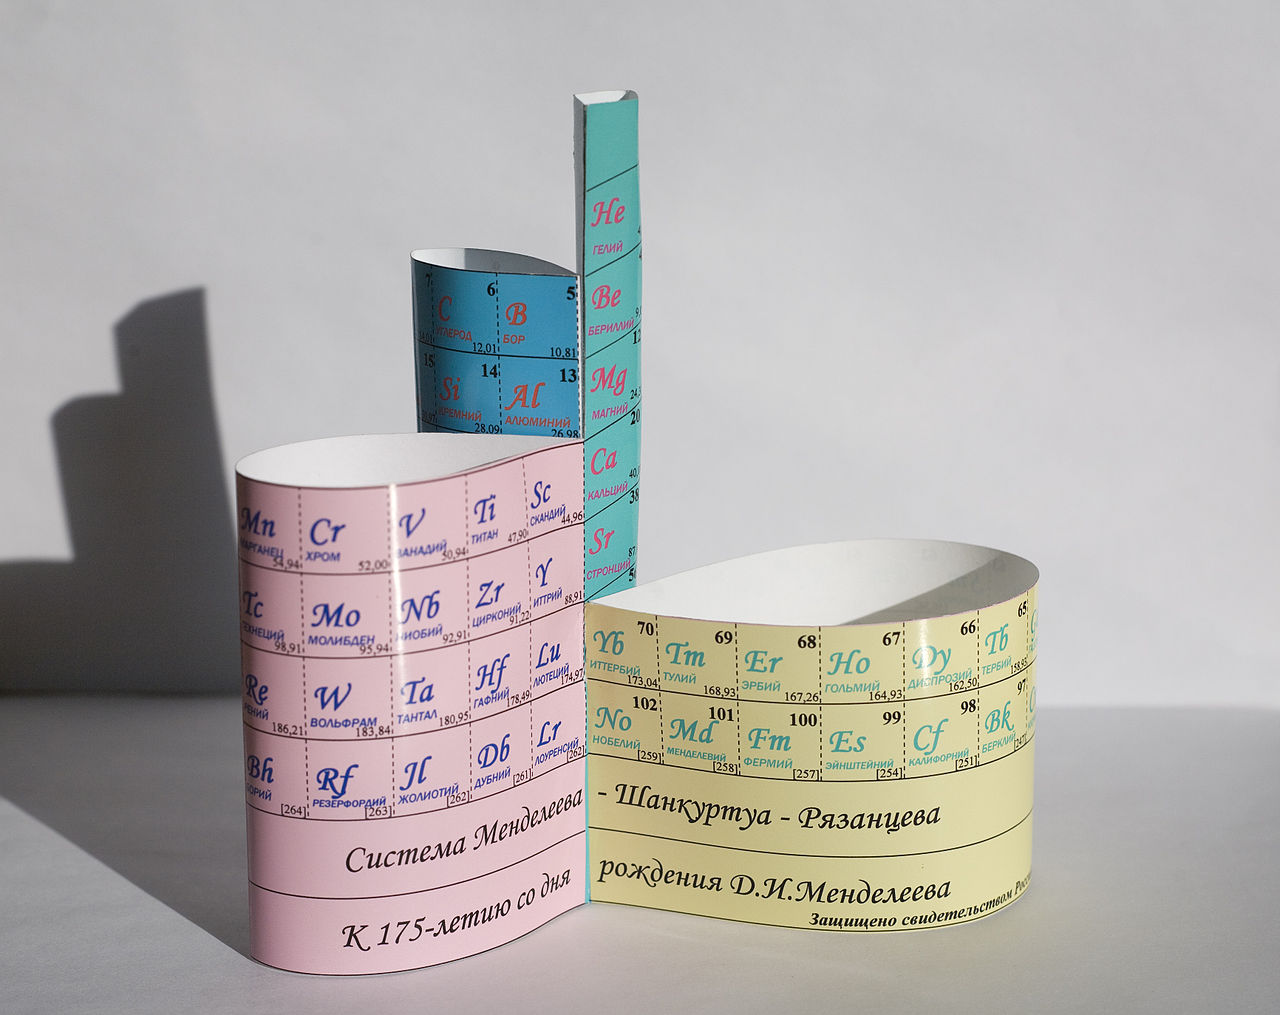
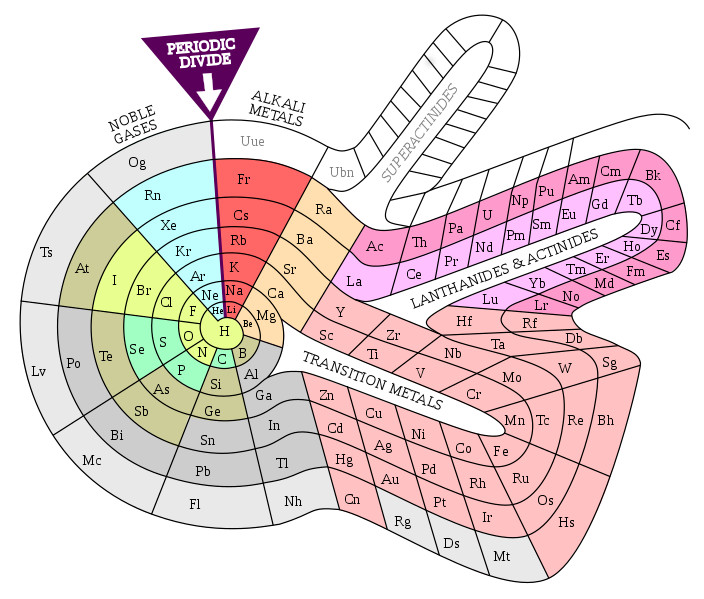
( Mendeleev’s Flower , Source )
In the citation quoted, Benjamin Kaverin masterfully showed the shortcomings of the integrated teaching method, but in some (maybe quite rare) cases, the elements of this method are justified. One such case is the Periodic Table of D.I. Mendeleev at school computer science lessons. The task of program automation of typical actions with a periodic table is illustrative for schoolchildren who have begun to study chemistry, and is divided into many typical chemical problems. At the same time, within the framework of computer science, this task allows us to demonstrate in a simple form the method of control cards, which can be attributed to graphic programming, understood in the broad sense of the word as programming using graphic elements.
(April 13, 2019 additions made:
Supplement 3: Chemical Quiz
Supplement 4: Integration of several tasks in one program
April 8, 2019 additions were made:
Supplement 1: how the chemical calculator works
Supplement 2: examples of tasks for filters)
Let's start with the basic task. In the simplest case, the Periodic table should be displayed on the screen in the form window, where in each cell there will be a chemical symbol of the element: H - hydrogen, He - helium, etc. If the mouse cursor points to a cell, then in a special field on our form displays the symbol of the element and its number. If the user clicks LMB, then the designation and number of this selected element will be indicated in another field of the form.

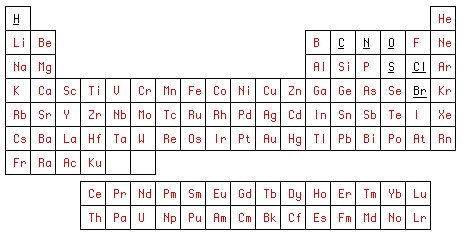
The problem can be solved on any universal PL. We will take a simple old Delpi-7, understandable to almost everyone. But before programming in YP, we’ll draw two pictures, for example, in Photoshop. First, let's draw the Periodic Table as we want it to be in the program. Save the result in the graphic file table01.bmp .
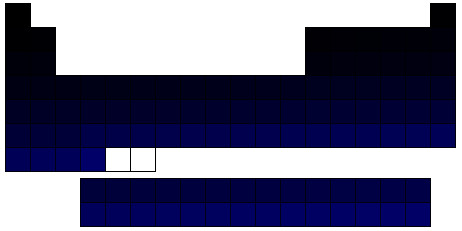
For the second picture we use the first. We will consistently fill the table cells cleared of any graphics with unique colors in the RGB color model. R and G will always be 0, and B = 1 for hydrogen, 2 for helium, etc. This figure will be our control card, which we save in a file under the name table2.bmp .
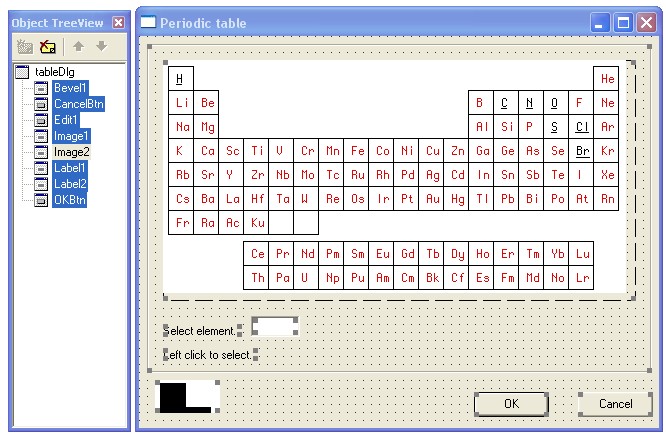
The first stage of graphic programming in Photoshop is completed. Let's move on to graphical GUI programming in the Delpi-7 IDE. To do this, open a new project, where on the main form we put the dialog call button ( tableDlg ), in which the work with the table will take place. Next, we work with the form tableDlg .
We place the components of the TImage class on the form . We get Image1 . Note that in general, for large projects, automatically generated names of the ImageN type , where N can reach several tens or more, are not the best programming style, and more meaningful names should be given. But in our small project, where Nwill not exceed 2, you can leave it as generated.
In the Image1.Picture property , load the file table01.bmp . Create Image2 and load our control card table2.bmp there . In this case, we make the component small and invisible to the user, as shown in the lower left corner of the form. Add additional controls, the purpose of which is obvious. The second stage of graphical programming of the GUI in the Delpi-7 IDE is completed.
We pass to the third stage - writing code in the IDE Delpi-7. The module consists of only five event handlers: creating a form ( FormCreate ), moving the cursor along Image1 ( Image1MouseMove ), clicking LMB on the cell (Image1Click ) and exit the dialog using the OK ( OKBtnClick ) or Cancel ( CancelBtnClick ) buttons . The headers of these handlers are generated in a standard way using the IDE.
In our version, we took a table with a size of 104 elements (constant size ). Obviously, this size can be increased. Element designations (chemical symbols) are written to the TableSymbols array . However, for reasons of compactness of the source code, it seems appropriate to write down the sequence of these notation in the form of string constants PeriodicTableStr1 , ..., PeriodicTableStr4so that at the event of the form creation, the program itself scatters these notations by array elements. Each designation of an element consists of one or two Latin letters, with the first letter uppercase, and the second (if any) lowercase. This simple rule is implemented when loading an array. Thus, the sequence of symbols can be written in a concise manner without spaces. The breakdown of the sequence into four parts (constants PeriodicTableStr1 , ..., PeriodicTableStr4 ) is due to consideration of the convenience of reading the source code, because too long a line may not fit entirely on the screen.
When the event moves the mouse cursor on the Image1 handler Image1MouseMoveThis event determines the value of the blue component of the pixel color of the Image2 control card for the current cursor coordinates. By construction of Image2, this value is equal to the number of the element if the cursor is inside the cell; zero if at the border, and 255 in other cases. The remaining actions performed by the program are trivial and require no explanation.
In addition to the stylistic tricks of programming noted above, it is worth noting the style of comments. Strictly speaking, the code reviewed is so small and simple that the comments do not look particularly useful. However, they were added, including for methodological reasons - a short code allows you to make more clear some general conclusions. One class is declared in the submitted code ( TtableDlg) The methods of this class can be interchanged and this will not affect the functioning of the program, but may affect its readability. For example, imagine a sequence:
It may not be very noticeable, but reading and understanding will become a little more difficult. If there are not five methods, but tens of times more and in the implementation section they have a completely different order than in class descriptions, then chaos will only increase. Therefore, although it is difficult to prove strictly and it may even be impossible, it is hoped that the introduction of an additional order will improve the readability of the code. This additional order is facilitated by the logical grouping of several methods that perform similar tasks. Each group should be given a heading, for example:
These headers should be copied to the top of the module and formatted as a table of contents. In some cases of sufficiently long modules, such tables of contents provide additional navigation capabilities. Similarly, in the long body of one method, procedure or function, it is worth, firstly, marking the end of this body:
and secondly, in forked statements with programmatic brackets begin - end, mark the statement to which the closing bracket refers:
To highlight the headings of groups and ends of the bodies of methods, you can add lines that exceed the length of most operators and consist, for example, of the characters "=" and "_", respectively.
Again we need to make a reservation: we have too simple an example. And when the method code does not fit on one screen, it is not easy to figure out the six consecutive end to make code changes. In some older compilers, for example, Pascal 8000 for OS IBM 360/370, a service column of the form was printed in the listing on the left
This meant that the closing program bracket on line E5 corresponds to the opening bracket on line B5.
Of course, the programming style is a very controversial issue, therefore, the ideas expressed here should be taken no more than information for consideration. It’s very difficult for two experienced programmers who have developed and become accustomed to different styles over the years to work. Another thing is a student to program a student who has not yet had time to find his own style. I think that in this case, the teacher should at least convey to his students such a simple, but not obvious to them idea that the success of the program largely depends on the style in which its source code is written. The student may not follow the recommended style, but let him at least think about the need for “extra” actions to improve the design of the source code.
Returning to our basic task on the Periodic Table: further development can go in different directions. One of the directions is for reference: when you hover over the table cell, an information window pops up containing additional information on the specified item. Further development is filters. For example, depending on the installation, the information window will only have: the most important physical and chemical information, information on the history of discovery, information on the distribution in nature, a list of the most important compounds (where this element is included), physiological properties, name in a foreign language, etc. e. Recalling the “duck” of Kaverin, with which this article begins, we can say that with this development of the program we will receive a complete training complex in the natural sciences: in addition to computer science, physics and chemistry - biology, economic geography,
But the local database is not the limit. The program naturally connects to the Internet. When an element is selected, a link is triggered, and a Wikipedia article about this element is opened in a web browser window. Wikipedia, as you know, is not an authoritative source. You can set links to authoritative sources, for example, chemical encyclopedia, TSB, abstract journals, order inquiries in search engines for this element, etc. T.O. students will be able to perform simple but informative tasks on the topics of DBMS and the Internet.
In addition to queries for a single element, you can make a functional that will, for example, mark with different colors the cells in the table that correspond to certain criteria. For example, metals and non-metals. Or cells that are drained into ponds by a local chemical plant.
You can also implement the functions of a notebook organizer. For example, highlight in the table the elements that are included in the exam. Then highlight the elements studied / repeated by the student in preparation for the exam.
But, for example, one of the typical tasks of school chemistry:
Given 10 g of chalk. How much hydrochloric acid do I need to dissolve all this chalk?
To solve this problem, you need to write a chem. the reaction and placing the coefficients in it, calculate the molecular weights of calcium carbonate and hydrogen chloride, then compose and solve the proportion. A calculator based on our basic program will be able to calculate and solve. True, it will still be necessary to take into account that acid must be taken with a reasonable excess and in a reasonable concentration, but this is chemistry, not computer science.
It is worth noting that:
Pupils can be smart in this direction, realizing any of the options already proposed or try to make their own original. It may seem that this is the least useful direction for computer science lessons. However, in the form of the Periodic Table implemented in this article, some students may not see the special advantages of control cards over an alternative solution using standard TButton buttons . The spiral form of the table (where the cells are of different shapes) will more clearly demonstrate the advantages of the solution proposed here.
( An alternate system of elements by Theodore Benfei , Source )
We also add that a number of the currently existing computer programs for Mendelev described in the recently published Habré article .
We used a predetermined static control card in advance, however, there are many important tasks where dynamic control cards that change during the program operation can be used. An example would be a graph editor in which the user, using the mouse, points to the position of the vertices and draws edges between them. To remove a vertex or edge, the user must point to it. But if the vertex indicated by the circle is rather simple to indicate, then the edge drawn by a thin line will be more difficult to point to. A control map will help here, where the vertices and edges occupy a wider area than in the visible figure.
An interesting side question is associated with the method of integrated learning that has been addressed: can this method be useful in teaching AI?
(Dedicated to the International Year of the Periodic Table of Chemical Elements)
(Last updated on April 8, 2019. List of additions immediately below the cut)
( Mendeleev’s Flower , Source )
I remember we passed the duck. These were three lessons at once: geography, natural sciences and Russian. In a natural science lesson, a duck was studied as a duck, what wings it had, what legs, how it swims, and so on. In a geography lesson, the same duck was studied as a resident of the globe: it was necessary to show on the map where it lives and where it does not exist. In Russian, Serafima Petrovna taught us to write “u-t-k-a” and read something about ducks from Brem. In passing, she informed us that in German a duck is so-so, and in French so-and-so. It seems that it was then called the "complex method." In general, everything came out in passing.
Benjamin Caverin , Two Captains
In the citation quoted, Benjamin Kaverin masterfully showed the shortcomings of the integrated teaching method, but in some (maybe quite rare) cases, the elements of this method are justified. One such case is the Periodic Table of D.I. Mendeleev at school computer science lessons. The task of program automation of typical actions with a periodic table is illustrative for schoolchildren who have begun to study chemistry, and is divided into many typical chemical problems. At the same time, within the framework of computer science, this task allows us to demonstrate in a simple form the method of control cards, which can be attributed to graphic programming, understood in the broad sense of the word as programming using graphic elements.
(April 13, 2019 additions made:
Supplement 3: Chemical Quiz
Supplement 4: Integration of several tasks in one program
April 8, 2019 additions were made:
Supplement 1: how the chemical calculator works
Supplement 2: examples of tasks for filters)
Let's start with the basic task. In the simplest case, the Periodic table should be displayed on the screen in the form window, where in each cell there will be a chemical symbol of the element: H - hydrogen, He - helium, etc. If the mouse cursor points to a cell, then in a special field on our form displays the symbol of the element and its number. If the user clicks LMB, then the designation and number of this selected element will be indicated in another field of the form.
The problem can be solved on any universal PL. We will take a simple old Delpi-7, understandable to almost everyone. But before programming in YP, we’ll draw two pictures, for example, in Photoshop. First, let's draw the Periodic Table as we want it to be in the program. Save the result in the graphic file table01.bmp .
For the second picture we use the first. We will consistently fill the table cells cleared of any graphics with unique colors in the RGB color model. R and G will always be 0, and B = 1 for hydrogen, 2 for helium, etc. This figure will be our control card, which we save in a file under the name table2.bmp .
The first stage of graphic programming in Photoshop is completed. Let's move on to graphical GUI programming in the Delpi-7 IDE. To do this, open a new project, where on the main form we put the dialog call button ( tableDlg ), in which the work with the table will take place. Next, we work with the form tableDlg .
We place the components of the TImage class on the form . We get Image1 . Note that in general, for large projects, automatically generated names of the ImageN type , where N can reach several tens or more, are not the best programming style, and more meaningful names should be given. But in our small project, where Nwill not exceed 2, you can leave it as generated.
In the Image1.Picture property , load the file table01.bmp . Create Image2 and load our control card table2.bmp there . In this case, we make the component small and invisible to the user, as shown in the lower left corner of the form. Add additional controls, the purpose of which is obvious. The second stage of graphical programming of the GUI in the Delpi-7 IDE is completed.
We pass to the third stage - writing code in the IDE Delpi-7. The module consists of only five event handlers: creating a form ( FormCreate ), moving the cursor along Image1 ( Image1MouseMove ), clicking LMB on the cell (Image1Click ) and exit the dialog using the OK ( OKBtnClick ) or Cancel ( CancelBtnClick ) buttons . The headers of these handlers are generated in a standard way using the IDE.
Source code of the module:
unit tableUnit;
// Периодическая таблица химических элементов Д.И.Менделеева
//
// third112
// https://habr.com/ru/users/third112/
//
// Оглавление
// 1) создание формы
// 2) работа с таблицей: указание и выбор
// 3) выход из диалога
interface
uses Windows, SysUtils, Classes, Graphics, Forms, Controls, StdCtrls,
  Buttons, ExtCtrls;
const
 size = 104; // число элементов
type
 TtableDlg = class(TForm)
    OKBtn: TButton;
    CancelBtn: TButton;
    Bevel1: TBevel;
    Image1: TImage;  //таблица химических элементов
    Label1: TLabel;
    Image2: TImage;  //управляющая карта
    Label2: TLabel;
    Edit1: TEdit;
    procedure FormCreate(Sender: TObject); // создание формы
    procedure Image1MouseMove(Sender: TObject; Shift: TShiftState; X,
      Y: Integer);                        // указание клетки
    procedure Image1Click(Sender: TObject); // выбор клетки
    procedure OKBtnClick(Sender: TObject);  // OK
    procedure CancelBtnClick(Sender: TObject); // Cancel
  private
    { Private declarations }
    TableSymbols : array [1..size] of string [2]; // массив обозначений элементов
  public
    { Public declarations }
    selectedElement : string; // выбранный элемент
    currNo : integer;         // текущий номер элемента
  end;
var
  tableDlg: TtableDlg;
implementation
{$R *.dfm}
const
PeriodicTableStr1=
'HHeLiBeBCNOFNeNaMgAlSiPSClArKCaScTiVCrMnFeCoNiCuZnGaGeAsSeBrKrRbSrYZrNbMoTcRuRhPdAgCdInSnSbTeIXeCsBaLa';
PeriodicTableStr2='CePrNdPmSmEuGdTbDyHoErTmYbLu';
PeriodicTableStr3='HfTaWReOsIrPtAuHgTlPbBiPoAtRnFrRaAc';
PeriodicTableStr4='ThPaUNpPuAmCmBkCfEsFmMdNoLrKu ';
// создание формы  ==================================================
procedure TtableDlg.FormCreate(Sender: TObject);
// создание формы
var
  s : string;
  i,j : integer;
begin
  currNo := 0;
// инициализация массива обозначений элементов:
  s := PeriodicTableStr1+ PeriodicTableStr2+PeriodicTableStr3+PeriodicTableStr4;
  j := 1;
  for i :=1 to size do
   begin
     TableSymbols [i] := s[j];
     inc (j);
     if s [j] in ['a'..'z'] then
      begin
        TableSymbols [i] := TableSymbols [i]+ s [j];
        inc (j);
      end; // if s [j] in
   end; // for i :=1
end; // FormCreate ____________________________________________________
// работа с таблицей: указание и выбор =========================================
procedure TtableDlg.Image1MouseMove(Sender: TObject; Shift: TShiftState;
  X, Y: Integer);
// указание клетки
var
  sl : integer;
begin
  sl := GetBValue(Image2.Canvas.Pixels [x,y]);
  if sl in [1..size] then
   begin
    Label1.Caption := intToStr (sl)+ ' '+TableSymbols [sl];
    currNo := sl;
   end
  else
    Label1.Caption := 'Select element:';
end; // Image1MouseMove   ____________________________________________________
procedure TtableDlg.Image1Click(Sender: TObject);
begin
  if currNo <> 0 then
   begin
    selectedElement := TableSymbols [currNo];
    Label2.Caption := intToStr (currNo)+ ' '+selectedElement+ ' selected';
    Edit1.Text := selectedElement;
   end;
end; // Image1Click  ____________________________________________________
// выход из диалога  ==================================================
procedure TtableDlg.OKBtnClick(Sender: TObject);
begin
    selectedElement := Edit1.Text;
    hide;
end;  // OKBtnClick ____________________________________________________
procedure TtableDlg.CancelBtnClick(Sender: TObject);
begin
  hide;
end;  // CancelBtnClick ____________________________________________________
end.
In our version, we took a table with a size of 104 elements (constant size ). Obviously, this size can be increased. Element designations (chemical symbols) are written to the TableSymbols array . However, for reasons of compactness of the source code, it seems appropriate to write down the sequence of these notation in the form of string constants PeriodicTableStr1 , ..., PeriodicTableStr4so that at the event of the form creation, the program itself scatters these notations by array elements. Each designation of an element consists of one or two Latin letters, with the first letter uppercase, and the second (if any) lowercase. This simple rule is implemented when loading an array. Thus, the sequence of symbols can be written in a concise manner without spaces. The breakdown of the sequence into four parts (constants PeriodicTableStr1 , ..., PeriodicTableStr4 ) is due to consideration of the convenience of reading the source code, because too long a line may not fit entirely on the screen.
When the event moves the mouse cursor on the Image1 handler Image1MouseMoveThis event determines the value of the blue component of the pixel color of the Image2 control card for the current cursor coordinates. By construction of Image2, this value is equal to the number of the element if the cursor is inside the cell; zero if at the border, and 255 in other cases. The remaining actions performed by the program are trivial and require no explanation.
In addition to the stylistic tricks of programming noted above, it is worth noting the style of comments. Strictly speaking, the code reviewed is so small and simple that the comments do not look particularly useful. However, they were added, including for methodological reasons - a short code allows you to make more clear some general conclusions. One class is declared in the submitted code ( TtableDlg) The methods of this class can be interchanged and this will not affect the functioning of the program, but may affect its readability. For example, imagine a sequence:
OKBtnClick, Image1MouseMove, FormCreate, Image1Click, CancelBtnClick.
It may not be very noticeable, but reading and understanding will become a little more difficult. If there are not five methods, but tens of times more and in the implementation section they have a completely different order than in class descriptions, then chaos will only increase. Therefore, although it is difficult to prove strictly and it may even be impossible, it is hoped that the introduction of an additional order will improve the readability of the code. This additional order is facilitated by the logical grouping of several methods that perform similar tasks. Each group should be given a heading, for example:
// работа с таблицей: указание и выбор
These headers should be copied to the top of the module and formatted as a table of contents. In some cases of sufficiently long modules, such tables of contents provide additional navigation capabilities. Similarly, in the long body of one method, procedure or function, it is worth, firstly, marking the end of this body:
end; // FormCreateand secondly, in forked statements with programmatic brackets begin - end, mark the statement to which the closing bracket refers:
      end; // if s [j] in
   end; // for i :=1
end; // FormCreate
To highlight the headings of groups and ends of the bodies of methods, you can add lines that exceed the length of most operators and consist, for example, of the characters "=" and "_", respectively.
Again we need to make a reservation: we have too simple an example. And when the method code does not fit on one screen, it is not easy to figure out the six consecutive end to make code changes. In some older compilers, for example, Pascal 8000 for OS IBM 360/370, a service column of the form was printed in the listing on the left
B5
…
E5
This meant that the closing program bracket on line E5 corresponds to the opening bracket on line B5.
Of course, the programming style is a very controversial issue, therefore, the ideas expressed here should be taken no more than information for consideration. It’s very difficult for two experienced programmers who have developed and become accustomed to different styles over the years to work. Another thing is a student to program a student who has not yet had time to find his own style. I think that in this case, the teacher should at least convey to his students such a simple, but not obvious to them idea that the success of the program largely depends on the style in which its source code is written. The student may not follow the recommended style, but let him at least think about the need for “extra” actions to improve the design of the source code.
Returning to our basic task on the Periodic Table: further development can go in different directions. One of the directions is for reference: when you hover over the table cell, an information window pops up containing additional information on the specified item. Further development is filters. For example, depending on the installation, the information window will only have: the most important physical and chemical information, information on the history of discovery, information on the distribution in nature, a list of the most important compounds (where this element is included), physiological properties, name in a foreign language, etc. e. Recalling the “duck” of Kaverin, with which this article begins, we can say that with this development of the program we will receive a complete training complex in the natural sciences: in addition to computer science, physics and chemistry - biology, economic geography,
But the local database is not the limit. The program naturally connects to the Internet. When an element is selected, a link is triggered, and a Wikipedia article about this element is opened in a web browser window. Wikipedia, as you know, is not an authoritative source. You can set links to authoritative sources, for example, chemical encyclopedia, TSB, abstract journals, order inquiries in search engines for this element, etc. T.O. students will be able to perform simple but informative tasks on the topics of DBMS and the Internet.
In addition to queries for a single element, you can make a functional that will, for example, mark with different colors the cells in the table that correspond to certain criteria. For example, metals and non-metals. Or cells that are drained into ponds by a local chemical plant.
You can also implement the functions of a notebook organizer. For example, highlight in the table the elements that are included in the exam. Then highlight the elements studied / repeated by the student in preparation for the exam.
But, for example, one of the typical tasks of school chemistry:
Given 10 g of chalk. How much hydrochloric acid do I need to dissolve all this chalk?
To solve this problem, you need to write a chem. the reaction and placing the coefficients in it, calculate the molecular weights of calcium carbonate and hydrogen chloride, then compose and solve the proportion. A calculator based on our basic program will be able to calculate and solve. True, it will still be necessary to take into account that acid must be taken with a reasonable excess and in a reasonable concentration, but this is chemistry, not computer science.
Appendix 1: how a chemical calculator works
Let us analyze the work of the calculator using the example of the above problem of chalk and hodgepodge. Let's start with the reaction:
CaCO 3 + 2HCl = CaCl 2 + H 2 O
From here we see that we will need the atomic weights of the following elements: calcium (Ca), carbon (C), oxygen (O), hydrogen (H) and chlorine (Cl ) In the simplest case, we can write these weights into a one-dimensional array defined as
where the index of the array corresponds to the number of the element. We also put two fields on the free space of the form tableDlg . In the first field it is initially written: “The first reagent is given”, in the second - “The second reagent is to find x”. Denote the fields reagent1 , reagent2, respectively. Other additions to the program will be clear from the following example of the calculator.
We type on the computer keyboard: 10 g. The inscription in the reagent1 field changes: “The first reagent is given 10 g”. Now we enter the formula of this reagent, and the calculator will read and show its molecular weight as you type.
Click LMB on the table cell with the symbol Ca. The inscription in the reagent1 field changes: “The first reagent Ca 40.078 is given 10 g.”
Click LMB on the table cell with the symbol C. The inscription in the reagent1 field changes: “The first reagent CaC 52.089 is given 10 g”. Those. the calculator added the atomic weights of calcium and carbon.
Click LMB on the table cell with the O symbol. The inscription in the reagent1 field changes: “The first reagent CaCO 68.088 is given 10 g”. The calculator added the atomic weight of oxygen to the sum.
Click LMB on the table cell with the O symbol. The inscription in the reagent1 field changes: “The first reagent CaCO2 84.087 is given 10 g”. The calculator once again added the atomic weight of oxygen to the sum.
Click LMB on the table cell with the O symbol. The inscription in the reagent1 field changes: “The first reagent CaCO3 100.086 is given 10 g”. The calculator again added the atomic weight of oxygen to the sum.
Press Enter on the computer keyboard. The input of the first reagent is completed and switches to the reagent2 field . Note that in this example we present the minimum version. If you wish, you can easily organize the multipliers of atoms of the same type, so that, for example, you don’t have to press the oxygen cell seven times in a row when entering the chrompeak formula (K 2 Cr 2 O 7 ).
Click LMB on the cell of the table with the letter H. The inscription in the reagent2 field changes: “Find the second reagent H 1.008 x”.
Click LMB on the table cell with the symbol Cl. The inscription in the field reagent2changing: “Second reagent HCl 36.458 find x”. The calculator added the atomic weights of hydrogen and chlorine. In the above reaction equation, hydrogen chloride has a coefficient of 2. Therefore, click LMB on the reagent2 field . Molecular weight doubles (double-pressing triples, etc.). The inscription in the reagent2 field changes: “The second reagent 2HCl 72.916 find x”.
Press Enter on the computer keyboard. Input of the second reagent is completed, and the calculator finds x from the proportion
Which was required to find.
Note 1. The meaning of the obtained proportion: to dissolve 100.086 Da of chalk, 72.916 Da of acid is needed, and to dissolve 10 g of chalk, x acid is needed.
Note 2. Collections of similar tasks:
Khomchenko I. G., Collection of tasks and exercises in chemistry 2009 (Grades 8-11).
Khomchenko G.P., Khomchenko I.G., A collection of problems in chemistry for applicants to universities, 2019.
Note 3. To simplify the task, you can simplify the input of the formula in the initial version and simply append the element symbol to the end of the formula line. Then the formula of calcium carbonate will look like:
CaCOOO
But such a record is unlikely to please a chemistry teacher. It is not difficult to make the correct record - for this you need to add an array:
where the index is the number of the chemical element, and the value at this index is the number of atoms (initially all elements of the array are reset to zero). It is necessary to take into account the order of writing of atoms in the formula adopted in chemistry. For example, few people will like O3CaC. We shift the responsibility to the user. We make an array:
where we write the number of the chemical element according to the index of its appearance in the formula. Adding the currNo atom to the formula:
Writing a formula to a line:
Note 4. It makes sense to provide the ability to alternatively enter the reagent formula from the keyboard. In this case, you will need to implement a simple parser.
CaCO 3 + 2HCl = CaCl 2 + H 2 O
From here we see that we will need the atomic weights of the following elements: calcium (Ca), carbon (C), oxygen (O), hydrogen (H) and chlorine (Cl ) In the simplest case, we can write these weights into a one-dimensional array defined as
AtomicMass : array [1..size] of real;where the index of the array corresponds to the number of the element. We also put two fields on the free space of the form tableDlg . In the first field it is initially written: “The first reagent is given”, in the second - “The second reagent is to find x”. Denote the fields reagent1 , reagent2, respectively. Other additions to the program will be clear from the following example of the calculator.
We type on the computer keyboard: 10 g. The inscription in the reagent1 field changes: “The first reagent is given 10 g”. Now we enter the formula of this reagent, and the calculator will read and show its molecular weight as you type.
Click LMB on the table cell with the symbol Ca. The inscription in the reagent1 field changes: “The first reagent Ca 40.078 is given 10 g.”
Click LMB on the table cell with the symbol C. The inscription in the reagent1 field changes: “The first reagent CaC 52.089 is given 10 g”. Those. the calculator added the atomic weights of calcium and carbon.
Click LMB on the table cell with the O symbol. The inscription in the reagent1 field changes: “The first reagent CaCO 68.088 is given 10 g”. The calculator added the atomic weight of oxygen to the sum.
Click LMB on the table cell with the O symbol. The inscription in the reagent1 field changes: “The first reagent CaCO2 84.087 is given 10 g”. The calculator once again added the atomic weight of oxygen to the sum.
Click LMB on the table cell with the O symbol. The inscription in the reagent1 field changes: “The first reagent CaCO3 100.086 is given 10 g”. The calculator again added the atomic weight of oxygen to the sum.
Press Enter on the computer keyboard. The input of the first reagent is completed and switches to the reagent2 field . Note that in this example we present the minimum version. If you wish, you can easily organize the multipliers of atoms of the same type, so that, for example, you don’t have to press the oxygen cell seven times in a row when entering the chrompeak formula (K 2 Cr 2 O 7 ).
Click LMB on the cell of the table with the letter H. The inscription in the reagent2 field changes: “Find the second reagent H 1.008 x”.
Click LMB on the table cell with the symbol Cl. The inscription in the field reagent2changing: “Second reagent HCl 36.458 find x”. The calculator added the atomic weights of hydrogen and chlorine. In the above reaction equation, hydrogen chloride has a coefficient of 2. Therefore, click LMB on the reagent2 field . Molecular weight doubles (double-pressing triples, etc.). The inscription in the reagent2 field changes: “The second reagent 2HCl 72.916 find x”.
Press Enter on the computer keyboard. Input of the second reagent is completed, and the calculator finds x from the proportion

Which was required to find.
Note 1. The meaning of the obtained proportion: to dissolve 100.086 Da of chalk, 72.916 Da of acid is needed, and to dissolve 10 g of chalk, x acid is needed.
Note 2. Collections of similar tasks:
Khomchenko I. G., Collection of tasks and exercises in chemistry 2009 (Grades 8-11).
Khomchenko G.P., Khomchenko I.G., A collection of problems in chemistry for applicants to universities, 2019.
Note 3. To simplify the task, you can simplify the input of the formula in the initial version and simply append the element symbol to the end of the formula line. Then the formula of calcium carbonate will look like:
CaCOOO
But such a record is unlikely to please a chemistry teacher. It is not difficult to make the correct record - for this you need to add an array:
formula : array [1..size] of integer;where the index is the number of the chemical element, and the value at this index is the number of atoms (initially all elements of the array are reset to zero). It is necessary to take into account the order of writing of atoms in the formula adopted in chemistry. For example, few people will like O3CaC. We shift the responsibility to the user. We make an array:
formulaOrder : array [1..size] of integer; // можно взять покорочеwhere we write the number of the chemical element according to the index of its appearance in the formula. Adding the currNo atom to the formula:
if formula [currNo]=0 then //этот атом встретился первый раз
 begin
 orderIndex := orderIndex+1;//в начале ввода формулы orderIndex=0
 formulaOrder [orderIndex] :=  currNo;
 end;
formula [currNo]:=formula [currNo]+1;
Writing a formula to a line:
s := ''; // пустая строка для формулы
for i:=1 to  orderIndex do // для всех хим.символов в формуле
 begin
 s:=s+TableSymbols [ formulaOrder[i]];// добавляем хим.символ
 if formula [formulaOrder[i]]<>1 then //добавляем кол-во атомов
  s:=s+ intToStr(formula [formulaOrder[i]]);
 end;
Note 4. It makes sense to provide the ability to alternatively enter the reagent formula from the keyboard. In this case, you will need to implement a simple parser.
It is worth noting that:
Today, there are several hundred variations of the table, while scientists are offering new options. ( Wikipedia )
Pupils can be smart in this direction, realizing any of the options already proposed or try to make their own original. It may seem that this is the least useful direction for computer science lessons. However, in the form of the Periodic Table implemented in this article, some students may not see the special advantages of control cards over an alternative solution using standard TButton buttons . The spiral form of the table (where the cells are of different shapes) will more clearly demonstrate the advantages of the solution proposed here.
( An alternate system of elements by Theodore Benfei , Source )
We also add that a number of the currently existing computer programs for Mendelev described in the recently published Habré article .
Appendix 2: sample tasks for filters
Using filters, you can solve, for example, such tasks:
1) Select in the table all the elements known in the Middle Ages.
2) Select all the elements known by the time the Periodic Law was discovered.
3) Highlight seven elements that alchemists considered metals.
4) Select all elements that are in a gaseous state under normal conditions (n.o.).
5) Select all the elements that are in a liquid state at nu
6) Select all elements that are in a solid state at n.o.
7) Select all the elements that can be in the air for a long time without noticeable changes at n.o.
8) Select all metals that dissolve in hydrochloric acid.
9) Select all metals that dissolve in sulfuric acid at n.a.
10) Select all metals that dissolve in sulfuric acid when heated.
11) Select all metals that dissolve in nitric acid.
12) Select all metals that react violently with water at n.o.
13) Select all metals.
14) Highlight elements that are widespread in nature.
15) Highlight the elements that are found in nature in a free state.
16) To highlight the elements that play a crucial role in the human body and animals.
17) Highlight elements that are widely used in everyday life (in free form or in compounds).
18) To identify the elements whose work is most dangerous and require special measures and protective equipment.
19) Highlight elements that in the free form or in the form of compounds pose the greatest threat to the environment.
20) Highlight precious metals.
21) Highlight items that are more expensive than precious metals.
Notes
1) It makes sense to ensure the operation of several filters. For example, if you enable the filter to solve problem 1 (all elements known in the Middle Ages) and 20 (precious metals), then cells (with color, for example) with precious metals known in the Middle Ages will be highlighted (for example, palladium will not be highlighted discovered in 1803).
2) It makes sense to ensure the operation of several filters in such a way that each filter highlights the cells with its color, but does not completely remove the selection of the other filter (part of the cell in one color, part in another). Then, in the case of the previous example, the elements of the intersection of the sets of open in the Middle Ages and precious metals, as well as elements belonging only to the first and only the second sets will be visible. Those. precious metals unknown in the Middle Ages, and elements known in the Middle Ages, but not precious metals.
3) It makes sense after applying the filter to provide the possibility of other work with the results. For example, by highlighting elements known in the Middle Ages, the user clicks the LMB on the selected element and enters the Wikipedia article about this element.
4) It makes sense to enable the user to deselect by clicking LMB on the selected table cell. For example, to remove already viewed items.
5) It makes sense to maintain a list of selected cells in a file and load such a file with automatic selection of cells. This will give the user the opportunity to take a break from work.
Appendix 3: Chemical Quiz
Unlike the multiplication table, schoolchildren are not forced to memorize the periodic table, but those who are interested in chemistry, as they study it, somehow remember almost the entire table by themselves. This is ensured by understanding the essence of the Periodic Law: why, for example, inert gases occupy the far right column, and halogens occupy the neighboring column. Knowing the correct order in the series of the same halogens helps knowledge of their chemical properties. Thus, if a student remembers by heart a large part of the Periodic Table, then this indicates his good knowledge of chemistry. Therefore, it makes sense to compete in the form of a quiz to test such optional, but desirable knowledge.
Free space on tableDlg formplace the component "single item selection list" component. This list contains all the names of chemical elements in alphabetical order. In the table, we clear all the cells. The quiz participant must select the LMB table cell and the element in the list that should be in this cell. You can vice versa: select a list item, and then a cell. If the choice is made correctly, the program enters the chemical symbol of the element in the specified cell and removes it from their list. Otherwise, the participant receives one penalty point. The score counter is placed on an empty seat tableDlg. The program is also equipped with a timer that counts the time spent by the participant to fill out the entire table. You can provide a lightweight option: do not fill the cells of lanthanides and actinides. The winner is determined by the time spent minus penalty points. For example, the first finisher receives 10 points, of which penalty points are deducted, the second 8 points, the third 5 points.
Free space on tableDlg formplace the component "single item selection list" component. This list contains all the names of chemical elements in alphabetical order. In the table, we clear all the cells. The quiz participant must select the LMB table cell and the element in the list that should be in this cell. You can vice versa: select a list item, and then a cell. If the choice is made correctly, the program enters the chemical symbol of the element in the specified cell and removes it from their list. Otherwise, the participant receives one penalty point. The score counter is placed on an empty seat tableDlg. The program is also equipped with a timer that counts the time spent by the participant to fill out the entire table. You can provide a lightweight option: do not fill the cells of lanthanides and actinides. The winner is determined by the time spent minus penalty points. For example, the first finisher receives 10 points, of which penalty points are deducted, the second 8 points, the third 5 points.
Appendix 4: Integrating Multiple Tasks in One Program
Above, we examined a number of possible tasks: a directory of chemical elements, a chemical calculator, a chemical quiz. Each of these tasks can be solved by different groups of students (one or more people). After everyone copes with their tasks, it makes sense to set the task of combining all the solutions into one program (avoiding code duplication), where the tool should be selected from the main form menu.
We used a predetermined static control card in advance, however, there are many important tasks where dynamic control cards that change during the program operation can be used. An example would be a graph editor in which the user, using the mouse, points to the position of the vertices and draws edges between them. To remove a vertex or edge, the user must point to it. But if the vertex indicated by the circle is rather simple to indicate, then the edge drawn by a thin line will be more difficult to point to. A control map will help here, where the vertices and edges occupy a wider area than in the visible figure.
An interesting side question is associated with the method of integrated learning that has been addressed: can this method be useful in teaching AI?