Correct ASP.NET Core

Especially for fans of books from the series "C ++ in 24 hours" I decided to write an article about ASP.NET Core.
If you have not previously developed for .NET or for any similar platform, then it makes no sense to go under the cat for you. But if you are interested in knowing what IoC, DI, DIP, Interseptors, Middleware, Filters are (that is, everything that distinguishes Core from classic .NET), then you definitely have a reason to click on "Read more", since without an understanding of all this is clearly not correct.
IoC, DI, DIP
If the theater begins with a hanger, then ASP.NET Core begins with Dependency Injection. In order to deal with DI you need to understand what IoC is.
Speaking about IoC, the Hollywood principle "Don't call us, we'll call you" is often remembered. Which means "Do not call us, we will call you yourself."
Different sources lead different patterns to which IoC can be applied. And most likely they are all right and just complement each other. Here are some of these patterns: factory, service locator, template method, observer, strategy.
Let's take a look at IoC using a simple console application as an example.
Suppose we have two simple classes that implement an interface with one method:
    class ConsoleLayer : ILayer
    {
        public void Write(string text)
        {
            Console.WriteLine(text);
        }
    }
    class DebugLayer : ILayer
    {
        public void Write(string text)
        {
            Debug.WriteLine(text);
        }
    }
    interface ILayer
    {
        void Write(string text);
    }
Both of them depend on abstraction (in this case, the interface acts as an abstraction).
And, let's say, we have a higher-level object using these classes:
    class Logging : ILayer
    {
        private ILayer _instance;
        public Logging(int i)
        {
            if (i == 1)
            {
                _instance = new ConsoleLayer();
            }
            else
            {
                _instance = new DebugLayer();
            }
        }
        public void Write(string text)
        {
            _instance.Write(text);
        }
    }
Depending on the constructor parameter, the _instance variable is initialized by a specific class. Well and further by a call of Write the conclusion to the console or in Debug will be made. Everything seems to be good and even seemingly corresponds to the first part of the principle of Dependency Inversion
Objects of a higher level do not depend on objects of a lower level. Both those and those depend on abstractions.
In our case ILayer acts as an abstraction.
But we must also have an even higher level object. The one that uses the Logging class
    static void Main(string[] args)
    {
        var log = new Logging(1);
        log.Write("Hello!");
        Console.Read();
    }
Initializing Logging with 1 we get in the Logging class an instance of the class that outputs data to the console. If we initialize Logging with any other number, then log.Write will output the data to Debug. Everything seems to work, but it works poorly. Our higher level Main object depends on the details of the lower level object code - the Logging class. If we change something in this class, we will need to change the code of the Main class. To prevent this from happening, we will make an inversion of control - Inversion of Control. Let's make the Main class control what happens in the Logging class. The Logging class will receive as a constructor parameter an instance of the class implementing the interface of the ILayer interface.
    class Logging
    {
        private ILayer _instance;
        public Logging(ILayer instance)
        {
            _instance = instance;
        }
        public void Write(string text)
        {
            _instance.Write(text);
        }
    }
And now our Main class will look like this:
    static void Main(string[] args)
    {
        var log = new Logging(new DebugLayer());
        log.Write("Hello!");
        Console.Read();
    }
In fact, we decorate our Logging object using the object we need.
Now our application also corresponds to the second part of the Dependency Inversion principle:
Abstractions are independent of details. Details depend on abstractions. Those. we do not know the details of what is happening in the Logging class, we simply pass in a class that implements the necessary abstraction.
There is such a term tight coupling - a close relationship. The weaker the connections between components in an application, the better. I would like to note that this example of a simple application falls short of the ideal a little. Why? Yes, because in the class of the highest level in Main, we twice use the creation of class instances with the help of new. And there is such a mnemonic phrase “New is a clue” - which means the less you use new, the less close connections of components in an application are and the better. Ideally, we should not have used new DebugLayer, but we had to get DebugLayer in some other way. How? For example, from the IoC container or using reflection from the parameter passed to Main.
Now we understand what Inversion of Control (IoC) is and what Dependency Inversion (DIP) principle is. It remains to figure out what Dependency Injection (DI) is. IoC is a design paradigm. Dependency Injection is a pattern. This is what is happening in the Logging class constructor. We get an instance of a particular dependency. The Logging class is dependent on the instance of the class implementing ILayer. And this instance is implemented (injected) through the constructor.
IoC container
IoC container is such an object that contains a lot of some specific dependencies (dependency). Dependence can be otherwise called a service - as a rule, it is a class with a specific functionality. If necessary, a dependency of the required type can be obtained from the container. Injecting dependency into a container is Inject. Extract - Resolve. I will give an example of the simplest self-written IoC container:
    public static class IoCContainer
    {
        private static readonly Dictionary<Type, Type> _registeredObjects = new Dictionary<Type, Type>();
        public static dynamic Resolve<TKey>()
        {
            return Activator.CreateInstance(_registeredObjects[typeof(TKey)]);
        }
        public static void Register<TKey, TConcrete>() where TConcrete : TKey
        {
            _registeredObjects[typeof(TKey)] = typeof(TConcrete);
        }
    }
Just a dozen lines of code, but you can already use it (not in production, of course, but for training purposes).
You can register a dependency (say, the ConsoleLayer or DebugLayer that we used in the last example) like this:
IoCContainer.Register<ILayer, ConsoleLayer>();And extract from the container in the required place of the program as follows:
    ILayer layer = IoCContainer.Resolve<ILayer>();
    layer.Write("Hello from IoC!");
Dispose () is also implemented in real containers, which allows destroying resources that have become unnecessary.
By the way, the name of the IoC container does not exactly convey the meaning, since the term IoC is much broader in application. Therefore, recently the term DI container has been increasingly used (as dependency injection is still used).
Service lifetimes + various extension methods in Composition Root
ASP.NET Core applications contain a Startup.cs file which is the starting point of an application that allows you to configure DI. Configured by the DI in the ConfigureServices method.
    public void ConfigureServices(IServiceCollection services) {
      services.AddScoped<ISomeRepository, SomeRepository>();
    }
This code will add the SomeRepository class to the DI container that implements the ISomeRepository interface. The fact that the service is added to the container using AddScoped means that an instance of the class will be created with each page request.
You can add a service to a container without an interface.
services.AddScoped<SomeRepository>();But this method is not recommended, since your application loses its flexibility and close connections appear. It is recommended to always specify the interface, since in such a case, at any time it is possible to replace one interface implementation with another. And if the implementations support the principle of Liskov substitution, then by “flick of the wrist,” changing the name of the implementation class will change the functionality of the entire application.
There are 2 more options to add service - AddSingleton and AddTransient.
When using AddSingleton, the service is created once and when using the application, the call goes to the same instance. It is necessary to use this method especially carefully, as memory leaks and problems with multithreading are possible.
AddSingleton has a small feature. It can be initialized either when it is first accessed.
services.AddSingleton<IYourService, YourService>();either immediately when added to the constructor
services.AddSingleton<IYourService>(new YourService(param));In the second way, you can even add a parameter to the constructor.
If you want to add a parameter to the constructor of a service added not only using AddSingleton, but also using AddTransient / AddScoped, then you can use a lambda expression:
services.AddTransient<IYourService>(o => new YourService(param));Finally, when using AddTransient, a service is created every time you access it. Great for lightweight services that do not consume memory and resources.
If everything should be more or less clear with AddSingleton and AddScoped, then AddTransient needs clarification. Official documentation gives an example in which a certain service is added to a DI container and as a parameter of the constructor of another service and separately independently. And in case it is added separately using AddTransient, it creates its own instance 2 times. I will give a very, very simplified example. In real life, it is not recommended for use, because classes for simplicity do not inherit interfaces. Suppose we have a simple class:
    public class Operation
    {
        public Guid OperationId { get; private set; }
        public Operation()
        {
            OperationId = Guid.NewGuid();
        }
    }
And there is a second class that contains the first as a dependent service and receives this dependency as a parameter of the constructor:
    public class OperationService
    {
        public Operation Operation { get; }
        public OperationService (Operation operation)
        {
            Operation = operation;
        }
    }
Now we make the inject of two services:
    services.AddTransient<Operation>();
    services.AddScoped<OperationService>();
And in some controller in Action, add the receipt of our dependencies and the output of values to the Debug window.
    public IActionResult Index([FromServices] Operation operation,
[FromServices] OperationService operationService)
    {
        Debug.WriteLine(operation.OperationId);
        Debug.WriteLine(operationService.Operation.OperationId);
        return View();
    }
So as a result, we get 2 different values Guid. But if we replace AddTransient with AddScoped, then as a result we will get 2 identical values.
The IoC container of ASP.NET Core applications by default already contains some services. For example, IConfiguration is a service with which you can get application settings from the files appsettings.json and appsettings.Development.json. IHostingEnvironment and ILoggerFactory with which you can get the current configuration and an auxiliary class that allows logging.
Classes are removed from the container using the following typical construction (the most trivial example):
    private readonly IConfiguration _configuration;
    public SomePageController(IConfiguration configuration)
    {
        _configuration = configuration;
    }
    public async Task<IActionResult> Index()
    {
        string connectionString = _configuration["connectionString"];
    }
In the scope of the controller, a variable is created with access modifiers private readonly. The dependency is obtained from the container in the class constructor and is assigned to a private variable. Further, this variable can be used in any method or Action controller.
Sometimes you do not want to create a variable in order to use it in only one Action. Then you can use the attribute [FromServices]. Example:
    public IActionResult About([FromServices] IDateTime dateTime)
    {
        ViewData["Message"] = «Московское время " + dateTime.Now;
        return View();
    }
It looks strange, but in order for the code not to call the static class method DateTime.Now () it is sometimes done that the time value is obtained from the service as a parameter. Thus, it is possible to pass any time as a parameter, which means it becomes easier to write tests and, as a rule, it becomes easier to make changes to the application.
This is not to say that static is evil. Static methods are faster. And most likely static can be used somewhere in the IoC container itself. But if we save our application from all static and new, then we will get more flexibility.
Third-party DI containers
What we considered and what the ASP.NET Core DI default container actually implements is constructor injection. It is still possible to inject a dependency into property using so-called property injection, but this feature is not present in the container built into ASP.NET Core. For example, we may have some class that you implement as a dependency, and this class has some public property. Now imagine that during or after we introduce a dependency, we need to set the property value. Let's go back to the example similar to the one we recently reviewed.
If we have such a class:
    public class Operation
    {
        public Guid OperationId { get; set; }
        public Operation() {}
    }
which we can introduce as an addiction,
services.AddTransient<Operation>();then using the standard container we cannot set the value for the property.
If you want to use such an opportunity to set a value for the OperationId property, then you can use some third-party DI container that supports property injection. By the way, property injection is not particularly recommended. However, there are Method Injection and Setter Method Injection, which may be useful to you and which are also not supported by the standard container.
Third-party containers may have other very useful features. For example, using a third-party container, you can embed a dependency only in controllers who have a certain word in their name. And quite often used case - DI containers, optimized for speed.
Here is a list of some third-party DI containers supported by ASP.NET Core: Autofac, Castle Windsor, LightInject, DryIoC, StructureMap, Unity
Although when using a standard DI container, you cannot use property / method injection, but you can implement the dependent service as a constructor parameter by implementing the “Factory” pattern as follows:
    services.AddTransient<IDataService, DataService>((dsvc) =>
    {
        IOtherService svc = dsvc.GetService<IOtherService>();
        return new DataService(svc);
    });
In this case, GetService will return null if the dependent service is not found. There is a variation of GetRequiredService, which will throw an exception in case the dependent service is not found.
The process of getting a dependent service using GetService actually uses the Service locator pattern.
Autofac
Let's sort Autofac on a practical example. Conveniently, it will be possible to register and receive services from the container, as well as in the default way, and with the help of Autofac.
Install the NuGet Autofac.Extensions.DependencyInjection package.
Change the value of the ConfigureServices method from void to IServiceProvider. And add property
public IContainer ApplicationContainer { get; private set; }After this, it will be possible to add a code like the following to the end of the ConfigureServices class of the Startup class (this is just one of the options for registering services):
    services.AddTransient<ISomeRepository, SomeRepository>();
    var builder = new ContainerBuilder();
    builder.Populate(services);
    builder.RegisterType<AnotherRepository>().As<IAnotherRepository>();
    this.ApplicationContainer = builder.Build();
    return new AutofacServiceProvider(this.ApplicationContainer);
Here is builder.Populate (services); adds services from IServiceCollection to container. Well, then you can already register services using builder.RegisterType. Oh yes. I almost forgot. You must change from void to IServiceProvider the return value of the ConfigureServices method.
AOP using ASP.NET Core - Autofac Interseptors
Speaking about aspect-oriented programming, they mention another term - cross-cutting concerns. Concern is some piece of information that affects the code. In the Russian version use the word responsibility. Well, cross-cutting concerns are responsibilities that affect other responsibilities. And ideally, they shouldn't influence each other, right? When they influence each other, it becomes more difficult to change the program. It is more convenient when all our operations take place separately. Logging, transactions, caching and more can be accomplished using AOP without changing the code of the classes and methods themselves.
In the .NET world, a method is often used when AOP code is injected using a post processor into an already compiled application code ( PostSharp ) Alternatively, interceptors can be used — these are event hooks that can be added to application code. These interceptors, as a rule, use for their work the decorator pattern that we have already examined.
Let's create our own spoiler. The simplest and most typical example that is easiest to reproduce is logging.
Let's install in addition to the Autofac.Extensions.DependencyInjection package also the Autofac.Extras.DynamicProxy package. Have you
installed it? Add a simple class of log that will be called when accessing certain services.
    public class Logger : IInterceptor
    {
        public void Intercept(IInvocation invocation)
        {
            Debug.WriteLine($"Calling {invocation.Method.Name} from Proxy");
            invocation.Proceed();
        }
    }
Add the registration of the spoiler to our Autofac registration:
   builder.Register(i => new Logger());
   builder.RegisterType<SomeRepository >()
   .As<ISomeRepository >()
   .EnableInterfaceInterceptors()
   .InterceptedBy(typeof(Logger));
And now each time the class is called, the Intercept method of the Logger class will be called.
Thus, we can simplify our life and not write a log at the beginning of each method. We will have it automatically. And if you wish, it will be easy for us to change or disable it for the entire application.
We can also remove .InterceptedBy (typeof (Logger)); and add call interception only for specific application services using the [Intercept (typeof (Logger))] attribute - you must specify it before the class header.
Middleware
In ASP.NET, there is a specific chain of code calls that occurs with each request. Even before the UI / MVC boots up, certain actions are performed.
That is, for example, if we add to the beginning of the Configure method of the Startup.cs class the code
    app.Use(async (context, next) =>
    {
        Debug.WriteLine(context.Request.Path);
        await next.Invoke();
    });
then we can see in the debug console which files our application requests. In fact, we get the capabilities of AOP “out of box”.
A little useless, but clear and informative example of using middleware, I will show you now:
    public void Configure(IApplicationBuilder app)
    {
        app.Use(async (context, next) =>
        {
            await context.Response.WriteAsync("Hello!" + Environment.NewLine);
            await next.Invoke();
        });
        app.Run(async context =>
        {
            await context.Response.WriteAsync("Hello again.");
        });
    }
At each request, the call chain will be executed. From each app.Use after the next.invoke () call, the transition to the next call is made. And everything ends after the app.Run runs.
You can execute some code only when accessing a specific route.
This can be done using app.Map:
    private static void Goodbye(IApplicationBuilder app)
    {
        app.Run(async context =>
        {
            await context.Response.WriteAsync("Goodbye!");
        });
    }
    public void Configure(IApplicationBuilder app)
    {
        app.Map("/goodbye", Goodbye);
        app.Run(async context =>
        {
            await context.Response.WriteAsync("Hello!");
        });
    }
Now, if you just go to the site page, then you will see the text “Hello!”, And if you add to the address bar / Goodbye, then Goodbye will be displayed.
In addition to Use and Map, you can use UseWhen or MapWhen to add code to the middleware chain only under certain conditions.
Still there were still useless examples, right? Here is a normal example:
    app.Use(async (context, next) =>
    {
      context.Response.Headers.Add("X-Frame-Options", "DENY");
      context.Response.Headers.Add("X-Content-Type-Options", "nosniff");
      context.Response.Headers.Add("X-Xss-Protection", "1");
      await next();
    });
Here we add to each request headers to help protect the page from hacker attacks.
Or here's an example of localization:
    var supportedCultures = new[]
    {
          new CultureInfo("ru"),
          new CultureInfo("fr")
    };
    app.UseRequestLocalization(new RequestLocalizationOptions
    {
        DefaultRequestCulture = new RequestCulture("ru"),
        SupportedCultures = supportedCultures,
        SupportedUICultures = supportedCultures
    });
Now, if you add the? Culture = fr parameter to the page address, then you can switch the language of the application to French (if localization is added to your application, then everything will work)
Filters
If the middleware chain refers to processes up to MVC, then the filters work together with MVC.
The following schematic shows how filters work out.
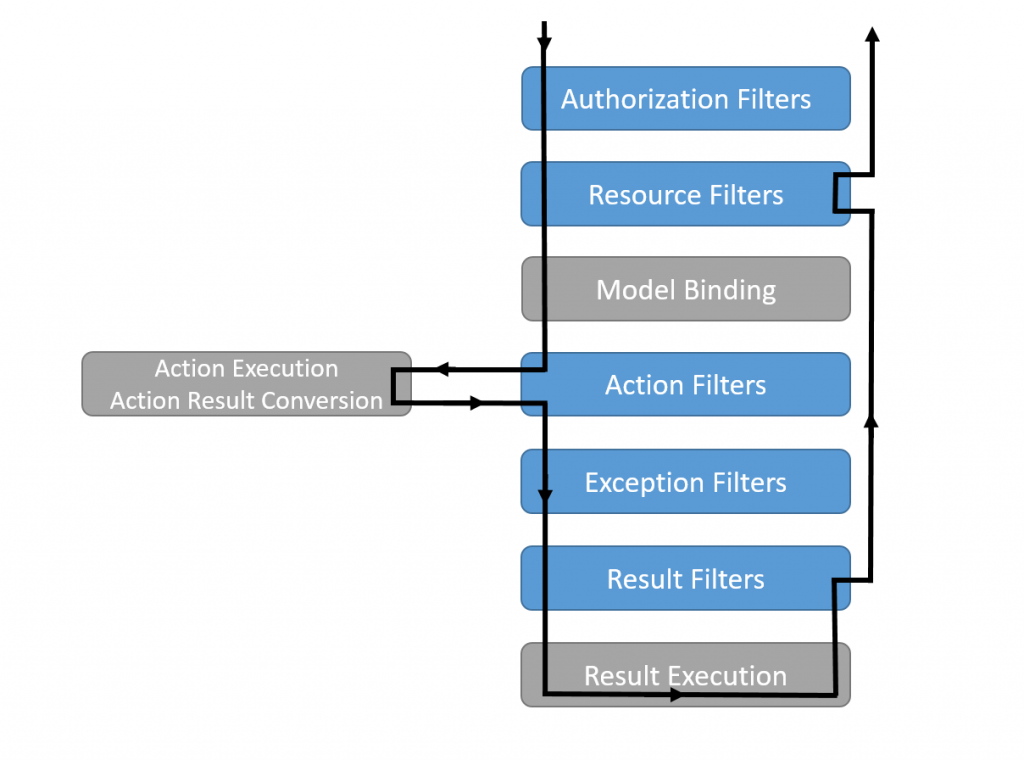
First, run authorization filters. Those. You can create some kind of filter or several filters and enter in them some kind of authorization code that will be processed upon requests.
Then work out the resource filters. Using these filters, you can, for example, return some information from the cache.
Then data binding occurs and Action filters are executed. With their help, you can manipulate the parameters passed to the Action and the returned result.
Exception filters as the name suggests suggests adding some kind of general error handling to the application. It should be quite convenient to handle errors the same everywhere. A kind of AOP-shny plus.
Result filters allow you to perform some actions before the execution of the Action controller or after. They are quite similar to Action filters, but they are executed only if there are no errors. Suitable for logic tied to the View.
Everything should be more clear on an example. And I have at hand just an example of a simplified authorization filter:
    public class YourCustomFilter : Attribute, IAuthorizationFilter
    {
        public async void OnAuthorization(AuthorizationFilterContext context)
        {
            // какая-то логика и в случае, если у пользователе нет прав, можно сделать следующее
            context.Result = new ContentResult()
            {
                Content = "У вас нет прав для доступа к этому ресурсу"
            };
        }
    }
Add this class to the DI container (as usual in Startup.cs)
services.AddScoped<YourCustomFilter>();And now it becomes possible to add some of your authorization to any Action by adding the following attribute.
[ServiceFilter(typeof(YourCustomFilter))]Fun thing - you can create your middleware and add it to some action as a filter. In order to do so, you need to create a class with an arbitrary name and the Configure method.
    public class MyMiddlewareFilter
    {
    public void Configure(IApplicationBuilder applicationBuilder)
          {
               applicationBuilder.Use(async (context, next) =>
              {
                   Debug.WriteLine("Привет от middleware!");
                await next.Invoke();
            });
        }
    }
This class can now be added to Action using the following attribute.
[MiddlewareFilter(typeof(MyMiddlewareFilter))]