The original sound amplifier - do it yourself
In this article, we will talk about one of the options for a home-made power amplifier based on Master Kit modules. The project is implemented by the user of our products.
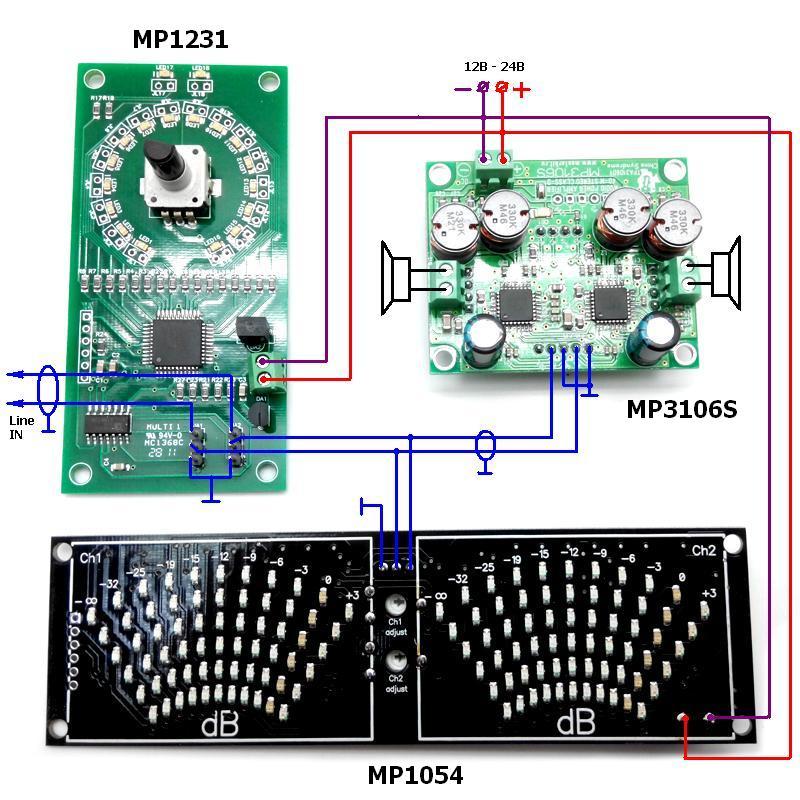
Structurally, the device consists of four main functional blocks:
1) the power amplifier itself ( MP3106S , D-class, 2x40W);
2) digital volume and balance level control ( MP1231 );
3) digital signal strength indicator MP1054 ;
4) a 12V power supply for a current of at least 4A (the author used a computer power supply).
As the acoustics, the well-known Radio System S-90 speaker system (stereo - two speakers) was used.
A sketch of connecting modules is shown in the figure:
It should be remembered that the noise level of the entire system depends on the quality of the power source. Particular care must be taken when using computer power supplies. It is better to use good-quality branded ATX power supplies, since in most cheap no-name power supplies instead of filter chokes ordinary jumpers are installed, which extremely negatively affects the sound quality.
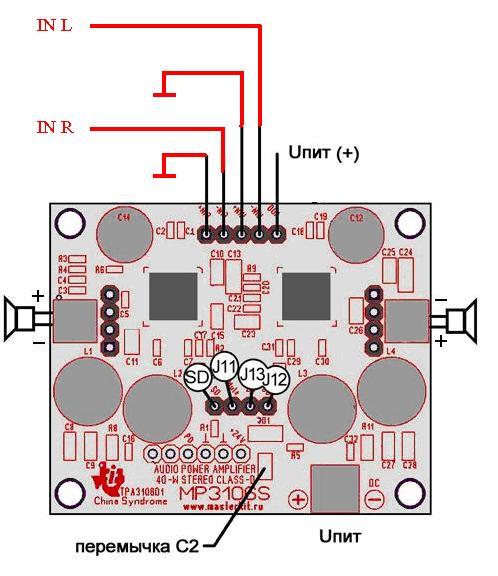
There are some subtleties of connecting modules that can cause difficulties for insufficiently trained electronics engineers. For example, the MP3106S power amplifier by default implies a balanced connection method, but it is often more convenient to connect the input signal according to the classical circuit with a common "ground".
To do this, you need to slightly modify the connection diagram of the amplifier:
In addition to the above basic modules, I additionally had to purchase a “little thing”: input and output connectors, power switch, fasteners.
The prototype of the future case was an ordinary cardboard shoe box.
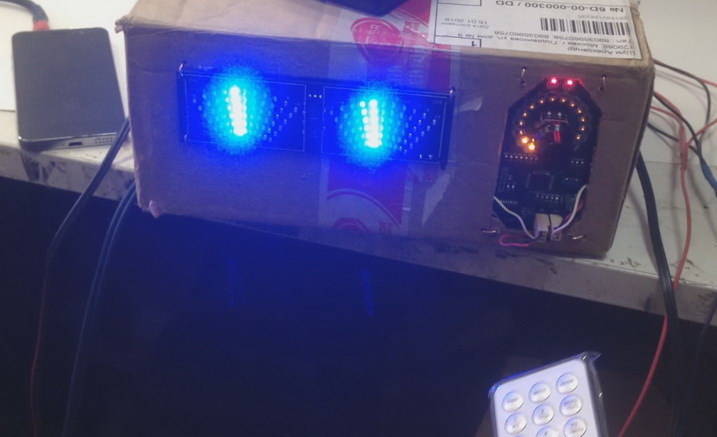
In such an improvised case, the whole system was debugged. After debugging, all components were moved to a wooden case.
The system sounds worthy: without wheezing, without noticeable dips in the frequency range. Of course, music lovers can find some flaws, but for such demanding customers, ready-made devices and HI-FI sound systems are produced (at the same HI-FI prices). But experience shows that with blind listening, 90% of people can not distinguish the sound of an expensive tube apparatus from a budget amplifier, and if so, why pay more? Moreover, a do-it-yourself design always seems the best!
The video of the amplifier layout can be seen here:
The work of the final version of the amplifier can be seen here:
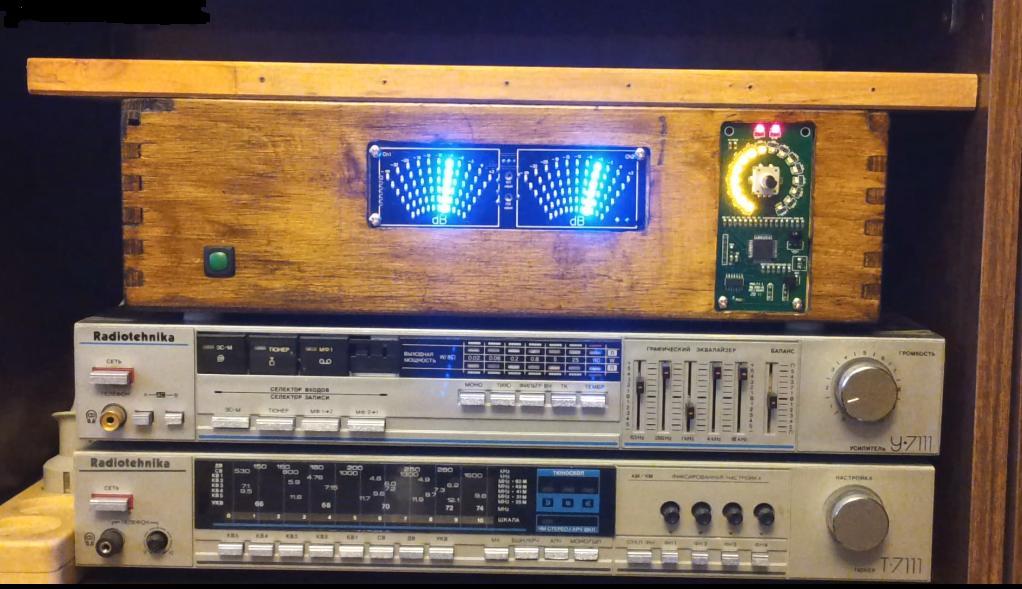
In addition, the assembled amplifier turned out to be very beautiful and original: a real wooden case, a spectacular luminous dial indicator of signal levels - all this is truly mesmerizing!
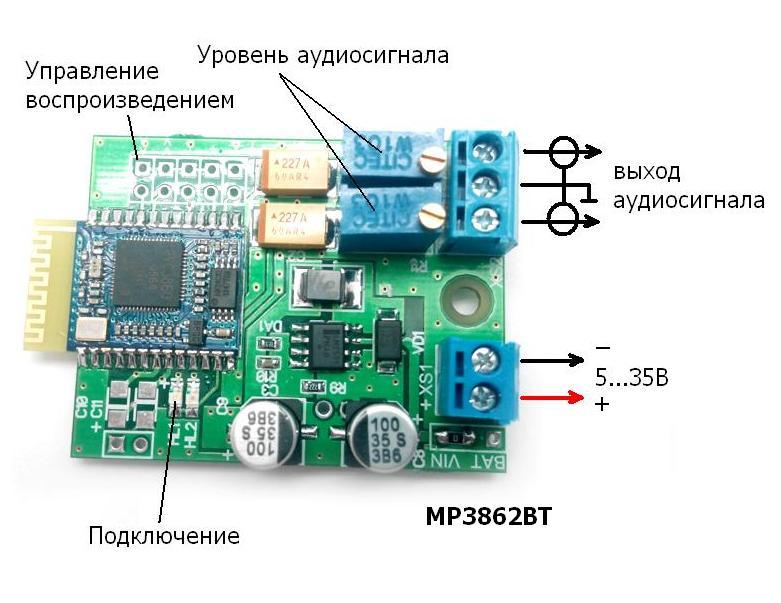
In the future, so that the amplifier can connect to modern gadgets, the author plans to equip the system with a Bluetooth wireless audio channel (based on the Master Kit MP3862BT module ), which will increase the convenience of connecting signal sources.
Connecting this module will not cause any special difficulties. The MP3862BT line output is connected to the line input of the amplifier. And the module power is connected to the system power line:
Solution author: Alexander Anatolyevich, Moscow
Structurally, the device consists of four main functional blocks:
1) the power amplifier itself ( MP3106S , D-class, 2x40W);
2) digital volume and balance level control ( MP1231 );
3) digital signal strength indicator MP1054 ;
4) a 12V power supply for a current of at least 4A (the author used a computer power supply).
As the acoustics, the well-known Radio System S-90 speaker system (stereo - two speakers) was used.
A sketch of connecting modules is shown in the figure:
It should be remembered that the noise level of the entire system depends on the quality of the power source. Particular care must be taken when using computer power supplies. It is better to use good-quality branded ATX power supplies, since in most cheap no-name power supplies instead of filter chokes ordinary jumpers are installed, which extremely negatively affects the sound quality.
There are some subtleties of connecting modules that can cause difficulties for insufficiently trained electronics engineers. For example, the MP3106S power amplifier by default implies a balanced connection method, but it is often more convenient to connect the input signal according to the classical circuit with a common "ground".
To do this, you need to slightly modify the connection diagram of the amplifier:
In addition to the above basic modules, I additionally had to purchase a “little thing”: input and output connectors, power switch, fasteners.
The prototype of the future case was an ordinary cardboard shoe box.
In such an improvised case, the whole system was debugged. After debugging, all components were moved to a wooden case.
The system sounds worthy: without wheezing, without noticeable dips in the frequency range. Of course, music lovers can find some flaws, but for such demanding customers, ready-made devices and HI-FI sound systems are produced (at the same HI-FI prices). But experience shows that with blind listening, 90% of people can not distinguish the sound of an expensive tube apparatus from a budget amplifier, and if so, why pay more? Moreover, a do-it-yourself design always seems the best!
The video of the amplifier layout can be seen here:
The work of the final version of the amplifier can be seen here:
In addition, the assembled amplifier turned out to be very beautiful and original: a real wooden case, a spectacular luminous dial indicator of signal levels - all this is truly mesmerizing!
In the future, so that the amplifier can connect to modern gadgets, the author plans to equip the system with a Bluetooth wireless audio channel (based on the Master Kit MP3862BT module ), which will increase the convenience of connecting signal sources.
Connecting this module will not cause any special difficulties. The MP3862BT line output is connected to the line input of the amplifier. And the module power is connected to the system power line:
Solution author: Alexander Anatolyevich, Moscow