Testing "Tsifroskop"
Hello, dear readers of the resource Geektimes!
Who about what, and again about photography. As a true lover of this process, especially the part related to macro photography, I have long noticed a class of compact USB microscopes. I really wanted to touch them and look at the results. And now an instance of such a device has fallen into my tenacious paws. Provided for testing by his company Dadget.
So let's get started.
Part 1. Descriptive
1. The device comes in a neat box:

2. Its contents. The instruction pleased with the completeness and normal Russian language. On the disk there is its electronic version. In order to start using a USB microscope, you need to install a driver and a program. The installation of both is quick and painless.

3. The device consists of a chromed metal stand and, in fact, a microscope attached to it. Its body is made of pleasant-to-touch plastic from which at first it was unbearably pulled by the smell of blue Soviet electrical tape (if anyone remembers this). Although he evoked nostalgic memories, he did not want to endure him. It’s good that after a couple of hours it was weathered and now the device smells nothing more. At the tip is a plastic cap. This is a buzz:

4. Let's look into his eye. The illumination is carried out by eight diodes, the brightness of which is regulated by the wheel on the handle. A lens moving up and down is located in the center:

5. Thus, the unit looks in working condition:

6. The stand is too light and in the low position of the microscope it outweighs and tumbles. It’s necessary to put something heavy on the edge:

A little information about the filling. The heart is the Vimicro USB 2.0 PC Camera (Venus) webcam. It has a 1/4 "CMOS 2 MP sensor (physical size 3.2mm x 2.4mm). Accordingly, the" honest "resolution is 1600x1280. It is interpolated to 2560x2048. The stated magnification ratio is from 20x to 200x. We
figured out the iron, now we turn to software.
7. The program is minimalistic, but functional. The main functions are displayed on the buttons.

8. The main options are clear. By the way, among the interface languages there is also Russian.

9. Among the variety of bookmarks, only this one and “Camera control” are of real interest, there you can set exposure compensation. All other tabs are remnants of the web-camera past of this device and they are not available for change.

Having configured everything, you can begin to consider and photograph the microworld. This is being done in a peculiar way (maybe I just don’t know the best way). First you need to set the desired degree of magnification by turning the dial. After that, look for sharpness by changing the height of the device above the object. In my opinion this is very inconvenient, it would be better to do the opposite. But in this case, you can not get the desired increase.
10. You can get a photo by clicking on the button on the case or the corresponding icon in the program. After that, you can take measurements in the image by selecting the source tool and units. An unpleasant glitch immediately crawled out - always when using the Undo button, all the inscriptions made by the font color you selected change to blue. This is very unpleasant and puts an end to using the Undo function. Also, Cyrillic is not supported (despite the fact that the opposite is stated). Instead, she received an inscription on the crackers.

11. The resulting file can be saved in two formats: JPEG or BMP. Here one more flaw awaited - untranslated from the "worms" save menu. I do not want to guess what two jackdaws mean and basically did not begin to find out empirically:

12. I will check the stated degrees of increase by photographing a metal ruler:

13. The method is not entirely scientific and accurate, but it works. The maximum optical zoom is approximately 135x:

14. The maximum zoom when using interpolation is approximately 220x - even more than stated:

Unfortunately, I am not a fan of shooting videos. Even on my camera, I never used this opportunity. Therefore, I’ll just say that the cytroscope allows you to record video and saves it in AVI format. I didn’t like that the save folder cannot be changed, the files are always saved in C: \ videos.
Part 2. Narrative
The overall impression of the device is made up, you can proceed to the practical results. By default, all of the photographs below are taken with the experimental cyroscope, unless otherwise indicated.
15. I will take a figure of my favorite scale 1:87 and garden shears for her:

16. 100% crop from a digital camera. Shot with a Nikkor 105mm macro lens:

17. This image was obtained using the device at maximum magnification:

18. And these are the ends of the same garden shears:

19. A leaf of some ornamental plant:

20. Another portion of the leaf:

21. And this is an image of the same sheet obtained using the unit, which I wrote about in my previous post (Nikon D610 + CFI plan achromat 10x + Nikkor 70-210mm + macro rails):

It is worth noting that the cost of the entire device is more than 30 times the cost of a cytroscope. And in order to get the image, I spent about 2.5 hours making about a hundred frames for the stack.
22. Butterfly wing:

23.

24. Photo of the butterfly wing, obtained using two docked lenses:

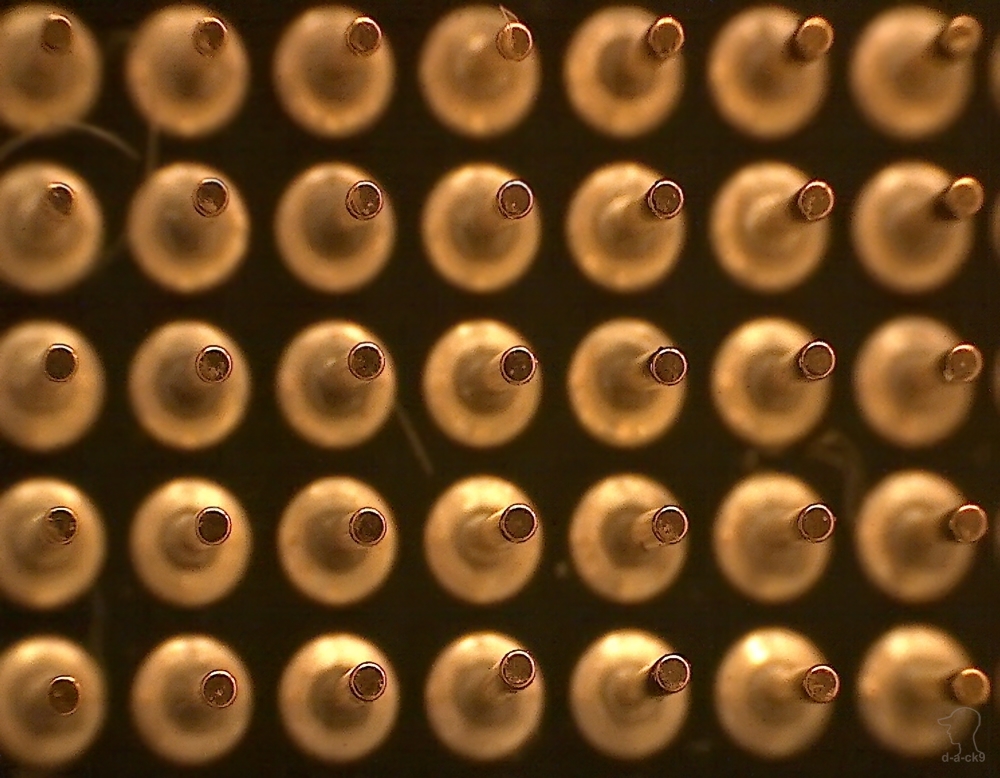
25. Processor contacts:

26. They are at maximum magnification:

27. They are on the side:

28. Camera display

pixels : 29. The same pixels photographed using a Nikon D610 + Nikkor 105 mm + 2 rings + Raynox m-250:

30. Gear from the watch mechanism:

31. The same notorious watch stone used as a bearing:

32. Anchor fork:

33. It’s the same, but photographed with Nikon D610 + Nikkor 105 mm + 2 rings + Raynox m-250:

34. Matrix type 1 / 2.3 "with a diagonal of 7.705 mm:

Part 3. The final
device is positioned as a" tool for electronic engineers , numismatists, philatelists and many others. "In this capacity, the microscope works out its purpose well. It can also be useful for taking a photograph of a small object at home without much effort. Moreover, the device is purely utilitarian and not suitable for receiving artistic macro photography.
PS Initially, I connected it to an Asus laptop. But then connected to Dell. And then undocumented opportunities opened up. From somewhere in the bowels of the hard drive, my native Dell's utility (which I had never seen before) used to control a web camera with a bunch of settings spontaneously, identified the connected microscope as a web camera and allowed it to be used not only to examine small details, but also put into web-camera mode with all the ensuing settings. So Dell owners get 2 in 1 without installing additional software.
Link to this USB microscope.