Last chance to get lifelong Windows 10 Pro without participating in the Insider program
- Tutorial
UPD 2016: updated the instructions for those who did not have time last time. 
As many people know, shortly before the final release, Microsoft made an offer to all Technical Preview users to join the Insider program. It was necessary to have time to connect to the program before July 29. That train left. Right now, only current Windows 10
users can participate in Insider. For users of Windows 7 and 8, there is still a free upgrade to Windows 10, which is valid until July 29, 2016. What about the rest? There is a way out, but there is only time leftuntil October 1, 2015 until the activation server is turned off.
Today I will tell you how to get lifelong Windows 10 Pro without having any of the previous versions of Windows.
We will not lose time and immediately get down to business. We will need:
We look for both images on the network and download. Copy the Insider Preview image to the USB flash drive. You can use the Rufus utility for this .
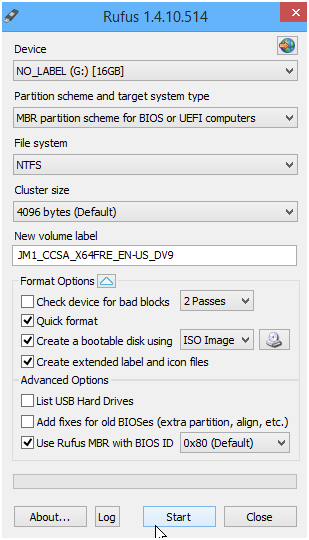
If you have two flash drives, immediately copy to the second image 1511 .
If you are from 2016, the Insider Preview installer will swear that it is out of date. For a workaround, we need to set the date in BIOS / UEFI prior to October 1, 2015, for example July 1, 2015. We pull out the network cable, otherwise during installation the time will go back and the installation will stop.
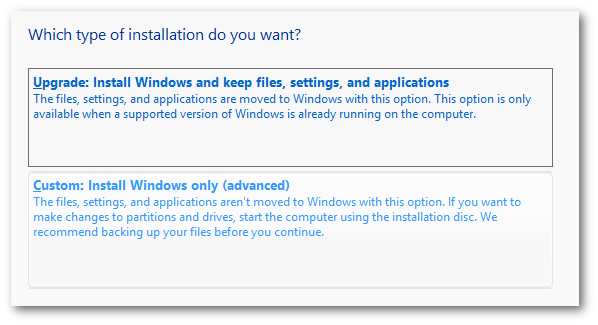
We reboot the computer and boot from the USB flash drive. The installation procedure is standard. Select "Custom: Install Windows only" .
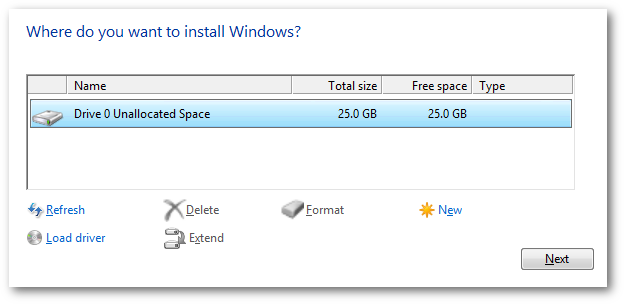
Delete all sections, click “Next” .
We are waiting for the installation to finish, come up with a username and boot into the system.
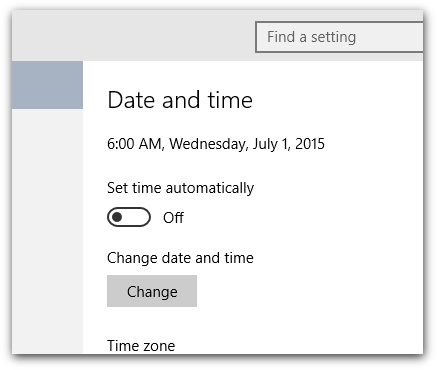
Turn off time synchronization.
After July 29, automatic activation of Insider Preview no longer works, we will have to do this manually. Then we call the context menu by the start button, select “Command Prompt (Admin)” .

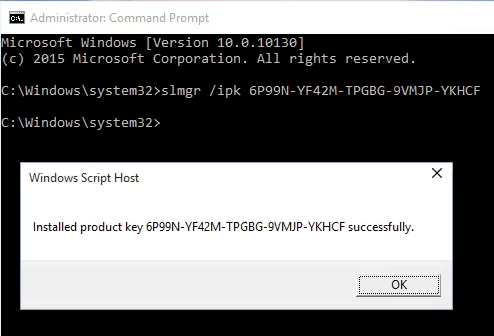
We enter two teams. First one:
We are waiting for the dialogue that the key is accepted. Click OK .
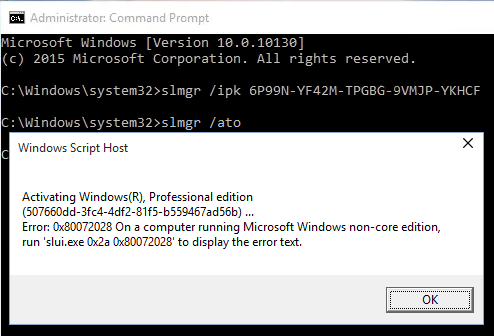
We connect the network, wait a few minutes. Now the second command:
We are waiting for another dialogue to appear (it will appear within a minute) that the activation was successful. Click OK .

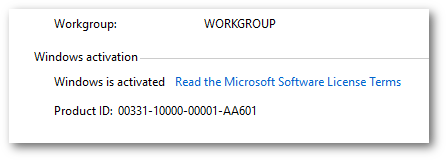
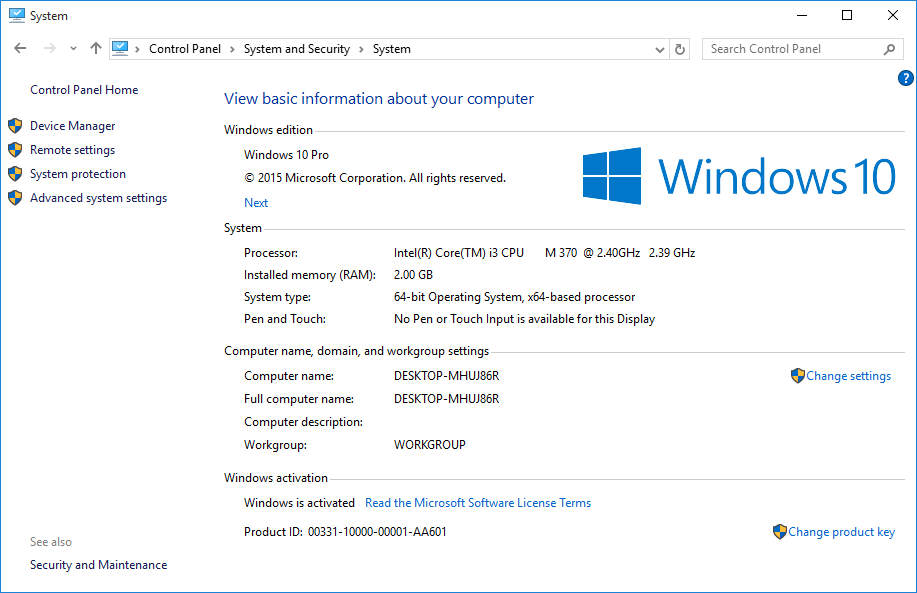
Again, call the context menu on the start button, select "System" and check that the system is indeed activated.
If you forgot to turn off time synchronization or see a dialog with the following error:
repeat the procedure for installing Insider Preview again.
In the event that you get this error for the umpteenth time - there is a chance that the activation was successful and you just need to upgrade to the Pro version (a case from your own experience). When the upgrade is completed, the system activates itself when connected to the network.
From personal correspondence they sent me a simpler option:
Copy the 1511 image (if you have not already done so) to the USB flash drive. We insert the flash drive into the system with the newly installed Insider Preview . On the flash drive we find setup.exe and run it.
In the “Get important updates” dialog that appears , select “Not right now” .

There will be a couple more minor issues about file transfer. We agree and wait for the end of the upgrade procedure.
We boot into the system, check again that the system is activated. At this stage, the activation becomes tied to a specific computer and has already been sent to Microsoft. This means that we can easily format the drive and perform a clean installation. The system will automatically be reactivated the first time you connect to the Internet.
We reboot the computer and boot from the same flash drive.
We begin the installation. This will bring up the Product Key input dialog.
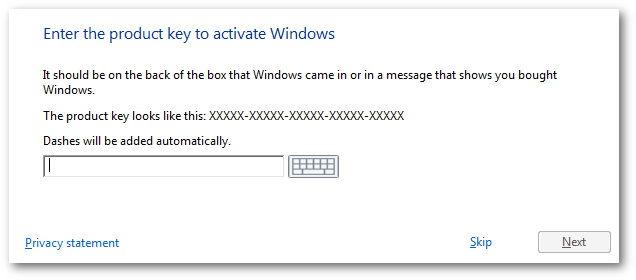
Click the “Skip” button .
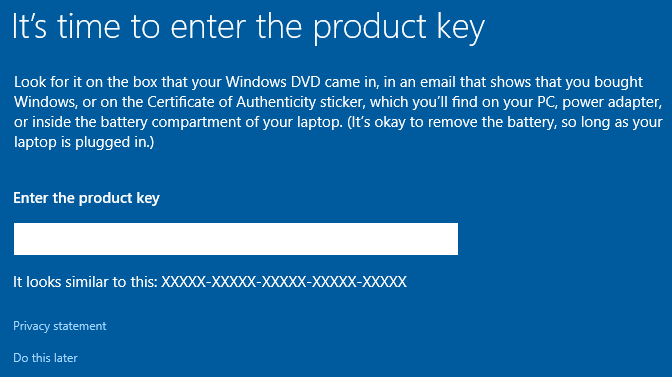
Then everything is as usual, delete all sections, click “Next” , wait for the installation to complete. At some point, we will again be asked to introduce a Product Key. We pretend to be a rag and click "Do this later . "
Then we come up with a username and boot into the system.
Check that the system is activated.
And voila.
I do not know in what form information about computers is stored in Microsoft and under what conditions it can be updated. You need to be careful, subsequent experiments with other versions of Windows may overwrite the current activation and you will be left with nothing (there is already a precedent in the comments ).
Here's a quote from the moderator of the wiki answers.microsoft.com :
Thus, those who managed to activate Insider Previews can upgrade to the final build.
As many people know, shortly before the final release, Microsoft made an offer to all Technical Preview users to join the Insider program. It was necessary to have time to connect to the program before July 29. That train left. Right now, only current Windows 10
users can participate in Insider. For users of Windows 7 and 8, there is still a free upgrade to Windows 10, which is valid until July 29, 2016. What about the rest? There is a way out, but there is only time left
Today I will tell you how to get lifelong Windows 10 Pro without having any of the previous versions of Windows.
We will not lose time and immediately get down to business. We will need:
- Windows 10 Insider Preview Build 10130 image (no links)
- Windows 10 Build 1511 image (no links)
- Flash drive (preferably two) on 4GB (8GB for combined x86 + x64 images)
- The laptop / computer itself, where we will put
- Internet connection
0. Prepare flash drives
We look for both images on the network and download. Copy the Insider Preview image to the USB flash drive. You can use the Rufus utility for this .
If you have two flash drives, immediately copy to the second image 1511 .
1. Installing Insider Preview
If you are from 2016, the Insider Preview installer will swear that it is out of date. For a workaround, we need to set the date in BIOS / UEFI prior to October 1, 2015, for example July 1, 2015. We pull out the network cable, otherwise during installation the time will go back and the installation will stop.
We reboot the computer and boot from the USB flash drive. The installation procedure is standard. Select "Custom: Install Windows only" .
Delete all sections, click “Next” .
We are waiting for the installation to finish, come up with a username and boot into the system.
Turn off time synchronization.
After July 29, automatic activation of Insider Preview no longer works, we will have to do this manually. Then we call the context menu by the start button, select “Command Prompt (Admin)” .
We enter two teams. First one:
slmgr /ipk 6P99N-YF42M-TPGBG-9VMJP-YKHCFWe are waiting for the dialogue that the key is accepted. Click OK .
We connect the network, wait a few minutes. Now the second command:
slmgr /atoWe are waiting for another dialogue to appear (it will appear within a minute) that the activation was successful. Click OK .
Again, call the context menu on the start button, select "System" and check that the system is indeed activated.
1.1 Something went wrong
If you forgot to turn off time synchronization or see a dialog with the following error:
repeat the procedure for installing Insider Preview again.
In the event that you get this error for the umpteenth time - there is a chance that the activation was successful and you just need to upgrade to the Pro version (a case from your own experience). When the upgrade is completed, the system activates itself when connected to the network.
From personal correspondence they sent me a simpler option:
if it doesn’t work, just remove the slmgr / upk key , disconnect the network, substitute the key, reboot, change the time for a couple of days, enter the key, reboot, turn on the network and execute the activation command. This scheme worked for me twice.
2. Upgrade Insider Preview to Windows 10 Pro
Copy the 1511 image (if you have not already done so) to the USB flash drive. We insert the flash drive into the system with the newly installed Insider Preview . On the flash drive we find setup.exe and run it.
In the “Get important updates” dialog that appears , select “Not right now” .
There will be a couple more minor issues about file transfer. We agree and wait for the end of the upgrade procedure.
We boot into the system, check again that the system is activated. At this stage, the activation becomes tied to a specific computer and has already been sent to Microsoft. This means that we can easily format the drive and perform a clean installation. The system will automatically be reactivated the first time you connect to the Internet.
3. Clean install of Windows 10 Pro
We reboot the computer and boot from the same flash drive.
We begin the installation. This will bring up the Product Key input dialog.
Click the “Skip” button .
Then everything is as usual, delete all sections, click “Next” , wait for the installation to complete. At some point, we will again be asked to introduce a Product Key. We pretend to be a rag and click "Do this later . "
Then we come up with a username and boot into the system.
Check that the system is activated.
And voila.
Underwater rocks
I do not know in what form information about computers is stored in Microsoft and under what conditions it can be updated. You need to be careful, subsequent experiments with other versions of Windows may overwrite the current activation and you will be left with nothing (there is already a precedent in the comments ).
The question of legality
Here's a quote from the moderator of the wiki answers.microsoft.com :
"In order to activate Windows 10 build 10240 (RTM), you must upgrade from a previous qualifying operating system that is genuine and activated: this includes Windows 7, Windows 8 / 8.1 and Windows 10 Insider Previews."
Thus, those who managed to activate Insider Previews can upgrade to the final build.