Connecting Avaya IP Phones to 3CX IP PBXs
- Tutorial
- Recovery mode
This week, great news came for organizations with fairly expensive Avaya PBXs installed. Now you can replace Avaya with a free and constantly updated 3CX PBX , but at the same time maintain your existing fleet of IP phones. Avaya IP phones will work both with a local 3CX and with a cloud installed. Once connected, you can centrally manage phones from the familiar 3CX server console.
Models of IP telephones that can be connected to the 3CX: Avaya 9601, 9608G, 9611G, 9621G, and 9641G.

Consider the connection procedure step by step.
To start the connection, reset the phones to the default settings to clear the existing configuration:
Avaya phones use the 242 DHCP server option for auto-tuning, which you must add to your DHCP server. We show this using the example of a Windows DHCP server.

In the DHCP snap-in, in the IPv4 context menu, select Set Predefined Options. Then click the Add button and add the following parameters (the name and description are given as an example:

In the same snap-in, in the Reservations context menu, select New Reservation ...

Specify reservation parameters for the MAC address of a particular phone, for example:

For the created reservation in the context menu, select Configure Options ...

Then select Option 242 and specify a string value for this option

Parameters of this line:
To automatically configure and connect Avaya phones, we have prepared a set of files that need to be downloaded and placed in specific folders on the 3CX server. The set includes the following files:
Download the 3CX AutoConfiguration template for Avaya and place it in the following folders on the 3CX server:
Download the Avaya IP Phone Firmware Suite and place it in the following folders on the 3CX server:
Download 3CX logos for Avaya and place them in the following folders:
As was said, secure_folder is a randomly generated security folder (in this example, it looks like 9kb94fwiaf3t).
After that, go to the 3CX management interface and restart the 3CX PhoneSystem 01 Configuration Server service.
In the 3CX server interface, add the user. Pay attention to the following points:
Then add the appropriate Avaya phone for the user by specifying their MAC address.

Turn on the phone. It will boot, receive an auto-configuration link from a DHCP server, and update the firmware files and configuration. The phone will display a request for the SIP authentication ID and password that you specified when creating the user. Enter this data and the phone will automatically connect to the server!
In conclusion, we consider the capabilities and limitations of Avaya IP phones when working with a 3CX PBX:
Models of IP telephones that can be connected to the 3CX: Avaya 9601, 9608G, 9611G, 9621G, and 9641G.
Consider the connection procedure step by step.
Reset IP Phones Phones to Default Settings
To start the connection, reset the phones to the default settings to clear the existing configuration:
- Press the Menu button
 and go to the Administration ... menu
 - Enter the administrator password - default is 27238
- Scroll through the menu and select Clear.
- Click Clear again to confirm. The phone will reset and restart.
Add DHCP Option 242
Avaya phones use the 242 DHCP server option for auto-tuning, which you must add to your DHCP server. We show this using the example of a Windows DHCP server.
In the DHCP snap-in, in the IPv4 context menu, select Set Predefined Options. Then click the Add button and add the following parameters (the name and description are given as an example:
- Name: Option 242
- Data Type: String
- Code: 242
- Description: Avaya provisioning
Create DHCP Reservation for Phone
In the same snap-in, in the Reservations context menu, select New Reservation ...
Specify reservation parameters for the MAC address of a particular phone, for example:
- Reservation Name: Avaya 9611G
- IP address: 10.172.1.232
- MAC address: b0075eb812e9
- Description: Avaya 9611G provisioning
For the created reservation in the context menu, select Configure Options ...
Then select Option 242 and specify a string value for this option
HTTPDIR=/provisioning/9kb94fwiaf3t/,HTTPPORT=5000,HTTPSRVR=10.172.0.242,SIG=2Parameters of this line:
- / provisioning / 9kb94fwiaf3t / - 3CX server autoconfiguration folder. Secure Folder 9kb94fwiaf3t - unique to each 3CX server installation.
- 5000 - HTTP port of the 3CX server. Avaya phones do not support auto-configuration over HTTPS, so specify port 5000 (default) or 80
- 10.172.0.242 - IP address or FQDN of the 3CX server name
- 2 - indicates the type of firmware. In our case - SIP
A set of files for connecting Avaya phones
To automatically configure and connect Avaya phones, we have prepared a set of files that need to be downloaded and placed in specific folders on the 3CX server. The set includes the following files:
- 3CX XML AutoConfiguration Template for Avaya Phones
- a set of firmware and other files for Avaya phones from 3CX
- 3CX logo files for display on phones
Download the 3CX AutoConfiguration template for Avaya and place it in the following folders on the 3CX server:
- Windows: C: \ ProgramData \ 3CX \ Instance1 \ Data \ Http \ Templates \ phones
- Linux: / var / lib / 3cxpbx / Instance1 / Data / Http / Templates / phones
Download the Avaya IP Phone Firmware Suite and place it in the following folders on the 3CX server:
- Windows: C: \ ProgramData \ 3CX \ Instance1 \ Data \ Http \ Interface \ provisioning \ secure_folder
- Linux: / var / lib / 3cxpbx / Instance1 / Data / Http / Interface / provisioning / secure_folder
Download 3CX logos for Avaya and place them in the following folders:
- Windows: C: \ ProgramData \ 3CX \ Instance1 \ Data \ Http \ Interface \ provisioning \ secure_folder \ logo
- Linux: / var / lib / 3cxpbx / Instance1 / Data / Http / Interface / provisioning / secure_folder / logo
As was said, secure_folder is a randomly generated security folder (in this example, it looks like 9kb94fwiaf3t).
After that, go to the 3CX management interface and restart the 3CX PhoneSystem 01 Configuration Server service.
Connecting an Avaya IP Phone to 3CX
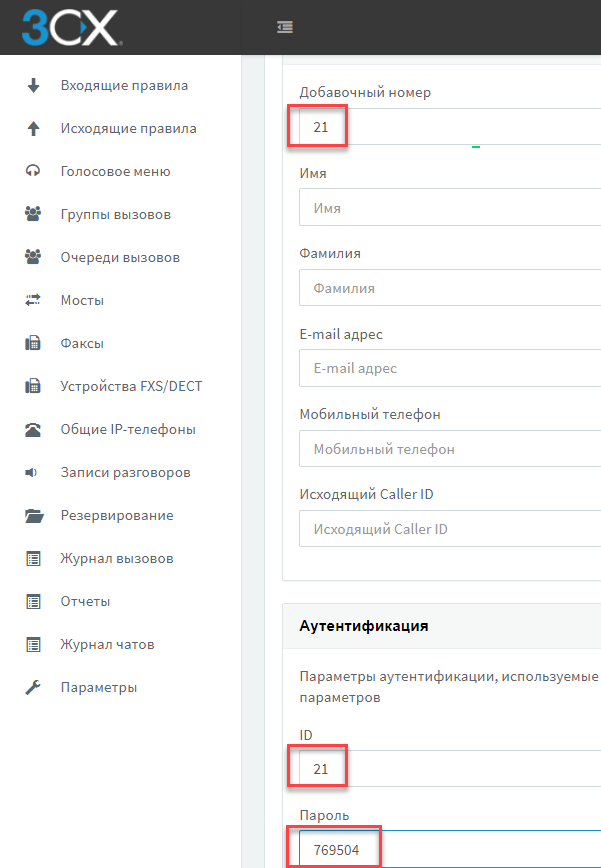
In the 3CX server interface, add the user. Pay attention to the following points:
- The extension phone number and authentication ID for Avaya phones must match!
- Specify an authentication password consisting of numbers. This will simplify the first connection of the phone.
Then add the appropriate Avaya phone for the user by specifying their MAC address.
Turn on the phone. It will boot, receive an auto-configuration link from a DHCP server, and update the firmware files and configuration. The phone will display a request for the SIP authentication ID and password that you specified when creating the user. Enter this data and the phone will automatically connect to the server!
Conclusion
In conclusion, we consider the capabilities and limitations of Avaya IP phones when working with a 3CX PBX:
- Full auto-configuration on DHCP Option 242, including SIP registration and setting your logo on the display
- Holding and transferring calls, answering calls automatically (paging function), conference
- Support for voicemail notifications (MWI) and time zone
- 3CX Address Book Download Not Supported
- When working with 3CX, the following are not supported: Alert info messages, DND status synchronization, remote reboot and reconfiguration, daylight saving time support.