Behavior-Driven Testing for iOS using Quick and Nimble
- Transfer
- Tutorial
After reading this article, you can use Quick and Nimble in your projects!
Writing great, healthy applications is one thing, but writing good tests that confirm the expected behavior of your application is a lot harder. In this article, we will look at one of the available application testing approaches, behavior-driven testing, using two extremely popular frameworks called Quick and Nimble .
You will learn about behavior-driven testing : learn what it is, why it is an extremely powerful concept, and how easy it is to write readable tests using the Quick and Nimble frameworks.
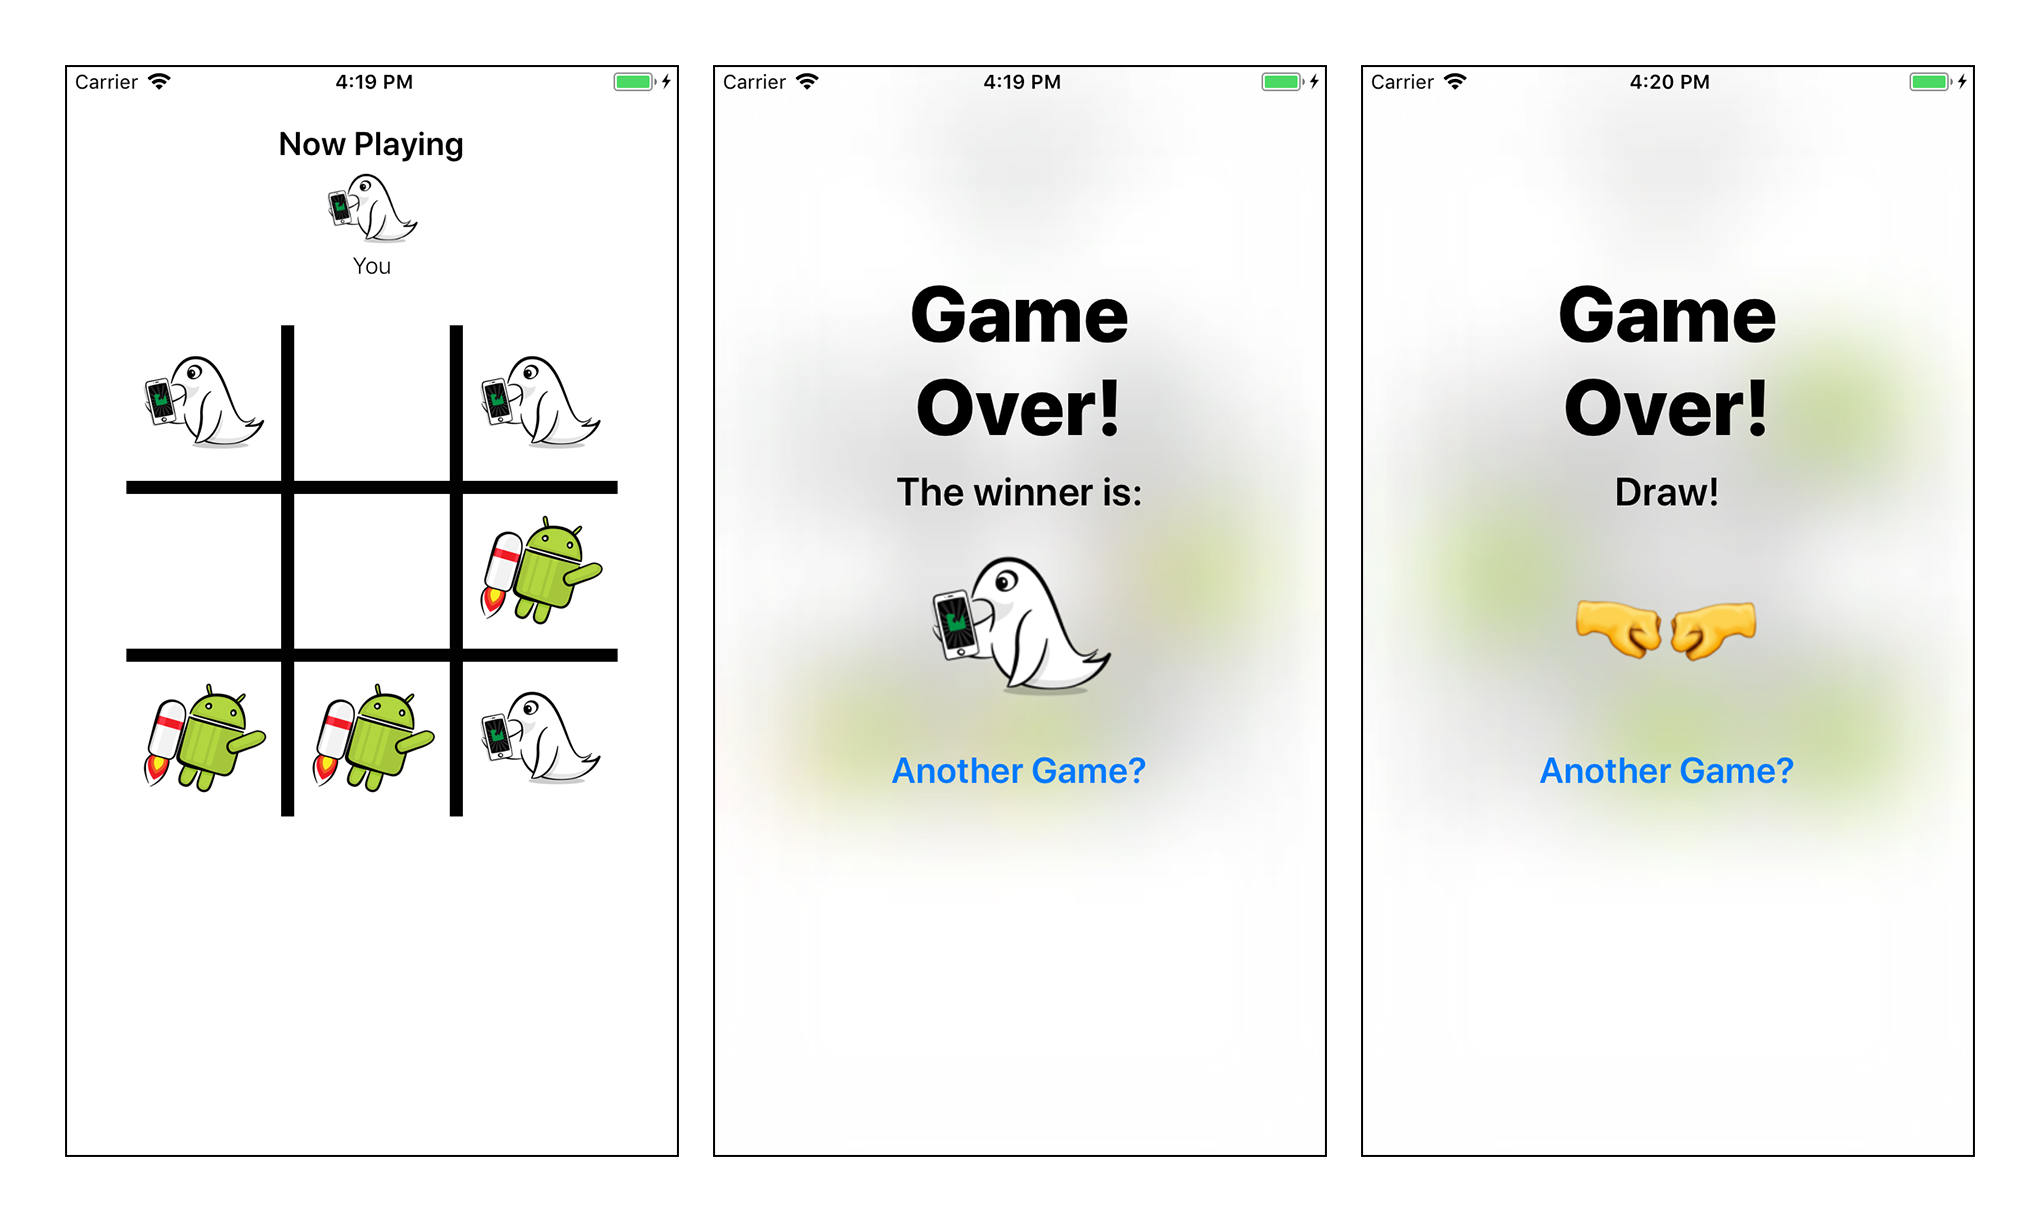
You will write tests for an amazingly simple and funny game called AppTacToein which you play a Tic Tac Toe game against a computer, portraying an iOS character playing against an evil Android player!
Note: For a better understanding of this article, it is assumed that you have basic knowledge of Unit Testing and the use of XCTestCase.
Despite the fact that you can continue reading this article without having this knowledge, it is still recommended to read the iOS Unit Testing and UI Testing Tutorial article to repeat the previously learned basics.
The best way to start writing tests is to work on a real application, which in your case will be the AppTacToe game presented earlier.
Download the starter project , which contains everything you need to work, it already contains Quick and Nimble. After downloading, open AppTacToe.xcworkspace .
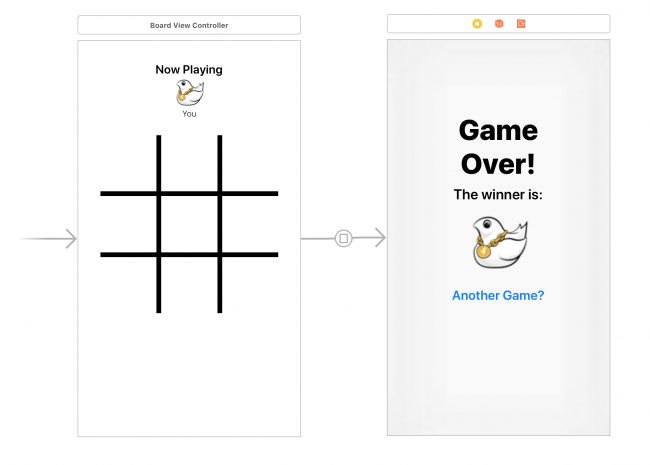
Open Main.storyboard and learn the basic structure of the application. It consists of two screens: Board , in which the game itself takes place, and the “ Game Over screen ” screen , which is responsible for displaying the result of the game.
Compile and run the applications and play one or two quick games to get to know the game.
You will also see useful logging, which is displayed in the console, duplicating the course of the game and displaying the final board after the game is completed.
Note: Do not worry if you notice minor errors during the game; You will correct them while you are working on this article!
Most of the business logic of the application is contained in one of two files:
Components / Board.swift : This file provides the logical implementation of the Tic Tac Toe game. It does not have any UI elements associated with this game.
ViewControllers / BoardViewController.swift : This is the main game screen. It uses the above board class.for the game and is responsible for displaying the state of the game on the device screen and processing user interaction.
What you really need to test in this case is the business logic of the game, so you will write tests for the Board class .
An application consists of many pieces of code. In traditional unit tests, you test every possible element of each of these parts. You provide some data for a certain piece of code and claim that it returns the expected result.
The disadvantage of this approach is that it emphasizes the need to verify the internal operation of the application. This means that you spend more time testing the implementation details, and then on the actual business logic, which is the real meat of your product!
It would be nice if you could just confirm that the application behaves as expected, regardless of how it was implemented.
Let's get acquainted with behavior-driven testing!
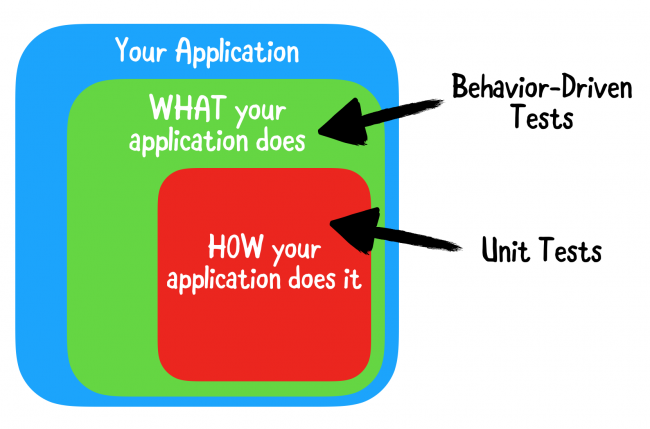
With behavior-driven testing (or BDT ), your tests are based on user stories that describe some specific expected actions of the application. Instead of checking implementation details, you are actually checking what matters most: is the application running user stories correctly?
This approach makes the tests extremely readable and maintainable, and also helps to describe the behavior of the logical parts in the application to other developers who one day have a chance to understand your code.
Here are some examples of user stories that you could write as part of an AppTacToe game:
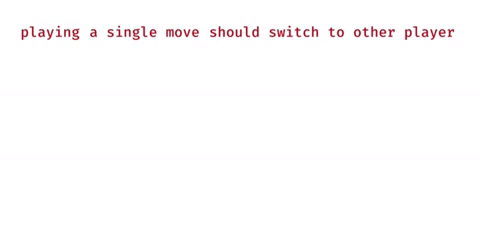
Performing a single-player action switches to another player.
Performing two game actions should switch back to the first player.
Performing a winning move should put the game in a Victory state.
Performing a move, after which there are no more moves, puts the game in a Draw state.
Tests are written based on a way to control behavior and user stories are simple sentences in English. This greatly facilitates their understanding compared to the usual Unit tests that you are used to writing.
Quick and Nimble provide an extremely powerful syntax that allows you to write tests that read exactly like regular sentences, allowing you to easily and quickly describe the behavior you want to test. Internally, they work just like regular XCTestCase (s).
Quick provides most of the basic syntax and features associated with writing behavior-driven tests, while Nimble is its companion framework. It provides additional expressive matching and statement capabilities through Matchers, which you'll learn about later in this article.
Break one of the user stories into three articles based on GWT - Given (action / behavior that you describe), When (context of this action / behavior) and Then (what you expect to see):
Given / Given: The user is playing.
When / When: This is one move.
Then: The move must be transferred to another player.
In Quick, you use three functions: describe, context, and it.
Quick test suites are called Specs, and each superset you create should inherit from QuickSpec, in the same way that you inherit from XCTestCase in tests. The test suite includes the main spec () method, which will contain all of your test cases.
The starter project already contains an empty test suite. Open the AppTacToeTests / BoardSpec.swift file and look at the BoardSpec test suite that inherits from QuickSpec and contains the only spec () method in which you will work.
Note: When you open the BoardSpec.swift file, you will see the No such module 'Quick' or 'Nimble' error message. Do not worry, as this is just a bug in Xcode, not related to the project. Your code will compile and work without any problems.
Start by adding the following code inside the spec () method :
This code performs two actions:
With a specific basic template, you can start writing the first test!
As conceived by this application, the game always starts with Cross (that is, either this or that., X), and the opponent is Naught (that is, O).
Let's start with the first user story mentioned above: After completing the first move, the second player must make the next move.
Add the following code immediately after the beforeEach closure :
Here is what this code does:
Note: You may have noticed a forced try call and an implicitly unwrapped optional for defining test global variables. Although this option is usually not approved when writing code in the application itself, it is a fairly common practice when writing tests.
Run the test by going to the menu bar Product ▸ Test or with a keyboard shortcut the Command + the U .
So, you will see the execution of your first test. Awesome!
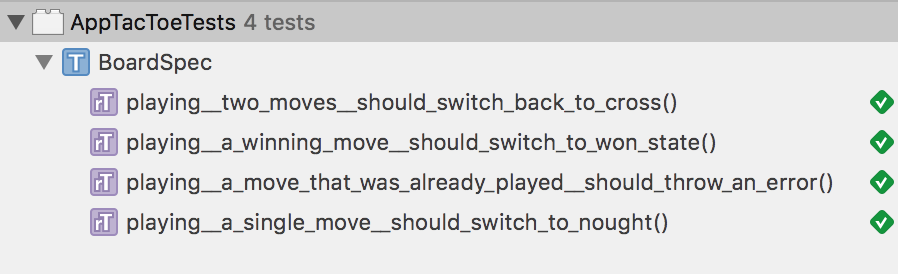
After running the test, the Test navigator tab should look like this:

You already noticed some interesting points by looking at the code. First of all, this is extremely readable code. After reviewing the test code, anyone can read it relatively easily, as a simple sentence in English:
Performing a single move switches to the second player.
At this point, you are introduced to the simple use of Nimble Matchers. Nimble uses these mappings so that you can get the expected test result in a very fast way, like simple sentences. equal () is just one of the mapping functions that is available in Nimble. You can even create your own functions.
The second user story - “After the second move should switch back to the first player” - sounds pretty much like a user story.
Add the following code immediately after the end of the previous context () method , inside the describe () curly brace :
This test is similar to the previous one, but differs only in that you make two moves instead of one.
Here is what the test does:
The tests you just wrote were relatively simple and straightforward. You make a single call on an empty board and approve the expected result. Usually, most scenarios are more complex, which requires a bit of extra work.
The following two user stories will be more difficult:
Performing a winning move should switch to Victory state.
Exiting the game does not produce any actions, but only transitions to the state of completion of the game.
In both of these user stories, you need to take some steps on the game board so that you can check its status, your statement.
These tests are usually divided into three stages: Arrange, Act and Assert .
Before you plan your tests, you need to understand how the Tic Tac Toe platform is implemented .
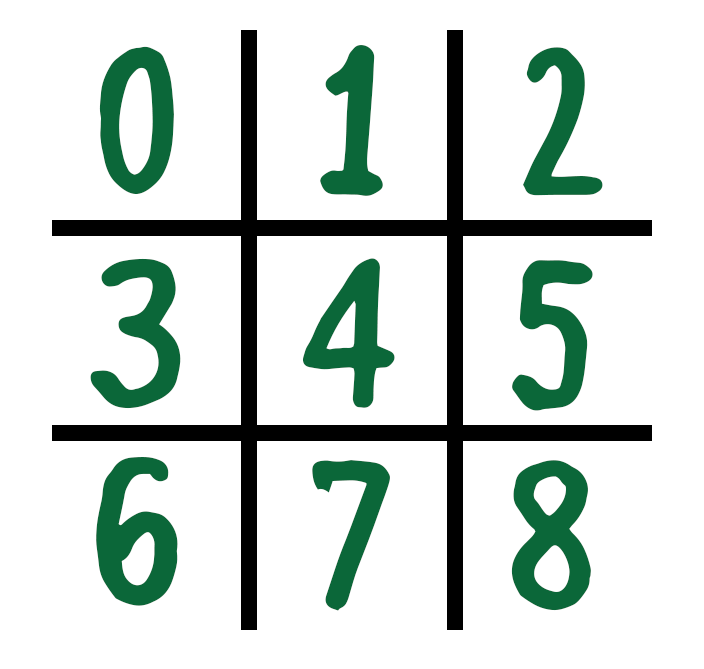
Board is modeled as an Array, consisting of 9 cells addressed using indices from 0 to 8.
At each step, the player performs one move. To write a test to simulate a user's victory, you will need to bring the Board to a state where the next move is winning.
Now that you understand how Board works, it's time to write this test.
Add the following code below your previous “two moves” context () :
Here's what this code implements:
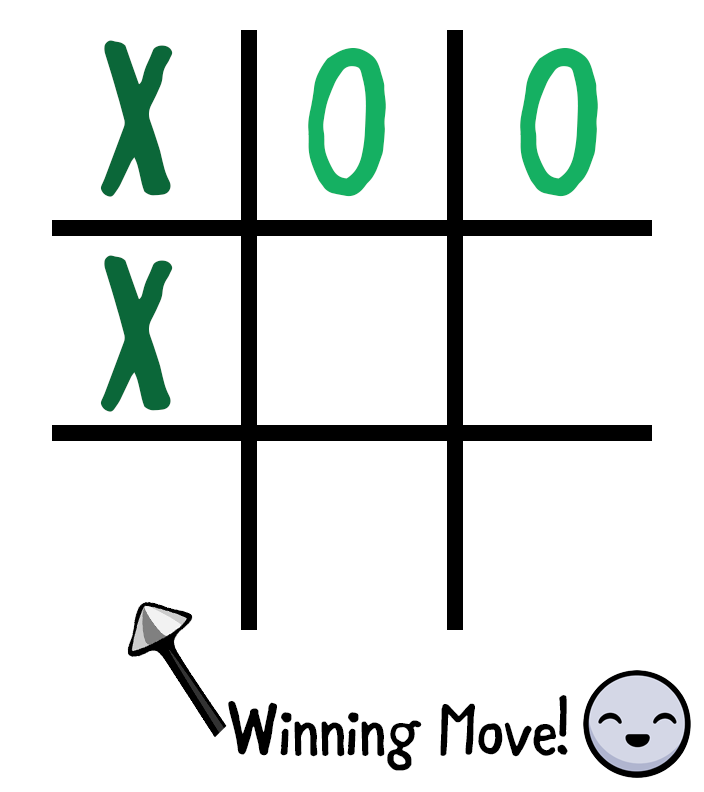
Arrange: You organize the Board to prepare it to the point where the next move will be winning. You do this by completing the moves of both players in turn; starting with X at point 0, at point 1, X at 3, and finally at 2.
Act: You move Cross (X) to position 6. In the current Board state, this move should lead to a winning state.
Assert: You indicate that the game will win a cross (X), and the Board and will go into Win (.won (.cross))
Run the test again, use the key combination the Command + the U .

Something is wrong; You took all the right steps, but the test failed unexpectedly.
Add the following code directly below the expect () line to see the error:
By displaying the Board immediately after the Assert block , you will receive a detailed explanation of this situation:
As you can see, Board should be in Victory state, but the test still does not work. Looks like you found a mistake.
Go to the Project navigator tab and open Board.swift . Go to the computed isGameWon property on line 120.
The code in this section checks all possible winning positions for rows, columns, and diagonals. But looking at the columns, the code seems to have only 2 columns checked, and in fact one of the winning options is missing. Oops!
Add the following line of code directly below the // Columns comment :
Run the tests again and enjoy the three green markers!

Such a scenario will be much more difficult to detect with conventional Unit tests. Since you are using behavior-based testing, you have actually tested a specific use case for the application and found a bug. A fix for the core implementation fixed the behavior tested, resolving the issue your user story was experiencing.
Note: When working on one specific test or a specific test context, you may not want to run all of your tests at once so that you can focus specifically on one test.
Fortunately, Quick provides a very easy way to do this. Just add f (stands for focus) before any of the names of the test functions - having it (), context () and describe () become fit (), fcontext () and fdescribe ()
For example, after replacing it (“should switch to won state ”) on fit (“ should switch to won state ”), only this particular test will be run, skipping the rest of the test suite. Just remember to remove it after you are done, otherwise only part of your tests will work!
Time to call. You have one final user story that you have not tested yet: Performing a move, after which there are no more moves, puts the game in a Draw state.
Using the previous examples, write a test to verify the correct definition of the Board.
Note: To achieve the output status, you can play the following items in sequence: 0, 2, 1, 3, 4, 8, 6, 7 .
In this state, game position 5 should cause your Board to be in a draw state.
Also, using the .draw method can confuse Xcode . If so, use the full expression: Board.State.draw .
If you were unable to dig this task, here is the solution:
All the tests that you have written so far have one thing in common: they describe the correct behavior of your application, following the happy path . You have confirmed that when a player plays the correct moves, the game behaves correctly. But what about a not-so-happy journey?
When writing tests, you should not forget about the concept of expected errors. You, as a developer, should be able to confirm the correct behavior of the Board even if your player does not behave correctly (for example, makes an unauthorized move).
Consider the last two user stories of this tutorial:
making a move that has already been made should cause an error.
making a move after the game is won should cause an error.
Nimble provides a convenient resolver called throwError () , which you can use to test this behavior.
Start by verifying that the already played move cannot be played again.
Add the following code right below the last context () that you added, but still inside the describe ("playing") block :
Here is what this code executes:
As you expected from Quick tests, the statement reads in the same way as the English sentence: expect playing the board to throw error - already played (it is expected that a further game will cause an “already played” error).
Run the test suite again by going to Product ▸ Test or use the keyboard shortcut the Command + the U .
The last user story that you are going to study today will be: Making a move after the game is won should cause an error.
This test should be relatively similar to the previous Arrange, Act and Assert tests : you need to bring the board into a winning state, and then try to play another step while the board is in this state.
Add the following code right below the lastcontext () that you added for the previous test:
Based on the knowledge you gained in this lesson, you should feel at home while working with this test!
You bring the board to the Win state (.won (.cross)) by playing 5 steps ... Then you Act and Assert , trying to play a move while the board is already in the Win state and waiting for Board.PlayError.noGame to display .
Run your test suite again and pat yourself on the back after completing all of these tests!
When writing the tests in this article, you already used several mappings built into Nimble: equal () (and its == overload operator), and .throwError () .
Sometimes you want to create your own mappings to encapsulate some complex form of mappings or increase the readability of some of your existing tests.
Think about how to improve the readability of the user story “the winning move should switch the state to Win” mentioned earlier:
expect (board.state) == .won (.cross) Rephrase
this code as an English sentence: expect board to be won by cross (it is expected that the board will win the Cross (x)) . Then the test will look like this:
expect (board) .to (beWon (by: .cross)) Compilers
in Nimble are nothing more than simple functions returning a Predicate, where generic T is the type you are comparing with. In your case, T will be of type Board.
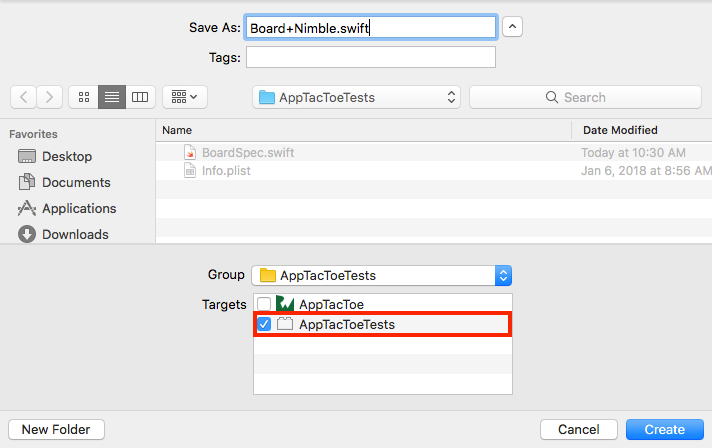
In the project navigator, right-click the AppTacToeTests folder and select New File. Select Swift File and click Next . Name your file Board + Nimble.swift . Make sure you correctly set the file as a member of your AppTacToeTests target :
Replace the standard import Foundation with the following three imports:
This code imports Quick and Nimble and also imports your main target, so you can use Board in your mapping.
As mentioned earlier, Matcher is a simple function that returns a Predicate of type Board.
Add the main part of the mapping at the bottom of the import:
This code defines the beWon (by :) mapping that Predicate returns, so it maps correctly to Board.
Inside your function, you return a new Predicate instance, passing it a closure with a single argument - expression - which is the value or expression with which you are comparing. A closure should return a PredicateResult.
At this point, you will see a compilation error because the result has not yet been returned. This will be fixed later.
To create a PredicateResult , you have to consider the following cases:
How beWon (by :) mapping works
Add the following code inside the Predicate closure, replacing the comment, // Error !:
At first, this predicative implementation may seem confusing, but it's pretty simple if you follow it step by step:
This is it! Open BoardSpec.swift and replace the following line:
using the new mapping:
Run the tests again by going to Product ▸ Test or using the keyboard shortcut Command + U. You should see that all your tests still pass, but this time with the new Matcher!
You now have the knowledge you need to write behavior-oriented tests in the application.
You learned all about testing user stories , instead of testing implementation details, and how Quick helps achieve this. You also learned about Nimble mappings and even wrote your own mappings. Wow!
To get started with Quick and Nimble in your own project, start with the installation guide and choose the installation method that is appropriate for your project.
When you're all set up and want to learn more about Quick, click on the link called Quick's official documentation. Also read Readme Nimble for a wealth of mappings and features available.
Writing great, healthy applications is one thing, but writing good tests that confirm the expected behavior of your application is a lot harder. In this article, we will look at one of the available application testing approaches, behavior-driven testing, using two extremely popular frameworks called Quick and Nimble .
You will learn about behavior-driven testing : learn what it is, why it is an extremely powerful concept, and how easy it is to write readable tests using the Quick and Nimble frameworks.
You will write tests for an amazingly simple and funny game called AppTacToein which you play a Tic Tac Toe game against a computer, portraying an iOS character playing against an evil Android player!
Note: For a better understanding of this article, it is assumed that you have basic knowledge of Unit Testing and the use of XCTestCase.
Despite the fact that you can continue reading this article without having this knowledge, it is still recommended to read the iOS Unit Testing and UI Testing Tutorial article to repeat the previously learned basics.
Start
The best way to start writing tests is to work on a real application, which in your case will be the AppTacToe game presented earlier.
Download the starter project , which contains everything you need to work, it already contains Quick and Nimble. After downloading, open AppTacToe.xcworkspace .
Open Main.storyboard and learn the basic structure of the application. It consists of two screens: Board , in which the game itself takes place, and the “ Game Over screen ” screen , which is responsible for displaying the result of the game.
Compile and run the applications and play one or two quick games to get to know the game.
You will also see useful logging, which is displayed in the console, duplicating the course of the game and displaying the final board after the game is completed.
Note: Do not worry if you notice minor errors during the game; You will correct them while you are working on this article!
Most of the business logic of the application is contained in one of two files:
Components / Board.swift : This file provides the logical implementation of the Tic Tac Toe game. It does not have any UI elements associated with this game.
ViewControllers / BoardViewController.swift : This is the main game screen. It uses the above board class.for the game and is responsible for displaying the state of the game on the device screen and processing user interaction.
What you really need to test in this case is the business logic of the game, so you will write tests for the Board class .
What is Behavior-Driven Testing?
An application consists of many pieces of code. In traditional unit tests, you test every possible element of each of these parts. You provide some data for a certain piece of code and claim that it returns the expected result.
The disadvantage of this approach is that it emphasizes the need to verify the internal operation of the application. This means that you spend more time testing the implementation details, and then on the actual business logic, which is the real meat of your product!
It would be nice if you could just confirm that the application behaves as expected, regardless of how it was implemented.
Let's get acquainted with behavior-driven testing!
With behavior-driven testing (or BDT ), your tests are based on user stories that describe some specific expected actions of the application. Instead of checking implementation details, you are actually checking what matters most: is the application running user stories correctly?
This approach makes the tests extremely readable and maintainable, and also helps to describe the behavior of the logical parts in the application to other developers who one day have a chance to understand your code.
Here are some examples of user stories that you could write as part of an AppTacToe game:
Performing a single-player action switches to another player.
Performing two game actions should switch back to the first player.
Performing a winning move should put the game in a Victory state.
Performing a move, after which there are no more moves, puts the game in a Draw state.
The role of Quick and Nimble in Behavior-Driven Testing
Tests are written based on a way to control behavior and user stories are simple sentences in English. This greatly facilitates their understanding compared to the usual Unit tests that you are used to writing.
Quick and Nimble provide an extremely powerful syntax that allows you to write tests that read exactly like regular sentences, allowing you to easily and quickly describe the behavior you want to test. Internally, they work just like regular XCTestCase (s).
Quick provides most of the basic syntax and features associated with writing behavior-driven tests, while Nimble is its companion framework. It provides additional expressive matching and statement capabilities through Matchers, which you'll learn about later in this article.
Anatomy quick test
Break one of the user stories into three articles based on GWT - Given (action / behavior that you describe), When (context of this action / behavior) and Then (what you expect to see):
Given / Given: The user is playing.
When / When: This is one move.
Then: The move must be transferred to another player.
In Quick, you use three functions: describe, context, and it.
Writing the first test
Quick test suites are called Specs, and each superset you create should inherit from QuickSpec, in the same way that you inherit from XCTestCase in tests. The test suite includes the main spec () method, which will contain all of your test cases.
The starter project already contains an empty test suite. Open the AppTacToeTests / BoardSpec.swift file and look at the BoardSpec test suite that inherits from QuickSpec and contains the only spec () method in which you will work.
Note: When you open the BoardSpec.swift file, you will see the No such module 'Quick' or 'Nimble' error message. Do not worry, as this is just a bug in Xcode, not related to the project. Your code will compile and work without any problems.
Start by adding the following code inside the spec () method :
var board: Board!// 1
beforeEach { // 2
  board = Board()
}
This code performs two actions:
- Defines the global variable board that will be used in tests.
- We set the board variable to a new instance of the Board before each test, using the beforeEach closure with Quick's.
With a specific basic template, you can start writing the first test!
As conceived by this application, the game always starts with Cross (that is, either this or that., X), and the opponent is Naught (that is, O).
Let's start with the first user story mentioned above: After completing the first move, the second player must make the next move.
Add the following code immediately after the beforeEach closure :
describe("playing") { // 1
  context("a single move") { // 2
    it("should switch to nought") { // 3try! board.playRandom() // 4
      expect(board.state).to(equal(.playing(.nought))) // 5
    }
  }
}
Here is what this code does:
- describe () is used to determine what actions or behavior you will test.
- context () is used to determine the specific context of the action you will be testing.
- it () is used to determine the specific expected result for the test.
- You do a random move using the playRandom () method in the Board class.
- You claim that the state of the Board is changed to .playing (.nought) . At this stage, the equal () method from Nimble is used, which is one of many available functions that can be used to assert that specific conditions meet the expected value.
Note: You may have noticed a forced try call and an implicitly unwrapped optional for defining test global variables. Although this option is usually not approved when writing code in the application itself, it is a fairly common practice when writing tests.
Run the test by going to the menu bar Product ▸ Test or with a keyboard shortcut the Command + the U .
So, you will see the execution of your first test. Awesome!
After running the test, the Test navigator tab should look like this:
You already noticed some interesting points by looking at the code. First of all, this is extremely readable code. After reviewing the test code, anyone can read it relatively easily, as a simple sentence in English:
Performing a single move switches to the second player.
At this point, you are introduced to the simple use of Nimble Matchers. Nimble uses these mappings so that you can get the expected test result in a very fast way, like simple sentences. equal () is just one of the mapping functions that is available in Nimble. You can even create your own functions.
Next test
The second user story - “After the second move should switch back to the first player” - sounds pretty much like a user story.
Add the following code immediately after the end of the previous context () method , inside the describe () curly brace :
context("two moves") { // 1
  it("should switch back to cross") {
    try! board.playRandom() // 2try! board.playRandom()
    expect(board.state) == .playing(.cross) // 3
  }
}
This test is similar to the previous one, but differs only in that you make two moves instead of one.
Here is what the test does:
- You define a new describe () to create a two-move context. You can have any number of describe () and context () blocks , and they can even be contained within each other. Since you are still testing the gameplay, you have added context inside describe ("playing").
- You commit for consistent moves.
- You state that the state of the board is .playing (.cross) now . Note that this time you used the regular equality operator ==, instead of the .to (equal ()) syntax that you used earlier. Mapping Nimble's equal () provides its own overloaded operators, which you can choose to your taste.
Arrange, Act & Assert
The tests you just wrote were relatively simple and straightforward. You make a single call on an empty board and approve the expected result. Usually, most scenarios are more complex, which requires a bit of extra work.
The following two user stories will be more difficult:
Performing a winning move should switch to Victory state.
Exiting the game does not produce any actions, but only transitions to the state of completion of the game.
In both of these user stories, you need to take some steps on the game board so that you can check its status, your statement.
These tests are usually divided into three stages: Arrange, Act and Assert .
Before you plan your tests, you need to understand how the Tic Tac Toe platform is implemented .
Board is modeled as an Array, consisting of 9 cells addressed using indices from 0 to 8.
At each step, the player performs one move. To write a test to simulate a user's victory, you will need to bring the Board to a state where the next move is winning.
Now that you understand how Board works, it's time to write this test.
Add the following code below your previous “two moves” context () :
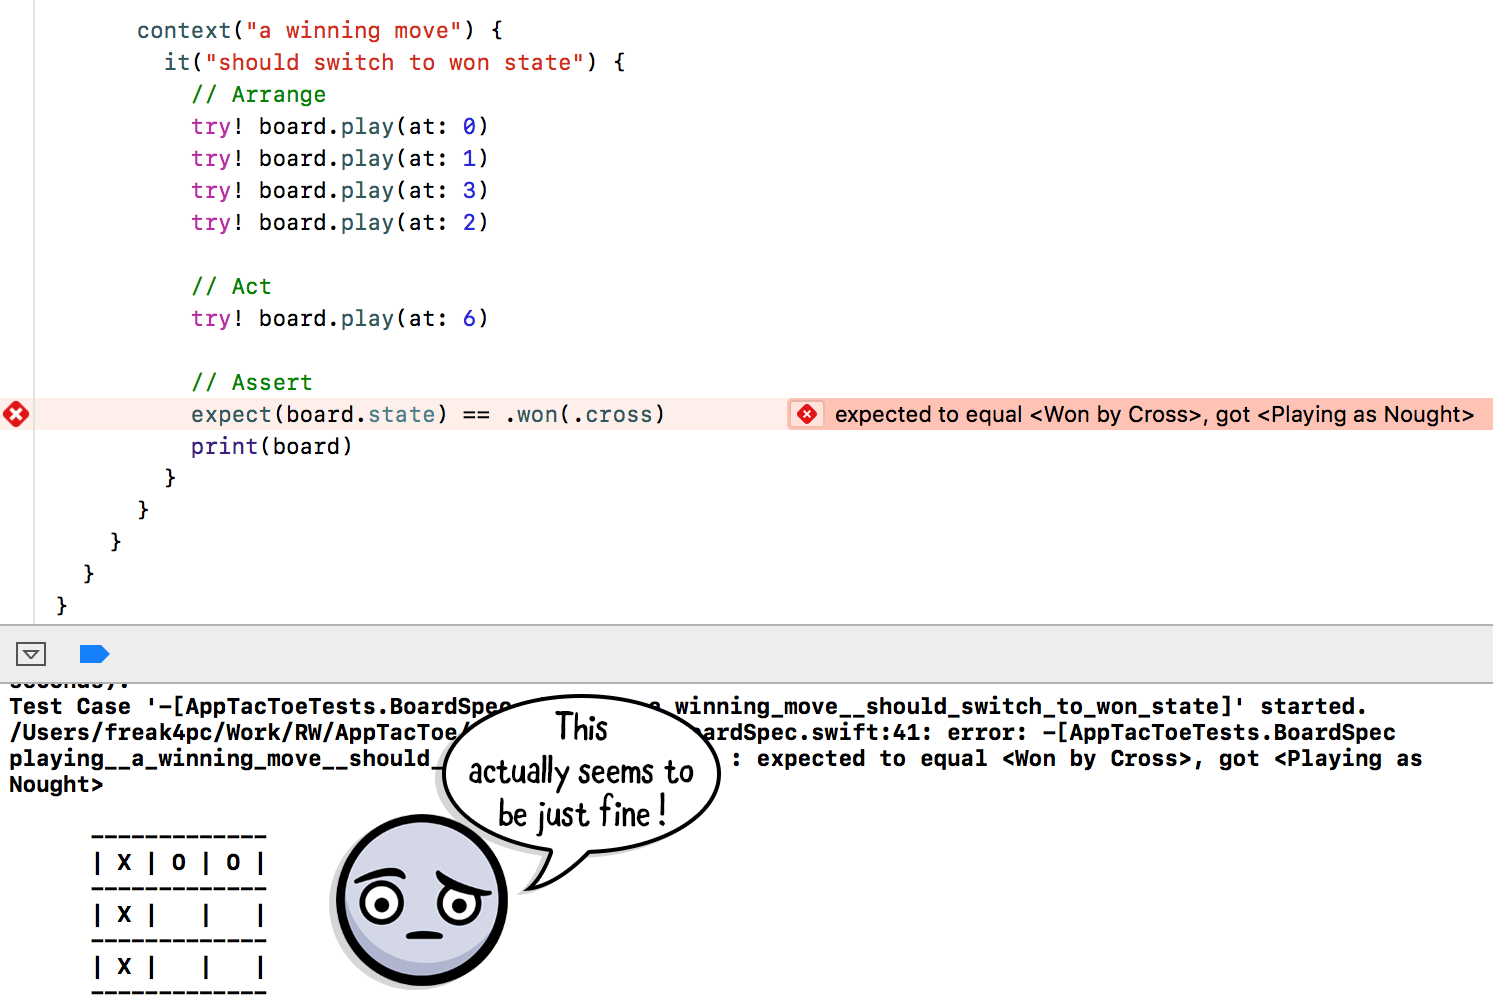
context("a winning move") {
  it("should switch to won state") {
    // Arrangetry! board.play(at: 0)
    try! board.play(at: 1)
    try! board.play(at: 3)
    try! board.play(at: 2)
    // Acttry! board.play(at: 6)
    // Assertexpect(board.state) == .won(.cross)
  }
}
Here's what this code implements:
Arrange: You organize the Board to prepare it to the point where the next move will be winning. You do this by completing the moves of both players in turn; starting with X at point 0, at point 1, X at 3, and finally at 2.
Act: You move Cross (X) to position 6. In the current Board state, this move should lead to a winning state.
Assert: You indicate that the game will win a cross (X), and the Board and will go into Win (.won (.cross))
Run the test again, use the key combination the Command + the U .
Something is wrong; You took all the right steps, but the test failed unexpectedly.
Add the following code directly below the expect () line to see the error:
print(board)
By displaying the Board immediately after the Assert block , you will receive a detailed explanation of this situation:
As you can see, Board should be in Victory state, but the test still does not work. Looks like you found a mistake.
Go to the Project navigator tab and open Board.swift . Go to the computed isGameWon property on line 120.
The code in this section checks all possible winning positions for rows, columns, and diagonals. But looking at the columns, the code seems to have only 2 columns checked, and in fact one of the winning options is missing. Oops!
Add the following line of code directly below the // Columns comment :
[0, 3, 6],Run the tests again and enjoy the three green markers!
Such a scenario will be much more difficult to detect with conventional Unit tests. Since you are using behavior-based testing, you have actually tested a specific use case for the application and found a bug. A fix for the core implementation fixed the behavior tested, resolving the issue your user story was experiencing.
Note: When working on one specific test or a specific test context, you may not want to run all of your tests at once so that you can focus specifically on one test.
Fortunately, Quick provides a very easy way to do this. Just add f (stands for focus) before any of the names of the test functions - having it (), context () and describe () become fit (), fcontext () and fdescribe ()
For example, after replacing it (“should switch to won state ”) on fit (“ should switch to won state ”), only this particular test will be run, skipping the rest of the test suite. Just remember to remove it after you are done, otherwise only part of your tests will work!
Little exercise
Time to call. You have one final user story that you have not tested yet: Performing a move, after which there are no more moves, puts the game in a Draw state.
Using the previous examples, write a test to verify the correct definition of the Board.
Note: To achieve the output status, you can play the following items in sequence: 0, 2, 1, 3, 4, 8, 6, 7 .
In this state, game position 5 should cause your Board to be in a draw state.
Also, using the .draw method can confuse Xcode . If so, use the full expression: Board.State.draw .
If you were unable to dig this task, here is the solution:
context("a move leaving no remaining moves") {
  it("should switch to draw state") {
    // Arrangetry! board.play(at: 0)
    try! board.play(at: 2)
    try! board.play(at: 1)
    try! board.play(at: 3)
    try! board.play(at: 4)
    try! board.play(at: 8)
    try! board.play(at: 6)
    try! board.play(at: 7)
    // Acttry! board.play(at: 5)
    // Assertexpect(board.state) == Board.State.draw
  }
}
Happy Way is not the only way
All the tests that you have written so far have one thing in common: they describe the correct behavior of your application, following the happy path . You have confirmed that when a player plays the correct moves, the game behaves correctly. But what about a not-so-happy journey?
When writing tests, you should not forget about the concept of expected errors. You, as a developer, should be able to confirm the correct behavior of the Board even if your player does not behave correctly (for example, makes an unauthorized move).
Consider the last two user stories of this tutorial:
making a move that has already been made should cause an error.
making a move after the game is won should cause an error.
Nimble provides a convenient resolver called throwError () , which you can use to test this behavior.
Start by verifying that the already played move cannot be played again.
Add the following code right below the last context () that you added, but still inside the describe ("playing") block :
context("a move that was already played") {
  it("should throw an error") {
    try! board.play(at: 0) // 1// 2expect { try board.play(at: 0) }
      .to(throwError(Board.PlayError.alreadyPlayed))
  }
}
Here is what this code executes:
- You move to position 0.
- You play the move at the same position and expect it to throw Board.PlayerError.alreadyPlayed . When you state that the error is displayed, expect accepts a closure in which you can run the code that causes the error.
As you expected from Quick tests, the statement reads in the same way as the English sentence: expect playing the board to throw error - already played (it is expected that a further game will cause an “already played” error).
Run the test suite again by going to Product ▸ Test or use the keyboard shortcut the Command + the U .
The last user story that you are going to study today will be: Making a move after the game is won should cause an error.
This test should be relatively similar to the previous Arrange, Act and Assert tests : you need to bring the board into a winning state, and then try to play another step while the board is in this state.
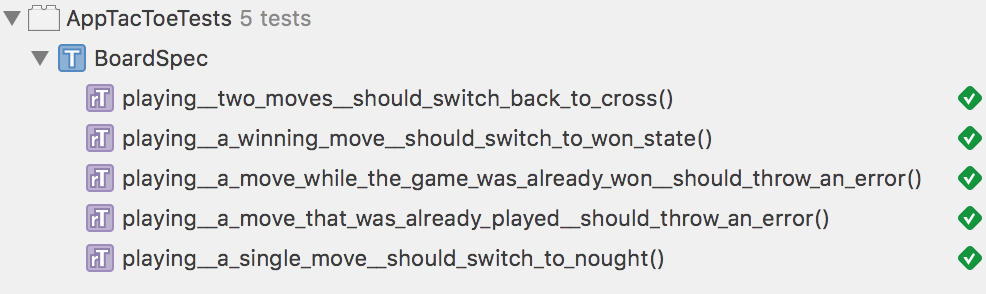
Add the following code right below the lastcontext () that you added for the previous test:
context("a move while the game was already won") {
  it("should throw an error") {
    // Arrangetry! board.play(at: 0)
    try! board.play(at: 1)
    try! board.play(at: 3)
    try! board.play(at: 2)
    try! board.play(at: 6)
    // Act & Assertexpect { try board.play(at: 7) }
      .to(throwError(Board.PlayError.noGame))
  }
}
Based on the knowledge you gained in this lesson, you should feel at home while working with this test!
You bring the board to the Win state (.won (.cross)) by playing 5 steps ... Then you Act and Assert , trying to play a move while the board is already in the Win state and waiting for Board.PlayError.noGame to display .
Run your test suite again and pat yourself on the back after completing all of these tests!
User mappings
When writing the tests in this article, you already used several mappings built into Nimble: equal () (and its == overload operator), and .throwError () .
Sometimes you want to create your own mappings to encapsulate some complex form of mappings or increase the readability of some of your existing tests.
Think about how to improve the readability of the user story “the winning move should switch the state to Win” mentioned earlier:
expect (board.state) == .won (.cross) Rephrase
this code as an English sentence: expect board to be won by cross (it is expected that the board will win the Cross (x)) . Then the test will look like this:
expect (board) .to (beWon (by: .cross)) Compilers
in Nimble are nothing more than simple functions returning a Predicate, where generic T is the type you are comparing with. In your case, T will be of type Board.
In the project navigator, right-click the AppTacToeTests folder and select New File. Select Swift File and click Next . Name your file Board + Nimble.swift . Make sure you correctly set the file as a member of your AppTacToeTests target :
Replace the standard import Foundation with the following three imports:
import Quick
import Nimble
@testableimport AppTacToe
This code imports Quick and Nimble and also imports your main target, so you can use Board in your mapping.
As mentioned earlier, Matcher is a simple function that returns a Predicate of type Board.
Add the main part of the mapping at the bottom of the import:
funcbeWon(by: Board.Mark) -> Predicate<Board> {
  returnPredicate { expression in// Error! ...your custom predicate implementation goes here
  }
}
This code defines the beWon (by :) mapping that Predicate returns, so it maps correctly to Board.
Inside your function, you return a new Predicate instance, passing it a closure with a single argument - expression - which is the value or expression with which you are comparing. A closure should return a PredicateResult.
At this point, you will see a compilation error because the result has not yet been returned. This will be fixed later.
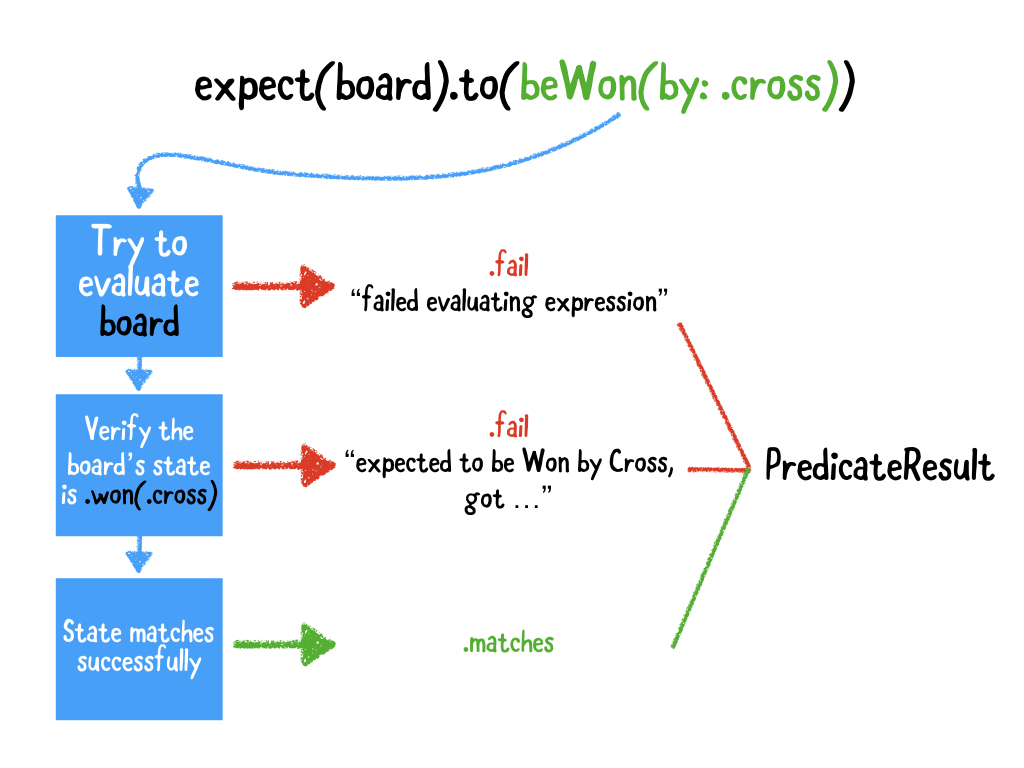
To create a PredicateResult , you have to consider the following cases:
How beWon (by :) mapping works
Add the following code inside the Predicate closure, replacing the comment, // Error !:
// 1
guard let board = try expression.evaluate() else {
  return PredicateResult(status: .fail,
                         message: .fail("failed evaluating expression"))
}
// 2
guard board.state == .won(by) else {
  return PredicateResult(status: .fail,
                         message: .expectedCustomValueTo("be Won by \(by)", "\(board.state)"))
}
// 3return PredicateResult(status: .matches,
                       message: .expectedTo("expectation fulfilled"))
At first, this predicative implementation may seem confusing, but it's pretty simple if you follow it step by step:
- You are trying to evaluate the expression passed to expect () . In this case, the expression is the board itself. If the evaluation fails, you return a failed PredicateResult with the appropriate message.
- You confirm that the state of board is .won (by) , where by is the argument passed to the Matcher function. If the state does not match, you return a PredicateResult error with the message .expectedCustomValueTo .
- Finally, if everything looks good and verified, you return a successful PredicateResult .
This is it! Open BoardSpec.swift and replace the following line:
expect(board.state) == .won(.cross)using the new mapping:
expect(board).to(beWon(by: .cross))
Run the tests again by going to Product ▸ Test or using the keyboard shortcut Command + U. You should see that all your tests still pass, but this time with the new Matcher!
What next?
You now have the knowledge you need to write behavior-oriented tests in the application.
You learned all about testing user stories , instead of testing implementation details, and how Quick helps achieve this. You also learned about Nimble mappings and even wrote your own mappings. Wow!
To get started with Quick and Nimble in your own project, start with the installation guide and choose the installation method that is appropriate for your project.
When you're all set up and want to learn more about Quick, click on the link called Quick's official documentation. Also read Readme Nimble for a wealth of mappings and features available.