Integration of dovecot and Apache Solr
- Tutorial
Good afternoon.
Today, mail is still one of the key means of messaging in the corporate segment. The volume of stored mail only grows and over time takes up hundreds of gigabytes, or even several terabytes. At this point, users in most cases begin to experience problems during the operation of mail, for example, with search. If you use a Web client, for example, the same RoundCube, then when searching through all messages in all folders and even by the contents of the letter itself, very often the result had to wait tens of seconds, which is not very pleasant. Therefore, I thought that it would be time to configure the FTS plugin in dovecot.
For most serious and experienced administrators, setting up a dovecot - solr bundle is not a big problem, but if this is your first encounter, setting up an acceptable search result may take some time. I'll try to simplify the setup for those who are faced with this for the first time.
So, initially we have the following initial data:
Now let's get down to the settings.
The version of this application should be higher than 2.2.19. This is due to the fact that it fixed a bug in the fts-solr plugin, which led to incorrect query generation, the result was always 404. The application should also be built with support for the fts and fts-solr plugin. No matter how strange it may sound, but when executed:
Dovecot with fts and fts-solr support cannot be found out. Regardless of the build parameters, these plugins do not appear there. In order to make sure that the plugins are there and work, we will run this command:
The result for me looks like this:
If your result is similar to mine, then everything is fine, you can begin to configure.
To do this, in the /etc/dovecot/conf.d directory in the 10-mail.conf file, add our plugins to the mail_plugins variable at the end, it looks like this for me:
Then open the 90-fts.conf file and bring it to the form:
If you do not have a 90-fts.conf file, you can create it with the contents indicated above. This completes the dovecot setup. Unforgettable restart dovecot. We pass to Solr.
Everything here is also quite simple. Therefore, immediately get down to business.
Since Solr is written in Java, you need to install openjdk:
First, download the Apache Solr distribution, at the time of writing, the current version is 7.2.1.
Unpack the installer file from the archive:
And install Solr:
As a result, the output of the installation will be like this:
Here you can see that Solr was successfully installed, as well as some installation data. Solr has a web interface that will be available on port 8983, there you can observe statistics, errors and some other things. Now let's configure it.
The first thing that you want to do is move the data directory, as it will grow very quickly (it all depends on the amount of data that needs to be indexed) and it is desirable that there is a lot of space. I don’t have much space in the / var directory, so we’ll fix it.
I create a directory for solr:
It will store all the data. Now open the file /etc/default/solr.in.sh and fix some settings in it:
Regarding the RAM, that would be understood, my Solr looks like this:
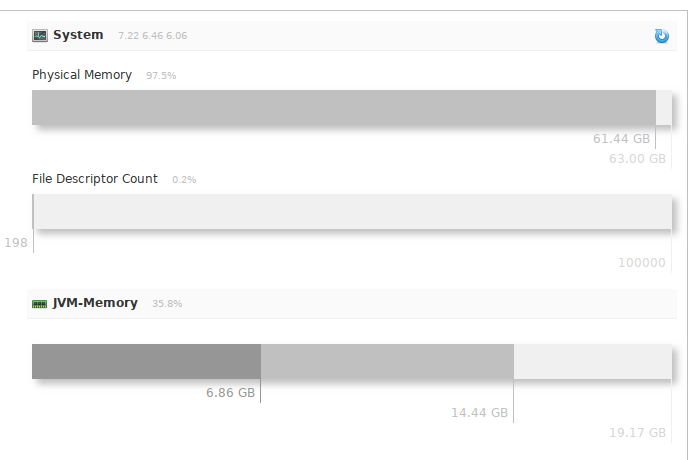
i.e. I was not mistaken with tokens in the settings, he eats a lot, with a lot of data.
Also in this file you can fix other settings, look at this file, there are a lot of interesting things. For now, this is enough for us.
Copy the contents of the old directory to the new one:
And set the correct rights:
Now you can restart Solr to reread the configuration file:
Go to the Solr installation directory and log in as the solr user:
You can create a diagram and configure Solr itself to work so that it correctly receives and processes requests from dovecot:
Create a kernel:
Go to the directory of the newly created kernel:
This is where the basic settings for our kernel will lie. We are interested in two files:
First, let's figure out schema.xml. The scheme that comes with dovecot is not acceptable for use from the word, at all. Therefore, I will give a more correct scheme, bring the file to such contents:
The main thing that interests us is the two analyzer blocks that describe the indexing and query rules for Solr. I will describe the main points:
tokenizer class Describes how Solr will break a sentence into words. The solr.ClassicTokenizerFactory is used in this scheme , according to the documentation, he sentence:
“Please, email john.doe@foo.com by 03-09, re: m37-xq.”
Parses into words as follows:
“Please”, “email” , “John.doe@foo.com”, “by”, “03-09”, “re”, “m37-xq”.
This more than suits me, but it will not suit everyone, so you can choose your own class that will be more optimal for your system. See the link that I gave above.
filter class Describesprocessing words that are output from tokenizer. Here various parameters can be specified, about which you can read the link that I brought. I will describe the main ones:
solr.EdgeNGramFilterFactory - forms tokens from the word according to its parameters minGramSize and maxGramSize. I have 1 and 40, which means that the following tokens will be formed from the word “Domains”: “d”, “before”, “house”, “house”, “domain”, “domains”. Such tokens will be created up to 40 characters in size. There is a small nuance here, if a word is longer than 40 characters, for example 50, then if the user enters a search query in sizes> 40 and <50, then the result will be zero. Therefore, I entered such a large number, since I did not meet email longer than 40 characters, and in Russian in general, the longest word is 25 characters.
solr.LowerCaseFilterFactory - puts all words in lower case, added so that the search is case-insensitive for the characters entered.
solr.StopFilterFactory - tells Solr which words to not index at all and just ignore, write the words to a file and specify through the words parameter.
solr.EnglishMinimalStemFilterFactory - a filter for processing plural English words, dogs will be converted to dog, etc.
solr.EnglishPossessiveFilterFactory - also for processing English words, removes possessive and not only endings, Man's is converted to Man.
solr.KeywordMarkerFilterFactory - language parameter, described herein details. If I understand correctly, a kind of exception words that solr indexes without preliminary modifications, so to speak, "as is".
These parameters can be used both in the indexing analyzer and in the query analyzer. Naturally, these analyzers can have different parameters and they do not affect each other. This can be done with the circuit.
We pass to solrconfig.xml. There is a point from version 7 of Solr, by default, the json format is used for communication, but the dovecot plugin uses xml. Therefore, we need to find several parameters in the file and correct them (this does not apply to Solr 6)
In the block (~ 745 line):
The defaults block is reduced to the following:
In the block (~ 810 line):
The defaults block is reduced to the following:
Now you need to delete (you can just comment out) the block (Applies to Solr 6 and 7)
and add a block (around 1190 lines)
before the block:
This completes the setup of Solr, you can proceed to indexing. Do not forget that after any changes to the configuration file, you must restart Solr.
In order to index user mailboxes dovecot has several commands.
If your doveadm swears that it cannot find users or something like that, check if you have the iterate_query parameter . Without this parameter, there may be problems finding users and their mailboxes. My users are in the database and this parameter looks like this for me:
Lies in a file where user database and password queries are described.
The Solr statistics for the dovecot kernel now look like this:
A bit of optimization, I also added the following parameters to cron:
You can still add in order to optimize the base.
After the full indexing of the mailbox, the speed of processing search queries has increased many times, if previously a complex query took tens of seconds, now it is less than a second. Unfortunately, I did not have any old tests, but I think that I can take my word for it or check it personally using this instruction.
Not without drawbacks, if you change the indexing options, then you will have to index all the mail from scratch. And it takes a very long time, on my volume and with my characteristics of iron, about 3 days. But once configured everything will work as it should.
If you forgot or messed up something, do not blame me for writing most of it from memory, since everything is already set up and working.
Today, mail is still one of the key means of messaging in the corporate segment. The volume of stored mail only grows and over time takes up hundreds of gigabytes, or even several terabytes. At this point, users in most cases begin to experience problems during the operation of mail, for example, with search. If you use a Web client, for example, the same RoundCube, then when searching through all messages in all folders and even by the contents of the letter itself, very often the result had to wait tens of seconds, which is not very pleasant. Therefore, I thought that it would be time to configure the FTS plugin in dovecot.
For most serious and experienced administrators, setting up a dovecot - solr bundle is not a big problem, but if this is your first encounter, setting up an acceptable search result may take some time. I'll try to simplify the setup for those who are faced with this for the first time.
So, initially we have the following initial data:
- CentOS 6 - to solve our problem, the distribution is not important at all, but I will do it by example
- Dovecot 2.2.32 - for us it is important that the version is 2.2.19 and higher.
- Apache Solr 7 - there can be either version 6 or version 7.
Now let's get down to the settings.
Docot
The version of this application should be higher than 2.2.19. This is due to the fact that it fixed a bug in the fts-solr plugin, which led to incorrect query generation, the result was always 404. The application should also be built with support for the fts and fts-solr plugin. No matter how strange it may sound, but when executed:
dovecot --build-optionsDovecot with fts and fts-solr support cannot be found out. Regardless of the build parameters, these plugins do not appear there. In order to make sure that the plugins are there and work, we will run this command:
ls /usr/lib64/dovecot/ | grep -E "solr|fts" The result for me looks like this:
lib20_fts_plugin.so
lib21_fts_solr_plugin.so
lib21_fts_squat_plugin.so
libdovecot-fts.so.0
libdovecot-fts.so.0.0.0
If your result is similar to mine, then everything is fine, you can begin to configure.
To do this, in the /etc/dovecot/conf.d directory in the 10-mail.conf file, add our plugins to the mail_plugins variable at the end, it looks like this for me:
mail_plugins = quota acl expire mail_log notify fts fts_solrThen open the 90-fts.conf file and bring it to the form:
plugin {
    fts = solr
    fts_solr = url=http://127.0.0.1:8983/solr/dovecot/  #слеш в конце обязателен!
    fts_autoindex = yes
}
If you do not have a 90-fts.conf file, you can create it with the contents indicated above. This completes the dovecot setup. Unforgettable restart dovecot. We pass to Solr.
Apache sorl
Everything here is also quite simple. Therefore, immediately get down to business.
Since Solr is written in Java, you need to install openjdk:
yum install java-1.8.0-openjdk lsofFirst, download the Apache Solr distribution, at the time of writing, the current version is 7.2.1.
wget http://apache-mirror.rbc.ru/pub/apache/lucene/solr/7.2.1/solr-7.2.1.tgz -O /usr/src/solr-7.2.1.tgzUnpack the installer file from the archive:
tar zxf solr-7.2.1.tgz solr-7.2.1/bin/install_solr_service.shAnd install Solr:
./solr-7.2.1/bin/install_solr_service.sh solr-7.2.1.tgz As a result, the output of the installation will be like this:
We recommend installing the 'lsof' command for more stable start/stop of Solr
id: solr: no such user
Creating new user: solr
Extracting solr-7.2.1.tgz to /opt
Installing symlink /opt/solr -> /opt/solr-7.2.1 ...
Installing /etc/init.d/solr script ...
Installing /etc/default/solr.in.sh ...
Service solr installed.
Customize Solr startup configuration in /etc/default/solr.in.sh
NOTE: Please install lsof as this script needs it to determine if Solr is listening on port 8983.
Started Solr server on port 8983 (pid=1647). Happy searching!
Found 1 Solr nodes:
Solr process 1647 running on port 8983
{
  "solr_home":"/var/solr/data",
  "version":"7.2.1 b2b6438b37073bee1fca40374e85bf91aa457c0b - ubuntu - 2018-01-10 00:54:21",
  "startTime":"2018-03-01T11:22:40.462Z",
  "uptime":"0 days, 0 hours, 0 minutes, 15 seconds",
  "memory":"25.6 MB (%5.2) of 490.7 MB"}
Here you can see that Solr was successfully installed, as well as some installation data. Solr has a web interface that will be available on port 8983, there you can observe statistics, errors and some other things. Now let's configure it.
The first thing that you want to do is move the data directory, as it will grow very quickly (it all depends on the amount of data that needs to be indexed) and it is desirable that there is a lot of space. I don’t have much space in the / var directory, so we’ll fix it.
I create a directory for solr:
mkdir -p /srv/solr/dataIt will store all the data. Now open the file /etc/default/solr.in.sh and fix some settings in it:
SOLR_JAVA_MEM="-Xms10240m -Xmx20480m" #тут указываем стартовый и максимальный размер памяти и конечно ориентируемся на размер ОЗУ на сервере на котором стоит Solr
SOLR_HOME="/srv/solr/data"  #тут указываем домашний каталог Solr
Regarding the RAM, that would be understood, my Solr looks like this:
i.e. I was not mistaken with tokens in the settings, he eats a lot, with a lot of data.
Also in this file you can fix other settings, look at this file, there are a lot of interesting things. For now, this is enough for us.
Copy the contents of the old directory to the new one:
cp /var/solr/data/* /srv/solr/data/And set the correct rights:
chown -R solr:solr /srv/solrNow you can restart Solr to reread the configuration file:
service solr restartGo to the Solr installation directory and log in as the solr user:
cd /opt/solr/bin
su solr
You can create a diagram and configure Solr itself to work so that it correctly receives and processes requests from dovecot:
Create a kernel:
./solr create_core -c dovecot -n dovecotGo to the directory of the newly created kernel:
cd /srv/solr/data/dovecot/confThis is where the basic settings for our kernel will lie. We are interested in two files:
- schema.xml - the main file for setting up indexing rules and Solr queries
- solrconfig.xml - configuration file of the kernel itself.
First, let's figure out schema.xml. The scheme that comes with dovecot is not acceptable for use from the word, at all. Therefore, I will give a more correct scheme, bring the file to such contents:
id The main thing that interests us is the two analyzer blocks that describe the indexing and query rules for Solr. I will describe the main points:
tokenizer class Describes how Solr will break a sentence into words. The solr.ClassicTokenizerFactory is used in this scheme , according to the documentation, he sentence:
“Please, email john.doe@foo.com by 03-09, re: m37-xq.”
Parses into words as follows:
“Please”, “email” , “John.doe@foo.com”, “by”, “03-09”, “re”, “m37-xq”.
This more than suits me, but it will not suit everyone, so you can choose your own class that will be more optimal for your system. See the link that I gave above.
filter class Describesprocessing words that are output from tokenizer. Here various parameters can be specified, about which you can read the link that I brought. I will describe the main ones:
solr.EdgeNGramFilterFactory - forms tokens from the word according to its parameters minGramSize and maxGramSize. I have 1 and 40, which means that the following tokens will be formed from the word “Domains”: “d”, “before”, “house”, “house”, “domain”, “domains”. Such tokens will be created up to 40 characters in size. There is a small nuance here, if a word is longer than 40 characters, for example 50, then if the user enters a search query in sizes> 40 and <50, then the result will be zero. Therefore, I entered such a large number, since I did not meet email longer than 40 characters, and in Russian in general, the longest word is 25 characters.
solr.LowerCaseFilterFactory - puts all words in lower case, added so that the search is case-insensitive for the characters entered.
solr.StopFilterFactory - tells Solr which words to not index at all and just ignore, write the words to a file and specify through the words parameter.
solr.EnglishMinimalStemFilterFactory - a filter for processing plural English words, dogs will be converted to dog, etc.
solr.EnglishPossessiveFilterFactory - also for processing English words, removes possessive and not only endings, Man's is converted to Man.
solr.KeywordMarkerFilterFactory - language parameter, described herein details. If I understand correctly, a kind of exception words that solr indexes without preliminary modifications, so to speak, "as is".
These parameters can be used both in the indexing analyzer and in the query analyzer. Naturally, these analyzers can have different parameters and they do not affect each other. This can be done with the circuit.
We pass to solrconfig.xml. There is a point from version 7 of Solr, by default, the json format is used for communication, but the dovecot plugin uses xml. Therefore, we need to find several parameters in the file and correct them (this does not apply to Solr 6)
In the block (~ 745 line):
The defaults block is reduced to the following:
explicit 10 xml
text -->In the block (~ 810 line):
The defaults block is reduced to the following:
explicit xml true Now you need to delete (you can just comment out) the block (Applies to Solr 6 and 7)
and add a block (around 1190 lines)
before the block:
This completes the setup of Solr, you can proceed to indexing. Do not forget that after any changes to the configuration file, you must restart Solr.
In order to index user mailboxes dovecot has several commands.
#сбросит индекс почтового ящика, после этой команды необходима полная индексация почтового ящика
doveadm fts rescan -u s.chistiakov@example.com
#индексируем почтовый ящик конкретного пользователя
doveadm -vvvvv index -u s.chistiakov@exmample.com "*"# индексируем все ящики всех пользователей.
doveadm -v index -A "*" If your doveadm swears that it cannot find users or something like that, check if you have the iterate_query parameter . Without this parameter, there may be problems finding users and their mailboxes. My users are in the database and this parameter looks like this for me:
iterate_query = SELECT username as user FROM mailboxLies in a file where user database and password queries are described.
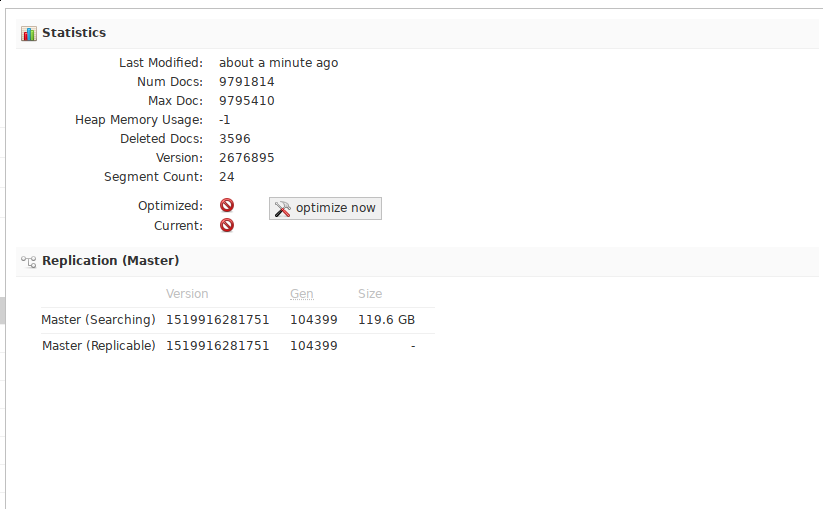
The Solr statistics for the dovecot kernel now look like this:
A bit of optimization, I also added the following parameters to cron:
0 6 * * * /usr/bin/doveadm -v index -A "*"
5 */1 * * * curl "http://127.0.0.1:8983/solr/dovecot/update?commit=true"
You can still add in order to optimize the base.
0 22 * * * curl "http://127.0.0.1:8983/solr/dovecot/update?optimize=true"
Total
After the full indexing of the mailbox, the speed of processing search queries has increased many times, if previously a complex query took tens of seconds, now it is less than a second. Unfortunately, I did not have any old tests, but I think that I can take my word for it or check it personally using this instruction.
Not without drawbacks, if you change the indexing options, then you will have to index all the mail from scratch. And it takes a very long time, on my volume and with my characteristics of iron, about 3 days. But once configured everything will work as it should.
If you forgot or messed up something, do not blame me for writing most of it from memory, since everything is already set up and working.