Isometric Depth Sorting for Moving Platforms
- Transfer
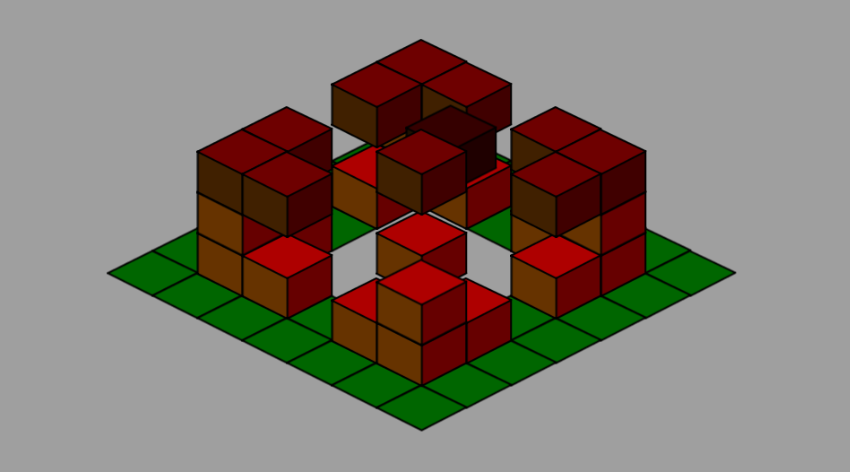
What we will create
In simple words, sorting by depth can be explained as a way to identify elements that are close and far from the camera. Thus, we determine the order in which they must be arranged in order to match the correct depth in the scene.
In this tutorial, we’ll take a closer look at depth sorting for isometric levels, because we’ll also add moving platforms. This tutorial is not an introduction to the theory of isometry and is not dedicated to code. In it, we will understand logic and theory, and not analyze the code. Unity is used as a tool, so sorting by depth comes down to changing
sortingOrdersprites. In other frameworks, it can be a change in order on the Z axis or a drawing sequence.To learn the basics of the theory of isometry, read this tutorial . The code and code structure are consistent with my previous isometric tutorial . Learn it if this tutorial seems complicated to you, because in it I will focus only on logic.
1. Levels without movement
If at the isometric levels of your game there are no moving elements or only a few characters running along the level are present, then sorting by depth is quite simple. In such cases, characters occupying isometric tiles will be smaller than the tiles themselves, so they can simply use the same drawing order / depth as the tile they occupy.
Let's call such fixed levels static. To maintain the correct depth, they can be drawn in various ways. Typically, level data is a two-dimensional array in which rows and columns correspond to rows and columns of a level.
Consider the next isometric level with just two rows and seven columns.
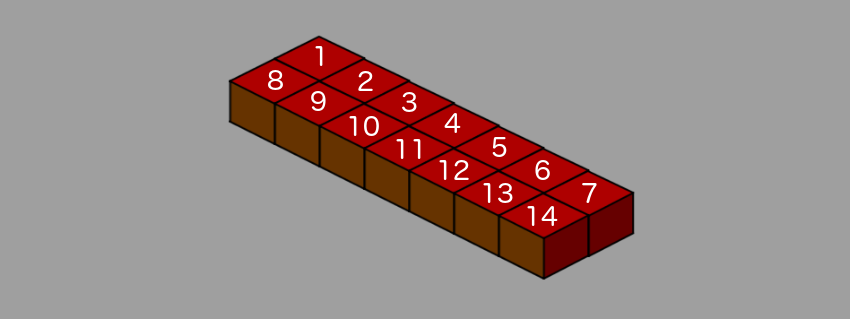
The numbers on the tiles correspond to their sort order (
sortingOrder), or depth, or order in Z, i.e. the order in which they need to be drawn. In this case, we first draw all the columns of the first row, starting from the first column with sortingOrder= 1. After drawing all the columns of the first row, the column closest to the camera has
sortingOrder= 7, and we move on to the next row. That is, each element in the second row will have a higher value sortingOrderthan any element in the first row. It is in this order that tiles should be built in order to maintain the correct depth, because a sprite with a larger value
sortingOrderwill overlap all other sprites with lower values sortingOrder.As for the code, it simply cycles through the rows and columns of the level array and sequentially assigns them
sortingOrderin increasing order. The result will not go bad, even if we swap rows and columns, as can be seen in the figure below.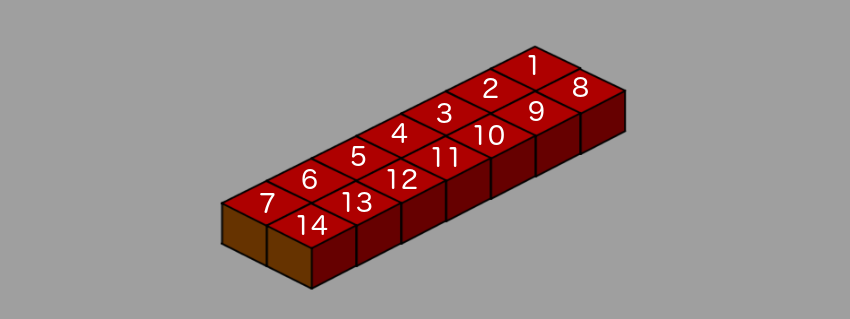
Here, before moving on to the next row, we first completely draw the column. The perception of depth remains the same. That is, the logic of the static level is to draw either a full row or a full column, moving to the next and sequential assignment
sortingOrderin increasing order.Adding height
If we consider the level as a building, then for now we draw only the first floor. If we need to add a new floor to the building, then we just have to wait for the entire first floor to be drawn, and then repeat the same algorithm for the second.
For the correct depth order, we waited for the line to complete, and then moved on to the next line. Similarly, we wait for the completion of all lines, and then move on to the next floor. That is, for a level with one line and two floors, this will work as shown in the figure below.

Naturally, any tile on the higher floor will be larger
sortingOrderthan any tile on the lower floor . As for the code, to add the upper floors, we just need to shift the value of the yscreen coordinates for the tile depending on the floor it occupies.float floorHeight=tileSize/2.2f;
float currentFloorHeight=floorHeight*floorLevel;
//
tmpPos=GetScreenPointFromLevelIndices(i,j);
tmpPos.y+=currentFloorHeight;
tile.transform.position=tmpPos;The value
floorHeightindicates the perceived height of the image of the tile isometric block, and floorLeveldetermines which floor the tile belongs to.2. The movement of tiles along the X axis
Depth sorting in static isometric levels is not so complicated, right? Let's move on - we will use the “first line” method, that is, we will first assign the
sortingOrderentire first line, and then move on to the next. Let's look at the first moving tile or platform that moves along a single X axis. When I say that the movement occurs along the X axis, I mean a Cartesian, not an isometric coordinate system. Let's look at the level with only the lower floor, consisting of three rows and seven columns. We assume that in the second line there is only one tile that moves. The level will look like the image below.
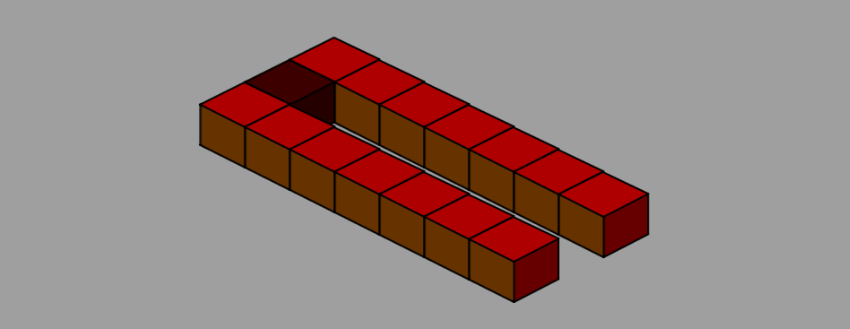
The dark tile is our movable tile, and it
sortingOrderwill be 8, because the first line has 7 tiles. If a tile moves along the Cartesian axis X, then it will move along a “track” between two lines. For all the positions that he can occupy on his way, the tiles in line 1 will have less sortingOrder. Similarly, all the tiles in line 2 will have a larger value
sortingOrder, regardless of the position of the dark tile in its path. Since sortingOrderwe chose the “line first” method for assignment, we don’t need to do anything extra to move along the X axis. This case is pretty simple.3. The movement of tiles along the Y axis
Problems begin to arise when we take on the Y axis. Let's imagine the level in which our dark tile moves along a rectangular track, as shown in the figure below. You can see the same situation in the Unity scene
MovingSortingProblemin the source .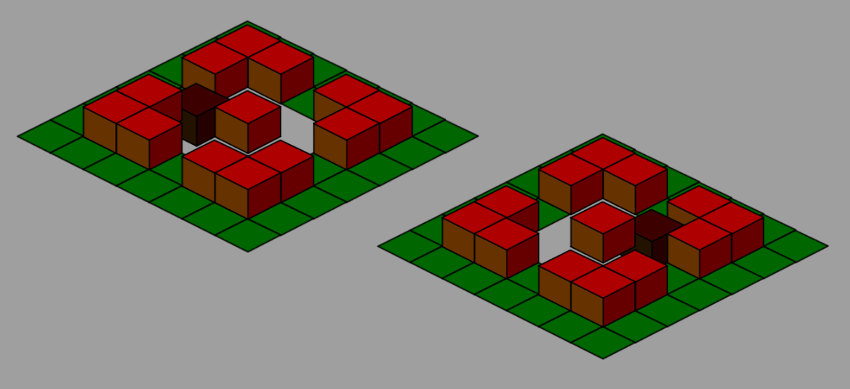
Using our “row-first” approach, we can assign a
sortingOrdermovable tile based on the row it is currently occupying. When a tile is between two lines, it is assigned sortingOrderto it based on the line from which it moves. In this case, we cannot follow the ordinal sortingOrderin the line in which it moves. This destroys our depth sorting algorithm.Block sorting
To solve this problem, we need to divide the level into various blocks, one of which is a problem block that destroys our “first line” approach, and the rest are blocks that can use the “first line” approach without breaking. To better understand this, look at the image below.
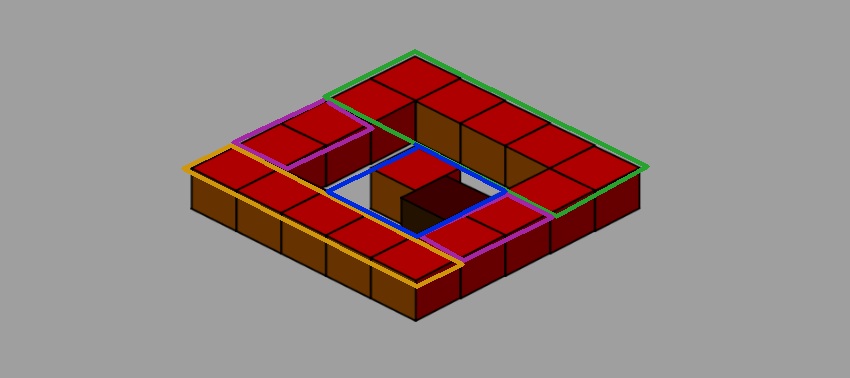
The 2x2 tile block indicated by the blue area is our problem block. All other blocks can use the “first row” approach. Let the picture do not bother you - it shows a level that is already correctly sorted using our block algorithm. The blue block consists of two column tiles in rows, between which our dark tile is currently moving, and from the tiles immediately to the left of them.
To solve the problem of depth of a problem block, we can use the “first columns” approach only for this block. That is, for green, pink and yellow blocks, we use “row first”, and for blue - “column first”.
Please note that we still need to consistently assign
sortingOrder. First, the green block, then the pink block on the left, then the blue block, then the pink block on the right, and finally the yellow block. When moving to the blue block, we break the order only in order to switch to the "first columns" mode. As an alternative solution, we can also consider the 2x2 block to the right of the movable tile column. (The interesting thing is that we don’t even need to change approaches, because blocking in this case itself solves our problem.) The solution in action is shown in the scene
BlockSort.
This algorithm is implemented in the following code.
private void DepthSort(){
    Vector2 movingTilePos=GetLevelIndicesFromScreenPoint(movingGO.transform.position);
    int blockColStart=(int)movingTilePos.y;
	int blockRowStart=(int)movingTilePos.x;
	int depth=1;
	//сортировка строк до блока
	for (int i = 0; i < blockRowStart; i++) {
		for (int j = 0; j < cols; j++) {
			depth=AssignDepth(i,j,depth);
		}
	}
	//сортировка столбцов в той же строке до блока
	for (int i = blockRowStart; i < blockRowStart+2; i++) {
		for (int j = 0; j < blockColStart; j++) {
			depth=AssignDepth(i,j,depth);
		}
	}
	//сортировка блока
	for (int i = blockRowStart; i < blockRowStart+2; i++) {
		for (int j = blockColStart; j < blockColStart+2; j++) {
			if(movingTilePos.x==i&&movingTilePos.y==j){
				SpriteRenderer sr=movingGO.GetComponent();
				sr.sortingOrder=depth;//assign new depth
				depth++;//increment depth
			}else{
				depth=AssignDepth(i,j,depth);
			}
		}
	}
	//сортировка столбцов в той же строке после блока
	for (int i = blockRowStart; i < blockRowStart+2; i++) {
		for (int j = blockColStart+2; j < cols; j++) {
			depth=AssignDepth(i,j,depth);
		}
	}
	//сортировка строк после блока
	for (int i = blockRowStart+2; i < rows; i++) {
		for (int j = 0; j < cols; j++) {
			depth=AssignDepth(i,j,depth);
		}
	}
}
4. The movement of tiles along the Z axis
Z-axis movement is a simulated movement along an isometric level. In essence, this is just movement along the screen axis Y. At the isometric level with one floor, to add movement along the Z axis, you no longer need to do anything with order if you have already implemented the method for sorting by blocks described above. This situation in action can be seen in the Unity scene
SingleLayerWave, where I added an additional wave motion along the Z axis to the lateral movement along the “track”.Drive Z on levels with multiple floors
Adding new floors to the level is, as mentioned above, just a matter of shifting the screen coordinate Y. If the tile does not move along the Z axis, then you do not need to do anything extra with sorting by depth. We can sort the blocks on the first floor with the movement, and then apply to all subsequent floors the sorting of “row first”. In action, this situation can be seen in the Unity scene
BlockSortWithHeight.
A very similar depth problem occurs when a tile begins to move between floors. Using our approach, it can satisfy the sequential order of only one floor and destroys sorting by the depth of another floor. To deal with this problem of depths on floors, we need to expand or change the sorting by blocks into three dimensions.
In essence, the problem is only two floors, between which the tile is currently moving. In the case of all other floors, we can continue to use the existing sorting algorithm. Special requirements arise only for these two floors, among which we can set the lower floor as follows, where
tileZOffsetis the magnitude of the movement along the Z axis of our moving tile.float whichFloor=(tileZOffset/floorHeight);
float lower=Mathf.Floor(whichFloor);This means that
lowerand lower+1are floors that require a special approach. The trick is to assign sortingOrderboth of these floors together, as shown in the code below. This corrects the order and solves the problem of sorting by depth.if(floor==lower){
// нам нужно отсортировать нижний этаж и этаж непосредственно над ним вместе, за один проход
depth=(floor*(rows*cols))+1;
int nextFloor=floor+1;
if(nextFloor>=totalFloors)nextFloor=floor;
//сортировка строк до блока
for (int i = 0; i < blockRowStart; i++) {
for (int j = 0; j < cols; j++) {
depth=AssignDepth(i,j,depth,floor);
depth=AssignDepth(i,j,depth,nextFloor);
}
}
//сортировка столбцов в той же строке до блока
for (int i = blockRowStart; i < blockRowStart+2; i++) {
for (int j = 0; j < blockColStart; j++) {
depth=AssignDepth(i,j,depth,floor);
depth=AssignDepth(i,j,depth,nextFloor);
}
}
//сортировка блока
for (int i = blockRowStart; i < blockRowStart+2; i++) {
for (int j = blockColStart; j < blockColStart+2; j++) {
if(movingTilePos.x==i&&movingTilePos.y==j){
SpriteRenderer sr=movingGO.GetComponent();
sr.sortingOrder=depth;//assign new depth
depth++;//increment depth
}else{
depth=AssignDepth(i,j,depth,floor);
depth=AssignDepth(i,j,depth,nextFloor);
}
}
}
//сортировка столбцов в той же строке после блока
for (int i = blockRowStart; i < blockRowStart+2; i++) {
for (int j = blockColStart+2; j < cols; j++) {
depth=AssignDepth(i,j,depth,floor);
depth=AssignDepth(i,j,depth,nextFloor);
}
}
//сортировка строк после блока
for (int i = blockRowStart+2; i < rows; i++) {
for (int j = 0; j < cols; j++) {
depth=AssignDepth(i,j,depth,floor);
depth=AssignDepth(i,j,depth,nextFloor);
}
}
} In essence, we consider two floors as one and sort by blocks for this single floor. See the code in action in the scene
BlockSortWithHeightMovement. Thanks to this approach, our tile can now move freely along either of the two axes without destroying the depth in the scene, as shown below.
Conclusion
This tutorial was intended to explain the logic of depth sorting algorithms, and I hope you understand them. Obviously, we are considering relatively simple levels with just one moving tile.
It also does not address inclines, because otherwise the tutorial would become too long. But when you understand the sorting logic, you can try to adapt the two-dimensional slope logic to an isometric view.
The source code for all the examples in the tutorial is uploaded to Github .
