Unreal Engine Tutorial. Part 10: How to create a simple FPS
- Transfer
- Tutorial
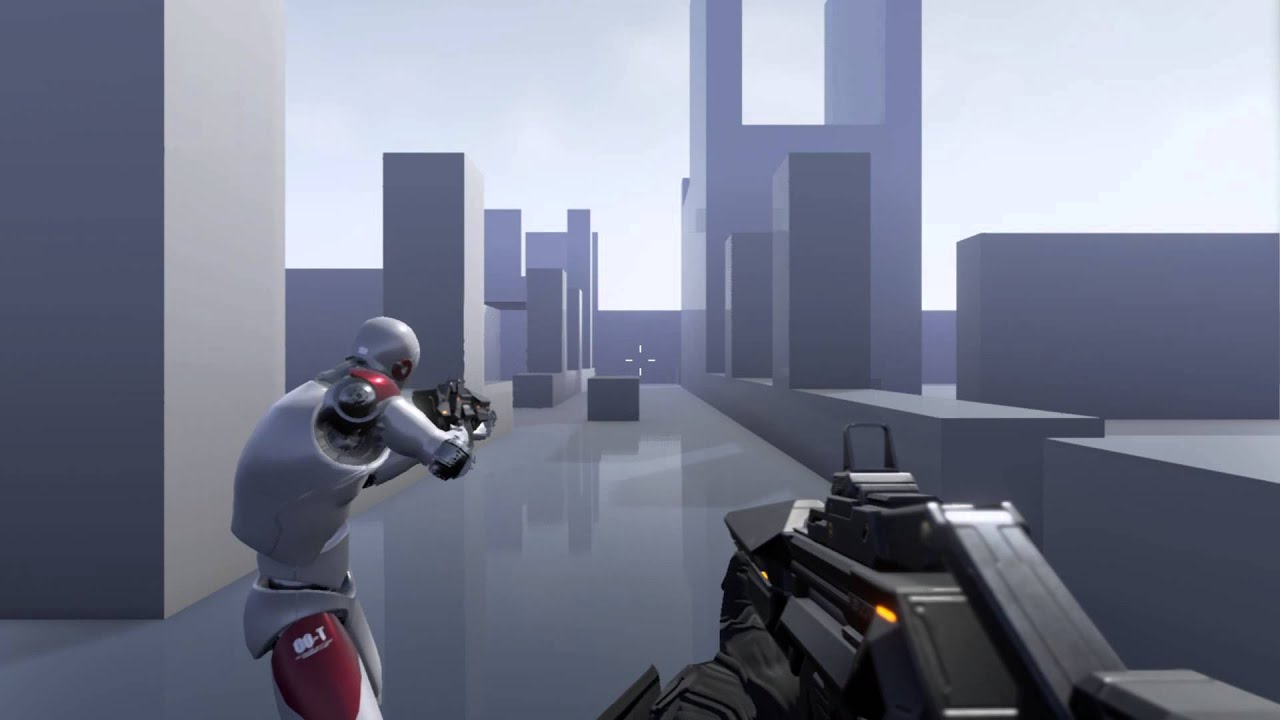
First-person shooter (FPS) is a genre in which a player uses a weapon and looks at the world through the eyes of the character. FPS games are extremely popular, as can be seen from the success of franchises such as Call of Duty and Battlefield .
Unreal Engine was originally created for the development of FPS, so it is logical to use it to create such a game. In this tutorial you will learn the following:
- Create a Pawn from a first-person view that can move and look around
- Create a weapon and tie it to a player's pawn
- Shoot bullets using line tracing (also known as ray tracing)
- Deal damage to actors
Note: this article is the tenth part of a series of tutorials on the Unreal Engine:
- Part 1: Introducing the Engine
- Part 2: Blueprints
- Part 3: Materials
- Part 4: UI
- Part 5: How to create a simple game
- Part 6: Animation
- Part 7: Sound
- Part 8: Particle Systems
- Part 9: Artificial Intelligence
- Part 10: How to create a simple FPS
Getting to work
Download the project blank and unzip it. Go to the project folder and open BlockBreaker.uproject . You will see the following scene:
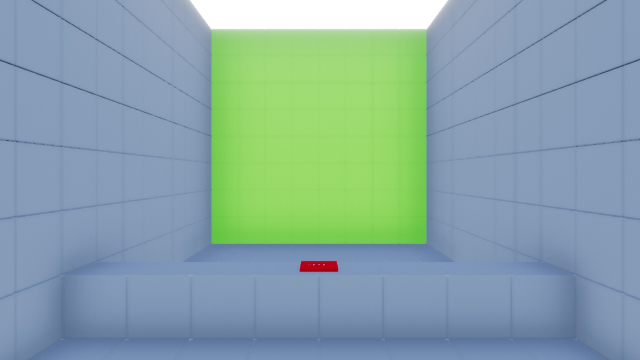
The green wall consists of many goals. When they are damaged, they turn red. When their health reaches zero, they disappear. The red button re-sets all goals.
First you need to create a Pawn player.
Creating a Pawn Player
Go to the Blueprints folder and create a new Blueprint Class . Select Character as the parent class and name it BP_Player .
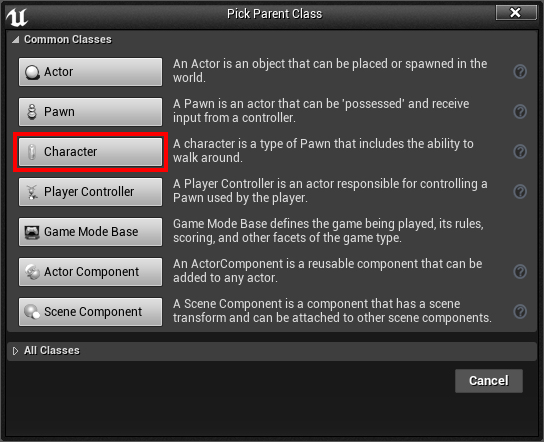
Character is a variation of Pawn, but with additional functionality, for example, with the CharacterMovement component .
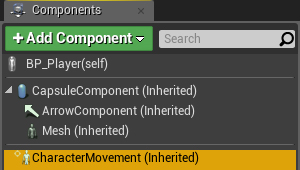
This component automatically handles movement, such as walking and jumping. We just call the appropriate function, so Pawn moves around. Variables such as walking and jumping speeds can also be set in this component.
To make Pawn move, we need to know when the player presses the move key. For this purpose we tie towards the keys W , A , S and D .
Note: if you are unfamiliar with the bindings, you can read about them in the part of the tutorial on Blueprints . By key binding, we determine which keys will perform the action.
Creating Motion Snaps
Select Edit \ Project Settings and open the Input settings .
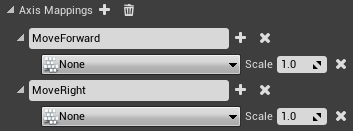
Create two Axis Mappings called MoveForward and MoveRight . MoveForward will drive forward and backward. MoveRight - move left and right.
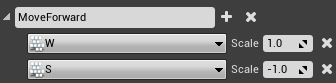
For MoveForward replace key on the W . Then create another key, and select the S . Change Scale for S to -1.0 .
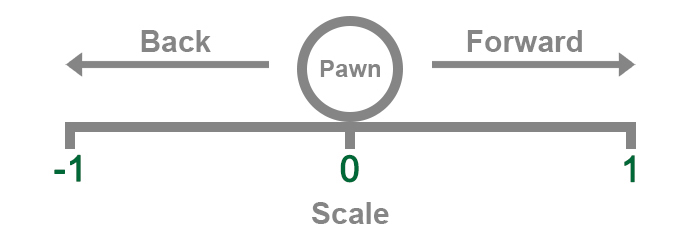
Note: if you want to know more about the Scale field , read the part of the tutorial on Blueprints . The section " Axis value and input scale " says what it is and how to use it.
Later we will multiply the scale value by the forward Pawn vector. This will give us a forward vector at a positive scale. If the scale is negative , then the vector will be directed backward . Using the resulting vector, you can move Pawn forward and backward.
Now we need to do the same for moving left and right. Change the key to MoveRight on D . Then create a new key and choose for her A . Change Scale for A to -1.0 .

Now that we have set up the bindings, we need to use them for movement.
Motion implementation
Open BP_Player , and then open the Event Graph. Add a MoveForward event (the one listed in the Axis Events list ). This event will be executed in every frame, even if you do not click anything.
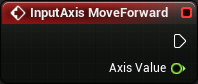
It will also output the Axis Value , which is equal to the Scale values previously set . It will be output 1 when pressing the W and -1 when pressing the S . If you do not press the keys, then the output will be 0 .
Next, you need to order Pawn to move. Add Add Movement Input and connect it as follows:
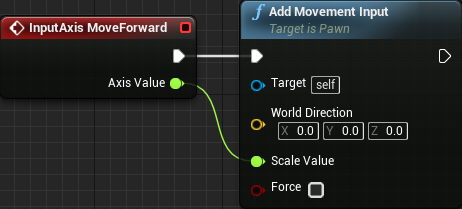
Add Movement Input will receive the vector and multiply it by Scale Value . This will convert it in the appropriate direction. Since we use Character , the CharacterMovement component will move Pawn in that direction.
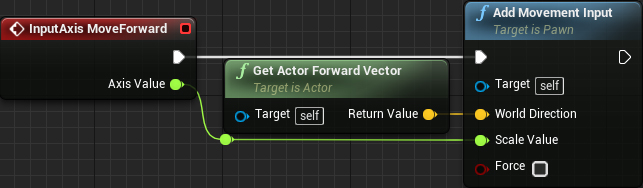
Now we need to indicate the direction of movement. Since we want to move forward, we can use Get Actor Forward Vector . This will return the forward vector. Create it and connect as follows:
Summarize:
- MoveForward executes each frame and passes the Axis Value to the output . This value will be equal to 1 when pressing the W and -1 when pressing the S . If you do not press any of these keys, then the output will be 0 .
- Add Movement Input multiplies the forward Pawn vector by Scale Value . Due to this, depending on the pressed key, the vector will be directed forward or backward. If you do not press the keys, the vector will have no direction, that is, Pawn will not move.
- The CharacterMovement component gets the result from Add Movement Input , and then moves Pawn in that direction.
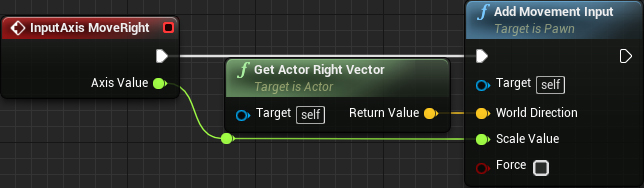
Repeat the process for MoveRight , but replace Get Actor Forward Vector with Get Actor Right Vector .
To check the movement, you need to set Pawn by default in game mode.
Set Pawn as default
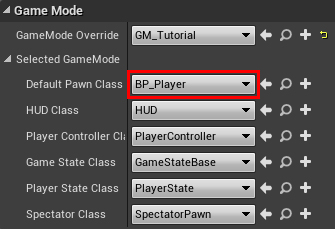
Click on Compile and return to the main editor. Open the World Settings panel and find the Game Mode section . Change the Default Pawn Class value to BP_Player .
Note: if you do not have the World Settings panel, go to the Toolbar and select Settings \ World Settings .
Now when you start the game, you will automatically use BP_Player . Press Play and use the keys W , A , S and D to move through the level.
GIF
Now we will create bindings for turning the head.
Create overview bindings
Open Project Settings . Create two more Axis Mappings called LookHorizontal and LookVertical .
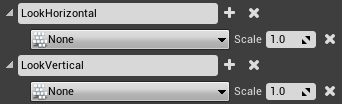
Replace the key to LookHorizontal on Mouse the X .

This binding will produce a positive value when you move the mouse to the right , and vice versa.
Now change the key to LookVertical on Mouse the Y .

This binding will produce a positive value when you move the mouse up , and vice versa.
Now we need to create logic to look around.
Implementation Review
If Pawn does not have a Camera component , then Unreal will automatically create a camera for you. By default, the camera will use the controller rotation .
Note: if you want to know more about controllers, then check out our Artificial Intelligence tutorial .
Despite the fact that the controllers are not physical, they still have their own turn. This means that you can direct the eyes of Pawn and the camera in different directions. For example, in a third-person game, the character and camera do not always look in the same direction.
GIF
To rotate the camera in the game from the first person, it is enough for us to change the rotation of the controller.
Open BP_Player and create a LookHorizontal event .
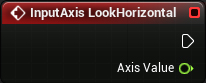
To make the camera turn left or right, we need to adjust the yaw . Create an Add Controller Yaw Input and connect it as follows:
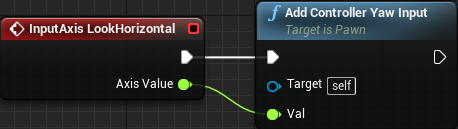
Now, when the mouse moves horizontally, the controller will turn left or right. Since the camera uses the rotation of the controller, it will also rotate.
Repeat the process for LookVertical , but replace Add Controller Yaw Input with Add Controller Pitch Input .
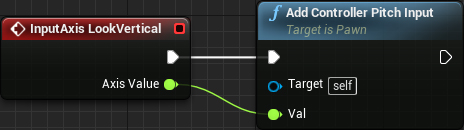
If you start the game now, you will notice that the vertical movement of the camera is inverted . This means that when you move the mouse up, the camera will look down .
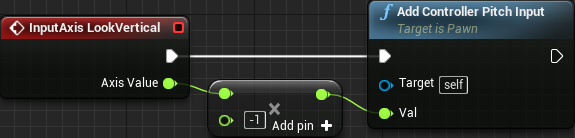
If you prefer non-inverted control, then multiply Axis Value by -1 . This inverts the Axis Value , which inverts the slope of the controller.
Click Compile and click Play . Take a look around with your mouse.
GIF
Now that all the movement and visibility are ready, it's time to create a weapon!
Weapon creation
Remember that when you create a Blueprint Class, you can select the parent class? You can also choose your own Blueprints as the parent. This is useful when there are different types of objects that share common functionality or attributes.
Let's say we need to create different types of cars. You can create a car base class that contains variables such as speed and color. Then you can create classes (children) that will use the car's base class as the parent. Each child class will contain the same variables. Now you have an easy way to create machines with different speeds and colors.

You can create weapons in the same way. To do this, you must first create a base class.
Creating a base weapon class
Return to the main editor and create a Blueprint Class of type Actor . Name it BP_BaseGun and open.
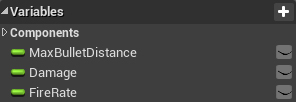
Now we will create several variables that define the properties of the weapon. Create the following variables of type float :
- MaxBulletDistance: maximum range of each bullet
- Damage: the amount of damage a bullet deals when it hits an actor
- FireRate: gap (in seconds) between shots fired by weapons
Note: by default, the values of all variables are zero, which is quite suitable for the tutorial. However, if you want the new weapon classes to have a different default value, then you need to set it in BP_BaseGun .
Now we need a physical representation of this weapon. Add a Static Mesh component and name it GunMesh .
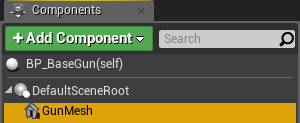
Don't worry about choosing a static mesh for now. We will deal with this in the next section, where we will create a child weapon class.
Creating a child weapon class
Click on Compile and return to the main editor. To create a child class, right-click on BP_BaseGun and select Create Child Blueprint Class .
GIF
Name it BP_Rifle and open. Open Class Defaults and set the variables to the following values:
- MaxBulletDistance: 5000
- Damage: 2
- FireRate: 0.1
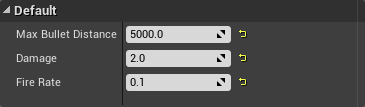
This means that the maximum path of each bullet will be 5000 . If she gets into the actor, she will do 2 points of damage. When firing bursts, the interval before each shot will be at least 0.1 seconds.
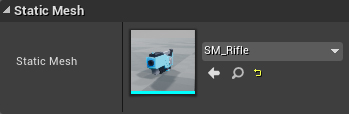
Now we need to specify the mesh that will be used by the weapon. Select the GunMesh component and set the Static Mesh value to SM_Rifle .
Now the weapon is ready. Click Compile and close BP_Rifle .
Now we will create our own camera component. It will give us more convenient control over the location of the camera. He will also allow us to attach weapons to the camera so that it is always in front of the camera.
Camera creation
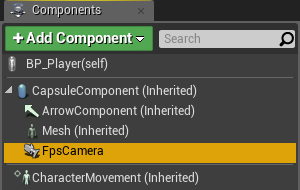
Open BP_Player and create the Camera component . Name it FpsCamera .
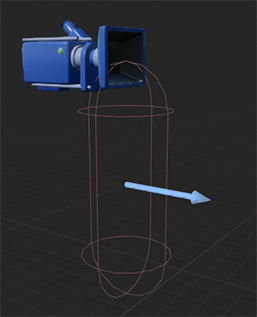
The default position is quite low, which is why the player may feel small. Change the location of the FpsCamera camera to (0, 0, 90) .
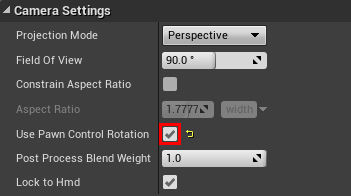
By default, Camera components do not use controller rotation. To fix this, go to the Details panel and turn on Camera Settings \ Use Pawn Control Rotation .
Now we need to set the place where the weapon should be.
Weapon Location
To create a weapon location, we can use the Scene component . These components are ideal for setting locations because they contain only Transform. Select FpsCamera and create a Scene component . Thus, it will attach to the camera. Name it GunLocation .
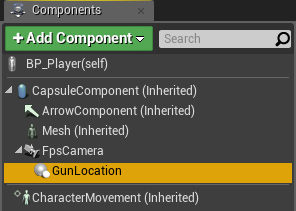
Thanks to the fact that we attached GunLocation to FpsCamera , the weapon will constantly maintain its position relative to the camera. Thus, we will always see weapons in front of the camera.
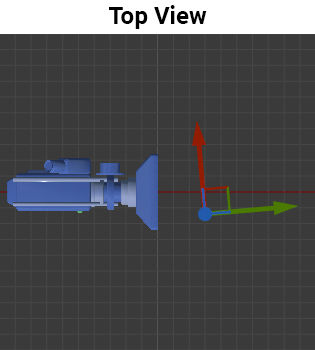
Now assign location component GunLocation values (30, 14, -12) . So we will place the weapon in front and slightly to the side of the camera.
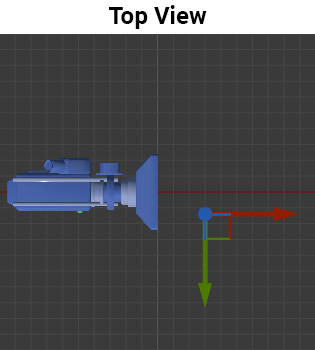
Then set rotation values (0, 0, -95) . When we attach the weapon, it will seem that it is always directed to the center of the screen.
Now we need to create a weapon and attach it to GunLocation .
Creating and attaching weapons
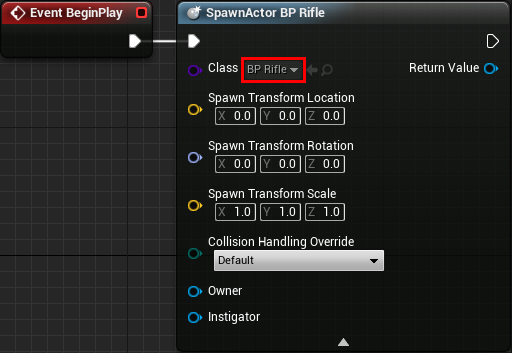
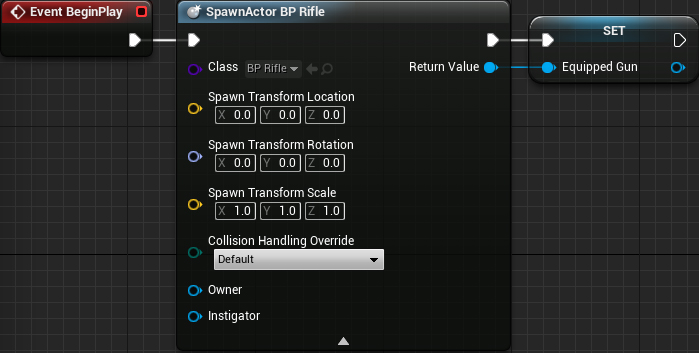
Find Event BeginPlay and create a Spawn Actor From Class . Set Class to BP_Rifle .
Since we will need to use the weapon later, we will store it in a variable. Create a variable of type BP_BaseGun and name it EquippedGun .
The important thing is that the variable is not of type BP_Rifle , because the player can have different types of weapons, and not just one. If we create another type of weapon, then we will not be able to store it in a variable of type BP_Rifle . It will be like trying to put a circle in a rectangular hole.
Choosing the BP_BaseGun type for the variable , we created a large “hole” that fits many “shapes”.
Now set EquippedGun to Return Value Spawn Actor From Class .
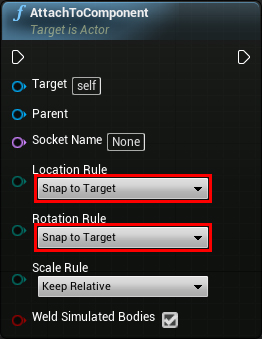
To attach a weapon, we can use AttachToComponent . Create it and set the Location Rule and Rotation Rule to Snap to Target . Thanks to this, the weapon will have the same location and rotation as the parent.
Now create a link to GunLocation and connect everything as follows:
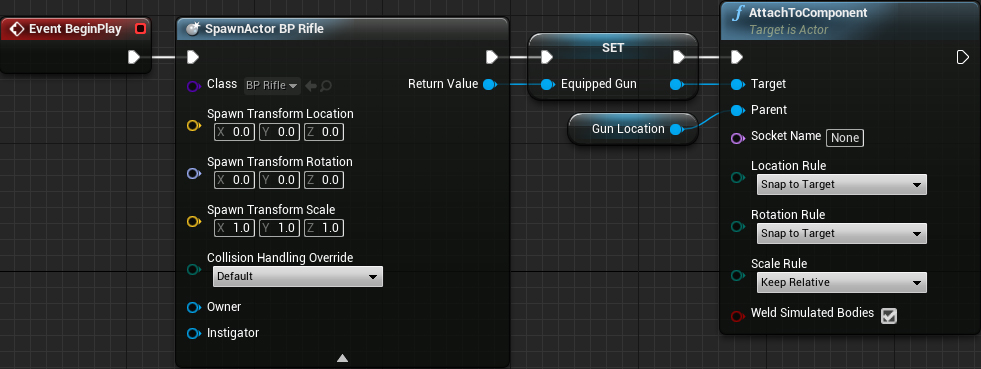
Summarize:
- When you create a BP_Player, it will create an instance of BP_Rifle
- EquippedGun will store a link to the created BP_Rifle for future reference.
- AttachToComponent Attaches Weapons to GunLocation
Click Compile and click Play . Now, when creating a player, weapons will also be created! When cornering, the weapon will always be in front of the camera.
Now the fun begins: we will shoot! To check if a bullet hit somewhere, we can use line tracing .
Bullet shooting
Tracing lines is a function that receives the start and end points (forming a line). She checks each point on a straight line (from start to finish) until she stumbles upon something. In games for checking bullet hit this method is most often used.
Since shooting is a function of a weapon, it must be carried out in the class of the weapon, not the player. Open BP_BaseGun and create a Shoot function .
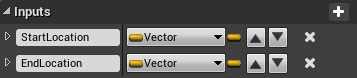
Then create two Vector inputs and name them StartLocation and EndLocation . They will be the starting and ending points of the trace lines (which we will pass from BP_Player ).
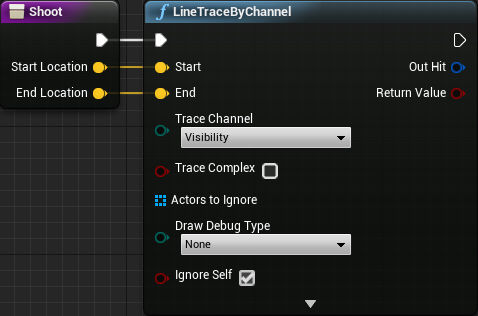
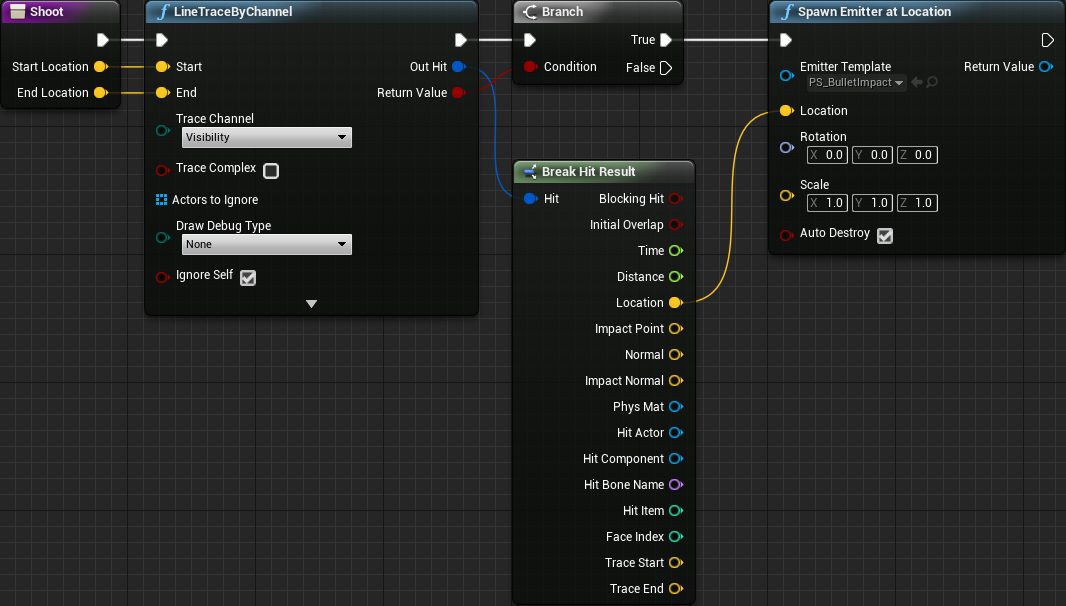
Line tracing can be done using LineTraceByChannel . This node checks hits using the Visibility or Camera collision channel . Create it and connect as follows:
Now we need to check if the trace of the lines gets into something. Create a Branch and connect it like this:
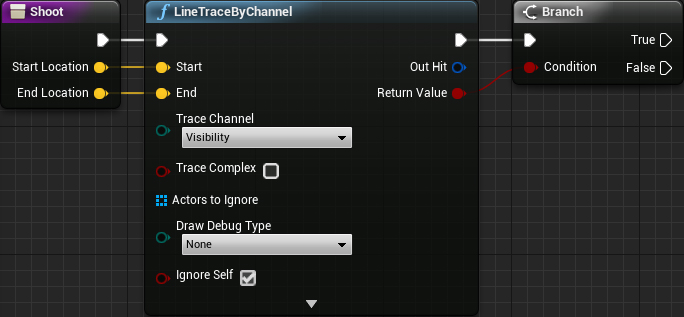
When hit, Return Value will output true , and vice versa.
To give the player visual feedback on where the bullet hit, you can use the particle effect.
Creating bullet hit particles
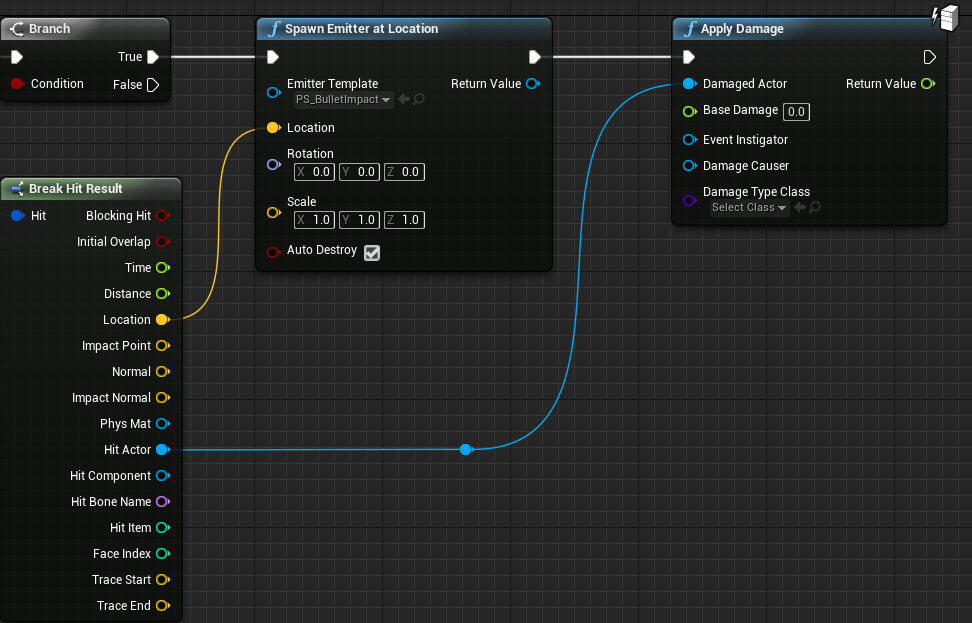
First we need to get the location of the hit trace. Left-click Out Hit on the graph. From the menu, select Break Hit Result .

So we will create a node with different contacts related to the direct trace results.
Create a Spawn Emitter at Location and set the Emitter Template to PS_BulletImpact . Then connect its Location to the Location of the Break Hit Result node .
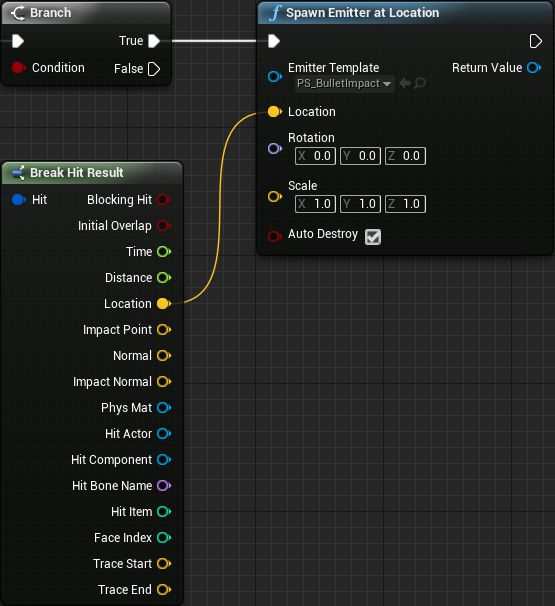
Here's how it would look:
Summarize:
- When executing a Shoot, it traces a line with the transmitted start and end points
- If the hit is fixed, then Spawn Emitter at Location will create PS_BulletImpact at the hit point.
Now that the shooting logic is complete, we need to use it.
Shoot function call
First we need to create a key binding for shooting. Click on Compile and open Project Settings . Create a new Axis Mapping called Shoot . Select the Left Mouse Button for it and close the Project Settings .

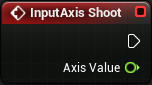
Then open BP_Player and create a Shoot event .
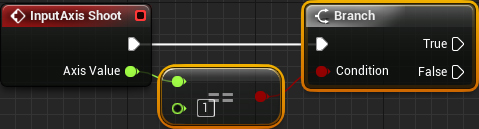
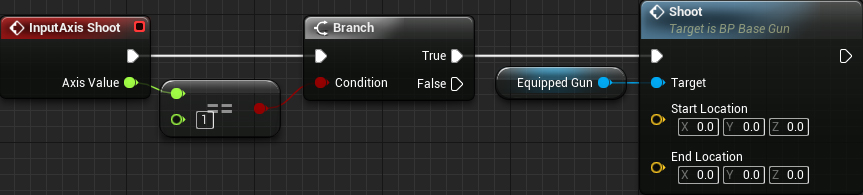
To check whether a player presses the Shoot key , we just need to check whether the value of Axis Value is equal to one ( 1 ). Create the selected nodes:
Then create a link to EquippedGun and call its Shoot function .
Now we need to calculate the start and end points for tracing the line.
Calculation of straight trace points
In many FPS, a bullet flies out of the camera, not from a weapon. This is because the camera is already perfectly aligned with the scope. Therefore, if we shoot from the camera, then the bullet is guaranteed to fly to where the cursor is.
Note: some games still implement gunfire. However, for shooting exactly at the sight, additional calculations are required.
Create a link to FpsCamera and connect it to GetWorldLocation .

Now we need an endpoint. Do not forget that the weapon has a MaxBulletDistance variable . This means that the endpoint must be at a distance of MaxBulletDistance units from the camera. To implement this, create dedicated nodes:
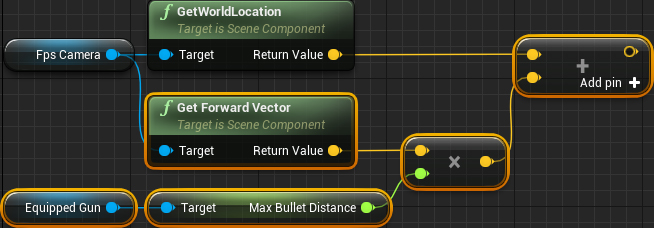
Then connect everything as follows:
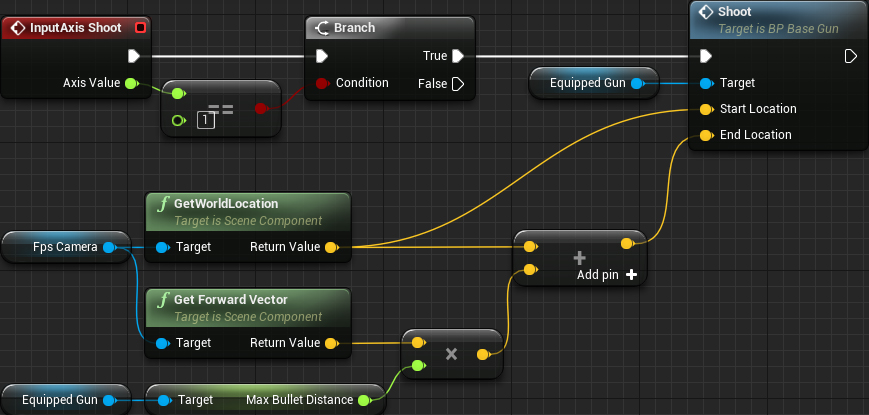
Summarize:
- When a player presses or holds the left mouse button , the weapon will release a bullet with a starting point in the camera
- The bullet will fly the distance specified in MaxBulletDistance
Click on Compile and then on Play . Hold the left mouse button to start shooting.
GIF
While the weapon shoots in every frame. This is too fast, so in the next step we will reduce the frequency of fire weapons.
Firing Frequency Reduction
First, we need a variable to determine if a player can shoot. Open BP_Player and create a boolean variable called CanShoot . Set it to true by default. If CanShoot is true , then the player can shoot, and vice versa.
Replace the Branch section with the following:
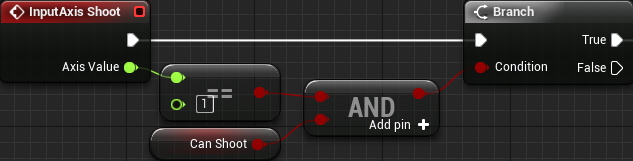
Now the player can only shoot if the Shoot key is pressed and the CanShoot variable is true .
Now add the selected nodes:

Changes:
- A player can shoot only when holding the left mouse button , and when CanShoot is true
- When a player fires a bullet, CanShoot is set to false . This will not allow the player to shoot again.
- CanShoot will be set to true again after the interval specified in FireRate
Click Compile and close BP_Player . Click Play and check the new firing rate.
GIF
Now we will teach the target and the button to respond to bullets. This can be done by adding damage to them .
Apply damage
Every actor in Unreal has the ability to take damage. However, you can choose for yourself how the actor will react to it.
For example, a fighting character will lose health when it takes damage. However, some objects, such as a balloon, may not have health. Then you can program the ball so that it explodes when it takes damage.
In order to be able to control how an actor takes damage, we first need to apply damage. Open BP_BaseGun and add Apply Damage at the end of the Shoot function .
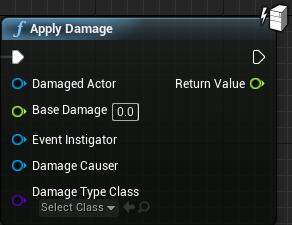
Now we need to indicate to which actor we want to inflict damage. In our case, this is the actor in which the direct trace falls. Connect the Damaged Actor to the Hit Actor of the Break Hit Result node .
Finally, we need to indicate the amount of damage done. Get a link to Damage and connect it to Base Damage .
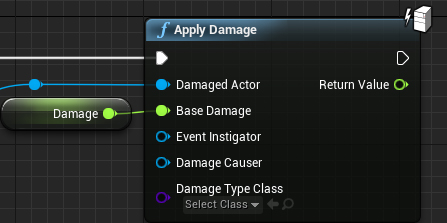
Now, when you call Shoot, it will inflict damage on the actors who are in the direct trace. Click Compile and close BP_BaseGun .
Now we need to handle how the actor takes damage.
Damage handling
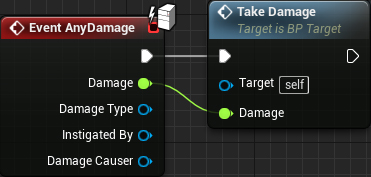
First, we will process how the damage is taken by the targets. Open BP_Target and create an Event AnyDamage . This event is fired when an actor takes non-zero damage .

Now call the TakeDamage function and connect the Damage pins . This will subtract health from the Health variable of the target and update the color of the target.
Now that the target takes damage, it loses health. Click on Compile and close BP_Target .
Now we need to handle how the button takes damage. Open BP_ResetButton and create an Event AnyDamage . Then call the ResetTargets function .
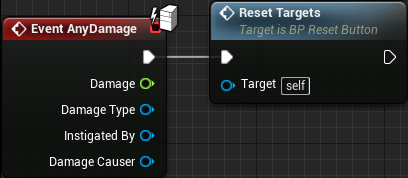
This will restore all targets when hit by a button. Click Compile and close BP_ResetButton .
Click on Play and start shooting at targets. If you want to restore goals, then shoot the button.
GIF
Where to go next?
The finished project can be downloaded from here .
Although the FPS created in this tutorial is very simple, you can easily expand it. Try to create more weapons with different types of shooting frequency and damage. You can even try adding a recharge function!