Horsepower in Android or once again about RecyclerView.LayoutManager

According to the author, the article can be useful in the same way as it is for novice Android developers making their first steps in such an exciting area. The history of the subject of this note began with the idea to equip the educational project with the so-called “wow effect”. As far as it was possible, judge you. I ask all curious under kat.
A demo project with all this disgrace can be found on GitHub by reference .
At the heart of the screen that interests us is everyone’s favorite RecyclerView. And the highlight is the fact that when scrolling through the list, one fully visible top element scaled in a special way. This feature is characterized by the fact that scaling occurs in different ways for the components that make up the list item.
However, it is better to see once.
Fig. 1. General view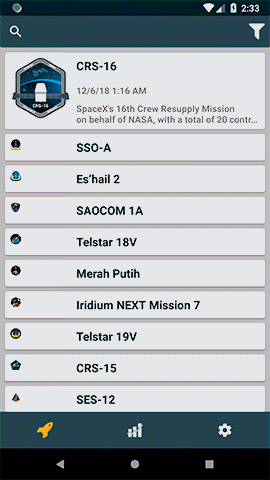
Consider the list item in detail. In the project, it is implemented as a LaunchItemView class inherited from CardView. Its markup contains the following components:
- Image - class ScaledImageView, designed to render an image with a given height (scaling).
- Headline
- Explanatory text.

Fig. 2. The structure of the list item (LaunchItemView).
In the process of scrolling the list, the following happens:
- The element height changes from the minimum value (equal to the height of the title with decoration) to the maximum value (equal to the height that allows displaying the title and explanatory text, with decoration).
- The height of the image is equal to the height of the element minus decoration, the width changes proportionally.
- The relative position inside the element and the size of the explanatory text remains unchanged.
- The magnitude of the scaling is limited to the top with a minimum size sufficient to display all content with regard to decoration and below with a minimum size sufficient to display the title with regard to decoration.
- Scaling, other than boundary values, is applied to the top fully visible list item. The elements above it have a maximum scale, below - the minimum.
Thus, when scrolling up, the effect of gradual “pulling” of the element content with proportional scaling of the image is created. When scrolling down, the opposite effect is observed.
I solved the problem posed in this way by creating a LayoutManager for RecyclerView and two additional components. But first things first.
LaunchLayoutManager
My training project is devoted to space topics, so the components have received the appropriate names.
Studying the topic of creating an arbitrary LayoutManager, I found two good articles on this topic [1, 2]. I will not repeat their contents. Instead, I’ll focus on the most interesting points of my decision.
Performing the decomposition of the task, I outlined two main stages:
- The definition of the index of the first and last element, which are fully or partially visible on the screen.
- Rendering of visible elements with the necessary scaling.
In general, the location and size of the elements of the list is as follows:
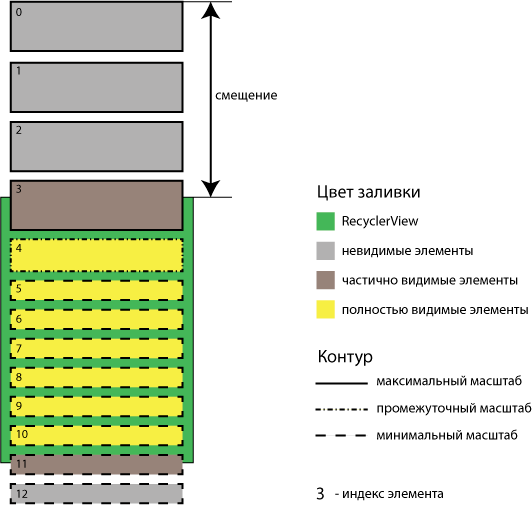
Figure 3. RecyclerView and its elements.
Definition of the closed interval of indices of visible elements
In fig. 3 visible elements include indexes from 3 to 11 inclusive. Moreover, according to our algorithm, the elements with indices 0-3 have a maximum size, the elements 5-12 have a minimum size, and the element with an index 4 is intermediate between the minimum and maximum.
As you might guess, one of the key points in determining the minimum and maximum index of visible elements is the offset by which the list is swept relative to the upper boundary of the visible area.
Consider the method calculateVisiblePositions, designed to determine these values.
1privatevoidcalculateVisiblePositions(){
2if (mBigViewHeight != 0) {
3        mMaximumOffset = (getItemCount() - 1) * mBigViewHeight;
4        mFirstVisibleViewPosition = mOffset / mBigViewHeight;
5if (mFirstVisibleViewPosition > getItemCount() - 1) {
6            mFirstVisibleViewPosition = 0;
7            mOffset = 0;
8        }
910        mLastVisibleViewPosition = mFirstVisibleViewPosition;
11int emptyHeight = getHeight();
12        mFirstVisibleViewTopValue =
                    mBigViewHeight * mFirstVisibleViewPosition - mOffset;
13int firstVisibleViewBottomValue =
                    mFirstVisibleViewTopValue + mBigViewHeight;
14        emptyHeight -= firstVisibleViewBottomValue;
15int secondVisibleViewHeight =
                   getViewHeightByTopValue(firstVisibleViewBottomValue);
16if (emptyHeight - secondVisibleViewHeight >= 0) {
17            emptyHeight -= secondVisibleViewHeight;
18           mLastVisibleViewPosition++;
19int smallViewPosCount = emptyHeight / mSmallViewHeight;
20            mLastVisibleViewPosition += smallViewPosCount;
21            emptyHeight -= smallViewPosCount * mSmallViewHeight;
22if (emptyHeight > 0) {
23                mLastVisibleViewPosition++;
24            }
25        }
26if (mLastVisibleViewPosition > getItemCount() - 1) {
27            mLastVisibleViewPosition = getItemCount() - 1;
28        }
29        Timber.d("calculateVisiblePositions
                            mFirstVisibleViewPosition:%d,
                            mLastVisibleViewPosition:%d",
                            mFirstVisibleViewPosition,
                            mLastVisibleViewPosition);
30    }
31 }
Line 2 - check whether the height of the element of the maximum size, which displays all the content (title, explanatory text and image), is determined. If not, then it makes no sense to continue.
Line 3 - we calculate how many places, except for one item scrolled up, will take up the maximum allowable offset. This value will limit the offset value in the scrollVerticallyBy method.
Line 4 - calculate the index of the first visible element. Since the mFirstVisibleViewPosition variable is of integer type, due to the drop of the fractional part, we automatically take into account the case of the partially visible first element.
Lines 5-8 - checks if the index of the first visible item exceeds the index of the last item in the list. This can happen, for example, when the list was first scrolled up, and then the number of elements decreased, for example, by applying a filter. In this case, simply “rewind” the list to the beginning.
Line 10 - use the index of the first visible element as a starting point to search for the index of the last.
Line 11 - set the height of the visible area. This value will decrease during the search for the maximum index of visible elements.
Lines 12, 13 - we define the coordinates top and bottom of the rectangle of drawing the first element.
Line 14 - we reduce the free visible area by the size of the visible part of the first element. Those. as if we are virtually placing the first element on the screen.
Line 15 - calculate the height of the second visible element. This element is potentially subject to scaling (see paragraph 5 of the algorithm). The getViewHeightByTopValue method is described in detail below.
Line 16 - check if there is still free space after the “virtual placement” of the second element on the screen.
Line 17 - we fix how much free space is left.
Line 18 - increment the index of the last visible item.
Line 19 - we calculate the largest number of elements of the minimum size that can fit in the remaining free space and at the same time will be fully visible.
Line 20 - increase the index of the last visible element by the calculated value.
Lines 21-24 - check if there is room for partial placement of another item. If so, increase the index by one more.
Now about the method that calculates the height of the second visible element depending on the position on the screen - the top coordinates of the display rectangle of this element.
1privateintgetViewHeightByTopValue(int topValue){
2    topValue -= mTopAndBottomMargins;
3if (topValue > mBigViewHeight) {
4        topValue = mBigViewHeight;
5    } elseif (topValue < 0) {
6        topValue = 0;
7    }
8float scale = 1 - (float) topValue / mBigViewHeight;
9int height =
          (int) (mSmallViewHeight + scale * (mBigViewHeight - mSmallViewHeight));
10    Timber.d("getViewHeightByTopValue
             topValue:%d, scale:%f, height:%d",
             topValue, scale, height);
11return height;
12  }
Line 2 - drop the lower and upper margin.
Lines 3-7 - for correct calculation of the scale, we limit the top from the top to the maximum height of the element, and from below to zero.
Line 8 - we calculate the scaling factor, which takes the value 1 for the maximally expanded element and 0 for the minimum. For the correctness of this particular result, we need restrictions in lines 3-7.
Line 9 - we calculate the element height as an increase to the minimum height and the difference between the maximum and minimum height, taking into account the scaling factor. Those. when the coefficient is 0, the height is minimal, and when 1 - minimum + (maximum - minimum) = maximum.
So now we know the first and last indexes of the elements to be drawn. It's time to do it!
Drawing elements with the necessary scaling
Since the process of drawing is cyclical, then immediately before drawing we warm up the cache with already existing RecyclerView elements (if there are any, of course). This technique is covered in [1, 2] and here I will not dwell on it.
Consider the fillDown method, designed to draw elements moving from top to bottom along the available visible area.
1privatevoidfillDown(RecyclerView.Recycler recycler){
2boolean isViewFromCache;
3int topValue = mFirstVisibleViewTopValue;
4int bottomValue;
5int viewHeight;
6try {
7for (int curPos = mFirstVisibleViewPosition;
                  curPos <= mLastVisibleViewPosition; curPos++) {
8            isViewFromCache = true;
9            View view = mViewCache.get(curPos);
10if (view == null) {
11                isViewFromCache = false;
12                view = recycler.getViewForPosition(curPos);
13            } else {
14                mViewCache.remove(curPos);
15            }
16            viewHeight = getViewHeightByTopValue(topValue);
17            bottomValue = topValue + viewHeight;
18if (view instanceof LaunchItemView) {
19                ((LaunchItemView) view).updateContentSize(viewHeight);
20           }
21if (isViewFromCache) {
22if (view.getTop() != topValue) {
23                    view.setTop(topValue);
24                }
25if (view.getBottom() != bottomValue - mTopAndBottomMargins) {
26                    view.setBottom(bottomValue - mTopAndBottomMargins);
27                }
28                attachView(view);
29            } else {
30                layoutView(view, topValue, bottomValue);
31            }
32            topValue = bottomValue;
33        }
34    } catch (Throwable throwable) {
35        Timber.d(throwable);
36    }
37 }
Line 3 - we initiate the variable topValue by the coordinate of the top of the first visible element. From the stove of this value and we will dance on.
Line 7 - we initiate a loop on the indices of the elements to be drawn.
Line 8 - optimistically we assume that we will find the item we need in the cache.
Line 9 - look at the cache (with hope).
Line 10-12 - if the item we need does not appear in the cache, we request it from an instance of the RecyclerView.Recycler class, which returns a view initialized with data from the adapter for a specific position.
Line 14 - if the item was still in the cache, delete it from there.
Line 16 - calculate the height of the element depending on its position on the screen.
Line 17 - calculate the lower boundary of the element.
Lines 18-20 - we scale the content of the element, if it knows how to do it.
Line 21 - it is important for us to understand whether the current view was previously drawn (taken from the cache) or whether we received a new instance. These two options require different approaches.
Lines 22-28 - if the view is obtained from the cache, then, if necessary, we change the values of the coordinates top and bottom, and attach the view.
Line 30 - if the view is not from the cache, then to display the element we use the layoutView method, which is described below.
Line 32 - we shift the topValue to the lower border of the view just drawn so that this value becomes the starting point for the next iteration of the loop.
Now about the layoutView method for displaying a new list item obtained from an instance of the RecyclerView.Recycler class.
1privatevoidlayoutView(View view, int top, int bottom){
2    addView(view);
3    measureChildWithMargins(view, 0, 0);
4int decoratedMeasuredWidth = getDecoratedMeasuredWidth(view);
5    RecyclerView.LayoutParams layoutParams =
                (RecyclerView.LayoutParams) view.getLayoutParams();
67    layoutDecorated(view,
8            layoutParams.leftMargin,
9            top + layoutParams.topMargin,
10           decoratedMeasuredWidth + layoutParams.rightMargin,
11           bottom + layoutParams.bottomMargin);
12 }
Line 2 - add view to RecyclerView.
Line 3 - measure the view.
Line 4 - define the width of the view.
Line 5 - we get the layout view parameters.
Line 7 - we actually draw the view in the received coordinates.
Content scaling
Of the entire structure of the list item, only the image is subject to scaling. The logic of this scaling is encapsulated in the ScaledImageView class inherited from View.
In our case, the execution of scaling is required at arbitrary points in time, and depends on external factors that we cannot control, for example, on how intensively the user scrolls the list. Since this very organically falls into the reactive programming paradigm, I could not miss the chance to practice with RxJava and the hot data source.
We will use PublishProcessor to create a stream of integer values that define the desired image height:
private PublishProcessor<Integer> mScalePublishProcessor;Accordingly, to perform scaling, we simply generate another stream element with the required value:
publicvoidsetImageHeight(int height){
   mScalePublishProcessor.onNext(height);
}
This is how the asynchronous processing of this stream takes place:
1privatevoidinitObserver(){
2    mScalePublishProcessor
3            .filter(value -> value > 0
                      && value != mBitmapHeight
                      && mOriginalBitmap != null)
4            .onBackpressureBuffer(1,
5                    () -> Timber.d("initObserver: buffer overflow"),
                    BackpressureOverflowStrategy.DROP_OLDEST)
6            .observeOn(Schedulers.computation(), false, 1)
7            .map(this::createScaledBitmap)
8            .map(this::setScaledBitmap)
9            .subscribe(
10                    (value) -> {
11                        invalidate();
12                        Timber.d("initObserver invalidate ThreadId:%d",
                                   Thread.currentThread().getId());
13                    }, Timber::d);
14 }
Line 3 - perform the initial filtering:
- Drop values less than or equal to zero.
- We do not consider values whose value is equal to the height of the image scaled earlier. Those. the case when scaling is no longer required.
- Do not perform scaling when the original image is not initialized. Initialization is discussed below in the setBitmap method.
Line 4 - use backpressure with a buffer size of 1 element and a strategy of displacing an older element from the buffer. Due to this, we will always receive the most current value of the height for scaling. In our case, this is very important, since we have a hot source that, in response to user actions (for example, intensive scrolling of the list), will generate elements faster than we can process them (perform scaling). In such conditions, it makes no sense to accumulate values in the buffer and process these elements sequentially, since they are already outdated, the user has already “squandered” this state.
To illustrate and enhance the effect, I added a delay of 25 ms to the image scaling method (createScaledBitmap) and below resulted in two visualizations: without using back pressure (left) and with back pressure (right). The interface on the left is clearly behind the actions of the user, living some kind of life. Right - lost in smoothness due to the additional delay in the scaling method, but not in responsiveness.
Comparison
Без обратного давления | С обратным давлением |
Line 6 - transfer work to the Schedulers.computation () stream with indication of the buffer size.
Line 7 - we perform scaling (see the description of the method below).
Line 8 - set the scaled image to display.
Line 9 - subscribe to the stream.
Line 11 - at the end of scaling we redraw the element.
The createScaledBitmap method directly involved in obtaining an image of the desired size:
1private Bitmap createScaledBitmap(Integer value){
2    Timber.d("createScaledBitmap value:%d", value);
3if (value > mHeightSpecSize) {
4        value = mHeightSpecSize;
5    }
6return Bitmap.createScaledBitmap(mOriginalBitmap, value, value, false);
7 }
Lines 3-5 - we will limit the maximum height to the size of view, which is calculated in the onMeasure method.
Line 6 - create an image of the desired size from the original.
In the setScaledBitmap method, we save the scaled image for displaying in view:
1private Boolean setScaledBitmap(Bitmap bitmap){
2try {
3            mBitmapLock.lock();
4if (bitmap != mDrawBitmap && mDrawBitmap != null) {
5                mDrawBitmap.recycle();
6            }
7            mDrawBitmap = bitmap;
8            mBitmapHeight = bitmap.getHeight();
9        } catch (Throwable throwable) {
10            Timber.d(throwable);
11        }
12        mBitmapLock.unlock();
13returntrue;
14    }
Lines 3, 12 - we use a lock to synchronize the access to the variable containing the image to be drawn on the screen.
Lines 4-6 - recycle the previously created image.
Lines 7-8 - remember the new image and its size.
The setBitmap method sets the original image:
1publicvoidsetBitmap(Bitmap bitmap){
2if (bitmap != null) {
3        mOriginalBitmap = Bitmap.createScaledBitmap(bitmap,
                                       mWidthSpecSize, mHeightSpecSize, false);
4if (bitmap != mOriginalBitmap) {
5            bitmap.recycle();
6        }
7int height = mBitmapHeight;
8        mBitmapHeight = 0;
9        setImageHeight(height);
10    }
11 }
Line 3 - we scale the original image to the size of the view. This will allow us to save resources when performing scaling in the createScaledBitmap method if the original image exceeds the view in size.
Line 4-6 - recycle the old original image.
Lines 7-9 - reset the height for scaling to overcome the filter in the initObserver method, and produce a stream element to redraw the new image at the required scale.
Total
As part of the article, I tried to clearly explain some of the ideas that came to me during the work on the educational project. The demo project can be found on GitHub at the link . With comments, suggestions, suggestions and criticism, please comment.