Adding highscores with OAuth 2: Laravel Passport + Unity. Part 2
- Tutorial

The continuation of the article about adding records from the game to the site from a specific user. In the first part, we made a record page on Laravel and prepared an API for adding them - both an anonymous and an authorized user. In this part, we will finalize the finished Unity game about the Rat on the Wall, log in to your account and send records to the site on Laravel using the authorization token.
Training
As an example, I propose to use my runner about a rat with the simplest functionality - a rat crawls along the wall, and pans fall on top. You can download the project for Unity 2017.1 from the github . If desired, you can use any other project, here only the principle and one of the options for its implementation are considered.
The tutorial also uses the finished site on Laravel from the first part. You can download it here . To make the site available at http://127.0.0.1:8000/ , you need to use the command:
php artisan serveOpen the project in Unity . The basic gameplay is as follows.

When you click on Play, we will be able to control the rat, moving along the wall within certain boundaries and dodging falling pans. At the top left is a point counter, below is the remainder of lives. When you press Esc , a pause menu is displayed - an empty panel to which we have to add an authorization form. After the game is over, you can restart the R button .
The first thing to do is add anonymous records.
Anonymous Records
Create a new script in the folder
Scriptsusing the command Create -> C# Scriptin the panel Project. Call it WWWScoreand open the resulting file WWWScore.csin the editor you use for Unity ( Visual Studio , MonoDevelop ). First, add a field to store the server address. We indicate
[SerializeField]in order to be able to change this private variable through the panel Inspectorin Unity .[SerializeField]
private string serverURL = "http://127.0.0.1:8000/";By default, the address will be set to the same as our site on Laravel. If desired, it can be changed.
Now let's move on to the function of adding a record from an anonymous user. This function will send a POST request to the server and wait for a response. Alternatively, processing such requests use the coroutine ( Coroutine ) to run parallel functions. A function to use in a coroutine will look like this:
public IEnumerator AddRecord(int score)
{
WWWForm form = new WWWForm();
form.AddField("score", score);
WWW w = new WWW(serverURL + "api/anonymrecord", form);
yield return w;
if(!string.IsNullOrEmpty(w.error)) {
Debug.Log(w.error);
} else {
Debug.Log("Рекорд добавлен!");
}
}We add data for the POST request (the value of the variable
scorethat we will pass when the coroutine is called from the class GameController), we form the request at http://127.0.0.1:8000/api/anonymrecord and wait for the result. As soon as the response from the server arrives (or expires the request), the console will display the message Record added! , or error information in case of failure. We add the script to the
WWWScore.csobject Game Controllervia the Add Component button in the panel Inspector, or simply by dragging the script with the mouse on the object. 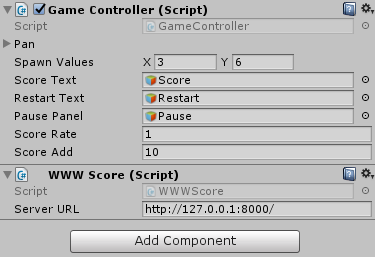
Now edit the script
GameController.csby adding a coroutine call there.void Update () {
if (gameover){
// Действия, выполняемые только один раз после конца игры до рестарта
if (!gameoverStarted) {
gameoverStarted = true; // Существующий код
restartText.SetActive(true); // Существующий код
// Отправляем рекорд
StartCoroutine(GetComponent().AddRecord(score));
}
// ...
} else {
// ...
}
// ...
} The coroutine is called once at the moment when the game was finished - immediately after turning on the game restart interface. When you press R, the scene will be restarted, and you can again reach the end of the game, causing the record to be added.
Save the script and check the game. Some time after the end of the game, the message Record Added! Will appear in the console .

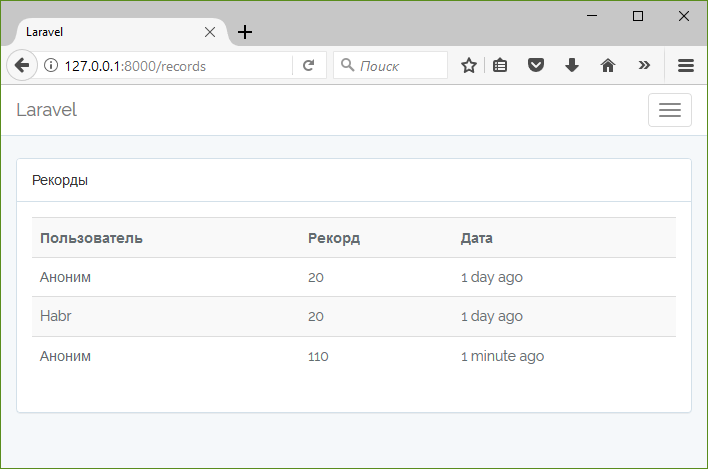
You can open the highscore on the site and make sure that the request has indeed been sent.
Anonymous adding records works. Let's pass to authorization.
Authorization code
Add the authorization function
Login(string email, string password)to WWWScore.cs, which we will then transfer to the coroutine. Similar to the function of adding records, it generates a POST request to our site on Laravel , passing in it a data set at the address http://127.0.0.1:8000/oauth/token . We considered the necessary data set for authorization in the first part of the article.WWWForm form = new WWWForm();
form.AddField("grant_type", "password");
form.AddField("client_id", "");
form.AddField("client_secret", "");
form.AddField("username", email); // Параметр функции
form.AddField("password", password); // Параметр функции
form.AddField("scope", "*"); After receiving the query result, it is necessary to convert the data from
json. This can be done using JsonUtility by converting jsonto an object. We describe the class of the object in the same file WWWScore.csbefore the class description WWWScore.[Serializable]
public class TokenResponse
{
public string access_token;
}As we remember, in the received object there
jsonwill be 4 fields, but we only need a field access_token, which we describe in the class. Now you can add the json conversion to the object itself.TokenResponse tokenResponse = JsonUtility.FromJson(w.text); After receiving the authorization token, we need to save it. For simplicity, we ’ll use the PlayerPrefs class , which is designed just to save user settings.
PlayerPrefs.SetString("Token", tokenResponse.access_token);After we saved the token, you can use it to add a record from this user. But before that, we can also request information about the current user in order to display in the game which user is logged in. To do this, call the coroutine with the corresponding function, which is not yet available.
StartCoroutine(GetUserInfo());We will write this function as well.
Full Login Function Code
[Serializable]
public class TokenResponse
{
public string access_token;
}
public class WWWScore : MonoBehaviour {
// ...
public IEnumerator Login(string email, string password)
{
WWWForm form = new WWWForm();
form.AddField("grant_type", "password");
form.AddField("client_id", "3");
form.AddField("client_secret", "W82LfjDg4DpN2gWlg8Y7eNIUrxkOcyPpA3BM0g3s");
form.AddField("username", email);
form.AddField("password", password);
form.AddField("scope", "*");
WWW w = new WWW(serverURL + "oauth/token", form);
yield return w;
if (!string.IsNullOrEmpty(w.error))
{
Debug.Log(w.error);
}
else
{
TokenResponse tokenResponse = JsonUtility.FromJson(w.text);
if (tokenResponse == null)
{
Debug.Log("Конвертирование не удалось!");
}
else
{
// Сохраняем токен в настройках
PlayerPrefs.SetString("Token", tokenResponse.access_token);
Debug.Log("Токен установлен!");
// Запрашиваем имя пользователя
StartCoroutine(GetUserInfo());
}
}
}
} Getting User Information
We need to execute a GET request at http://127.0.0.1:8000/api/user , registering authorization data in the Headers of the request and not transmitting any other data in the request (
null).Dictionary headers = new Dictionary();
headers.Add("Authorization", "Bearer " + PlayerPrefs.GetString("Token"));
WWW w = new WWW(serverURL + "api/user", null, headers); Similarly to the previous function, as an answer we get
json, for the analysis of which we need to create a separate class with the only field we need from the whole structure json- the name.[Serializable]
public class UserInfo
{
public string name;
}Convert json to an object of this class.
UserInfo userInfo = JsonUtility.FromJson(w.text); Save the username in the settings.
PlayerPrefs.SetString("UserName", userInfo.name);Full GetUserInfo Function Code
// Класс TokenResponse
// ...
[Serializable]
public class UserInfo
{
public string name;
}
public class WWWScore : MonoBehaviour {
// ...
// Функция Login
// ...
public IEnumerator GetUserInfo()
{
Dictionary headers = new Dictionary();
headers.Add("Authorization", "Bearer " + PlayerPrefs.GetString("Token"));
WWW w = new WWW(serverURL + "api/user", null, headers);
yield return w;
if (!string.IsNullOrEmpty(w.error))
{
Debug.Log(w.error);
}
else
{
UserInfo userInfo = JsonUtility.FromJson(w.text);
if (userInfo == null)
{
Debug.Log("Конвертирование не удалось!");
}
else
{
// Сохраняем токен в настройках
PlayerPrefs.SetString("UserName", userInfo.name);
Debug.Log("Имя пользователя установлено!");
}
}
}
} Changes in the code for adding records
To add records from an authorized user, we will slightly modify the function code
AddRecord(int score). We’ll add a check to see if the authorization token is filled in the settings, and if so, we will add it to Headers in the same way as when we received information about the user, with the only difference being that we still transmit the record in the data of the POST request.WWW w;
if (PlayerPrefs.HasKey("Token"))
{
Dictionary headers = new Dictionary();
byte[] rawData = form.data;
headers.Add("Authorization", "Bearer " + PlayerPrefs.GetString("Token"));
w = new WWW(serverURL + "api/record", rawData, headers);
} else {
w = new WWW(serverURL + "api/anonymrecord", form);
} Full code of the modified AddRecord function
public IEnumerator AddRecord(int score)
{
WWWForm form = new WWWForm();
form.AddField("score", score);
WWW w;
if (PlayerPrefs.HasKey("Token"))
{
Dictionary headers = new Dictionary();
byte[] rawData = form.data;
headers.Add("Authorization", "Bearer " + PlayerPrefs.GetString("Token"));
w = new WWW(serverURL + "api/record", rawData, headers);
} else {
w = new WWW(serverURL + "api/anonymrecord", form);
}
yield return w;
if(!string.IsNullOrEmpty(w.error)) {
Debug.Log(w.error);
} else {
Debug.Log("Рекорд добавлен!");
}
} Exit code
To marry a user from the game, you must delete all data about him in the settings. In our case, we do not have any other settings, so we just clear all the settings. Be careful with this in your projects.
public void Logout()
{
PlayerPrefs.DeleteAll();
}Main controller
Now prepare the main game controller (
GameController.cs) to work with user authorization. We will need objects with an authorization panel loginObjand an exit panel logoutObjso that we can switch them. On the authorization panel there will be input fields for the email address ( inputFieldEmail) and password ( inputFieldPassword). We will also need an inscription userNameTextto display the name of the user who has logged into their account.// Объект авторизации
public GameObject loginObj;
// Объект выхода
public GameObject logoutObj;
// Поле E-mail
public GameObject inputFieldEmail;
// Поле Пароль
public GameObject inputFieldPassword;
// Надпись с именем пользователя
public GameObject userNameText;For authorization, we will create a function
Login()that will be called by clicking on the Login button , read the email address with a password and call the coroutine with the function of the same name WWWScore.cs.public void Login()
{
var email = inputFieldEmail.GetComponent().text;
var password = inputFieldPassword.GetComponent().text;
StartCoroutine(GetComponent().Login(email, password));
} The exit function is very simple - it will be called by clicking on the Exit button and call the function of the same name
WWWScore.cswithout any parameters.public void Logout()
{
GetComponent().Logout();
} To switch the visibility of the authorization and exit panels, we will check whether the corresponding setting is saved in PlayerPrefs and, depending on this, display the desired panel.
public void SetLoginVisible()
{
if (PlayerPrefs.HasKey("Token"))
{
loginObj.SetActive(false);
logoutObj.SetActive(true);
}
else
{
loginObj.SetActive(true);
logoutObj.SetActive(false);
}
}Similarly, to display the username, check the name setting and if it is not there, write Anonymous .
public void SetUserName()
{
if (PlayerPrefs.HasKey("UserName"))
{
userNameText.GetComponent().text = PlayerPrefs.GetString("UserName");
} else
{
userNameText.GetComponent().text = "Аноним";
}
} The last two functions should be called only when changing the corresponding settings (and during the initialization process), but within the framework of this tutorial you can do this in the function
Update():void Update () {
// ...
// Подсчет результата
// ...
SetUserName();
SetLoginVisible();
}Now we turn to the visual component.
Authorization interface
Add an authorization interface. Check the Enable checkbox of the socket
Pauseattached to the object Canvas. Create a new empty object ( Create Empty ), name it Loginand place it inside the panel Pause, at the same level as Title(the inscription Pause ). Add a component to it Graphic Raycaster(for correct work with nested elements). 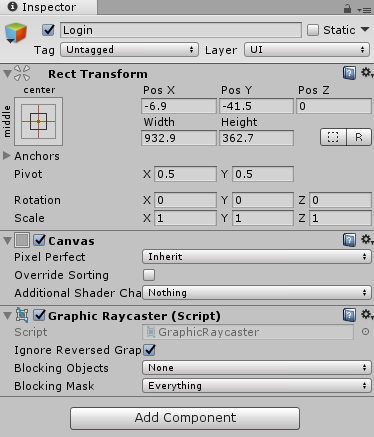
We
Loginadd two input fields to this object , InputFieldEmailand InputFieldPassword( UI -> Input Field ), changing the placeholder text for clarity. To the Input Field component of the object, InputFieldEmailchange the data type in the Content Type field to Email Address , and for the object InputFieldPasswordtoThe Password . Add a buttonButtonLogin( UI -> Button ) to the same objectLogin. The interface will look something like this (if you play around with fonts and component sizes). 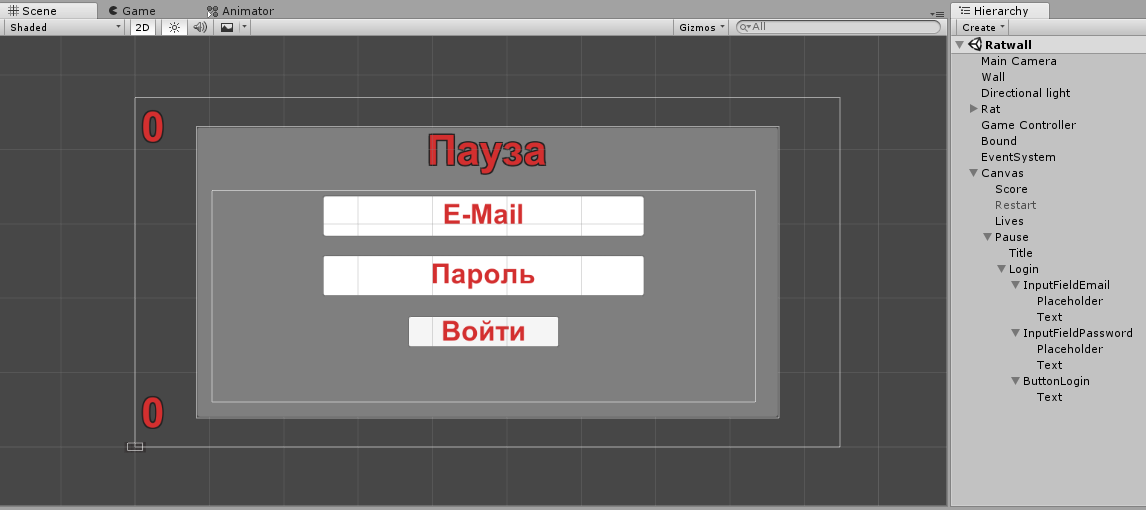
We bind the function created earlier to the event of a click on a button
ButtonLogin. For the Button componentin the panel,Inspectorclick on the plus sign of the On Click () event, select Editor and Runtime from the list (for correct work during debugging) and drag the Game Controller object there(with the mouse or by selecting it when clicking on the selection circle next to the object field) . In the drop-down menu that appears after this, select the componentGameControllerand functionLogin()in it. 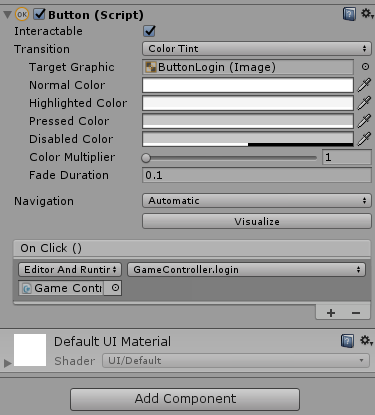
Uncheck Enableat the object
Login- its display is regulated in GameController.cs.Exit interface
Let's create a new object
Logoutsimilar to the object Login(not forgetting about the component Graphic Raycaster) nested in Pause. Add Logoutonly a button to the object ButtonLogout. Similarly to the previous button, we assign the Logout()component function of GameControllerthe object of the same name to the click event . 
Uncheck Enable for the object
Logoutand the panel itself Pause.Username display
Add a text element
User( UI -> Text ) to the main one Canvasbefore the element Pauseby writing Anonymous in it (or leaving it empty, because the inscription will be assigned to GameController.cs) and placing it in the upper right corner. The name of the authorized user will be displayed here.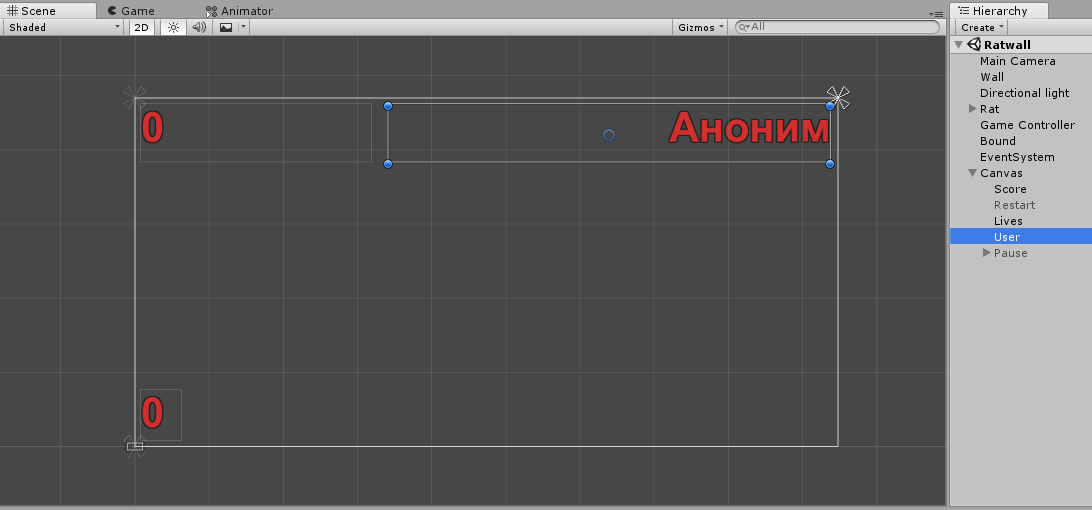
Assigning objects to a controller
Select an object
GameController. In the Inspector panel , the component Game Controllerhas several empty fields that we added in the code earlier. Assign them the appropriate objects by dragging the mouse from the Hierarchy panel or selecting from the list after clicking on the selection circle near the field.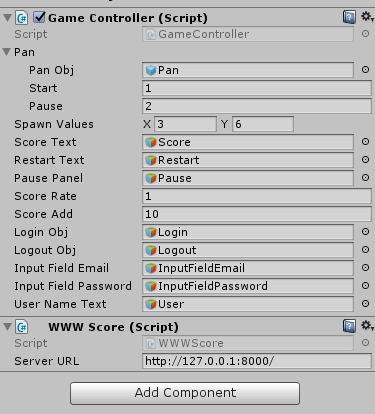
Testing
We come to the final part - checking that everything works as it should. Launch the game and press Esc . An authorization panel will open before us. We will collect the data of the user registered on the site (in the last article we used habr@habrahabr.ru / habrahabr ).
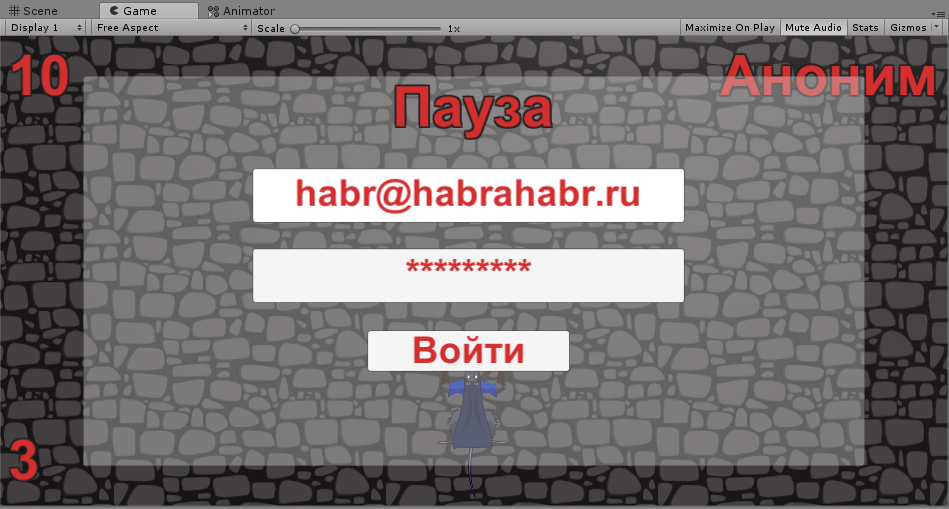
Click on the Login button . If successful, after some time, the user authorization panel will be replaced with the exit panel, leaving only the corresponding button, and instead of Anonymous , Habr will be written in the upper right - the username from the site.
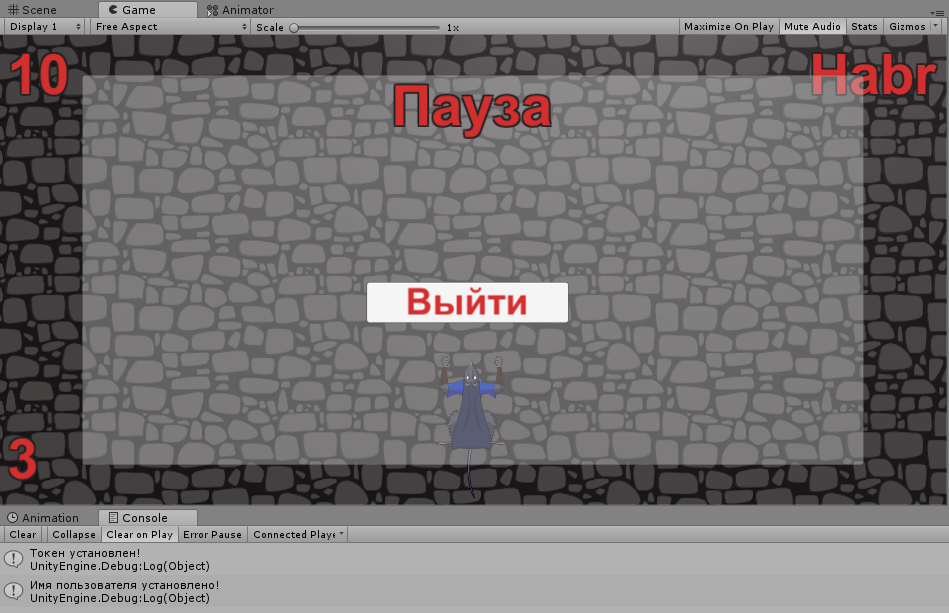
Now, if you press Esc againand set a record, it will be sent from an authorized user, and not from an anonymous user.

This can be checked by going to the records page on the site.

This concludes my first tutorial. I will be glad to answer questions about it!
Full WWWScore.cs Code
using System;
using System.Collections;
using System.Collections.Generic;
using UnityEngine;
[Serializable]
public class TokenResponse
{
public string access_token;
}
[Serializable]
public class UserInfo
{
public string name;
}
public class WWWScore : MonoBehaviour {
[SerializeField]
private string serverURL = "http://127.0.0.1:8000/";
public IEnumerator AddRecord(int score)
{
WWWForm form = new WWWForm();
form.AddField("score", score);
WWW w;
if (PlayerPrefs.HasKey("Token"))
{
Dictionary headers = new Dictionary();
byte[] rawData = form.data;
headers.Add("Authorization", "Bearer " + PlayerPrefs.GetString("Token"));
w = new WWW(serverURL + "api/record", rawData, headers);
} else {
w = new WWW(serverURL + "api/anonymrecord", form);
}
yield return w;
if(!string.IsNullOrEmpty(w.error)) {
Debug.Log(w.error);
} else {
Debug.Log("Рекорд добавлен!");
}
}
public IEnumerator Login(string email, string password)
{
WWWForm form = new WWWForm();
form.AddField("grant_type", "password");
form.AddField("client_id", "3"); // Пример заполнения
form.AddField("client_secret", "W82LfjDg4DpN2gWlg8Y7eNIUrxkOcyPpA3BM0g3s"); // Пример заполнения
form.AddField("username", email);
form.AddField("password", password);
form.AddField("scope", "*");
WWW w = new WWW(serverURL + "oauth/token", form);
yield return w;
if (!string.IsNullOrEmpty(w.error))
{
Debug.Log(w.error);
}
else
{
TokenResponse tokenResponse = JsonUtility.FromJson(w.text);
if (tokenResponse == null)
{
Debug.Log("Конвертирование не удалось!");
}
else
{
// Сохраняем токен в настройках
PlayerPrefs.SetString("Token", tokenResponse.access_token);
Debug.Log("Токен установлен!");
// Запрашиваем имя пользователя
StartCoroutine(GetUserInfo());
}
}
}
public IEnumerator GetUserInfo()
{
Dictionary headers = new Dictionary();
headers.Add("Authorization", "Bearer " + PlayerPrefs.GetString("Token"));
WWW w = new WWW(serverURL + "api/user", null, headers);
yield return w;
if (!string.IsNullOrEmpty(w.error))
{
Debug.Log(w.error);
}
else
{
UserInfo userInfo = JsonUtility.FromJson(w.text);
if (userInfo == null)
{
Debug.Log("Конвертирование не удалось!");
}
else
{
// Сохраняем токен в настройках
PlayerPrefs.SetString("UserName", userInfo.name);
Debug.Log("Имя пользователя установлено!");
}
}
}
public void Logout()
{
	PlayerPrefs.DeleteAll();
}
} Full GameController.cs Code
using System.Collections;
using System.Collections.Generic;
using UnityEngine;
using UnityEngine.SceneManagement;
using UnityEngine.UI;
// Класс сковородки
[System.Serializable]
public class PanClass
{
// Префаб сковородки
public GameObject panObj;
// Пауза до начала падения сковородок
public float start;
// Пауза между сковородками
public float pause;
}
public class GameController : MonoBehaviour {
// Объект сковородки
public PanClass pan;
// Точка спавна
public Vector2 spawnValues;
// Объект с интерфейсом результата
public GameObject scoreText;
// Объект с интерфейсом рестарта игры
public GameObject restartText;
// Объект с интерфейсом панели паузы
public GameObject pausePanel;
// Время между повышениями результата
public float scoreRate = 1.0F;
// Значение, на которое повышается результат
public int scoreAdd = 10;
// Результат
public static int score;
// Признак завершения игры
public static bool gameover;
// Время до следующего результата
private float nextScore = 0.0F;
// Признак того, что единоразовые действия после конца игры были выполнены
private bool gameoverStarted;
// Объект авторизации
public GameObject loginObj;
// Объект выхода
public GameObject logoutObj;
// Поле E-mail
public GameObject inputFieldEmail;
// Поле Пароль
public GameObject inputFieldPassword;
// Надпись с именем пользователя
public GameObject userNameText;
void Start () {
// Инициализация значений (для рестарта)
gameover = false;
score = 0;
gameoverStarted = false;
// Запустить падение сковородок
StartCoroutine(PanSpawn());
}
void FixedUpdate()
{
if (!gameover)
{
// Обновить результат
scoreText.GetComponent().text = score.ToString();
}
}
void Update () {
if (gameover){
// Действия, выполняемые только один раз после конца игры до рестарта
if (!gameoverStarted) {
gameoverStarted = true;
// Отобразить интерфейс рестарта
restartText.SetActive(true);
// Отправляем рекорд
StartCoroutine(GetComponent().AddRecord(score));
}
// Рестарт по R
if (Input.GetKey(KeyCode.R))
{
// Перезапуск сцены
SceneManager.LoadScene(0);
}
} else {
if (Input.GetKeyDown(KeyCode.Escape))
{
if (Time.timeScale != 0) {
// Поставить на паузу
Time.timeScale = 0;
pausePanel.SetActive(true);
} else {
// Снять с паузы
Time.timeScale = 1;
pausePanel.SetActive(false);
}
}
}
// Подсчет результата
if (!gameover && (Time.time > nextScore))
{
nextScore = Time.time + scoreRate;
score = score + scoreAdd;
}
SetUserName();
SetLoginVisible();
}
// Падение сковородки
IEnumerator PanSpawn()
{
// Пауза до начала падения сковородок
yield return new WaitForSeconds(pan.start);
// Бесконечный цикл, до конца игры
while (!gameover)
{
// Генерировать крутящуюся сковородку в случайном месте на определенной высоте
Vector2 spawnPosition = new Vector2(Random.Range(-spawnValues.x, spawnValues.x), spawnValues.y);
Quaternion spawnRotation = Quaternion.identity;
Instantiate(pan.panObj, spawnPosition, spawnRotation);
yield return new WaitForSeconds(pan.pause);
}
}
// Авторизация
public void Login()
{
	var email = inputFieldEmail.GetComponent().text;
	var password = inputFieldPassword.GetComponent().text;
	StartCoroutine(GetComponent().Login(email, password));
}
// Выход
public void Logout()
{
	GetComponent().Logout();
}
// Поменять видимость формы авторизации
public void SetLoginVisible()
{
	if (PlayerPrefs.HasKey("Token"))
	{
		loginObj.SetActive(false);
		logoutObj.SetActive(true);
	}
	else
	{
		loginObj.SetActive(true);
		logoutObj.SetActive(false);
	}
}
// Установить имя пользователя из настроек
public void SetUserName()
{
	if (PlayerPrefs.HasKey("UserName"))
	{
		userNameText.GetComponent().text = PlayerPrefs.GetString("UserName");
	} else
	{
		userNameText.GetComponent().text = "Аноним";
	}
}
} The first part The
finished project on Laravel
The basic project on Unity (branch
master) The finished project on Unity (branch
final)