We create vulnerable virtual machines in two accounts with SecGen
- Tutorial

Today I want to draw your attention to an interesting SecGen project with which it becomes possible to have a new Metasploitable or another virtual machine every day to learn the basics of ethical hacking.
Everything happens in automatic mode, you just need to install the framework. Getting started!
How it works?
SecGen is a script written in ruby. His work is based on Vagrant and Puppet .
Let me remind you that Vagrant is a tool that allows you to quickly and conveniently deploy entire infrastructures from virtual machines using VirtualBox hypervisors , VM Ware on- premises or Amazon AWS cloud service . You can describe all the settings for the future virtual machine in a special Vagrantfile. And you don’t have to download the ISO-images of the OS, because Vagrant already offers many ready-made images of virtual machines (box), which can be downloaded from a special catalog .
A puppet- a tool for automating the configuration of machines, which came to replace bash scripts. Puppet has a clear configuration description language. Scripts are stored in files with the extension .pp. Puppet can install certain software on the machine, before checking that the system meets the required conditions, configure it, set environment variables and much more.
Thus, SecGen only needs to choose which box to download and deploy using Vagrant, which software to install and configure using Puppet and generate flags that the Pentester needs to find during operation.
SecGen has a modular structure and each module is a distribution with a vulnerable application, its settings, puppet scripts and some additional files for its correct processing of SecGen.
Installation
Testing is officially conducted on the Ubuntu distribution and the installation process is described on the official github . I will use 64-bit Ubuntu 16.04.3, which itself is a virtual machine with 2.5 GB of RAM.
Install the required packages
sudo apt-get install ruby-dev zlib1g-dev liblzma-dev build-essential patch virtualbox ruby-bundler vagrant imagemagick libmagickwand-dev exiftoolAlso, you (may) need to install another package that is not listed on the official website
sudo apt-get install libpq-devNow clone the github repository
git clone https://github.com/cliffe/SecGen.gitGo to the created directory and install all the necessary
cd SecGen
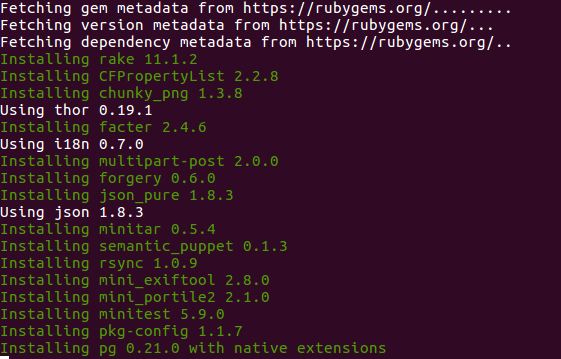
bundle installThe necessary Ruby libraries will begin to be installed. We
check that the script works
ruby secgen.rb --helpAnd see the available options
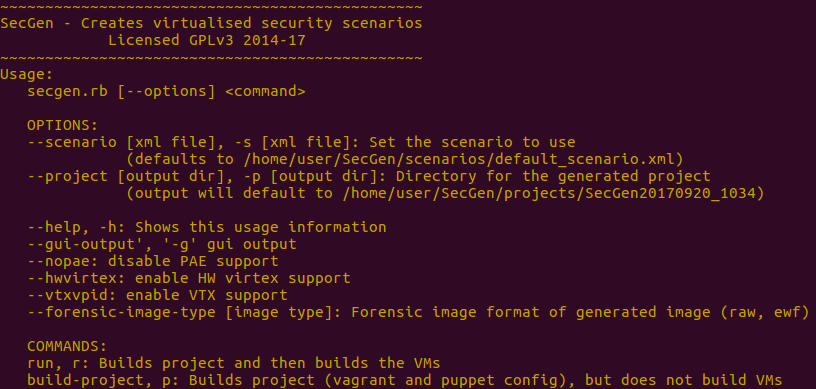
We create our first machine with a random set of vulnerabilities
This is the basic SecGen mode of operation if no keys are set. Execute the command
ruby secgen.rb runThe Vagrant box will start downloading, which SecGen will automatically select for us.

When the Vagrant image of the virtual machine is downloaded and imported, the virtual machine starts
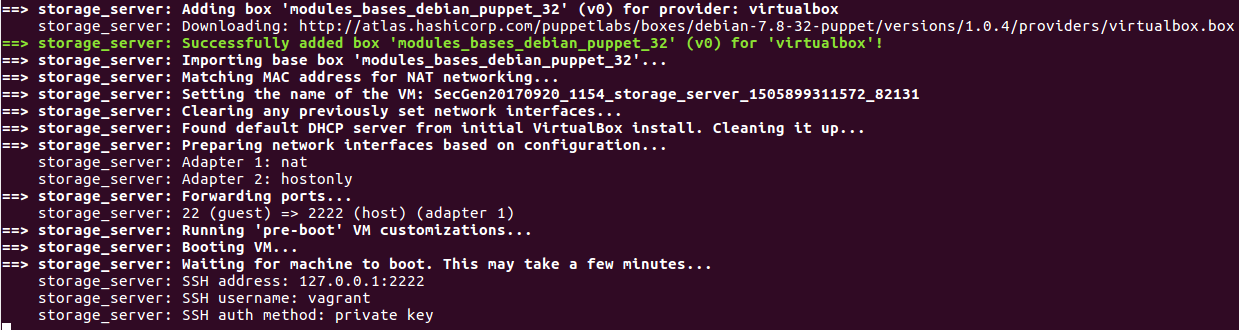
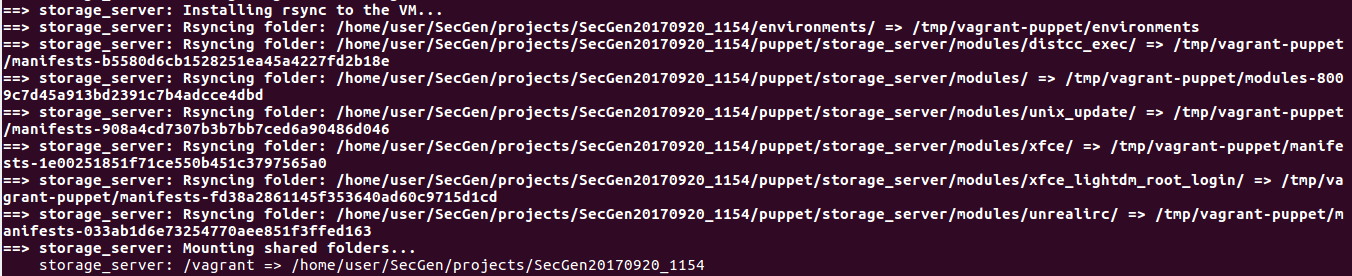
up. The SSH forward is automatically configured to access the machine on port 2222. A key is generated, SecGen connects to the machine, installs rsync and makes installation and configuration of everything necessary.
Please note that if your host machine does not have direct access to repositories, and you work, for example, through a proxy, the installation process will be interrupted because the guest virtual machine will not be able to install rsync. In this case, you will need to get direct access to the repositories, delete the virtual machine and run SecGen again with the build-vms key.
All necessary Puppet scripts will be executed
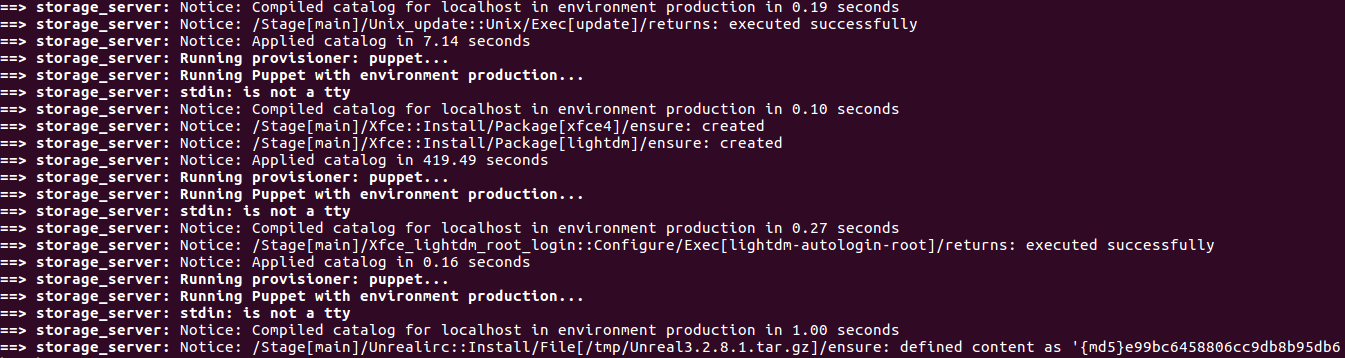
And in the end you will see a message in the console

And with the virtualbox command you can make sure that the machine is really running

Anatomy
The SecGen directory, among others, has the directories projects, scenarios, and modules.
Projects
projects, as the name implies, will store everything you need to create the virtual machine described in the project. You can remove the machine and regenerate the exact same one. To do this, you will need to run the following command indicating the project
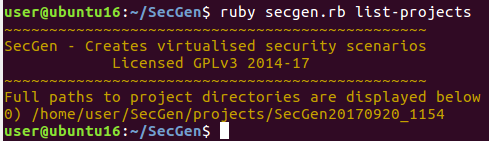
ruby secgen.rb --project home/user/SecGen/projects/SecGen20170920_1154 build-vmsTo get a list of projects, you need to run the command
ruby secgen.rb list-projectsAnd we will get the result.
Similarly, there is a build-project key, specifying which configuration files for Vagrant and Puppet will be created, but virtual machines will not be created. SecGen
scripts
, when launched without a key, will create a virtual machine for us with a random set of vulnerabilities, but we can influence their nature using scripts. They are stored in the scenarios directory as XML files and are categorized. The default is default_scenario.xml and it looks like this
storage_server It says that a Linux virtual machine will be created containing two vulnerabilities of the remote and local types. Those. First you will need to get to the server through one vulnerability and then exploit the second locally.
Typically, the name of the script makes it clear which machine SecGen will create, for example, any_random_vulnerability.xml. I recommend that you familiarize yourself with the examples in the scenarios / examples directory.
There are quite complex scripts in the scenarios / security_audit and scenarios / ctf directories.
For CTF, it is proposed to use the frontend from the developers of SecGen.
Modules
From the description of the scenarios, it becomes clear that the modules are divided into categories. All modules are collected in the modules directory and are divided into
- bases
- build
- encoders
- generators
- networks
- services
- utilities
- vulnerabilities
In turn, each of the groups has subgroups, such as smb, webapp, bash, ftp, etc.
Each module has approximately the following structure.

The secgen_metadata.xml file describes the module in detail. This is necessary for the scripts to work correctly and to select this module for the appropriate case.
Part of the file
chkrootkit 0.49 privilege escalation Thomas Shaw MIT
chkrootkit 0.49 and earlier contain a local privilege escalation vulnerability allowing a non-root user to place a
script in /tmp that will be executed as root when chkrootkit is run. This module adds a cronjob to run chkrootkit
periodically for exploitability.
privilege_escalation root_rwx local linux
...The manifes directory contains puppet configure.pp, init.pp, and install.pp scripts.
The files directory contains the necessary distributions. In this case, one chkrootkit-0.49.tar.gz file. Project
details
When the project is created, you can find the scenario.xml file in it describing what vulnerabilities were used and how to get the flags at all.
For example, in our project, we can find two XML vulnerability tags that point to
modules / vulnerabilities / unix / misc / distcc_exec modules with the description “Distcc has a documented security weakness that enables remote code execution” and modules / vulnerabilities / unix / desktop / xfce_lightdm_root_login with Description "Configures XFCE w / LightDM to automatically login as root without a password \."
If it is not clear what the essence of the module description is, you can go to the appropriate directory and study the module files.
Also in the project directory there is a hidden directory .vagrant, which, in particular, contains a private key for accessing the server via SSH under the user vagrant. Private_key file.
Thus, you can connect to the virtual machine as follows
ssh vagrant@127.0.0.1 -p 2222 -i private_key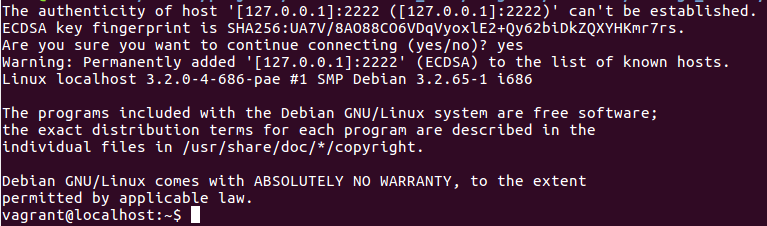
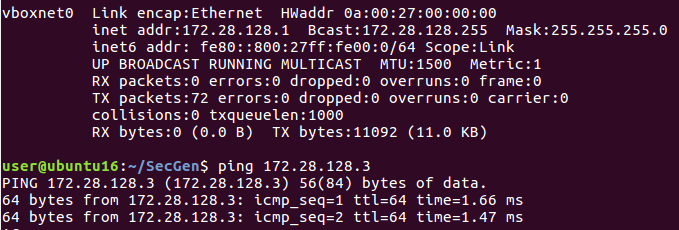
the ifconfig command will give us the following result
eth0      Link encap:Ethernet  HWaddr 08:00:27:86:1c:fb
          inet addr:10.0.2.15  Bcast:10.0.2.255  Mask:255.255.255.0
          inet6 addr: fe80::a00:27ff:fe86:1cfb/64 Scope:Link
          UP BROADCAST RUNNING MULTICAST  MTU:1500  Metric:1
          RX packets:125254 errors:0 dropped:0 overruns:0 frame:0
          TX packets:13570 errors:0 dropped:0 overruns:0 carrier:0
          collisions:0 txqueuelen:1000
          RX bytes:177651061 (169.4 MiB)  TX bytes:1034124 (1009.8 KiB)
eth1      Link encap:Ethernet  HWaddr 08:00:27:83:ea:5e
          inet addr:172.28.128.3  Bcast:172.28.128.255  Mask:255.255.255.0
          inet6 addr: fe80::a00:27ff:fe83:ea5e/64 Scope:Link
          UP BROADCAST RUNNING MULTICAST  MTU:1500  Metric:1
          RX packets:8 errors:0 dropped:0 overruns:0 frame:0
          TX packets:14 errors:0 dropped:0 overruns:0 carrier:0
          collisions:0 txqueuelen:1000
          RX bytes:3130 (3.0 KiB)  TX bytes:2304 (2.2 KiB)
lo        Link encap:Local Loopback
          inet addr:127.0.0.1  Mask:255.0.0.0
          inet6 addr: ::1/128 Scope:Host
          UP LOOPBACK RUNNING  MTU:16436  Metric:1
          RX packets:0 errors:0 dropped:0 overruns:0 frame:0
          TX packets:0 errors:0 dropped:0 overruns:0 carrier:0
          collisions:0 txqueuelen:0
          RX bytes:0 (0.0 B)  TX bytes:0 (0.0 B)
Testing
We found out the IP address and now you can conduct penetration testing. Check the availability of the virtual machine from the host.
Scan and find the following open ports.
sudo nmap -n -Pn -p- 172.28.128.3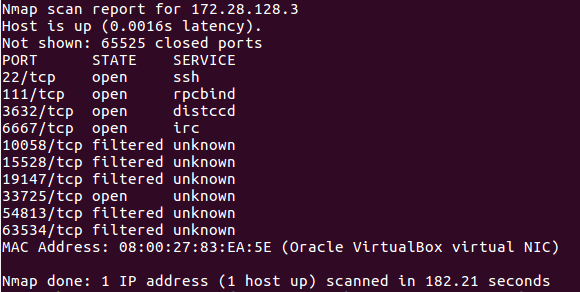
Further, with the help of your favorite penetration testing distribution kit, you can start operating distcc.
The only thing is that by default the virtual machine has two interfaces in the NAT and Host-Only modes, so you can access it from an external machine either through the configuration of port forwarding in the NAT interface.

Or reconfigure the machine, which is the entry point to using another type of Virtualbox interface that is accessible from the outside.
You can change the Host-Only interface type to Bridged, restart the machine, and assign a static IP address if your infrastructure does not have DHCP. And do not forget to set routes across the bridge.
In custody
Of course, people write modules and errors are possible. But in most cases, SecGen creates properly configured and working virtual machines for practice. On the official website in English, you can learn detailed instructions for creating your own scripts and modules, which greatly expands the capabilities of SecGen and, I hope, will allow the project to develop further.