Computer Vision Annotation Tool: A Universal Approach to Data Marking
Intel’s Nizhny Novgorod office, among other things, is developing computer vision algorithms based on deep neural networks. Many of our algorithms are published in the Open Model Zoo repository . For training models requires a large number of marked data. Theoretically, there are many ways to prepare them, but the availability of specialized software speeds up this process many times over. So, in order to improve the efficiency and quality of markup, we have developed our own Computer Vision Annotation Tool (CVAT) .
Of course, on the Internet you can find a lot of annotated data, but here there are some problems. For example, there are constantly new tasks for which there is simply no such data. Another issue is that not all data is suitable for use in the development of commercial products, due to their licensing agreements. Thus, in addition to the development and training of algorithms, our activities include data markup. This is a rather lengthy and laborious process that it would be unwise to lay on the shoulders of developers. For example, for the training of one of our algorithms, about 769,000 objects were labeled in more than 3,100 man-hours.
There are two possible solutions to the problem:
Originally, the Computer Vision Annotation Tool was developed specifically for our annotation team.
Of course, we didn’t have the goal to create a “15th standard”. At first, we used a ready-made solution - Vatic , but in the process, the annotation and algorithmic teams presented new requirements to it, the implementation of which eventually led to a complete rewriting of the program code.
Further in the article:
The Computer Vision Annotation Tool (CVAT) is an open source markup tool for digital images and video. Its main task is to provide the user with convenient and efficient means of marking up data sets. We create CVAT as a universal service that supports different types and markup formats.
For end users, CVAT is a web application running in a browser. It supports different work scenarios and can be used for both personal and team work. The main tasks of machine learning with a teacher in the field of image processing can be divided into three groups:
CVAT is useful in all of these scenarios.
Benefits:
Disadvantages:
Of course, these lists are not exhaustive, but contain the main provisions.
As mentioned earlier, CVAT supports a number of additional components. Among them:
Deep Learning Deployment Toolkit in the OpenVINO Toolkit - used to accelerate the launch of the TF OD API model in the absence of a GPU. We are working on a couple of other useful uses for this component.
Tensorflow Object Detection API - used for automatic layout of objects. By default, we use the Faster RCNN Inception Resnet V2 model trained in COCO (80 classes), but there should be no difficulty connecting other models.
Logstash, Elasticsearch, Kibana- allow to visualize and analyze logs accumulated by customers. This can be used, for example, to monitor the marking process or to find errors and their causes.
NVIDIA CUDA Toolkit - a set of tools to perform calculations on the graphics processor (GPU). Can be used to speed up automatic markup with the TF OD API or other custom add-ons.
At first, we didn’t have any unification, and each markup task was performed with its own tools, mostly written in C ++ using the OpenCV library . These tools were installed locally on end-user machines, there was no mechanism for sharing data, a common pipeline for setting and marking tasks, many things had to be done manually.
The starting point of CVAT history can be considered the end of 2016, when Vatic was introduced as a markup tool., whose interface is presented below. Vatic had open source code and introduced some great, general ideas, such as interpolating markup between keyframes to a video or client-server application architecture. However, in general, it provided fairly modest markup functionality and we did a lot of things ourselves.
For example, for the first six months, the possibility of annotating images was implemented, user attributes of objects were added, a page with a list of existing tasks and the ability to add new ones via a web interface were developed.
During the second half of 2017, we implemented the Tensorflow Object Detection API as a method of obtaining pre-markup. There were many minor improvements of the client, but in the end we were faced with the fact that the client part began to work very slowly. The point was that the size of the tasks increased, the time of their opening increased in proportion to the number of frames and marked data, the UI slowed down due to the ineffective presentation of marked objects, and progress during the working hours was often lost. Productivity mostly sagged on tasks with images, since the foundation of the then architecture was originally designed for working with video. The need to completely change the client architecture emerged, which we successfully managed. Most of the performance problems at the time were gone. Web interface began to work much faster and more stable. The marking of larger tasks has become possible. In the same period, there was an attempt to introduce unit-testing, to ensure, to some extent, automation of checks upon changes. This task has not been solved so successfully. We set up QUnit, Karma, Headless Chrome in the Docker container, wrote some tests, launched it all on CI. Nevertheless, a huge part of the code remained, and still remains uncovered by tests. Another innovation was the system of logging user actions followed by search and visualization based on the ELK Stack. It allows you to monitor the work process of the annotators and look for action scenarios leading to program exceptions. to ensure, to some extent, automation of checks upon changes. This task has not been solved so successfully. We set up QUnit, Karma, Headless Chrome in the Docker container, wrote some tests, launched it all on CI. Nevertheless, a huge part of the code remained, and still remains uncovered by tests. Another innovation was the system of logging user actions followed by search and visualization based on the ELK Stack. It allows you to monitor the work process of the annotators and look for action scenarios leading to program exceptions. to ensure, to some extent, automation of checks upon changes. This task has not been solved so successfully. We set up QUnit, Karma, Headless Chrome in the Docker container, wrote some tests, launched it all on CI. Nevertheless, a huge part of the code remained, and still remains uncovered by tests. Another innovation was the system of logging user actions followed by search and visualization based on the ELK Stack. It allows you to monitor the work process of the annotators and look for action scenarios leading to program exceptions. a huge part of the code remained, and is still not covered by tests. Another innovation was the system of logging user actions followed by search and visualization based on the ELK Stack. It allows you to monitor the work process of the annotators and look for action scenarios leading to program exceptions. a huge part of the code remained, and is still not covered by tests. Another innovation was the system of logging user actions followed by search and visualization based on the ELK Stack. It allows you to monitor the work process of the annotators and look for action scenarios leading to program exceptions.
In the first half of 2018, we expanded client functionality. Attribute Annotation Mode was added, implementing an effective attribute markup script, the idea of which we borrowed from colleagues and summarized; There were opportunities to filter objects for a variety of features, connect a shared storage for downloading data when setting tasks with viewing it through a browser and many others. The tasks became more voluminous and the performance problems began to arise again, but this time the server side was the bottleneck. The problem with Vatic was that it contained a lot of self-written code for tasks that could be solved more easily and efficiently using ready-made solutions. So we decided to redo the server part. We chose Django as a server framework, largely because of its popularity and the availability of many things. what is called “out of the box”. After reworking the server part, when nothing was left of Vatic, we decided that we had already done quite a lot of work that can be shared with the community. So it was decided to go to open source. To get permission for this inside a large company is a rather thorny process. For this there is a large list of requirements. Including, it was necessary to invent a name. We sketched options and conducted a series of surveys among colleagues. As a result, our internal tool was named CVAT, and on June 29, 2018, the source code was published on To get permission for this inside a large company is a rather thorny process. For this there is a large list of requirements. Including, it was necessary to invent a name. We sketched options and conducted a series of surveys among colleagues. As a result, our internal tool was named CVAT, and on June 29, 2018, the source code was published on To get permission for this inside a large company is a rather thorny process. For this there is a large list of requirements. Including, it was necessary to invent a name. We sketched options and conducted a series of surveys among colleagues. As a result, our internal tool was named CVAT, and on June 29, 2018, the source code was published onGitHub in the OpenCV organization under the MIT license and with the initial version 0.1.0. Further development took place in a public repository.
At the end of September 2018, the major version 0.2.0 was released. There were quite a few small changes and fixes, but the main focus was on supporting new types of annotations. So there was a number of tools for marking and validation of segmentation, as well as the possibility of annotation by polylines or points.
The next release, just like a New Year's gift, is scheduled for December 31, 2018. The most significant points here are the optional integration of the Deep Learning Deployment Toolkit as part of the OpenVINO, which is used to accelerate the launch of the TF OD API in the absence of an NVIDIA video card; a user log analytics system that was not previously available in the public version; many improvements in the client side.
We have summarized the CVAT history to date (December 2018) and reviewed the most significant events. More details about the change history can always be read in the changelog .
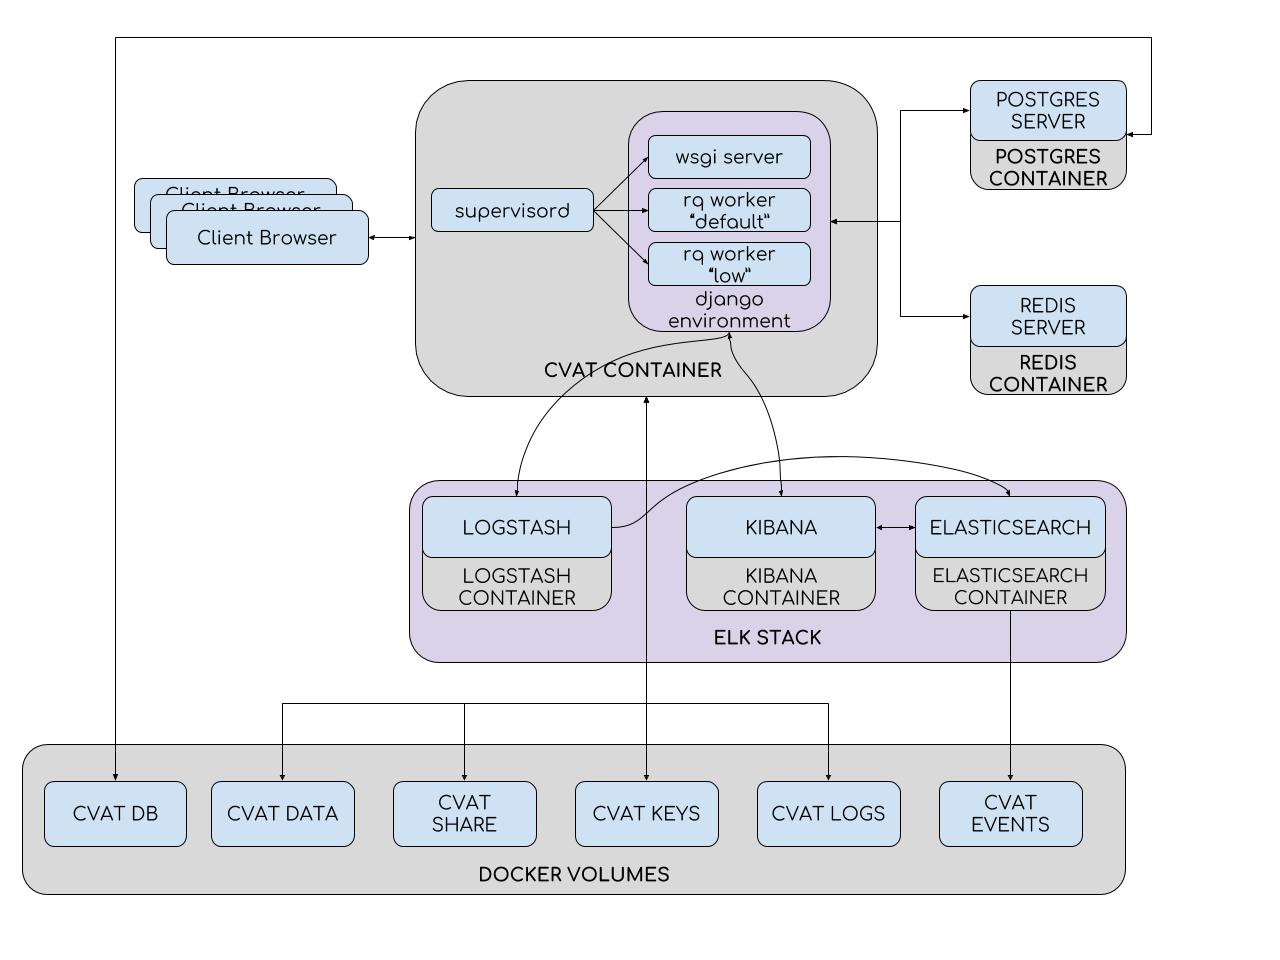
To simplify installation and deployment, CVAT uses Docker containers. The system consists of several containers. The CVAT container runs the supervisord process, which spawns several Python processes in the Django environment. One of them is the wsgi server, which handles client requests. Other processes - rq workers, are used to process “long” tasks from the Redis queues: default and low. Such tasks include those that cannot be processed within one user request (setting a task, preparing an annotation file, marking with the TF OD API, and others). The number of workers can be configured in the supervisord configuration file.
The Django environment communicates with two database servers. The Redis server stores the status of task queues, and the CVAT database contains all information about tasks, users, annotations, etc. PostgreSQL is used as a DBMS for CVAT (and SQLite 3 is being developed). All data is stored on the connected partition (cvat db volume). Partitions are used where it is necessary to avoid data loss when the container is updated. Thus, in the CVAT container are mounted:
The analytics system consists of Elasticsearch, Logstash and Kibana, wrapped in Docker containers. When you save work on the client, all data, including logs, is transmitted to the server. The server, in turn, sends them to Logstash for filtering. In addition, there is the possibility of automatically sending notifications to the mail in case of any errors. Next, logs get into Elasticsearch. The latter saves them on a pluggable partition (cvat events volume). Then, the user can use the Kibana interface to view statistics and logs. At the same time, Kibana will actively interact with Elasticsearch.
At the source level, CVAT consists of a variety of Django applications:
We aim to create a project with a flexible structure. For this reason, optional applications do not have hard (hardcode) embedding. Unfortunately, while we do not have an ideal prototype of the plugin system, but gradually, with the development of new applications, the situation here is improving.
The client part is implemented in JavaScript and Django templates. When writing JavaScript code, we mainly use the object-oriented programming paradigm (as far as the language itself allows) and the model-view-controller architecture. Thus, each high-level object in the client (player, figure, story) has its own source code file, which describes the behavior of the object itself. A file can contain both a single class (if the object does not have any display in the UI) or a whole set (as, for example, in the case of figures: we have many different types of shapes and, therefore, many classes of models, views, and controllers) .
Having come to open source, we received a lot of positive feedback from users. It turned out that the work is demanded by the community. There were many requests for new functionality. And this is wonderful, because now not only internal needs determine the direction of CVAT development. These directions, in fact, a lot. Here are some of them:
There are many other requests for functionality that do not apply to the above. Unfortunately, there are always more requests than opportunities to implement them. For this reason, we encourage the community to connect and actively participate in open source development. It does not have to be a major investment - we will be happy and small, simple changes. We have prepared an instruction that describes how to set up the development environment, the process of creating your PR and more. As mentioned earlier, there is no documentation for developers, but you can always contact us in Gitter for help . So ask, turn on and create! Good luck to all!
Of course, on the Internet you can find a lot of annotated data, but here there are some problems. For example, there are constantly new tasks for which there is simply no such data. Another issue is that not all data is suitable for use in the development of commercial products, due to their licensing agreements. Thus, in addition to the development and training of algorithms, our activities include data markup. This is a rather lengthy and laborious process that it would be unwise to lay on the shoulders of developers. For example, for the training of one of our algorithms, about 769,000 objects were labeled in more than 3,100 man-hours.
There are two possible solutions to the problem:
- The first is to transfer data for markup to third-party companies with the appropriate specialization. We had a similar experience. Here it is worth noting the complicated process of validation and re-marking of data, as well as the presence of bureaucracy.
- The second, more convenient for us - the creation and support of their own annotation team. Convenience is the ability to quickly set new tasks, manage their progress and facilitate balancing between price and quality. In addition, it is possible to implement your own automation algorithms and improve the quality of markup.
Originally, the Computer Vision Annotation Tool was developed specifically for our annotation team.
Of course, we didn’t have the goal to create a “15th standard”. At first, we used a ready-made solution - Vatic , but in the process, the annotation and algorithmic teams presented new requirements to it, the implementation of which eventually led to a complete rewriting of the program code.
Further in the article:
- General information (functionality, applications, advantages and disadvantages of the tool)
- History and evolution (a brief narration on how CVAT lived and developed)
- Internal device (high-level architecture description)
- Directions of development (a little about the goals that I would like to achieve, and possible ways to them)
General information
The Computer Vision Annotation Tool (CVAT) is an open source markup tool for digital images and video. Its main task is to provide the user with convenient and efficient means of marking up data sets. We create CVAT as a universal service that supports different types and markup formats.
For end users, CVAT is a web application running in a browser. It supports different work scenarios and can be used for both personal and team work. The main tasks of machine learning with a teacher in the field of image processing can be divided into three groups:
- Object Detection
- Image classification
- Image segmentation
CVAT is useful in all of these scenarios.
Benefits:
- No installation for end users. To create a task or markup data just open a certain link in the browser.
- The possibility of collaboration. It is possible to make the task publicly accessible to users and parallelize the work on it.
- Ease of deployment. CVAT is installed on the local network by a couple of commands using Docker .
- Automating the markup process. Interpolation, for example, allows you to get markup on multiple frames, with real work only on some key.
- The experience of professionals. The tool was developed with the participation of annotation and several algorithmic commands.
- The possibility of integration. CVAT is suitable for embedding into broader platforms. For example, Onepanel .
- Optional support for various tools:
- Deep Learning Deployment Toolkit (component in OpenVINO)
- Tensorflow Object Detection API (TF OD API)
- ELK (Elasticsearch + Logstash + Kibana) analytics system
- NVIDIA CUDA Toolkit
- Support for different annotation scripts.
- Open source under a simple and free MIT license .
Disadvantages:
- Limited browser support. Operability of the client part is guaranteed only in the Google Chrome browser. We do not test CVAT in other browsers, but theoretically the tool can earn in Opera, Yandex Browser and others with the Chromium engine.
- Not developed a system of automatic tests. All performance checks are conducted manually, which significantly slows down the development. However, we are already working on solving this problem together with students of the UNN them. Lobachevsky in the IT Lab project .
- No source code documentation. Getting involved can be quite difficult.
- Performance restrictions. With the increase in requirements for markup volumes, we faced various problems, such as the limitation of the Chrome Sandbox on the use of RAM.
Of course, these lists are not exhaustive, but contain the main provisions.
As mentioned earlier, CVAT supports a number of additional components. Among them:
Deep Learning Deployment Toolkit in the OpenVINO Toolkit - used to accelerate the launch of the TF OD API model in the absence of a GPU. We are working on a couple of other useful uses for this component.
Tensorflow Object Detection API - used for automatic layout of objects. By default, we use the Faster RCNN Inception Resnet V2 model trained in COCO (80 classes), but there should be no difficulty connecting other models.
Logstash, Elasticsearch, Kibana- allow to visualize and analyze logs accumulated by customers. This can be used, for example, to monitor the marking process or to find errors and their causes.
NVIDIA CUDA Toolkit - a set of tools to perform calculations on the graphics processor (GPU). Can be used to speed up automatic markup with the TF OD API or other custom add-ons.
Data markup
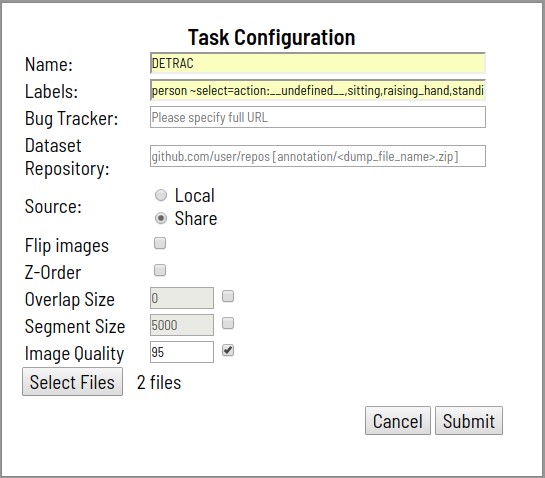
- The process begins with a problem statement for markup. The staging includes:
- Specifying task name
- Enumeration of classes to be markup and their attributes
- Specifying Files to Download
- Data is loaded from the local file system, or from a distributed file system mounted on the container.
- A task can contain one archive with images, one video, a set of images, and even a directory structure with images when loaded via distributed storage.
- Optionally set:
- Link to detailed markup specification, as well as any other additional information (Bug Tracker)
- Link to a remote Git repository for storing annotations (Dataset Repository)
- Rotate all images 180 degrees (Flip Images)
- Layer support for segmentation tasks (Z-Order)
- Segment Size (Segment Size). The loadable task can be divided into several subtasks for parallel work.
- Segment intersection area (Overlap). Used in video to merge annotations in different segments.
- Quality level when converting images (Image Quality)
- After processing the request, the created task will appear in the task list.
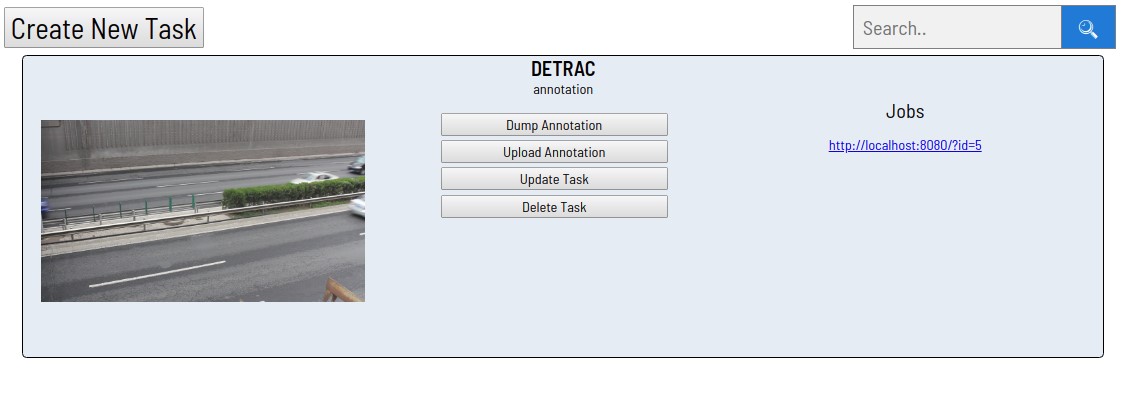
- Each of the links in the "Jobs" section corresponds to one segment. In this case, the task was not previously divided into segments. Clicking on any of the links opens a markup page.

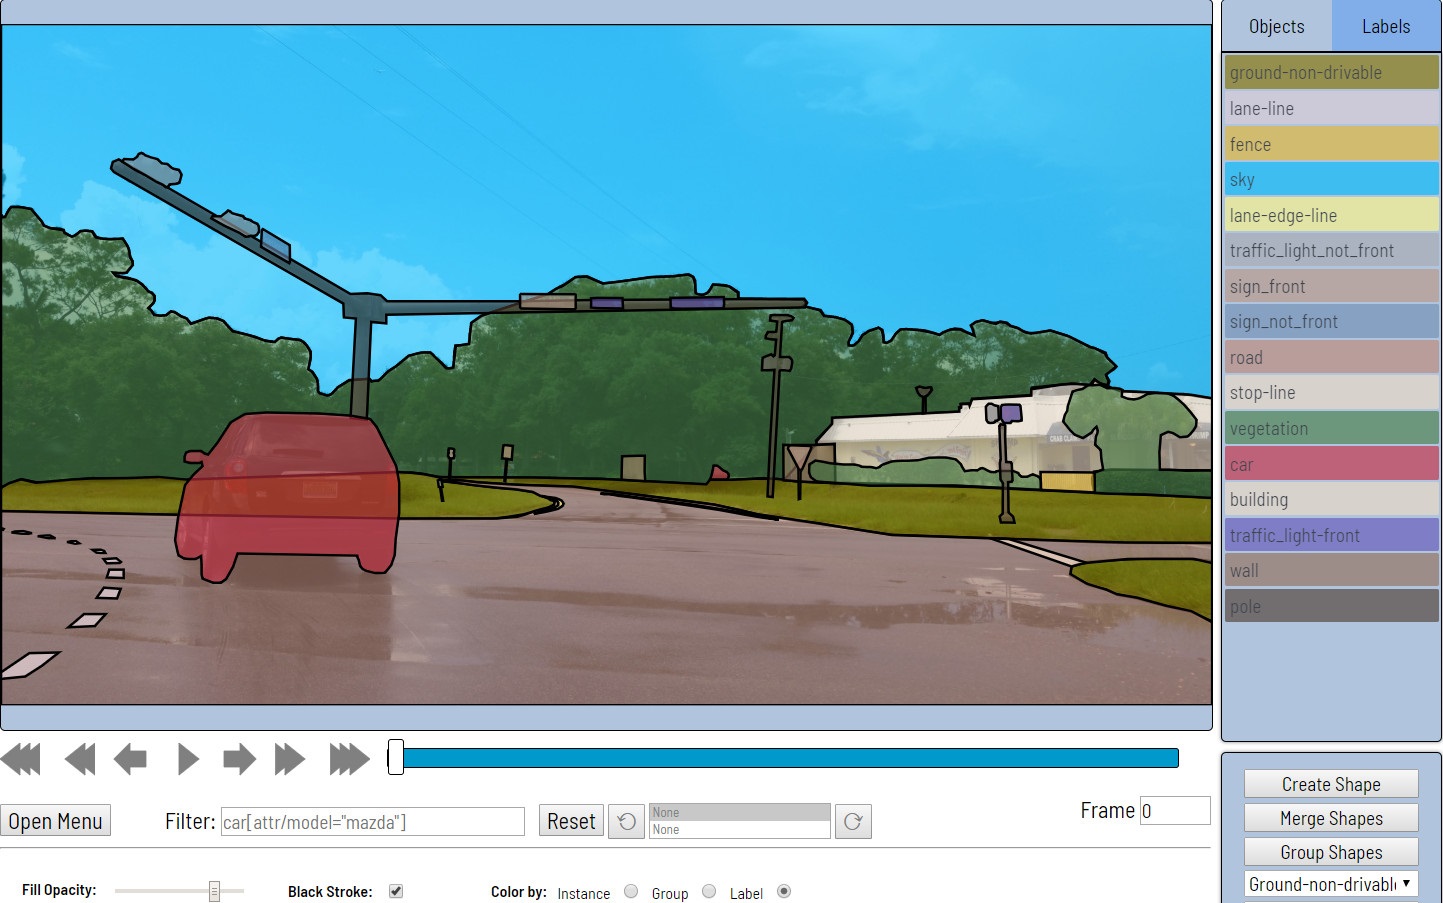
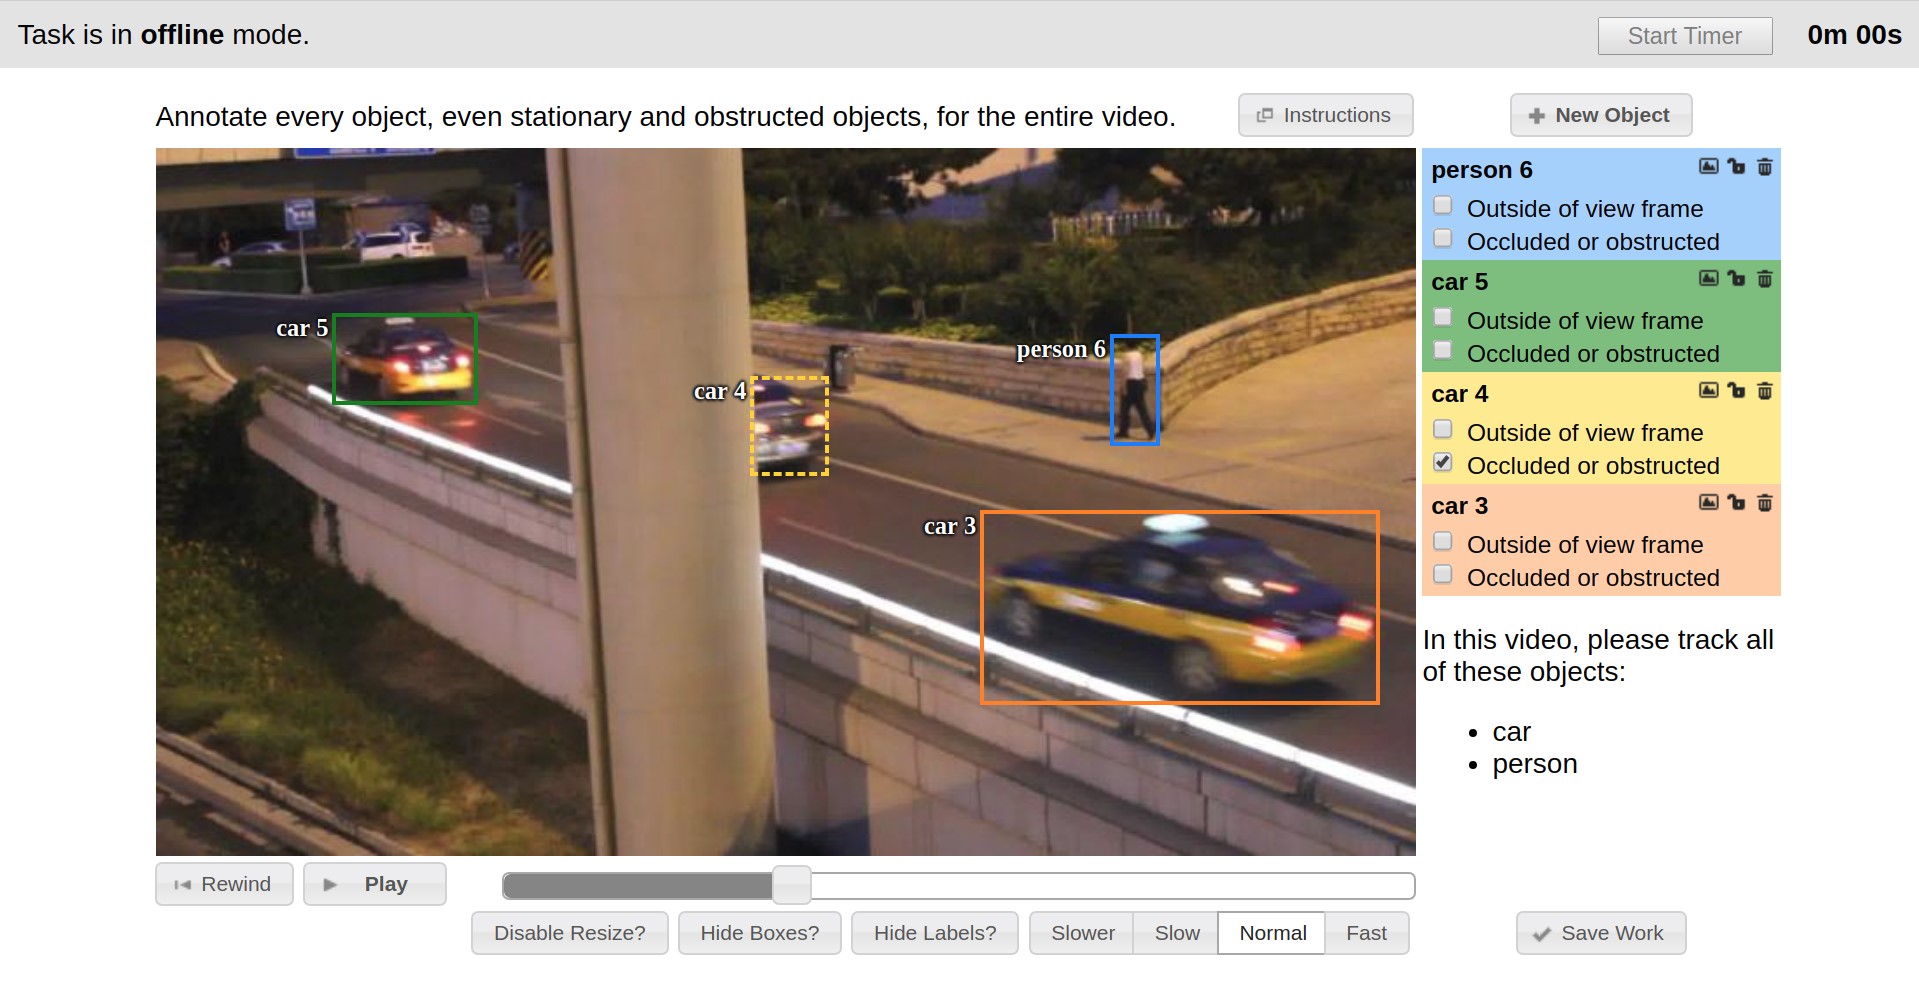
- Next comes the data markup. Rectangles, polygons (mainly for segmentation problems), polylines (may be useful, for example, for road markings) and a set of points (for example, face landmarks or pose estimation) are provided as primitives.
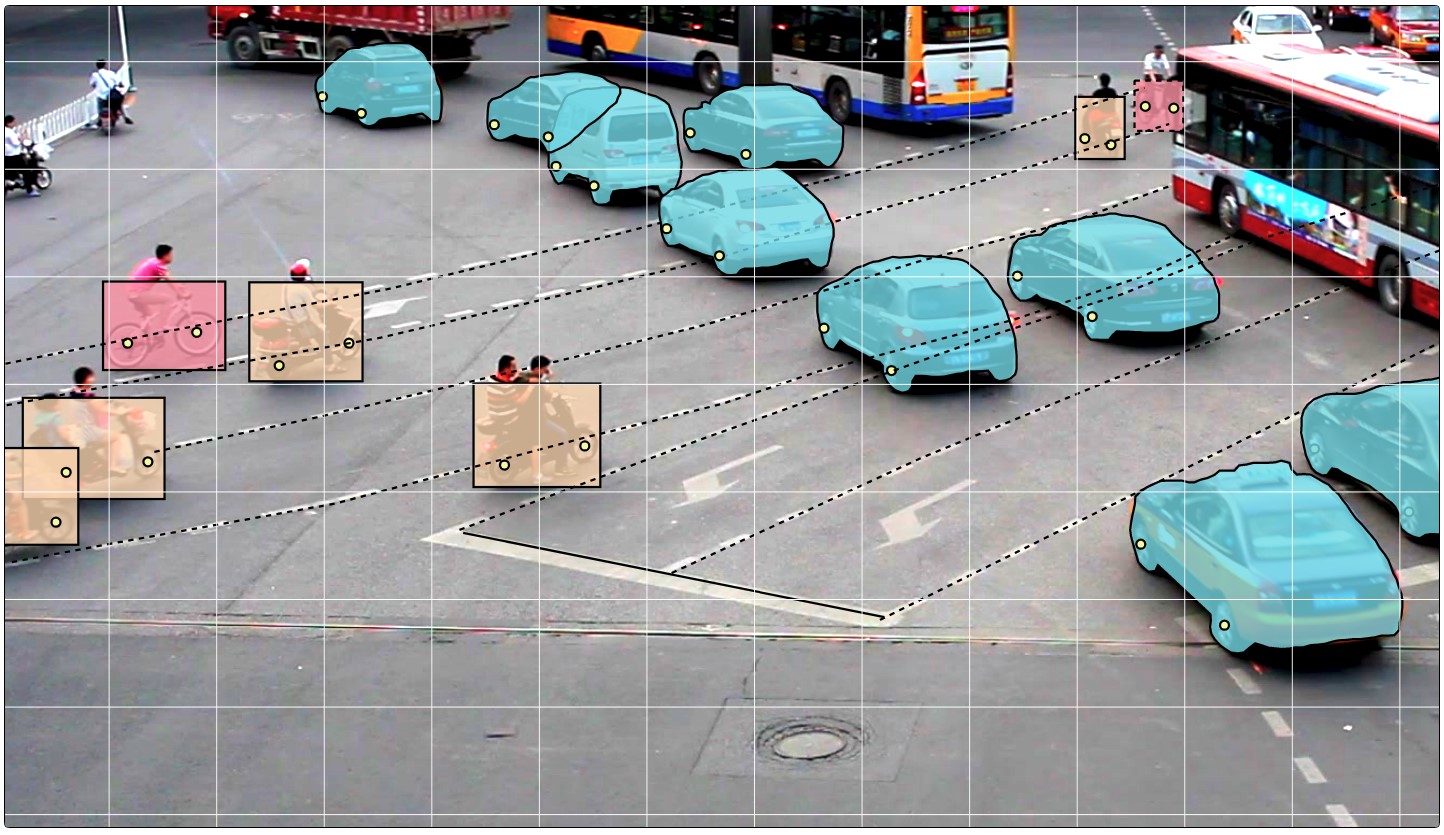
Various automation tools are also available (copying, replicating to other frames, interpolation, pre-marking with the TF ODI API), visual settings, many hot keys, search, filtering and other useful functionality. In the settings window, you can change a number of parameters for more comfortable work.
The help dialog box contains many supported hotkey combinations and some other hints.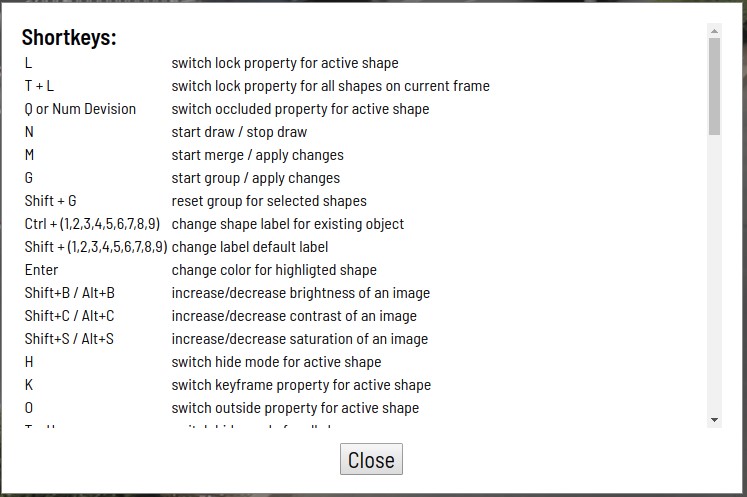
The marking process can be seen in the examples below.
CVAT can linearly interpolate rectangles and attributes between keyframes of a video. Due to this, annotation on multiple frames is displayed automatically.
For the classification script, Attribute Annotation Mode was developed, which allows you to quickly annotate attributes due to the attention of the marker on one specific property. In addition, the markup here is due to the use of "hot keys".
Using polygons, semantic segmentation and instance segmentation scripts are supported. Different visual settings facilitate the validation process. - Obtaining annotations
Clicking the “Dump Annotation” button initiates the process of preparing and downloading the markup results as a single file. An annotation file is a specified .xml file that contains some task metadata and all annotation. The markup can be downloaded directly to the Git repository, if the latter was connected at the stage of creating the task.
History and evolution
At first, we didn’t have any unification, and each markup task was performed with its own tools, mostly written in C ++ using the OpenCV library . These tools were installed locally on end-user machines, there was no mechanism for sharing data, a common pipeline for setting and marking tasks, many things had to be done manually.
The starting point of CVAT history can be considered the end of 2016, when Vatic was introduced as a markup tool., whose interface is presented below. Vatic had open source code and introduced some great, general ideas, such as interpolating markup between keyframes to a video or client-server application architecture. However, in general, it provided fairly modest markup functionality and we did a lot of things ourselves.
For example, for the first six months, the possibility of annotating images was implemented, user attributes of objects were added, a page with a list of existing tasks and the ability to add new ones via a web interface were developed.
During the second half of 2017, we implemented the Tensorflow Object Detection API as a method of obtaining pre-markup. There were many minor improvements of the client, but in the end we were faced with the fact that the client part began to work very slowly. The point was that the size of the tasks increased, the time of their opening increased in proportion to the number of frames and marked data, the UI slowed down due to the ineffective presentation of marked objects, and progress during the working hours was often lost. Productivity mostly sagged on tasks with images, since the foundation of the then architecture was originally designed for working with video. The need to completely change the client architecture emerged, which we successfully managed. Most of the performance problems at the time were gone. Web interface began to work much faster and more stable. The marking of larger tasks has become possible. In the same period, there was an attempt to introduce unit-testing, to ensure, to some extent, automation of checks upon changes. This task has not been solved so successfully. We set up QUnit, Karma, Headless Chrome in the Docker container, wrote some tests, launched it all on CI. Nevertheless, a huge part of the code remained, and still remains uncovered by tests. Another innovation was the system of logging user actions followed by search and visualization based on the ELK Stack. It allows you to monitor the work process of the annotators and look for action scenarios leading to program exceptions. to ensure, to some extent, automation of checks upon changes. This task has not been solved so successfully. We set up QUnit, Karma, Headless Chrome in the Docker container, wrote some tests, launched it all on CI. Nevertheless, a huge part of the code remained, and still remains uncovered by tests. Another innovation was the system of logging user actions followed by search and visualization based on the ELK Stack. It allows you to monitor the work process of the annotators and look for action scenarios leading to program exceptions. to ensure, to some extent, automation of checks upon changes. This task has not been solved so successfully. We set up QUnit, Karma, Headless Chrome in the Docker container, wrote some tests, launched it all on CI. Nevertheless, a huge part of the code remained, and still remains uncovered by tests. Another innovation was the system of logging user actions followed by search and visualization based on the ELK Stack. It allows you to monitor the work process of the annotators and look for action scenarios leading to program exceptions. a huge part of the code remained, and is still not covered by tests. Another innovation was the system of logging user actions followed by search and visualization based on the ELK Stack. It allows you to monitor the work process of the annotators and look for action scenarios leading to program exceptions. a huge part of the code remained, and is still not covered by tests. Another innovation was the system of logging user actions followed by search and visualization based on the ELK Stack. It allows you to monitor the work process of the annotators and look for action scenarios leading to program exceptions.
In the first half of 2018, we expanded client functionality. Attribute Annotation Mode was added, implementing an effective attribute markup script, the idea of which we borrowed from colleagues and summarized; There were opportunities to filter objects for a variety of features, connect a shared storage for downloading data when setting tasks with viewing it through a browser and many others. The tasks became more voluminous and the performance problems began to arise again, but this time the server side was the bottleneck. The problem with Vatic was that it contained a lot of self-written code for tasks that could be solved more easily and efficiently using ready-made solutions. So we decided to redo the server part. We chose Django as a server framework, largely because of its popularity and the availability of many things. what is called “out of the box”. After reworking the server part, when nothing was left of Vatic, we decided that we had already done quite a lot of work that can be shared with the community. So it was decided to go to open source. To get permission for this inside a large company is a rather thorny process. For this there is a large list of requirements. Including, it was necessary to invent a name. We sketched options and conducted a series of surveys among colleagues. As a result, our internal tool was named CVAT, and on June 29, 2018, the source code was published on To get permission for this inside a large company is a rather thorny process. For this there is a large list of requirements. Including, it was necessary to invent a name. We sketched options and conducted a series of surveys among colleagues. As a result, our internal tool was named CVAT, and on June 29, 2018, the source code was published on To get permission for this inside a large company is a rather thorny process. For this there is a large list of requirements. Including, it was necessary to invent a name. We sketched options and conducted a series of surveys among colleagues. As a result, our internal tool was named CVAT, and on June 29, 2018, the source code was published onGitHub in the OpenCV organization under the MIT license and with the initial version 0.1.0. Further development took place in a public repository.
At the end of September 2018, the major version 0.2.0 was released. There were quite a few small changes and fixes, but the main focus was on supporting new types of annotations. So there was a number of tools for marking and validation of segmentation, as well as the possibility of annotation by polylines or points.
The next release, just like a New Year's gift, is scheduled for December 31, 2018. The most significant points here are the optional integration of the Deep Learning Deployment Toolkit as part of the OpenVINO, which is used to accelerate the launch of the TF OD API in the absence of an NVIDIA video card; a user log analytics system that was not previously available in the public version; many improvements in the client side.
We have summarized the CVAT history to date (December 2018) and reviewed the most significant events. More details about the change history can always be read in the changelog .
Internal organization
To simplify installation and deployment, CVAT uses Docker containers. The system consists of several containers. The CVAT container runs the supervisord process, which spawns several Python processes in the Django environment. One of them is the wsgi server, which handles client requests. Other processes - rq workers, are used to process “long” tasks from the Redis queues: default and low. Such tasks include those that cannot be processed within one user request (setting a task, preparing an annotation file, marking with the TF OD API, and others). The number of workers can be configured in the supervisord configuration file.
The Django environment communicates with two database servers. The Redis server stores the status of task queues, and the CVAT database contains all information about tasks, users, annotations, etc. PostgreSQL is used as a DBMS for CVAT (and SQLite 3 is being developed). All data is stored on the connected partition (cvat db volume). Partitions are used where it is necessary to avoid data loss when the container is updated. Thus, in the CVAT container are mounted:
- Section with video and images (cvat data volume)
- Section with keys (cvat keys volume)
- Section with logs (cvat logs volume)
- Shared file storage (cvat shared volume)
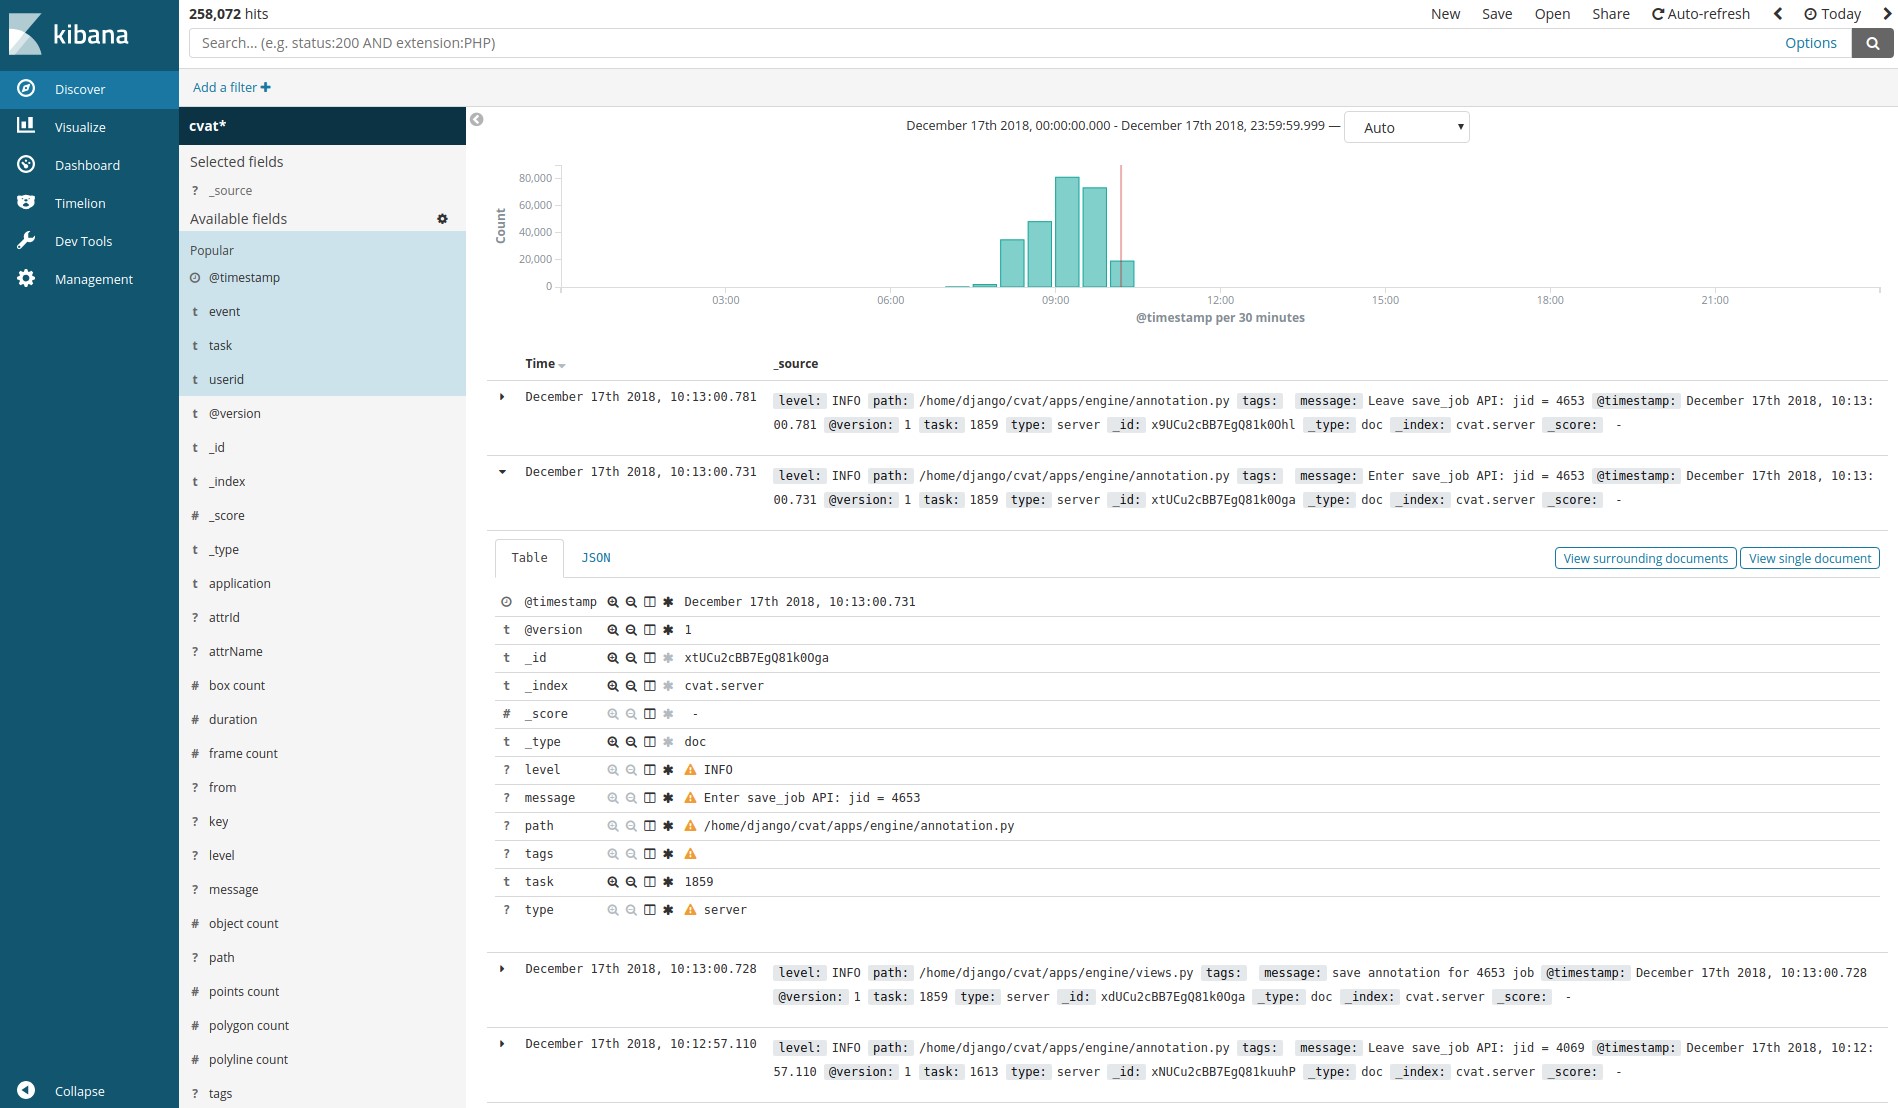
The analytics system consists of Elasticsearch, Logstash and Kibana, wrapped in Docker containers. When you save work on the client, all data, including logs, is transmitted to the server. The server, in turn, sends them to Logstash for filtering. In addition, there is the possibility of automatically sending notifications to the mail in case of any errors. Next, logs get into Elasticsearch. The latter saves them on a pluggable partition (cvat events volume). Then, the user can use the Kibana interface to view statistics and logs. At the same time, Kibana will actively interact with Elasticsearch.
At the source level, CVAT consists of a variety of Django applications:
- authentication - authentication of users in the system (basic and LDAP)
- engine - key application (basic database models; loading and saving tasks; loading and unloading annotations; client markup interface; server interface for creating, modifying and deleting tasks)
- dashboard - client interface for creating, editing, searching and deleting tasks
- documentation - display user documentation in the client interface
- tf_annotation - automatic annotation with Tensorflow Object Detection API
- log_viewer - sending logs from the client to Logstash when saving a task
- log_proxy - proxy connection CVAT → Kibana
- git - integration of Git-repositories for storing the finished annotation
We aim to create a project with a flexible structure. For this reason, optional applications do not have hard (hardcode) embedding. Unfortunately, while we do not have an ideal prototype of the plugin system, but gradually, with the development of new applications, the situation here is improving.
The client part is implemented in JavaScript and Django templates. When writing JavaScript code, we mainly use the object-oriented programming paradigm (as far as the language itself allows) and the model-view-controller architecture. Thus, each high-level object in the client (player, figure, story) has its own source code file, which describes the behavior of the object itself. A file can contain both a single class (if the object does not have any display in the UI) or a whole set (as, for example, in the case of figures: we have many different types of shapes and, therefore, many classes of models, views, and controllers) .
Directions of development
Having come to open source, we received a lot of positive feedback from users. It turned out that the work is demanded by the community. There were many requests for new functionality. And this is wonderful, because now not only internal needs determine the direction of CVAT development. These directions, in fact, a lot. Here are some of them:
- Make CVAT more convenient, intuitive, as fast as possible and, finally, just beautiful. To do this, it is necessary in many ways to rework the UI with the involvement of professional designers and the introduction of modern approaches.
- Cover a larger circle of annotation scenarios. For example, add markup by cuboids or sorting images by a specific attribute.
- Increase the reliability and stability of the tool, simplify development. Here is the question of processing the automated testing system to a state where it would be really effective and useful.
- Expand automatic markup features. Embed more deep learning patterns that automate markup. In particular, with the Deep Learning Deployment Toolkit it is possible to connect a large variety of models from OpenVINO without any additional dependencies. We already have some useful chips, but for a number of reasons they have not yet entered the public repository. In addition, I would like to support the loading of custom models.
- Develop a CVAT demo server so that anyone can go in there and try out the tool in action without wasting time on installation. There is a third-party demo server from Onepanel, however CVAT has undergone significant modifications in it and we cannot be responsible for the stability of its work.
- Integrate the Amazon Mechanical Turk platform into CVAT for data layout using crowdsourcing. This platform provides a ready-made SDK for this purpose.
There are many other requests for functionality that do not apply to the above. Unfortunately, there are always more requests than opportunities to implement them. For this reason, we encourage the community to connect and actively participate in open source development. It does not have to be a major investment - we will be happy and small, simple changes. We have prepared an instruction that describes how to set up the development environment, the process of creating your PR and more. As mentioned earlier, there is no documentation for developers, but you can always contact us in Gitter for help . So ask, turn on and create! Good luck to all!