How SystemUI in Android works
In this article, I will discuss the architecture and operation of the main Android application, SystemUI. I was interested in this topic, because I’m wondering how the system works, which is used by such a huge number of users and for which thousands of apps roll out every day on Google Play or just on the Internet. In addition, I am interested in the issue of information security of Android and applications created for it.
In the Android system, SystemUI is an application, the path to the source code of which is in platform_frameworks_base / packages / SystemUI / , on the device it is in system / priv-app / -SystemUI.
priv-app is the directory where privileged applications are stored. By the way, on the way system / app are pre-installed applications, and the usual applications that we install on our device ourselves are stored in data / app.
Then the question immediately arises: why it is impossible to shove all the pre-installed and privileged applications in one directory, why do you need this separation?
The fact is that some applications are more system than others :) And this separation is necessary in order to reduce the exploit coverage of system applications in order to gain access to protected operations. You can create an application that will have a special ApplicationInfo.FLAG_SYSTEM and will get more permissions in the system, however, an apk file with this permission will be placed in the system section.
So, SystemUI is an apk-file, which is essentially a regular application. However, if you look at the complex SystemUI device, it no longer seems like this is just a simple application, right?
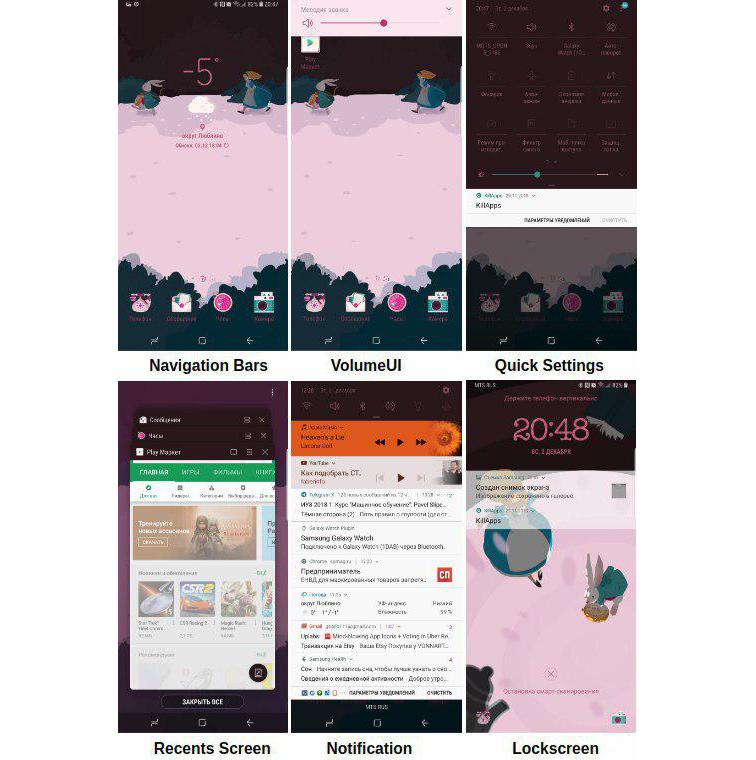
This application performs very important functions:
- Navigation
- Recent Applications
- Quick settings
- Notification bar
- Lock screen
- Volume control
- Main screen
- ...
Launch SystemUI
As I said above, SystemUI is not similar to a regular application, so its launch is not accompanied by the launch of activity, as it happens in most applications. SystemUI is a global user interface that runs during the system boot process and cannot be completed.
    <application
        android:name=".SystemUIApplication"
        android:persistent="true"
        android:allowClearUserData="false"
        android:allowBackup="false"
        android:hardwareAccelerated="true"
        android:label="@string/app_label"
        android:icon="@drawable/icon"
        android:process="com.android.systemui"
        android:supportsRtl="true"
        android:theme="@style/Theme.SystemUI"
        android:defaultToDeviceProtectedStorage="true"
        android:directBootAware="true"
        android:appComponentFactory="androidx.core.app.CoreComponentFactory">
If we climb into SystemServer, which is one of two pillars in the Android world (the second is Zygote, but I’ll tell you about this some other time), then we can find a place where SystemUI starts when the system boots.
staticfinalvoidstartSystemUi(Context context, WindowManagerService windowManager){
        Intent intent = new Intent();
        intent.setComponent(new ComponentName("com.android.systemui",
                    "com.android.systemui.SystemUIService"));
        intent.addFlags(Intent.FLAG_DEBUG_TRIAGED_MISSING);
        //Slog.d(TAG, "Starting service: " + intent);
        context.startServiceAsUser(intent, UserHandle.SYSTEM);
        windowManager.onSystemUiStarted();
    }
Here we see how the SystemUI service is launched using the non-public startServiceAsUser API. If you wanted to use it, you would have to turn to reflection. But if you decide to use the reflection API in Android - think a few times if it's worth it.
So, there is a separate process for the application, and in fact each SystemUI section is a separate service or an independent module.
publicabstractclassSystemUIimplementsSysUiServiceProvider{
    public Context mContext;
    public Map<Class<?>, Object> mComponents;
    publicabstractvoidstart();
    protectedvoidonConfigurationChanged(Configuration newConfig){
    }
    publicvoiddump(FileDescriptor fd, PrintWriter pw, String[] args){
    }
    protectedvoidonBootCompleted(){
    }
    @SuppressWarnings("unchecked")
    public <T> T getComponent(Class<T> interfaceType){
        return (T) (mComponents != null ? mComponents.get(interfaceType) : null);
    }
    public <T, C extends T> voidputComponent(Class<T> interfaceType, C component){
        if (mComponents != null) {
            mComponents.put(interfaceType, component);
        }
    }
    publicstaticvoidoverrideNotificationAppName(Context context, Notification.Builder n,
            boolean system){
        final Bundle extras = new Bundle();
        String appName = system
                ? context.getString(com.android.internal.R.string.notification_app_name_system)
                : context.getString(com.android.internal.R.string.notification_app_name_settings);
        extras.putString(Notification.EXTRA_SUBSTITUTE_APP_NAME, appName);
        n.addExtras(extras);
    }
}
The start () method is called to start each service listed below.
<string-arrayname="config_systemUIServiceComponents"translatable="false"><item>com.android.systemui.Dependency</item><item>com.android.systemui.util.NotificationChannels</item><item>com.android.systemui.statusbar.CommandQueue$CommandQueueStart</item><item>com.android.systemui.keyguard.KeyguardViewMediator</item><item>com.android.systemui.recents.Recents</item><item>com.android.systemui.volume.VolumeUI</item><item>com.android.systemui.stackdivider.Divider</item><item>com.android.systemui.SystemBars</item><item>com.android.systemui.usb.StorageNotification</item><item>com.android.systemui.power.PowerUI</item><item>com.android.systemui.media.RingtonePlayer</item><item>com.android.systemui.keyboard.KeyboardUI</item><item>com.android.systemui.pip.PipUI</item><item>com.android.systemui.shortcut.ShortcutKeyDispatcher</item><item>@string/config_systemUIVendorServiceComponent</item><item>com.android.systemui.util.leak.GarbageMonitor$Service</item><item>com.android.systemui.LatencyTester</item><item>com.android.systemui.globalactions.GlobalActionsComponent</item><item>com.android.systemui.ScreenDecorations</item><item>com.android.systemui.fingerprint.FingerprintDialogImpl</item><item>com.android.systemui.SliceBroadcastRelayHandler</item></string-array>Volume control
We regularly use the volume buttons on our devices, but we do not think about what processes should occur in the system in order for us to add or subtract sound. The operation seems quite simple in words, but if you look at VolumeUI, which is located in the SystenUI / volume subfolder , the interface has its own variation in different modes.
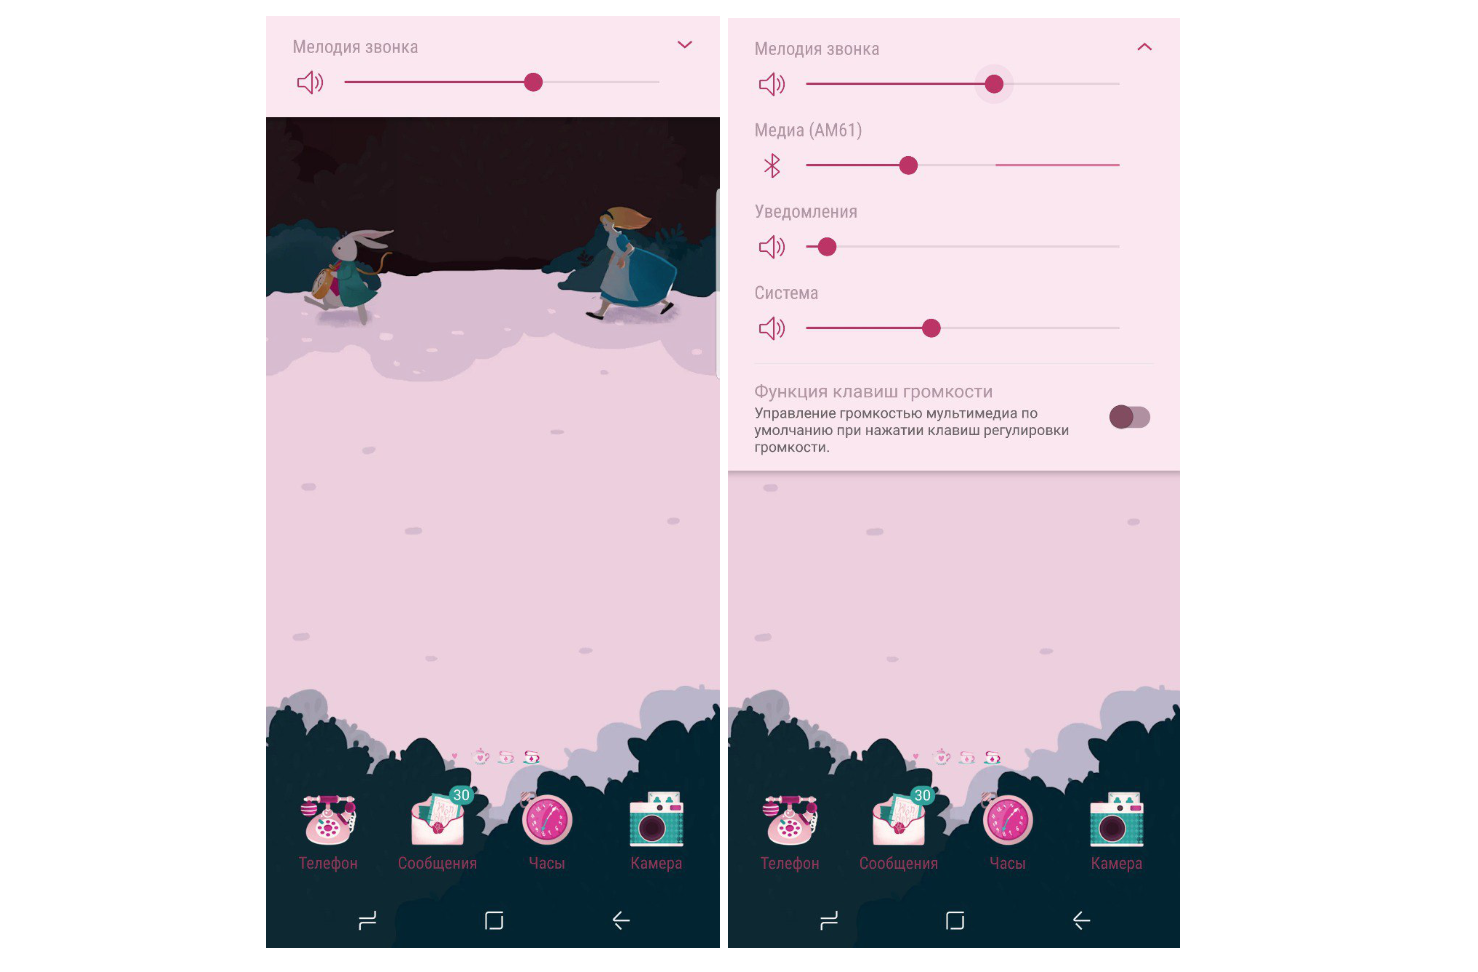
I have already said that SystemUI services are started using the start () method. If we look at the VolumeUI class , it is also inherited from SystemUI.
publicclassVolumeUIextendsSystemUI{
    privatestaticfinal String TAG = "VolumeUI";
    privatestaticboolean LOGD = Log.isLoggable(TAG, Log.DEBUG);
    privatefinal Handler mHandler = new Handler();
    privateboolean mEnabled;
    private VolumeDialogComponent mVolumeComponent;
    @Overridepublicvoidstart(){
        boolean enableVolumeUi = mContext.getResources().getBoolean(R.bool.enable_volume_ui);
        boolean enableSafetyWarning =
            mContext.getResources().getBoolean(R.bool.enable_safety_warning);
        mEnabled = enableVolumeUi || enableSafetyWarning;
        if (!mEnabled) return;
        mVolumeComponent = new VolumeDialogComponent(this, mContext, null);
        mVolumeComponent.setEnableDialogs(enableVolumeUi, enableSafetyWarning);
        putComponent(VolumeComponent.class, getVolumeComponent());
        setDefaultVolumeController();
    }
…
Here we see that with the help of mEnabled we determine whether we should show the panel with the sound setting. And judging by the VolumeDialogComponent, VolumeUI displays the soundbar in the form of a dialogue. But all actions regarding pressing the volume keys are handled in PhoneWindow .
protectedbooleanonKeyDown(int featureId, int keyCode, KeyEvent event){
     ...
        switch (keyCode) {
            case KeyEvent.KEYCODE_VOLUME_UP:
            case KeyEvent.KEYCODE_VOLUME_DOWN:
            case KeyEvent.KEYCODE_VOLUME_MUTE: {
                // If we have a session send it the volume command, otherwise// use the suggested stream.if (mMediaController != null) {
                    mMediaController.dispatchVolumeButtonEventAsSystemService(event);
                } else {
                    getMediaSessionManager().dispatchVolumeKeyEventAsSystemService(event,
                            mVolumeControlStreamType);
                }
                returntrue;
            }
            ...
   protectedbooleanonKeyUp(int featureId, int keyCode, KeyEvent event){
        final KeyEvent.DispatcherState dispatcher =
                mDecor != null ? mDecor.getKeyDispatcherState() : null;
        if (dispatcher != null) {
            dispatcher.handleUpEvent(event);
        }
        //Log.i(TAG, "Key up: repeat=" + event.getRepeatCount()//        + " flags=0x" + Integer.toHexString(event.getFlags()));switch (keyCode) {
            case KeyEvent.KEYCODE_VOLUME_UP:
            case KeyEvent.KEYCODE_VOLUME_DOWN: {
                // If we have a session send it the volume command, otherwise// use the suggested stream.if (mMediaController != null) {
                    mMediaController.dispatchVolumeButtonEventAsSystemService(event);
                } else {
                    getMediaSessionManager().dispatchVolumeKeyEventAsSystemService(
                            event, mVolumeControlStreamType);
                }
                returntrue;
            }
…
As far as we can see, KEYCODE_VOLUME_UP (+) is not processed and will go into processing KEYCODE_VOLUME_DOWN (-). In both events, both in onKeyDown and onKeyUp, the dispatchVolumeButtonEventAsSystemService method is called .
publicvoiddispatchVolumeButtonEventAsSystemService(@NonNull KeyEvent keyEvent){
        switch (keyEvent.getAction()) {
            case KeyEvent.ACTION_DOWN: {
                int direction = 0;
                switch (keyEvent.getKeyCode()) {
                    case KeyEvent.KEYCODE_VOLUME_UP:
                        direction = AudioManager.ADJUST_RAISE;
                        break;
                        ...
                    mSessionBinder.adjustVolume(mContext.getPackageName(), mCbStub, true, direction,
               ...
            }
So, here we call the adjustVolume method so that we can check our direction to which the event parameter will be assigned.
As a result, when we get to the AudioService , where sendVolumeUpdate will be invoked, where in addition to calling the postVolumeChanged method, the HDMI interface will be installed.
// UI update and Broadcast IntentprotectedvoidsendVolumeUpdate(int streamType, int oldIndex, int index, int flags){
        ...
        mVolumeController.postVolumeChanged(streamType, flags);
    }
    privateintupdateFlagsForSystemAudio(int flags){
       ...
                if (mHdmiSystemAudioSupported &&
                        ((flags & AudioManager.FLAG_HDMI_SYSTEM_AUDIO_VOLUME) == 0)) {
                    flags &= ~AudioManager.FLAG_SHOW_UI;
                }
           ...
        }
        return flags;
    }
     publicvoidpostVolumeChanged(int streamType, int flags){
         ...
                mController.volumeChanged(streamType, flags);
        ...
        }
Ringtone player
Android RingtonePlayer plays the role of a player. It is also inherited from SystemUI and in the start () method we see:
@Overridepublicvoidstart(){
       ...
            mAudioService.setRingtonePlayer(mCallback);
      ...
    }
Here we set mCallback, which is essentially an instance of IRingtonePlayer .
private IRingtonePlayer mCallback = new IRingtonePlayer.Stub() {
        @Overridepublicvoidplay(IBinder token, Uri uri, AudioAttributes aa, float volume, boolean looping)throws RemoteException {
            ...
        }
        @Overridepublicvoidstop(IBinder token){
           ...
        }
        @OverridepublicbooleanisPlaying(IBinder token){
            ...
        }
        @OverridepublicvoidsetPlaybackProperties(IBinder token, float volume, boolean looping){
           ...
        }
        @OverridepublicvoidplayAsync(Uri uri, UserHandle user, boolean looping, AudioAttributes aa){
           ...
        }
        @OverridepublicvoidstopAsync(){
           ...
        }
        @Overridepublic String getTitle(Uri uri){
            ...
        }
        @Overridepublic ParcelFileDescriptor openRingtone(Uri uri){
            ...
        }
    };
As a result, you can manage RingtonePlayerService with the help of Binder to play audio files.
Powerui
PowerUI is responsible for power management and notification. It is similarly inherited from SystemUI and has a start () method.
publicvoidstart(){
        mPowerManager = (PowerManager) mContext.getSystemService(Context.POWER_SERVICE);
        mHardwarePropertiesManager = (HardwarePropertiesManager)
                mContext.getSystemService(Context.HARDWARE_PROPERTIES_SERVICE);
        mScreenOffTime = mPowerManager.isScreenOn() ? -1 : SystemClock.elapsedRealtime();
        mWarnings = Dependency.get(WarningsUI.class);
        mEnhancedEstimates = Dependency.get(EnhancedEstimates.class);
        mLastConfiguration.setTo(mContext.getResources().getConfiguration());
        ContentObserver obs = new ContentObserver(mHandler) {
            @OverridepublicvoidonChange(boolean selfChange){
                updateBatteryWarningLevels();
            }
        };
        final ContentResolver resolver = mContext.getContentResolver();
        resolver.registerContentObserver(Settings.Global.getUriFor(
                Settings.Global.LOW_POWER_MODE_TRIGGER_LEVEL),
                false, obs, UserHandle.USER_ALL);
        updateBatteryWarningLevels();
        mReceiver.init();
        showThermalShutdownDialog();
        initTemperatureWarning();
    }
As we can see from the above code, the Settings.Global.LOW_POWER_MODE_TRIGGER_LEVEL change is subscribed to, and then the call to mReceiver.init () is followed .
publicvoidinit(){
            // Register for Intent broadcasts for...
            IntentFilter filter = new IntentFilter();
            filter.addAction(PowerManager.ACTION_POWER_SAVE_MODE_CHANGED);
            filter.addAction(Intent.ACTION_BATTERY_CHANGED);
            filter.addAction(Intent.ACTION_SCREEN_OFF);
            filter.addAction(Intent.ACTION_SCREEN_ON);
            filter.addAction(Intent.ACTION_USER_SWITCHED);
            mContext.registerReceiver(this, filter, null, mHandler);
        }
This is where the broadcast receiver is registered, through which changes are tracked.
Tasks
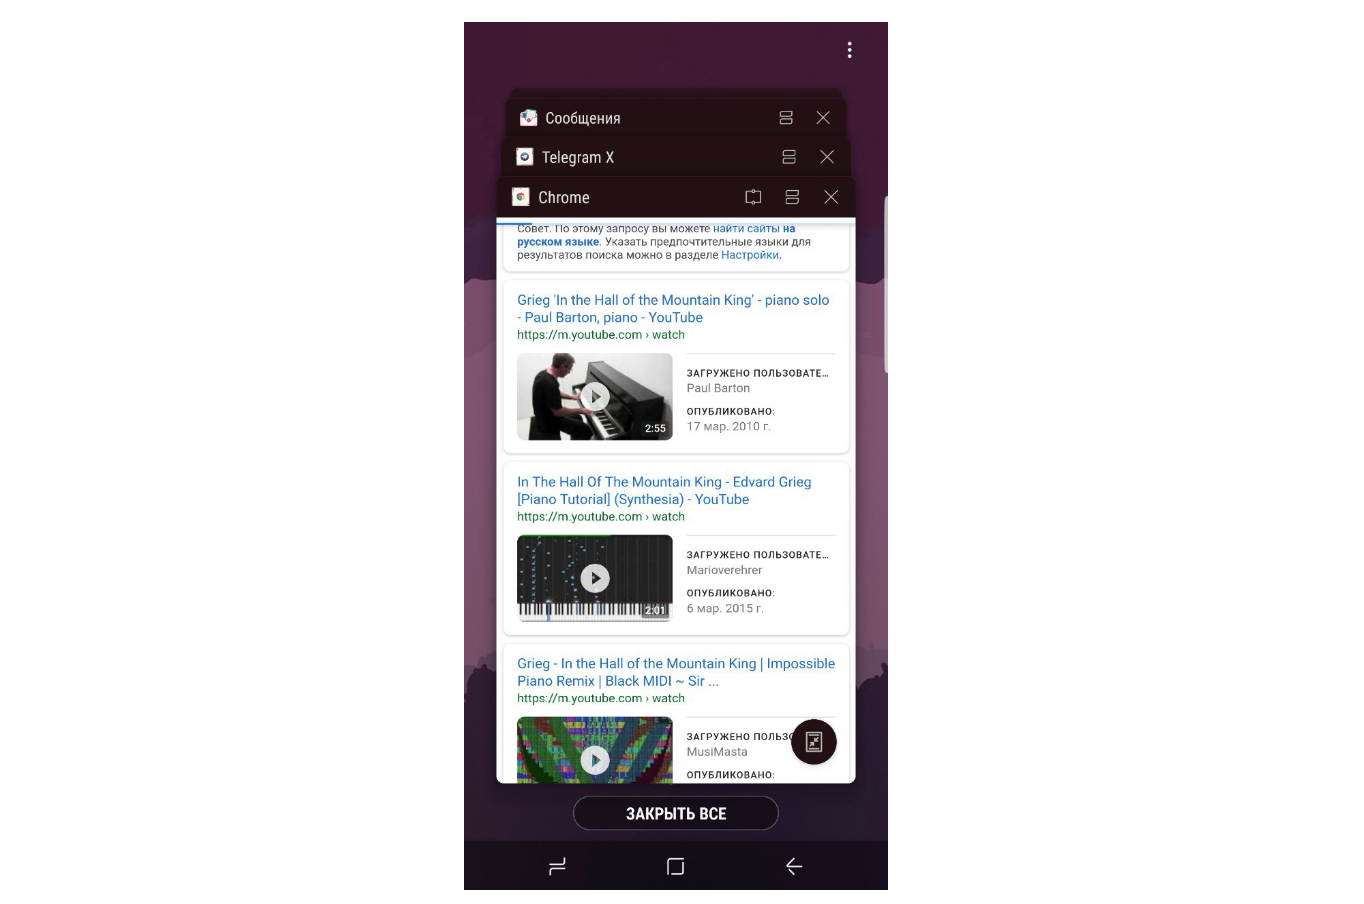
Recents is the main and frequently used feature in Android mobile devices.
Main functions:
- Display all tasks
- Switch between tasks
- Deleting tasks
In addition, Recents are also inherited from SystemUI. In RecentsActivity, the latest tasks are created and updated so that we can see them on our screen.
And with the help of RecentTaskInfo we can get information about a specific task.
publicstaticclassRecentTaskInfoimplementsParcelable{
        publicint id;
        publicint persistentId;
        public Intent baseIntent;
        public ComponentName origActivity;
        public ComponentName realActivity;
        public CharSequence description;
        publicint stackId;
        ...
In general, running tasks can be put in a separate topic. I studied it from all sides, because I wanted to blur the application screen before switching the application to background, so that an unreadable snapshot version was displayed in RecentsTask. However, the problem is that the application snapshot is taken before onPause () is called. This problem can be solved in several ways. Or set the flag so that the system simply hides the screen contents using
getWindow().setFlags(WindowManager.LayoutParams.FLAG_SECURE, WindowManager.LayoutParams.FLAG_SECURE);What I talked about in a previous article about snapshots.
You can even make sure that the specific activity of the application is not displayed in the tasks by putting it in the manifest
android:excludeFromRecents = "true"Or you can use the trick with
Intent.FLAG_ACTIVITY_MULTIPLE_TASKYou can set the above activity above the excludeFromRecents = true flag so that the screen does not appear in the running tasks, but at the time of downloading the application run a separate task that will show either a blurred screenshot of the main activity or any other image. In more detail, how this can be done is described in the official documentation on the example of Google Drive.
Lock screen
Keyguard is more complicated than all the above modules. It is a service that runs in SystemUI, and is managed using KeyguardViewMediator.
privatevoidsetupLocked(){
        ...
        // Assume keyguard is showing (unless it's disabled) until we know for sure, unless Keyguard// is disabled.if (mContext.getResources().getBoolean(
                com.android.keyguard.R.bool.config_enableKeyguardService)) {
            setShowingLocked(!shouldWaitForProvisioning()
                    && !mLockPatternUtils.isLockScreenDisabled(
                            KeyguardUpdateMonitor.getCurrentUser()),
                    mAodShowing, mSecondaryDisplayShowing, true/* forceCallbacks */);
        } else {
            // The system's keyguard is disabled or missing.
            setShowingLocked(false, mAodShowing, mSecondaryDisplayShowing, true);
        }
       ...
        mLockSounds = new SoundPool(1, AudioManager.STREAM_SYSTEM, 0);
        String soundPath = Settings.Global.getString(cr, Settings.Global.LOCK_SOUND);
        if (soundPath != null) {
            mLockSoundId = mLockSounds.load(soundPath, 1);
        }
       ...
        int lockSoundDefaultAttenuation = mContext.getResources().getInteger(
                com.android.internal.R.integer.config_lockSoundVolumeDb);
        mLockSoundVolume = (float)Math.pow(10, (float)lockSoundDefaultAttenuation/20);
        ...
    }
However, in fact, the KeyguardService does not independently work with the lock screen interface, it only transmits information to the StatusBar module, where actions regarding the visual appearance of the screen and the display of information are already performed.
Notification bar
SystemBars has a rather complicated device and structure. His work is divided into two stages:
- SystemBars Initialization
- Display notifications
If you look at the launch of SystemBars
privatevoidcreateStatusBarFromConfig(){
        ...
        final String clsName = mContext.getString(R.string.config_statusBarComponent);
        ...
            cls = mContext.getClassLoader().loadClass(clsName);
        ...
            mStatusBar = (SystemUI) cls.newInstance();
        ...
    }
Then we see a link to the resource from which the class name is read and an instance is created.
<stringname="config_statusBarComponent"translatable="false">com.android.systemui.statusbar.phone.StatusBar</string>Thus, we see that StatusBar is called here, which will work with the output of notifications and UI.
I think no one doubted that Android is very complex and contains many tricks, which are described in a huge number of lines of code. SystemUI is one of the most important parts of this system and I enjoyed studying it. Due to the fact that there is very little material on this topic, if you notice any errors, please correct me.
PS Selection of material and shorter articles I always put on @paradisecurity in telegrams.