Comfortable work with Android Studio
Good day to all!
How productive is Android Studio? Do you think it works fast on your PC or Mac? Or, sometimes, encounter lags or a long build? And on large projects?
In any case, we all want to get maximum performance from hardware and software. Therefore, I have prepared a list of points and tips for beginners and experienced developers who will help you to work comfortably with large projects or simply to increase productivity. You will also understand if your equipment needs an upgrade.
Users of other popular IDEs may also find something useful for themselves.
Motivation
Android Studio was awkward during the transition from Eclipse. And even then I started looking for ways to optimize the work of this IDE. However, the majority of colleagues related to this "nothing". Works. Not always fast. And ok.
But now I have been working for another company for a year. The climate is different, developers read reports on various technologies. At one of these reports, it seemed to me that the topic of this article may be relevant. Especially in projects of increased technical complexity.
After talking with colleagues and familiar developers, it became clear to me that not even every "pro" understands the nuances of the hardware, OS and IDE. Because here I tried to collect a full educational program based on my own experience.
DISCLAIMER! All the models and brands mentioned in the article are not advertising!
Iron
Here is what is said about hardware on the official website of Android Studio in the System requirements column (not counting disk space):
3 GB RAM minimum, 8 GB RAM recommended; plus 1 GB for the Android Emulator
1280x800 minimum screen resolution
This is enough for the studio to simply start and work. About any performance and comfort there is no question.
In this chapter, I will talk about what iron is desirable to have for comfortable work with large projects and what can become a bottleneck in your system.
Here, 5 parameters are most critical for us:
- CPU performance
- The number of CPU hardware threads
- Amount of RAM
- The speed of random read and random write disk subsystem
- Speed of small block reading and small block writing of a disk subsystem
Since I more often worked on configurations based on Intel products, then we will discuss them later. However, if you have AMD, just read the corrections for similar “red” technologies for yourself. The only minus with which I came across on AMD, was already described on Habré .
A couple of words about Mac
There is an opinion that Mac is the best development machine. More often say so about the MacBook Pro.
Personally, I think this is a myth. With the advent of technology NVMe Mac lost its "magic". So today, even among laptops, the Mac is not the leader in price-performance-performance ratio. Especially in the context of development for Android Studio.
Otherwise, for a comfortable development it makes sense MacBook Pro 2015 or 2016 not with a U-processor. Read about other features and service below.
CPU
By processor performance, it is obvious and understandable. The higher it is, the better. The only thing that needs to be noted is that if there is a sufficiently fast drive, a weak processor will become a bottleneck in your system. Especially critical in the case of NVMe-drive. Often, when working with it, the emphasis goes precisely to the power of the CPU.
With threads, things are a little more complicated. I read that users reduce the priority of the studio and its subprocesses so that the OS "does not hang" during the build. The reason here is one- 1-2 hardware streams. This is not only for the IDE, but also for the modern OS. The only "but" - in my practice, there were situations when dual-core U-processors with Hyper Threading (that is, 2 cores to 4 threads) normally worked with relatively small projects, but the above-mentioned problems started on large ones.
Of course, the presence of hardware virtualization is required.
Therefore, I recommend to look towards the Core i5 HQ Skylake with 4+ streams and more powerful.
RAM
Regarding the standards, DDR3 and higher. Here, I think, it is clear.
If there is an opportunity to work in 2 or 4-channel mode and you are not active, I strongly recommend using it, because you can get a significant increase in responsiveness of IDE. This feature is activated either in the BIOS \ UEFI settings, or by installing additional RAM modules (if you still have one module).
What volume is needed? For small (really small) projects, 4GB is enough. On larger projects, the studio is able to quickly take up 4GB of memory and more. Add here an emulator for HAXM (say 2 GB) and take into account that the modern OS (with the exception of some Linux distributions) takes up about 2 GB in memory, and now it turns out that 8GB is already "flush".
This does not include, for example, Slack (which takes an average of about 500 MB in memory) and Chrome (where the bill goes to gigabytes).
In general, with 8GB of RAM, you can quickly and comfortably work; a fast drive and swap \ swap file save you. But it is worth thinking about the upgrade.
Therefore, the company buys new ones, or provides an upgrade of current working machines with 12GB of RAM or more.
SSD
The disk subsystem is the most frequent bottleneck, so it is necessary to pay attention to it first.
Working with Android Studio on HDD in 2018 is comparable to anguish, the more the project, the more friezes you are provided with. Therefore, obviously, use only SSD.
As mentioned above, there are two critical parameters here:
- The speed of random read and random write disk subsystem
- Speed of small block reading and small block writing of a disk subsystem
The higher they are, the more responsive the studio will be, and the faster it will load and assemble.
I draw your attention to the fact that there is no talk of linear read / write speeds — for a studio, this is not critical. Therefore, when choosing a drive, you need to look not at its read / write speed on the manufacturer or store website, but on the number of IOPS (the more, the better).
Needless to say, there is no talk of a Mac, because there the drive either has its own standard or is simply soldered on the board. Replacement is possible, perhaps, for a larger volume. High-speed performance here is unlikely to succeed.
Nvme
If your motherboard supports NVMe technology , then it is better to use a drive with its support. It allows you to get speeds comparable to SSD on Mac and above.
With a high-speed drive, the emphasis is on the PCIe bus and the power of your CPU. Therefore, if, for example, your motherboard supports output to a PCIe 2.0x4 \ 3.0x2 drive or you do not have a very powerful CPU, you should not buy a very expensive drive. Look at the capabilities of your system and the thickness of your wallet.
SATA3
Yes, SATA3 is very much alive. And you can quickly work at the studio.
In this segment, high-speed drives are more accessible, so it makes sense to immediately look at the top solutions of 120 GB and higher.
Intel optane
I did not have to use Android Studio on a machine with this drive (if you can call it that). If someone has experience, write in the comments.
GPU
There is not much to say.
If you write the usual user applications, for the studio itself and the emulator something like the Intel HD 500 Series is enough for the eyes.
If you are developing games or this is your personal machine, then discrete graphics make sense. How-see your needs.
Cooling system and throttling
This is not about upgrades, but about maintenance.
Most of us know such a thing as throttling . Its implementation is used to protect against overheating.
Of course, throttling leads to a decrease in performance. Not always noticeable. In some cases, the Turbo Boost operation is reduced to the minimum values; in others, the maximum processor frequencies fall. The reason is not enough efficient operation of the cooling system. It is also important to understand that most stress tests (such as AIDA) diagnose Turbo Boost’s standard operation as throttling.
In the case of desktop PCs, everything has been online for a long time. In the case of mobile systems based on heat pipes, a lot of conflicting information. This includes most laptops, nettops, MacBooks, and iMacs. Next, it will be about them.
On modern powerful mobile CPUs of 80-90 degrees on a chip under load, this is the norm. At the same time, SOC with these CPUs have an open-crystal design, from which the heat transfer area is small. All this heat is given away.here is this laughing stock similar design with a small closed fluid circuit.
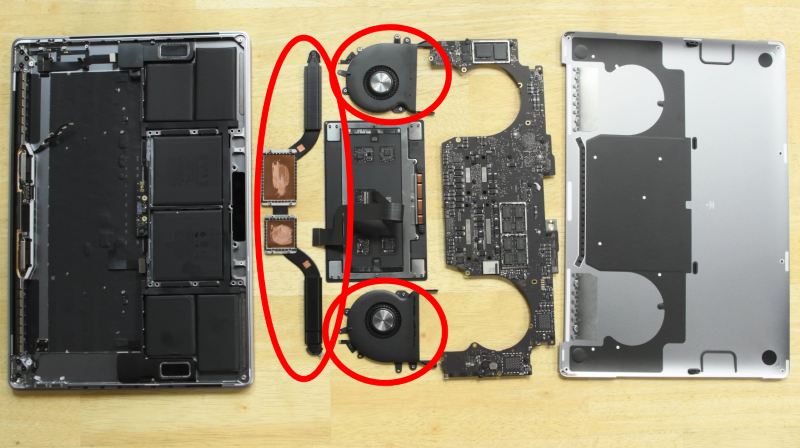
You need to understand that such cooling systems are under heavy loads and need more frequent maintenance. Especially in the case of laptops and MacBooks, when transported from vibrations, the layer of dried thermal paste is destroyed faster. And late service is fraught with not only a loss of performance, but also a leakage of thermal tubes and "heaps" of crystals.
The service consists in replacing the thermal paste and cleaning the radiator every six months or a year after the end of the warranty period. In any case, this is how they do it.
Because of the small area of the crystal, it makes sense to use dielectric thermal grease with high thermal conductivity (this costs around 800-1000 r per gram). Never use liquid metal! Otherwise, you probably will not be able to separate the crystal from the plate!
If you do not have enough skills for this procedure, it is better to contact the service.
Hardware settings
This chapter deals with the functions and settings of the equipment. Much, most likely, you already know.
Intel Hyper Threading
This is Intel technology, which divides the hardware kernel stream into two "virtual" ones. Thanks to it, the system sees the 4-core processor as an 8-core processor. This approach allows efficient utilization of processor power. AMD has a similar technology.
I often come across the fact that many developers have disabled this feature and they don’t know about it at all. However, its inclusion can increase studio responsiveness and build performance. In some cases, 10-15%.
It is enabled in the BIOS \ UEFI settings of your motherboard or laptop. The item is called the same or similar way. If you still did not know about this technology, then it makes sense to check its availability and enable it if this has not been done.
Intel Turbo Boost
Another well-known technology. In fact, it is an automatic short-term overclocking of the CPU and gives a significant increase in the assembly. And, at the same time, it tends to heat up mobile processors to temperatures not far from Tjunction .
Therefore, if this technology has previously been disabled, it is advisable to check the condition of the cooling system before switching on and, possibly, to perform its maintenance, as described in the previous chapter.
It can be included in the BIOS \ UEFI, as well as in the OS settings.
Intel Rapid Storage
Support for this motherboard technology is highly recommended. More details can be read here .
I can only recommend timely updating the drivers for this technology to the latest version from the official site of Intel. Even if your laptop maker supplies you with older drivers.
In my particular case, the update from the driver version from the manufacturer to the current one, increased the linear recording speed by about 30%, and arbitrary - by 15%.
I don’t know how to install and update IRST drivers on Linux (and in general, is it possible?). If anyone knows, write in the comments, I’m happy to add an article.
SSD Secure Erase
The performance of inexpensive SSD models may drop over time. This does not always happen due to the “degradation” of the drive. Perhaps your TRIM model is not very efficiently implemented.
Secure Erase will force the controller to mark all memory cells empty, which, theoretically, should return the SSD performance to the factory state. And, also, erase all your data! Be careful, make backups!
To carry out the procedure, you can use a proprietary utility from the manufacturer. In case your disk is a system drive, then you will need a flash drive, which the utility will make bootable. Follow the instructions below.
At one of the stages, it may be necessary to reconnect the drive during operation. Therefore, in the case of M.2, the presence of an adapter is very desirable.
The use of third-party utilities for this operation is not recommended.
However, if your SSD is significantly lost in speed in less than a year, it is better to change the drive to another model.
Hardware virtualization
This technology is necessary for fast operation of the x86-emulator. If it is disabled for you, enable it in the BIOS \ UEFI settings. Different vendors may have different settings names.
Yes, we all know about Genymotion and BlueStacks, which do very well without hardware virtualization. However, in the images of these emulators, some or many implementations of the Android API are greatly modified in order to increase speed. This can provoke behavior that you will never see on a real device. Or when debugging, you can miss a couple of bugs. Therefore, the availability of working and smart AVD is highly desirable.
OS and Third-Party Software
This chapter discusses the possible configuration of the OS and the installation of third-party software to increase performance.
Indexing
Here we will talk about searching for Windows and Spotlight on Mac OS. These mechanisms can take up to 15% of the CPU capacity at build because they are trying to index everything that is generated in / build.
Of course, from the indexing it is necessary to exclude all the directories with which the studio works:
- SDK directory
- Studio Directory
- Project Directory (highly recommended)
- ~ / .gradle
- ~ / .android
- ~ / Android StudioX.X
- ~ / lldb
- Kotlin cache directory
Antivirus
I know that not everyone in the development environment decided to use antivirus. But many use it. Including, sometimes, on Linux and Mac OS. And its use is completely justified.
Even if you have Windows 10 and do not have an antivirus, Windows Defender performs its functions.
When building an antivirus can take a very significant share of the CPU. Therefore, all the directories listed in the "Indexing" column should be added to the antivirus exceptions. Also, in the exceptions it makes sense to add the names of the processes of the studio itself and the JetBrains JVM.
Depending on the implementation of the anti-virus, the CPU consumption for them during the assembly will decrease significantly, or it will generally cease to consume CPU power. And the assembly time itself will noticeably decrease.
Disk or home directory encryption
These functions are present on all popular OS or implemented by third-party software. Of course, the work of the studio in the encrypted file space may require more CPU power. How much depends on the implementation of encryption. Therefore, it is recommended to disable such functions either completely or, if possible, for the directories listed in the "Indexing" column.
Does TRIM work?
TRIM can be implemented both in hardware and software. In the latter case, the obligation to call TRIM falls on the OS. And, for various reasons, a periodic call can be disconnected, which leads to a drop in the speed of the drive.
You can check the operation and resume calls to TRIM using specialized utilities. It is recommended to use the utility from the manufacturer of the drive.
Ramdisk
What is RAMDisk most have long known. But how effective is it in working with the studio?
From my own experience I will say not very much. Unless you transfer to the RAMDisk the project itself, the SDK, the studio, and so on. If you have enough RAM ...
With a simple transfer of a project weighing more than 500 mb (the figure is indicated with a build cache), I could not achieve a gain of more than 15%. Most likely, calls to SDK and system API are braked. As a result, such an increase is quite expensive.
The following method is much more efficient and less expensive.
Caching requests to the drive
Something similar is implemented in Mac OS. However, in comparison with the technologies listed below, it is not so effective.
Unfortunately, I know only two implementations, and both are tightly tied to manufacturers' products. It's about Samsung RAPID and PlexTurbo .
Both technologies work according to similar principles (I describe it as I understand it myself):
- If there was a request for reading small volumes, then they are deposited in the RAM and when re-reading they are taken from there. Standard RAM cache.
- If there was a request to write small data, they are deposited in the RAM-cache. Next, write requests are compared to the cache. If you re-write the same data on the same paths - why re-write them in hardware? And SSD so live longer.
The only difference is that RAPID uses the free balance of RAM as a cache. Less residue — less cache size, less acceleration. PlexTurbo allows you to limit the maximum cache size and load it from the hard disk at system startup.
In the case of use on SATA 3, you can get a gain of up to 50%. When using NVMe-drive, less, but, often, also significant.
At the moment I have a Samsung 860 EVO SATA 3 in my work. Under the spoiler, the benchmarks with i7 6700HQ and disabled Turbo Boost.
RAPID off
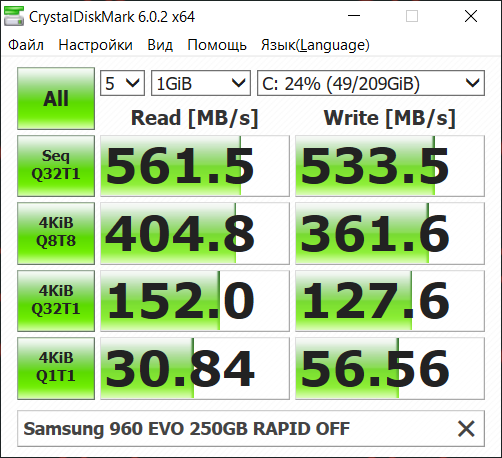
First run
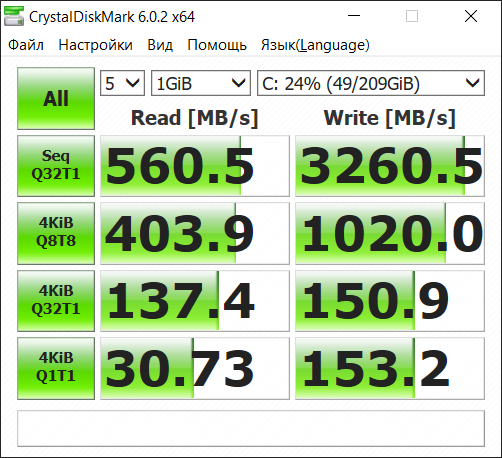
Second run
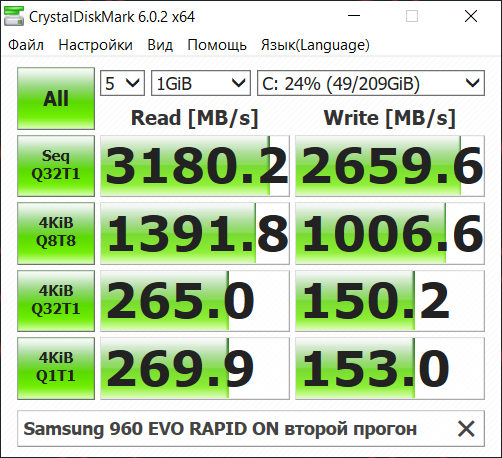
You can clearly see how the system starts caching data on the first run. The final result is significantly higher than the SATA 3 performance. However, the efficiency of this technology depends more on CPU power. What is clearly seen when you turn on Turbo Boost.
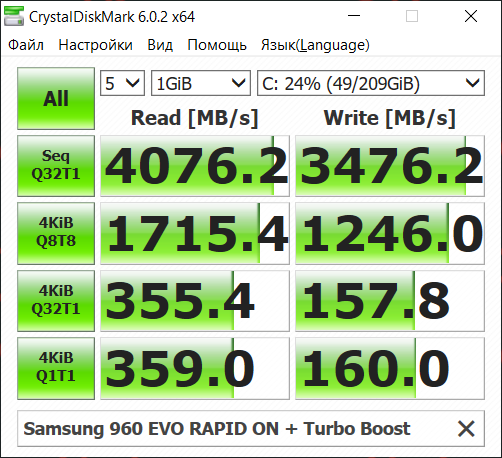
Synthetics is, of course, good. But this all works when reading / writing duplicate small files. And this is the most frequent operation when running Android Studio.
I now have a total project with a cache weighing more than 700 MB, consisting of 10 modules. One of the modules is its own kapt-based code generator with very heavy logic. Two NDK modules, one of which refers to Boost along an external path. The rest is tons of Kotlin code.
If we compare the time for a complete rebuild of this project, the results are as follows:
- With the RAPID disabled, the time is 1m 47s 633ms. Tolerant.
- With RAPID enabled, the first rebuild went through 1m 41s 633ms. Included in the error.
- With RAPID enabled, the second rebuild passed for 1m 7s 132m. Here is the increase. Slightly more than 37%, which is significant. Further rebuilds show even less time, but with a difference of no more than 3-5 seconds from the last measurement. What is irrelevant.
In less lengthy processes, growth in the studio is noticeable immediately.
As a result, we can recommend these technologies and drives as a good way to improve performance. There were no complaints about the stability.
Android Studio
Many of these tips are taken from here and supplemented with my comments. The rest is the result of my research and experience.
Updates
Advice though banal, but always relevant. If you are not legacy-project, then, if possible, try to keep the version of the studio and related components (such as Gradle, Android Plugin, Kotlin Plugin) up to date. Google and JetBrains do a lot of work in terms of optimizing the speed of work and assembly in new versions.
Sometimes, of course, embarrassment happens when new versions stop behaving predictably and provoke errors. Therefore, we have a regulation on how to act in such situations.
In some cases, you need to execute File-> invalidate caches and restart after a rollback. If you update the studio itself, it’s better to backup the studio directory and settings directory. This is true if your project contains anycrutches non-standard approaches that are sensitive to the mechanisms of the assembly or the studio itself.
Project structure
If possible, try to make large parts of your project, which communicate with the main code via the API, into separate library-modules. This will enable the incremental build feature. It will allow not to reassemble unchanged modules and, thereby, significantly reduce the build time.
However, do not make everything absolute. Bring the components into modules meaningfully, think with your head.
Instant run
Advice more for newbies. This feature allows you to replace bytecode and resources in an already installed application "on the fly". Of course, this significantly reduces the debug build time. In new versions of the studio is included by default.
However, in my experience and that of my colleagues, this function does not always work correctly. It depends more on the project and the changes you make. Therefore, if after the assembly you did not see the changes, or your code began to work incorrectly, before searching for a bug, try disabling Instant Run.
You can enable and disable the function in the Build, Execution, Deployment -> Instant Run menu with the Enable Instant Run flag.
Attach to Process
The same advice is commonplace for beginners. I was surprised to find that some junas (and sometimes even the middle ones) do not know about this function. It allows you to connect to a debugging process already running on the device, thereby skipping the build phase.
Therefore, if there is no need to make any changes to the code on the device for the actual build and before debugging, feel free to click Attach debugger to Android process.
Gradle build configs
If possible, if your main buildConfig or flavour has components that are used only in release builds (for example, crashlytics, various annotation processors, or your own gradle procedures), disable them for debug or for your debug config. How to do this can be found here , either on the official pages of the components, or simply google it.
In case you have a custom buildConfig, then PNG crunching should be disabled for it, since by default this option is disabled only for the debug-config. This option applies compression to png during build. You can disable it as follows:
android {
   buildTypes {
       myConfig {
           crunchPngs false
       }
   }
}
//Для старых версий android plugin
android{
   aaptOptions {
       cruncherEnabled false
   }
}
Webp
If the minimum api level of your project is more than 18, then it makes sense to convert images to WebP. This format is more compact, reads faster and does not apply compression during assembly. Because the conversion of all raster graphics in the project is always recommended. Accordingly, the larger the raster in your project, the shorter the assembly time after conversion.
Parallel assembly
If your project contains several independent modules (for example, several app modules), then the Compile independent modules in parallel option in Settings-> Build, Execution, Deployment-> Compiler will be relevant for it. This will allow more efficient utilization of CPU threads during assembly. A minus is a larger heap size and, as a result, a greater consumption of RAM.
This option can also be enabled via a line in gradle.properties
org.gradle.parallel=true
Gradle daemon
This option in the newer studio versions is enabled by default, and this advice is for those who have not used it yet.
This option allows you to keep a separate jvm and gradle instance in RAM for three hours after the last build. Thus, no time is spent on their initialization and heap buildup. Negative, greater consumption of RAM. Enabled by a line in gradle.properties
org.gradle.daemon=true
Offline assembly
When building Gradle, it periodically checks dependency web resources to resolve them. You can disable this behavior. This tip is suitable for those who have a slow internet connection or a connection with high latency.
In the Build, Execution, Deployment -> Gradle menu, check the Offline work checkbox.
Increase heap size Android Studio or IDEA
This option is useful for large projects. The default studio is xmx1280m (however, the studio consumes much more RAM along with the subprocesses). A small maximum heap size can provoke more frequent GC calls and thus slow down work.
Increase the starting heap size can be both the studio itself, and Gradle.
For gradle we write in gradle.properties
org.gradle.jvmargs=-Xms1024m -Xmx4096m
which corresponds to 1GB of starting heap size and a maximum of 4 GB for capacity. Choose the size in accordance with the resources you want to select from those available to you.
For Android Studio or IDEA itself, go to the Help -> Edit Custom VM Options menu and write the same JVM parameters with the volumes you need.
The same methods can be used to correct the behavior of a JVM in case you have any difficulties with it. A complete list of arguments can be obtained using the command java -X.
Plugins
There are no plugins that can speed up IDE. But you can get rid of a pair-three. This can increase responsiveness or reduce startup time. Especially if you have installed several third-party.
I will not give specific recommendations here; everyone has different needs. Just go to Settings -> Plugins and disable what you don’t need, carefully read the description and think very carefully. Not the fact that you generally need to disconnect something.
Inspections
Disabling a number of items in the menu Settings -> Editor -> Inspections can increase the responsiveness of the IDE. Sometimes significant.
Here, too, there will be no specific recommendations, disable wisely. Remember, you are not a robot and make mistakes, and inspections help you to avoid them.
Power Save mode
Activation of this mode is in the File menu. It disables all background processes (indexing, static code analysis, Spell Checking, etc.). And the studio starts to behave noticeably quicker. But the functionality is not much better, for example, VS Code.
In general, the mode for situations where everything is very bad.
Settings Repository
This advice is not about speed, but about comfort. It will be more convenient to store your settings in a separate repository and use this function. When moving to another car is convenient.
If you work in a team with an approved codestyle, then it will be convenient for a new developer to make his branch in Git, change the copyright and settings for his machine, and use the same codestyle settings along with all the others.
You can, of course, commit .idea to the repository, but this is a bad approach.
Avd
From the very beginning of its existence, AVD was clumsy and voracious. In the past 3 years, it has been greatly improved, which made it possible to start and work on modern machines relatively quickly (at least in the x86 version).
Nevertheless, even today the x86-version of Pie on AVD manages to slow down. Even on powerful glands. Below are options for how to remedy the situation.
Of course, turning on hardware virtualization and installing HAXM with a minimum of 2 GB of RAM is required.
If AVD heavily loads the CPU and at the same time slows down, I am afraid, nothing can be done. However, if the load on the CPU is not high, then the matter is in the graphics subsystem.
Most often this is due to the incorrect determination of the most suitable for your render machine. You can manually select the most suitable one in the Settings -> Advanced emulator menu. Specific settings can not tell, because it all depends on the configuration of hardware and OS. Just change the item, close the emulator and call Cold Boot. Stop on the most suitable option for you.
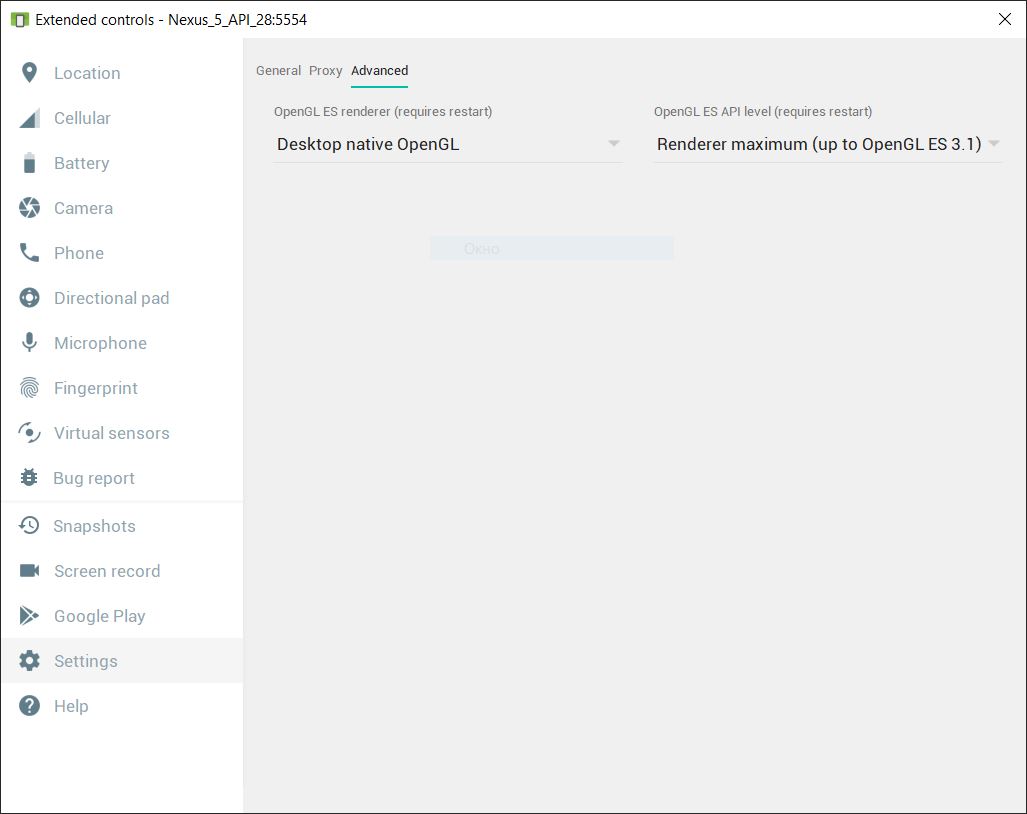
If you have a discrete GPU, you can try to run the emulator on it, since by default the emulator runs on the same GPU that processes the desktop. This is done the same way as with any game. After do not forget to call Cold Boot.
Total
Anyway, not all of the listed items are required. Try to solve problems as they are discovered.
Time is the most valuable resource. I hope this material will help you spend it more productively.
