Centralized VLAN configuration for IP phones in 3CX
- Tutorial
- Recovery mode
Introduction
Tagging VLAN traffic (assigning VLANs to IP phones) eliminates the need for additional cables and network ports, i.e. Do not create two separate networks for voice and data. The PC can be connected to the built-in telephone switch (to the PC port) in the default VLAN, or to the assigned VLAN.
Starting with v15.5 SP1 in the 3CX management interface, you can centrally set priorities for real-time traffic (RTP) on the WAN port and / or PC port of the user's IP phone. That is, you can assign a VLAN for both the IP phones themselves and for PCs connected through a mini-switch.
VLAN settings are configured only on 3CX-supported IP phones, provided that the device has the appropriate capabilities in the firmware. Centralized VLAN configuration is not supported on legacy phones (for example, Cisco 7900 Series) and DECT databases.
Features of using VLAN on the IP telephone switch
Despite the fact that the built-in switch allows you to save on cables and network ports, its operation affects the operation of the connected PC. When you restart or turn off the phone, the PC loses connection with the network. If network applications are running on the PC, their operation may stop with an error. In addition, if a PC connected to a PC port generates a lot of traffic (working with graphics and video, etc.), the quality of VoIP communication can noticeably deteriorate. In this case, it is recommended that you prioritize application traffic on the PC and on the switch.
AutoConfiguration 3CX allows you to set VLAN parameters only on the LAN / WAN and PC ports of the phone. However, setting up corporate switches, routers and a DHCP server is the responsibility of the system administrator. Incorrect auto-configuration of VLAN on the phone can lead to disconnection from the network. In this case, a hardware reset will be required, which is usually done directly from the keyboard. Mismatch between the VLAN settings on the phone and the switch can also lead to a noticeable deterioration in the quality of communication and intermittent breaks in the conversation.
Configure VLAN on IP Phones
In general, the successful implementation of VLAN tagging requires high-quality network equipment and the skills of a system engineer to configure switches / routers. We recommend that you pre-test VLAN auto-configuration on a small group of phones in a test network segment.
Before implementing a VLAN, it is important to consider the following:
- VLAN tagging is not always necessary, because this complicates the network and the work of the administrator;
- If this is available, you can simply use the different ports of the corporate switch for PC and IP phone;
- The benefits of VLAN are noticeable only in large installations;
- Be sure to test the VLAN before deploying the technology to the production network;
- VLAN will not help if your network is abnormally congested.
Most often VLAN is implemented as follows:
- Data network
- without VLAN tagging
- 3CX and 3CXPhone web client installed on PC
- Configured routing with a 3CX server located on a voice network
- Voice network
- VLAN tagging (in our example, Vlan ID55)
- 3CX server located on the voice network
This setting assumes that IP phone traffic is tagged with VLAN, and PC traffic passes without tagging. Topology Example:
- Data Network 10.10.10.0 / 24
- IP PC 10.10.10.3 / 24
- Voice transmission network 10.10.20.0 / 24 (Vlan Tag 55) (traffic on the WAN port of the IP phone is tagged)
- 3CX server IP 10.10.20.2 / 24
- IP Phone 10.10.20.5 / 24
In this topology, there is one problem - new phones connected to the network do not yet have VLAN parameters set and will receive IP addresses from the data network. In order for 3CX to be able to automatically configure IP phones using Plug and Play technology , the devices must be on the same network segment as the server. Therefore, it is necessary to configure automatic switching of IP phones to the voice network (multicast auto-configuration packets sent by the phone will be intercepted and processed by the server).
DHCP Option 132
Note: LLDP on switches must be turned off. On the DHCP server, create Option 132 and specify Vlan ID 55 (for our example). Typically, PCs ignore this option, but the IP phone must correctly interpret it. Having received Option 132, the phone releases the current IP address, changes the VLAN and receives a new IP address from VLAN 55. After that, the phone sends a multicast PnP auto-tuning request, which is processed by 3CX.
LAN / WAN Port
VLAN ID is specified directly in the phone’s auto-configuration interface. It should match the DHCP Option 132. This configuration gives you a number of advantages:
- The configured device does not initially try to obtain an IP address from the data network in order to switch to the desired VLAN ID
- IP Phone Does Not Use DHCP Option 132
The VLAN Priority option is enabled by default and can have a value from 0 to 7. The packet priority determines how it should be processed by the network nodes through which it passes. The range of values is from 1 (low priority) to 6 (high priority). 7 use is not recommended, because reserved for emergencies. We remind you that an incorrect indication of this value leads to a deterioration in the quality of communication. Real-time traffic from IP phones should always have higher priority than other network traffic.
PC port (optional)
If you do not define the VLAN for the PC port of the phone, it will work in the default VLAN of the network, i.e. in a data network (this does not mean that the PC port will be disconnected - it is still available for connecting a PC).

Sometimes a PC connected to a PC port must be “transferred” (ie, tagged) to a different VLAN other than the default network. In this case, VLAN tagging is used on the PC interface of the phone, for example:
- The default network is 10.10.10.0 / 24
- DHCP pool 10.10.10.3 / 24
- Voice transmission network 10.10.20.0 / 24 (Vlan Tag 55) ← VLAN port WAN
- 3CX server IP 10.10.20.2 / 24
- IP Phone 10.10.20.5 / 24
- Data network 10.10.30.0 / 24 (Vlan Tag 77) ← VLAN port PC
- IP PC 10.10.30.3 / 24
VLAN Configuration Examples
Configuring VLAN tagging on an IP phone in a voice network + DHCP Option 132
- When connecting an IP phone receives an IP address in the data network (10.10.10.5). There is no access to the PBX server on this network (10.10.30.2), and the phone cannot be configured using PnP technology.
- Configure DHCP redundancy for the IP address of the phone and assign it DHCP Option 132 with a text value of 55
- Reboot IP Phone
- After rebooting, the IP phone will receive a VLAN tag of 55 and will again receive the IP address from the voice network (10.10.20.5).
- In the 3CX management interface, go to the Phones section , select the connected new phone and assign it to the user (or create a new user for this phone).
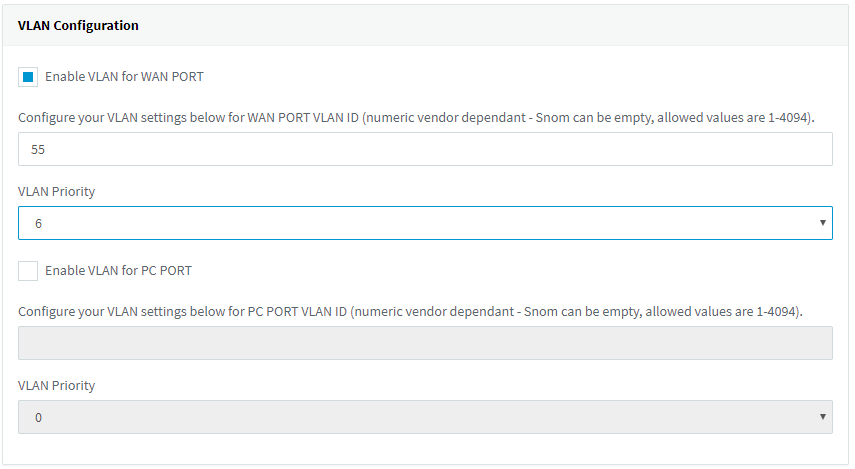
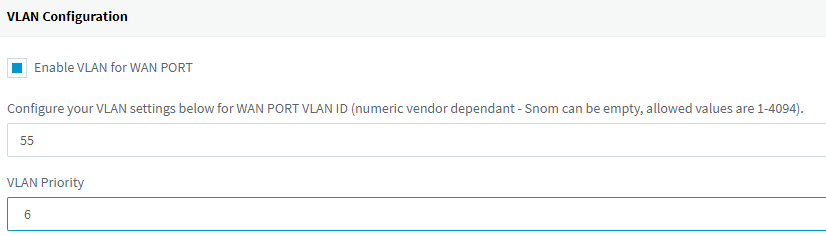
- In the Autotune phone section in the VLAN Configuration section, enable the Enable VLAN for WAN PORT option
- In the Configure your VLAN settings below for WAN PORT VLAN ID field (numeric vendor dependant - Snom can be empty, allowed values are 1-4094), set the value to 55.
- Apply the changes by clicking OK at the top.
- The phone will receive new settings and reboot
- After rebooting, the WAN port of the phone will be tagged with VLAN ID 55
- The IP phone will receive the IP address of the voice network (10.10.20.5)
- DHCP Option 132 will be overridden by a parameter obtained through auto-configuration.
Configuring VLAN tagging on an IP phone in a voice network
- When connecting an IP phone receives an IP address in the data network (10.10.10.X).
- In the Autotune phone section in the VLAN Configuration section, enable the Enable VLAN for WAN PORT option
- In the Configure your VLAN settings below for WAN PORT VLAN ID field (numeric vendor dependant - Snom can be empty, allowed values are 1-4094), set the value to 55.
- Apply the changes by clicking OK at the top.
- IP phone will receive new settings and reboot
- After rebooting, the WAN port of the phone will be tagged with VLAN ID 55
- The IP phone will receive the IP address of the voice network (10.10.20.5)
Configuring VLAN tagging on an IP phone in a voice network + connecting a PC through a PC port to a data network
- Connect the PC with the PC IP port of the phone, and the WAN port of the phone to the corporate network
- When connected, the phone receives an IP address in the data network (10.10.10.5).
- The PC port of the phone also receives an IP address from the address pool of the data network (10.10.10.3).
- In the Autotune phone section in the VLAN Configuration section, enable the Enable VLAN for WAN PORT option
- In the Configure your VLAN settings below for WAN PORT VLAN ID field (numeric vendor dependant - Snom can be empty, allowed values are 1-4094), set the value to 55.
- Do not enable Enable VLAN for PC PORT
- Apply the changes by clicking OK at the top.
- IP phone will receive new settings and reboot
- After rebooting, the WAN port of the phone will be tagged with VLAN ID 55, and the PC port will continue to work in the data network (10.10.10.3).
- The IP phone will receive the IP address of the voice network (10.10.20.5)