Creating stones for games using photogrammetry
- Transfer
Sebastian van Elverding talks about his approach to creating stunning three-dimensional stones and rocks with the help of many photographs. You can learn more about it in the tutorial at gumroad.com/sebvhe .
Hi, my name is Sebastian, I live in Brussels, in the homeland of the best french fries, beer and chocolate! Now I work as an environmental artist at Starbreeze Studios (Stockholm). I used to work at Playground Games on Forza Horizon 3, which was a great opportunity for me to use photogrammetry in an AAA-class game.
Over the past four years, I have experimented a lot with photogrammetry. Pretty quickly, I began to study textures and materials, which I knew little about then. About a year ago, I released a tutorial on how to create textures using photogrammetry.
Although my workflow has changed a bit since writing, the tutorial still applies to what I'm going to tell. If you find something incomprehensible in this interview, then most likely you will find a detailed explanation in the tutorial.

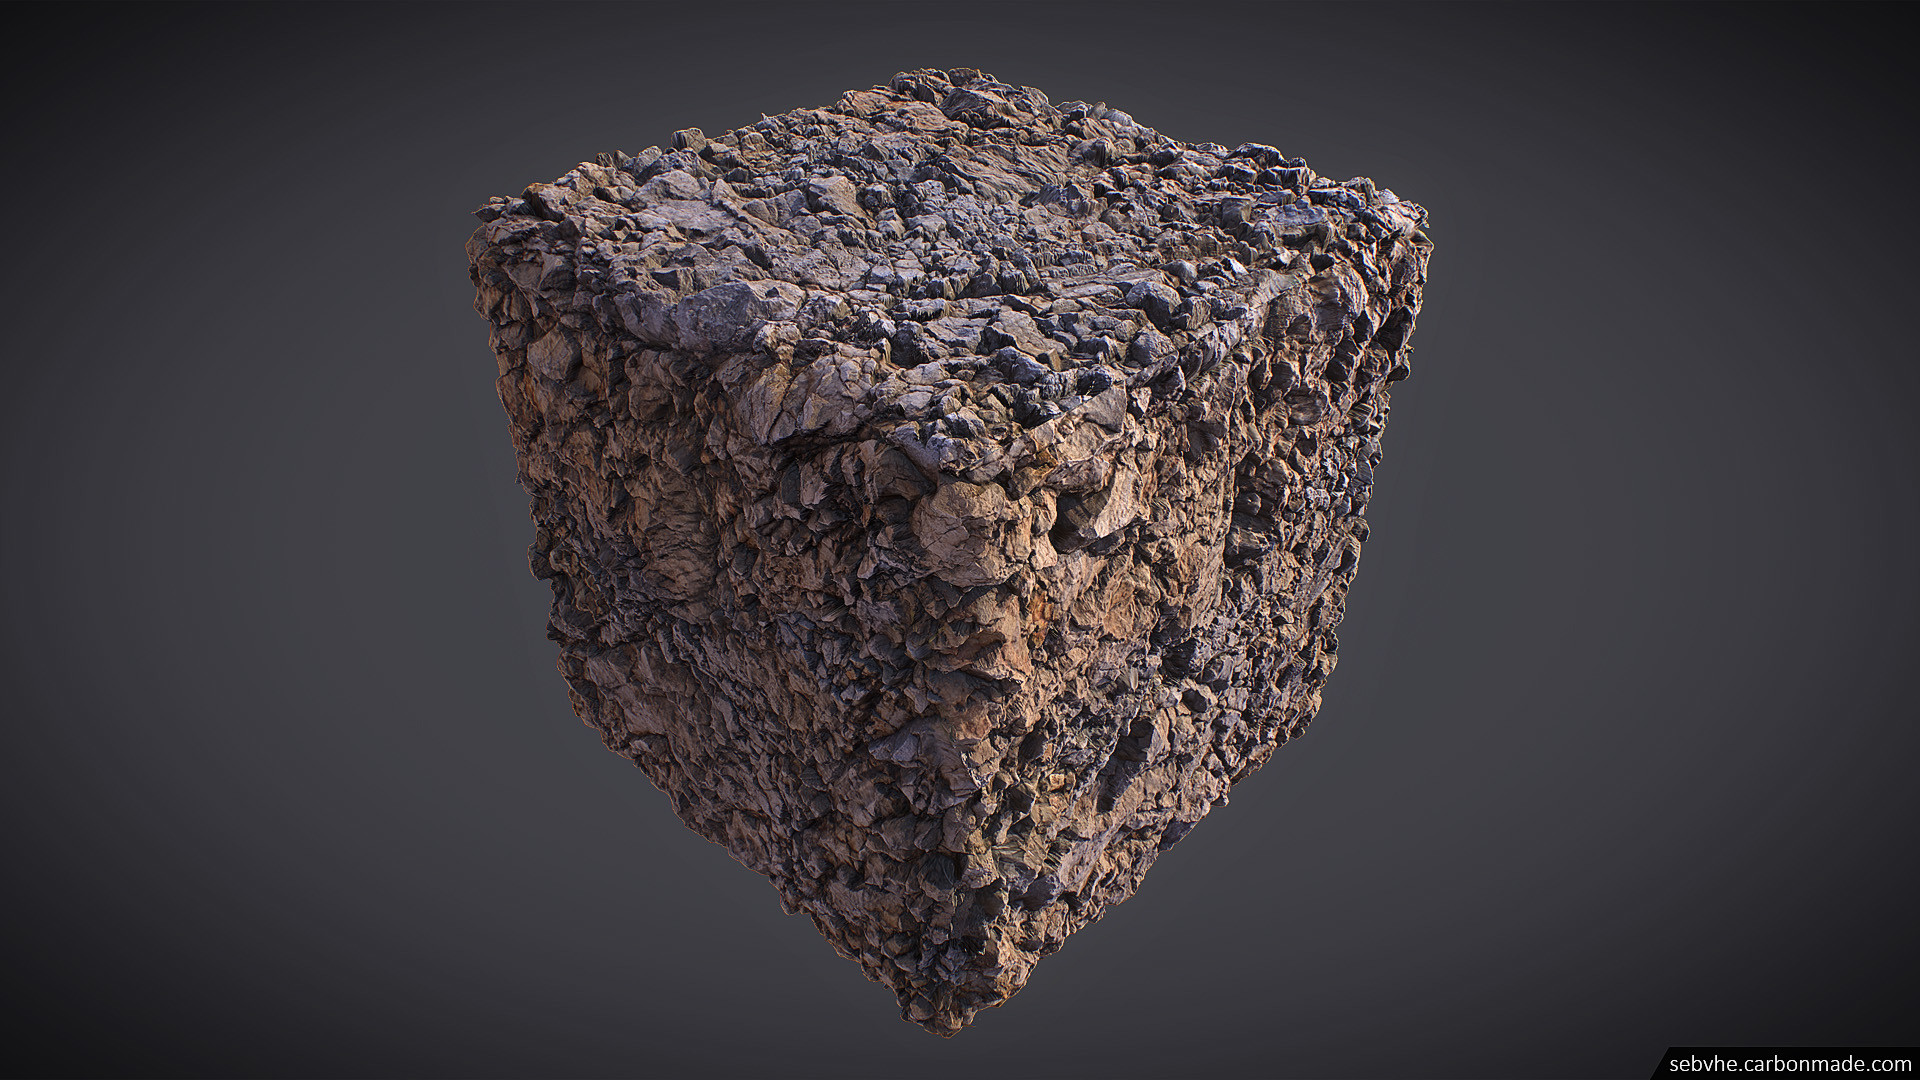
My very first seamless scan of 2014 (left) and one of the last scans (right)
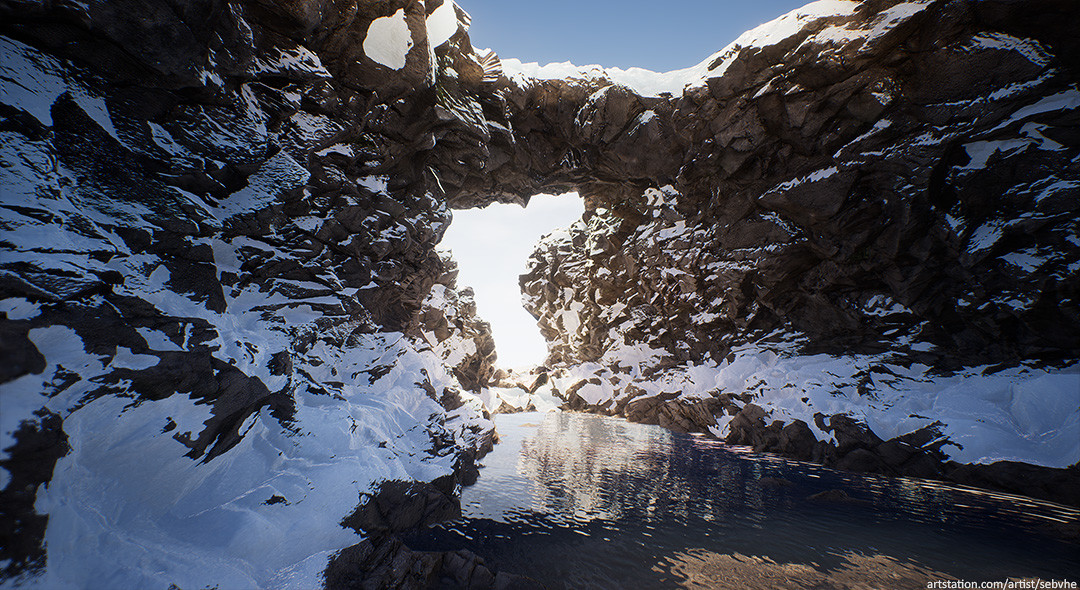
Usually people perceive photogrammetry as a way to transfer static scanned meshes (mesh) into the game. When working with environment scanning, they always deal with huge unique textures with a side of 4-16 kilopixels on unique, non-repeating grids. A good example is the UE4 Kite demo. But what is suitable for cinematics such as Kite will be completely inapplicable for use in real time, especially on large surfaces.

This was important to me when I was working on the UE4 Marketplace Rock Texture Set. Imagine that we are making a small rocky canyon. The mistake is to scan a set of 4-8 large rocks, from which you will then try to assemble a canyon. As a result, you are likely to get four unique textures with a side of 4 kilopixels. Instead, I strive to create one very good seamless stone texture by writing beautiful shapes to its height map. Then I just create a very simple canyon grid, for which I apply displacement based on the resulting texture. This way I get the whole scene in which only one 4k texture is used for the rocks.
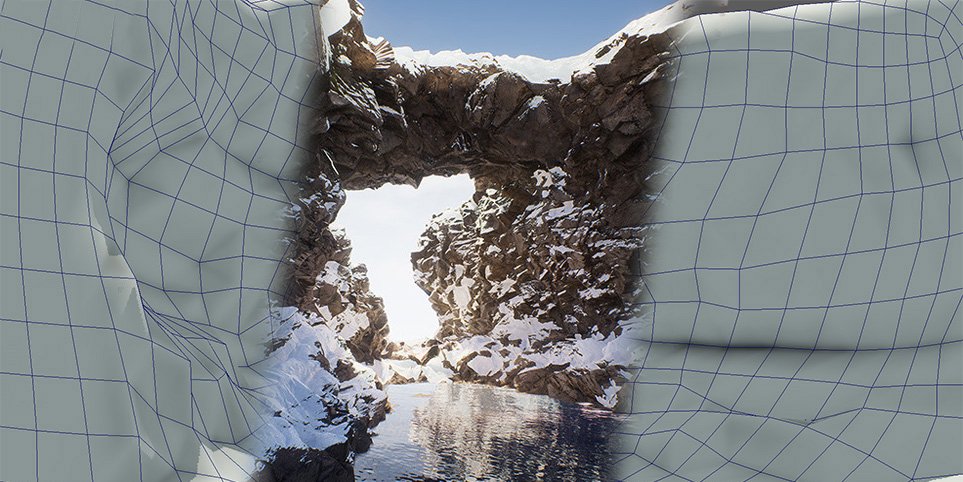
Quickly created canyon envelope grid with offset in UE4, use one seamless stone texture and some snow for beauty.
Without any problems, you can perform the offset in advance in the 3D editor based on the height map, and then import the optimized grid instead of using tessellation. The choice depends on the importance of the environment and the resources available.
I believe that this method takes up much less memory, requires incredibly little time (compared to scanning multiple grids), and allows you to iterate a design much faster. If you want to turn a scene into a desert canyon, then just scanning one desert rock texture is enough.

Just imagine how many grids would have to be scanned to replace the biome, and in our case only one texture is required (plus snow, sand or moss)
However, it is wise to approach hiding or removing seams. My tessellation material allows you to remove 100% of the seams.
In the end, photogrammetry can be very flexible, you just have to think about it outside of the traditional "hard" use.

In fact, you will not need anything else except a camera and a computer. A good analogy: to play the guitar, you do not need Gibson for $ 2,000, with a simple guitar for $ 100 you can achieve a lot. Ultimately, craftsmanship means more than equipment. When working with photogrammetry, I use very simple equipment. I would love to upgrade, but so far I think that the limitations of poor equipment have helped me find tricky ways to improve the poor quality of scans.

All my scanning work I spend with the Canon 100D / Rebel SL1, one of the cheapest DSLRs on the market, it costs only about $ 400.
However, it will take some effort to improve the quality of scans.


And now about the equipment that I do not use:
Let's talk about computers: if you have a standard gaming desktop computer, then there will be no problems with processing. I recommend having at least 16 GB of RAM and a decent graphics card. I use GTX670 and 16 GB of RAM, a pretty standard set. Probably the bottleneck will be memory.
It is very difficult to achieve good lighting, because on the street you cannot control it and there are no other options but to wait for the right moment. In general, two points must be avoided:

This is one of the worst examples.
Your goal is a cloudy sky, both uniform and very bright. Do not wait too long, the probability of getting it is not very high!
The number of images depends heavily on the software used (about it a bit later), the size of the scanned surface and the desired level of detail. It is always better to take more pictures than necessary.
Of course, overlay is critical. Photogrammetric software compares features in different images to determine the spatial position of the frames. Therefore, several images should have the same parts, the more the better.


So, you want to scan the found surface, where to start?
Remember, I said that I can abandon the tripod because I change the narrow aperture to a high shutter speed? I can afford a narrow depth of field with almost no blurring, because I always shoot from top to bottom (but here you have to be careful so as not to get into the frame with shoes!). This not only provides the best results, but also means that the subject will be almost at the same distance from the camera in the whole frame, reducing the amount of blurring of the depth of field. Of course, this applies to scanning relatively flat surfaces.

Source: Agisoft User Guide
And now for the overlay: imagine yourself a Google Earth cartographer, first you want to capture the whole Earth, the whole object in the first shots, and then add different levels of detail. First take global shots, at least eight, better more. Perhaps they cannot be made from top to bottom, do not worry, just move around the object, and more accurately with the depth of field. Now you have in each picture all the characteristic features of the surface to which the following, more accurate pictures will be attached.
Next, you need to create the first zoom level: take pictures from top to bottom, about 1/4 of the size. Make them overlap each other by more than 50%. Repeat again for 1/8 of the surface, 1/16, etc ... It all depends on the level of detail you need.
Such an operation algorithm ensures that close images do not mix with their neighbors, for binding they can rely on the previous level of detail.
Of course, in reality you are doing everything by eye, you do not need to carry a tape measure with you. Moreover, this principle does not always work, for example, if you scan sand, then you can not step on it in the scanning process. But it’s good to always remember this principle.

In this example, common shots are highlighted in blue, the first level of shots from top to bottom is shown in green, and the other detailed top-down view is shown in red.
There are two main competitors, Agisoft Photoscan and the fairly new Reality Capture package . I mainly used Photoscan, but recently started using Reality Capture. I can’t say that one is much better than the other, but lately the industry seems to be leaning towards Reality Capture.
Here are my pros and cons of each package. Do not forget, I'm still quite inexperienced in Reality Capture and may be mistaken in some ways.
I think it’s worth advising beginners to start with Reality Capture, it is more tolerant of bad pictures, in addition, you can compensate for low-quality pictures with good image quality, which Agisoft may not provide on your computer.
However, if you plan to work with photogrammetry only from time to time, it will probably be cheaper to choose Agisoft standalone license.
A stunning over-detailed scan may not look beautiful in the game if you do not take care of a good artistic vision in advance.
The most important and difficult thing is tiling. It is always worth remembering about it, especially when searching for a surface for scanning. Many people ask me: “Is there a faster way to place textures and can it be automated, for example, using Substance?”
In 90% of cases there is no such method.
I think that the belief in the existence of such a method arose from the belief that tiling is the removal of stitches. Yes, it probably is, but it is less than 10% of the texture joining process. The real work is to balance the frequency and characteristics of your surface, so that the texture looks good even with repeated repetition. In most cases, this cannot be automated yet.
Perhaps this process should be called not “placement”, but “connection”.
Do not focus only on the seams, move fragments of the texture, remove pebbles that are too noticeable, etc. ...

It is impossible to switch from an extended rock (left) to a square seamless texture (right), simply by “removing the seams”
The way I make textures seamless in Photoshop makes it pretty easy to move objects compared to 3D editors, especially when working with meshes of 50 million polygons.
I almost never use ZBrush , except for the texture offset for baking all the cards I need. Sometimes I can quickly fix some artifacts, but usually this does not happen, and I do nothing in ZBrush.
Getting rid of lighting is a very big problem when scanning 3D objects. For textures ... it’s not very important. Most often this problem is solved quickly and in a straightforward manner. The most important thing is to have uniform illumination during scanning. If it was possible to achieve it, then it remains to use the AO (Ambient occlusion) card to remove the blackout from the diffuse card. Then, you may have to fix a few fragments manually.

I almost never spend on deleting lighting information for more than thirty minutes.
Normal maps are created quite simply, but there are two points to pay attention to:
Very tricky question!
Since PBR is widely used in games, the opinions of artists are divided. Some people want the system to be 100% accurate, and therefore claim that it is never worth using reflection maps. Others say that some objects look better with them, although technically wrong. I can say that both sides are right, but I am inclined to use reflection maps in certain cases. Moreover, perhaps they are not as inaccurate as you think. Let me explain:
When baking organic textures on a plane, you oversimplify extremely complex shapes, leaves, small pebbles, etc ... Have you ever realized how complicated moss can be?

All these irregularities cannot be imitated by simple roughness and a normal map. The main reason for this is that all these small details cast shadows on each other. The light is “entangled” in the complex pattern of moss, and cannot just be reflected back.
Tessellation can bring back these small shadows, but for small details it is not enough.
Can I solve this problem with an AO card?
Yes, maybe, but the problem with AO cards is that they really work only in the shaded parts of the grid, and all parts illuminated with direct light remain very flat and “plastic”.
Using a reflection map is an easy way to simulate the complex behavior of complex organic forms.

Without reflection map (left) and with reflection map (right). Note that dirt and very small stones look less plastic with a reflection map.
At the same time, you should carefully handle the reflection map. Always understand why you are doing it, what logic is behind it. The need for a reflection map also greatly depends on the engine used.
When using the reflection map, I pass only part of it to the input using linear interpolation in order to control the amount of reflection to be changed.
I always create reflection maps for my textures because it only takes a few minutes, but as a result I use them only in special cases, mainly for grass and moss.

My other works can be viewed on ArtStation !
Sebastian van Elverding, environmental artist at Starbreeze Studios.
Introduction
Hi, my name is Sebastian, I live in Brussels, in the homeland of the best french fries, beer and chocolate! Now I work as an environmental artist at Starbreeze Studios (Stockholm). I used to work at Playground Games on Forza Horizon 3, which was a great opportunity for me to use photogrammetry in an AAA-class game.
Over the past four years, I have experimented a lot with photogrammetry. Pretty quickly, I began to study textures and materials, which I knew little about then. About a year ago, I released a tutorial on how to create textures using photogrammetry.
Although my workflow has changed a bit since writing, the tutorial still applies to what I'm going to tell. If you find something incomprehensible in this interview, then most likely you will find a detailed explanation in the tutorial.
My very first seamless scan of 2014 (left) and one of the last scans (right)
Photogrammetry
Usually people perceive photogrammetry as a way to transfer static scanned meshes (mesh) into the game. When working with environment scanning, they always deal with huge unique textures with a side of 4-16 kilopixels on unique, non-repeating grids. A good example is the UE4 Kite demo. But what is suitable for cinematics such as Kite will be completely inapplicable for use in real time, especially on large surfaces.
This was important to me when I was working on the UE4 Marketplace Rock Texture Set. Imagine that we are making a small rocky canyon. The mistake is to scan a set of 4-8 large rocks, from which you will then try to assemble a canyon. As a result, you are likely to get four unique textures with a side of 4 kilopixels. Instead, I strive to create one very good seamless stone texture by writing beautiful shapes to its height map. Then I just create a very simple canyon grid, for which I apply displacement based on the resulting texture. This way I get the whole scene in which only one 4k texture is used for the rocks.
Quickly created canyon envelope grid with offset in UE4, use one seamless stone texture and some snow for beauty.
Without any problems, you can perform the offset in advance in the 3D editor based on the height map, and then import the optimized grid instead of using tessellation. The choice depends on the importance of the environment and the resources available.
I believe that this method takes up much less memory, requires incredibly little time (compared to scanning multiple grids), and allows you to iterate a design much faster. If you want to turn a scene into a desert canyon, then just scanning one desert rock texture is enough.
Just imagine how many grids would have to be scanned to replace the biome, and in our case only one texture is required (plus snow, sand or moss)
However, it is wise to approach hiding or removing seams. My tessellation material allows you to remove 100% of the seams.
In the end, photogrammetry can be very flexible, you just have to think about it outside of the traditional "hard" use.
Equipment
In fact, you will not need anything else except a camera and a computer. A good analogy: to play the guitar, you do not need Gibson for $ 2,000, with a simple guitar for $ 100 you can achieve a lot. Ultimately, craftsmanship means more than equipment. When working with photogrammetry, I use very simple equipment. I would love to upgrade, but so far I think that the limitations of poor equipment have helped me find tricky ways to improve the poor quality of scans.
All my scanning work I spend with the Canon 100D / Rebel SL1, one of the cheapest DSLRs on the market, it costs only about $ 400.
However, it will take some effort to improve the quality of scans.
- Manual exposure: Although it is technically possible to use a poor camera with automatic settings, in fact, the lack of manual exposure is very limited. It is necessary that all the pictures have the same settings, otherwise the camera will begin to compensate for the darker pictures and it will be much more difficult for the software to link the pictures to each other, and you will need to delete the lighting information. Almost all cameras and phones today have a manual shutter function.
- Good SD card / high write speed: at first it is not so obvious, but it can change your world. For a long time I used a slow SD card and I had to wait about 5 seconds between shots (as soon as the buffer memory of the card was full). When you take hundreds of frames, 5 seconds between shots is a lot.
- RAW Files: This is the main reason I recommend DSLR. The RAW file format contains much more information and dynamic range than regular JPG (which also has compression artifacts). It allows you to pre-process images, achieving, among other things, better quality, color balance and eliminate vignettes.
In addition, it allows you to reduce lighting information before processing scans, which simplifies the removal of this information after the process. RAW files can be huge, so you should consider this when choosing an SD card.
And now about the equipment that I do not use:
- Tripod: That's right, I rarely use a tripod, at least when shooting outdoors. This is my personal choice. For me, a faster shutter speed than a large aperture is more important (more on this later). Do not get me wrong, the use of a tripod will undoubtedly improve the quality of scans, but there is a drawback - time, a lot of time is spent on installing a tripod for each shot (and even a few seconds add up to a lot). When shooting outdoors, the lighting conditions are rarely ideal, so I usually strive to be as fast as possible (but without the hassle) to avoid a gradual change in the lighting conditions when scanning. I repeat, if you are scanning indoors or the lighting conditions are stable, then there is no reason not to use a tripod! Moreover, perhaps
- Color calibrator (color checker): there is no good reason not to use them, except for the high cost - about $ 100 for the X-Rite Passport. The color calibrator provides the correct color calibration. Soon I will buy it for myself.

- Chrome balls and all the equipment for removing information about HDR lighting: in my opinion, this is just a waste of time and money, at least for textures, but it can be useful for large scans of 360 degrees. By default, if you scan textures, then the surface you are removing most often looks in one direction and the illumination of the entire scan is almost the same. You can get rid of the remnants of lighting in a few minutes of work in Photoshop and not waste time fussing with deleting information about HDRI lighting.
Let's talk about computers: if you have a standard gaming desktop computer, then there will be no problems with processing. I recommend having at least 16 GB of RAM and a decent graphics card. I use GTX670 and 16 GB of RAM, a pretty standard set. Probably the bottleneck will be memory.
Lighting
It is very difficult to achieve good lighting, because on the street you cannot control it and there are no other options but to wait for the right moment. In general, two points must be avoided:
- Rain: when scanning should be dry. Depending on the material, rain can make it more reflective or dark.
- Changes in conditions: if you are unable to find a good uniform cloudy sky, at least strive for something stable, even if it is sunny, in which case you can scan something in the shade. Moving clouds should be avoided at all costs, because they can literally dramatically change the brightness in seconds.
This is one of the worst examples.
Your goal is a cloudy sky, both uniform and very bright. Do not wait too long, the probability of getting it is not very high!
How many pictures do you usually need to take to get good material?
The number of images depends heavily on the software used (about it a bit later), the size of the scanned surface and the desired level of detail. It is always better to take more pictures than necessary.
Of course, overlay is critical. Photogrammetric software compares features in different images to determine the spatial position of the frames. Therefore, several images should have the same parts, the more the better.
So, you want to scan the found surface, where to start?
Remember, I said that I can abandon the tripod because I change the narrow aperture to a high shutter speed? I can afford a narrow depth of field with almost no blurring, because I always shoot from top to bottom (but here you have to be careful so as not to get into the frame with shoes!). This not only provides the best results, but also means that the subject will be almost at the same distance from the camera in the whole frame, reducing the amount of blurring of the depth of field. Of course, this applies to scanning relatively flat surfaces.
Source: Agisoft User Guide
And now for the overlay: imagine yourself a Google Earth cartographer, first you want to capture the whole Earth, the whole object in the first shots, and then add different levels of detail. First take global shots, at least eight, better more. Perhaps they cannot be made from top to bottom, do not worry, just move around the object, and more accurately with the depth of field. Now you have in each picture all the characteristic features of the surface to which the following, more accurate pictures will be attached.
Next, you need to create the first zoom level: take pictures from top to bottom, about 1/4 of the size. Make them overlap each other by more than 50%. Repeat again for 1/8 of the surface, 1/16, etc ... It all depends on the level of detail you need.
Such an operation algorithm ensures that close images do not mix with their neighbors, for binding they can rely on the previous level of detail.
Of course, in reality you are doing everything by eye, you do not need to carry a tape measure with you. Moreover, this principle does not always work, for example, if you scan sand, then you can not step on it in the scanning process. But it’s good to always remember this principle.
In this example, common shots are highlighted in blue, the first level of shots from top to bottom is shown in green, and the other detailed top-down view is shown in red.
Software
There are two main competitors, Agisoft Photoscan and the fairly new Reality Capture package . I mainly used Photoscan, but recently started using Reality Capture. I can’t say that one is much better than the other, but lately the industry seems to be leaning towards Reality Capture.
Here are my pros and cons of each package. Do not forget, I'm still quite inexperienced in Reality Capture and may be mistaken in some ways.
Agisoft photoscan | Reality capture | |
pros | Good documentation and online tutorials | Insanely fast in processing, sometimes you don’t even have time to drink coffee! |
| Good filtering tools to remove unwanted points after snapping. Doesn't seem to make as many holes as Reality Capture | Can handle thousands of shots on a simple computer | |
| In my opinion, the texture quality in Agisoft is slightly better. | The program never fell out, it happens so rarely that it is worth mentioning | |
| The Standalone license is pretty cheap, $ 179, cheaper in the long run than Reality Capture. | ||
Minuses | Quite slow and uses a LOT of RAM, with a mediocre computer, the resolution of scans can be pretty much trimmed | Creates more holes and requires a bit more manual snap. However, here the problem may be in my settings, which are still imperfect. |
| You need to carefully select the pictures, because the computer may not be able to process them all. | Most of the parameters are very mysterious, lacking documentation and examples. | |
| For the same reasons, it is most likely not possible to achieve ultra-high resolution grids. | Too similar to the one-click solution approach. It’s convenient when it works, but when it doesn’t work, a lot of problems arise when fixing it. | |
| The subscription system makes it more expensive in the long run (from six months) |
I think it’s worth advising beginners to start with Reality Capture, it is more tolerant of bad pictures, in addition, you can compensate for low-quality pictures with good image quality, which Agisoft may not provide on your computer.
However, if you plan to work with photogrammetry only from time to time, it will probably be cheaper to choose Agisoft standalone license.
Features
A stunning over-detailed scan may not look beautiful in the game if you do not take care of a good artistic vision in advance.
The most important and difficult thing is tiling. It is always worth remembering about it, especially when searching for a surface for scanning. Many people ask me: “Is there a faster way to place textures and can it be automated, for example, using Substance?”
In 90% of cases there is no such method.
I think that the belief in the existence of such a method arose from the belief that tiling is the removal of stitches. Yes, it probably is, but it is less than 10% of the texture joining process. The real work is to balance the frequency and characteristics of your surface, so that the texture looks good even with repeated repetition. In most cases, this cannot be automated yet.
Perhaps this process should be called not “placement”, but “connection”.
Do not focus only on the seams, move fragments of the texture, remove pebbles that are too noticeable, etc. ...
It is impossible to switch from an extended rock (left) to a square seamless texture (right), simply by “removing the seams”
The way I make textures seamless in Photoshop makes it pretty easy to move objects compared to 3D editors, especially when working with meshes of 50 million polygons.
I almost never use ZBrush , except for the texture offset for baking all the cards I need. Sometimes I can quickly fix some artifacts, but usually this does not happen, and I do nothing in ZBrush.
Clear Lighting Information
Getting rid of lighting is a very big problem when scanning 3D objects. For textures ... it’s not very important. Most often this problem is solved quickly and in a straightforward manner. The most important thing is to have uniform illumination during scanning. If it was possible to achieve it, then it remains to use the AO (Ambient occlusion) card to remove the blackout from the diffuse card. Then, you may have to fix a few fragments manually.
I almost never spend on deleting lighting information for more than thirty minutes.
Normal Maps
Normal maps are created quite simply, but there are two points to pay attention to:
- Avoid overhanging at all costs: you need to remember this even during shooting, figure out which area may look wrong when shifting on a plane, and know how to fix it if you decide to shoot anyway. As I explained in my tutorial, most of the problems can be solved by creating a special low-poly model. However, this is a tricky problem, because you may not notice it until you already get very far in the process. On my first scans there were a lot of sprains due to overhangs.

An example of overhang stretching in one of my first scans. The special low poly mesh that I am now using would fix this.
Do not expect the scan to be detailed enough for an ultra-fine normal map. You will need to regenerate the high-frequency parts by converting albedo into a normal map and laying small parts on top of the scan normals.
Why do you think the use of reflection maps is important for selecting the right types of materials?
Very tricky question!
Since PBR is widely used in games, the opinions of artists are divided. Some people want the system to be 100% accurate, and therefore claim that it is never worth using reflection maps. Others say that some objects look better with them, although technically wrong. I can say that both sides are right, but I am inclined to use reflection maps in certain cases. Moreover, perhaps they are not as inaccurate as you think. Let me explain:
When baking organic textures on a plane, you oversimplify extremely complex shapes, leaves, small pebbles, etc ... Have you ever realized how complicated moss can be?
All these irregularities cannot be imitated by simple roughness and a normal map. The main reason for this is that all these small details cast shadows on each other. The light is “entangled” in the complex pattern of moss, and cannot just be reflected back.
Tessellation can bring back these small shadows, but for small details it is not enough.
Can I solve this problem with an AO card?
Yes, maybe, but the problem with AO cards is that they really work only in the shaded parts of the grid, and all parts illuminated with direct light remain very flat and “plastic”.
Using a reflection map is an easy way to simulate the complex behavior of complex organic forms.
Without reflection map (left) and with reflection map (right). Note that dirt and very small stones look less plastic with a reflection map.
At the same time, you should carefully handle the reflection map. Always understand why you are doing it, what logic is behind it. The need for a reflection map also greatly depends on the engine used.
When using the reflection map, I pass only part of it to the input using linear interpolation in order to control the amount of reflection to be changed.
I always create reflection maps for my textures because it only takes a few minutes, but as a result I use them only in special cases, mainly for grass and moss.
My other works can be viewed on ArtStation !
Sebastian van Elverding, environmental artist at Starbreeze Studios.