How to deploy a customer support system in 5 minutes
- Tutorial
Improving efficiency is one of the most relevant and popular topics in business. At the same time, user support automation systems are becoming increasingly relevant and in demand. This is primarily because competition in the market forces companies to fight for the loyalty of literally every client. The work of customer support will become much more effective if you choose the right software. Of course, not all systems are the same. Some are better suited for small and medium-sized businesses, while others are better suited for large. The market has long presented products that somehow solve the problem of automating customer support: open and closed source, paid and free, installed on users' servers and computers, and SaaS solutions.

According to the capabilities of the user support system can be divided into the following groups:
Complex integrated solutions, as a rule, require a lot of time and high implementation costs, while simple ones may not have the necessary functionality. Any company that needs to start customer support needs to assess its needs, capabilities and only then choose a service. It is also important to consider the possible development of their products and the increase in the load on the service. If the selected service does not cope, then the process of switching to another software will result in large financial and labor costs.
DeskunIt was developed on the basis of Gmail e-mail in order to minimize the time for launching customer support and training employees to work with the service. From the moment of authorization to launch, only 5 minutes can pass. Moreover, the system can be used in the future not only to track user requests, but also to manage tasks within the company.
Work with Deskun begins with authorization on the site. Unlike other services, you do not need to register here, fill out questionnaires with information about the company and enter employee data. Log in with your Google account at Deskun and then install the browser extension. You can also simply install the plugin, and access to your personal account will happen automatically. The same process will need to be performed on all computers of employees who will work in the service. Recall that Deskun only works with the Google Chrome and Yandex.Browser browsers, but the developers will soon promise to launch a web version of the client.
After setting up the service, each employee will be able to carry out their work from anywhere. The main thing is to have access to the Internet and the installed extension. The tendency to let managers go home from office is gaining momentum, thereby saving on office rent and equipment purchase. With Deskun, you can easily implement this model of employee interaction.
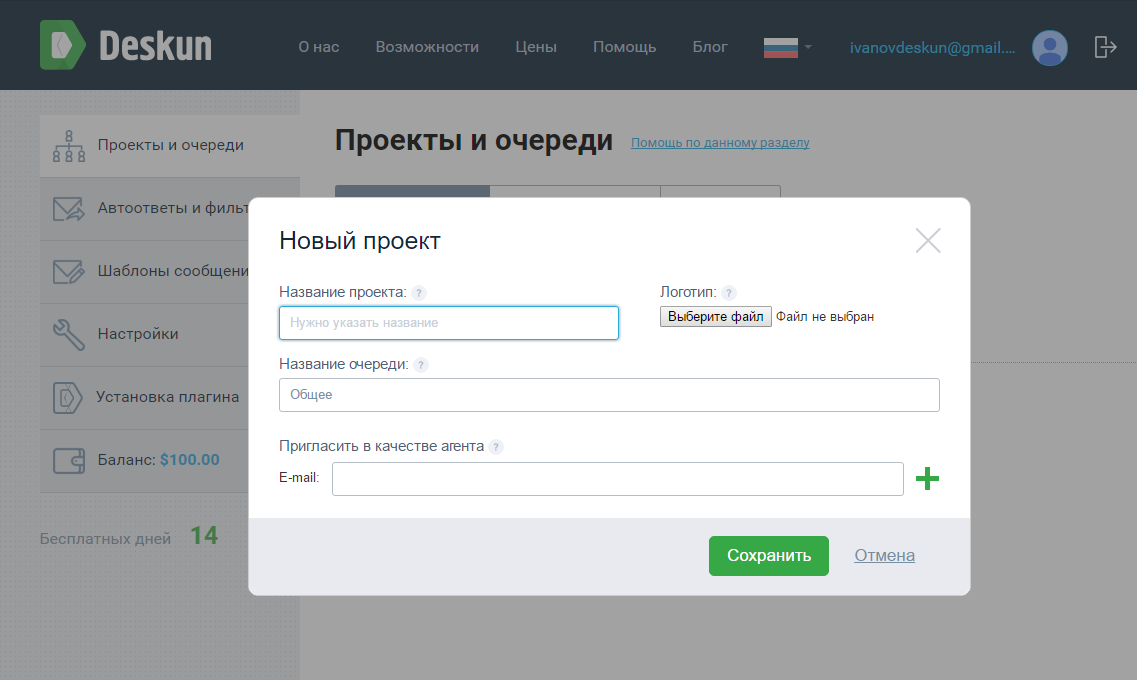
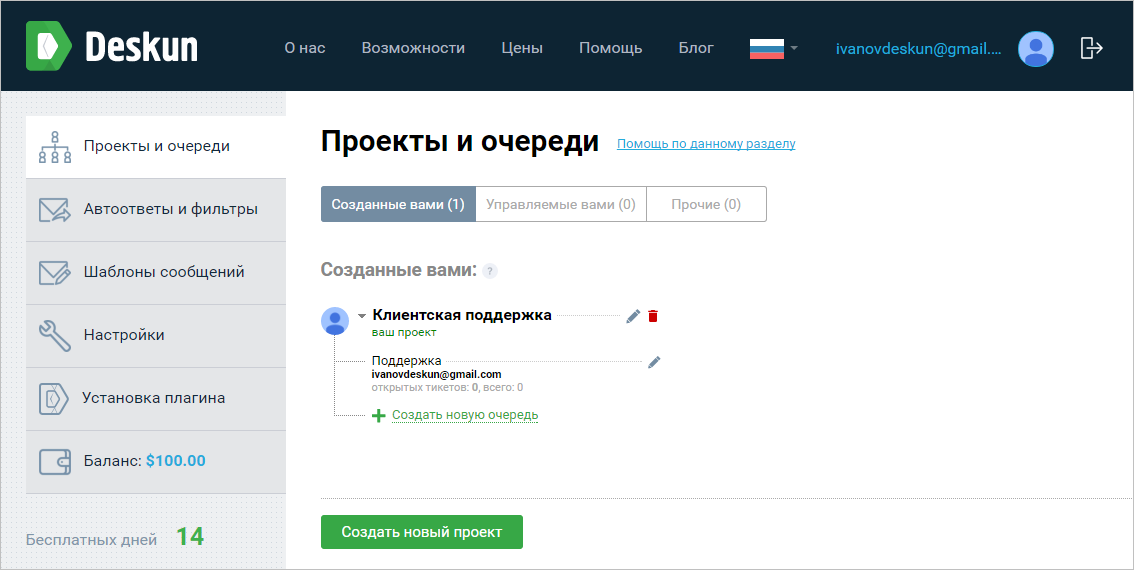
After authorization and installation of the extension, you must do the initial setup of the system. To do this, go to your personal account on the Deskun website and create a new project. The concept of "project" means any service or activity of the company, within the framework of which user requests may arise. Depending on the size of your organization, you can make either one general project or separate ones for any area of activity.
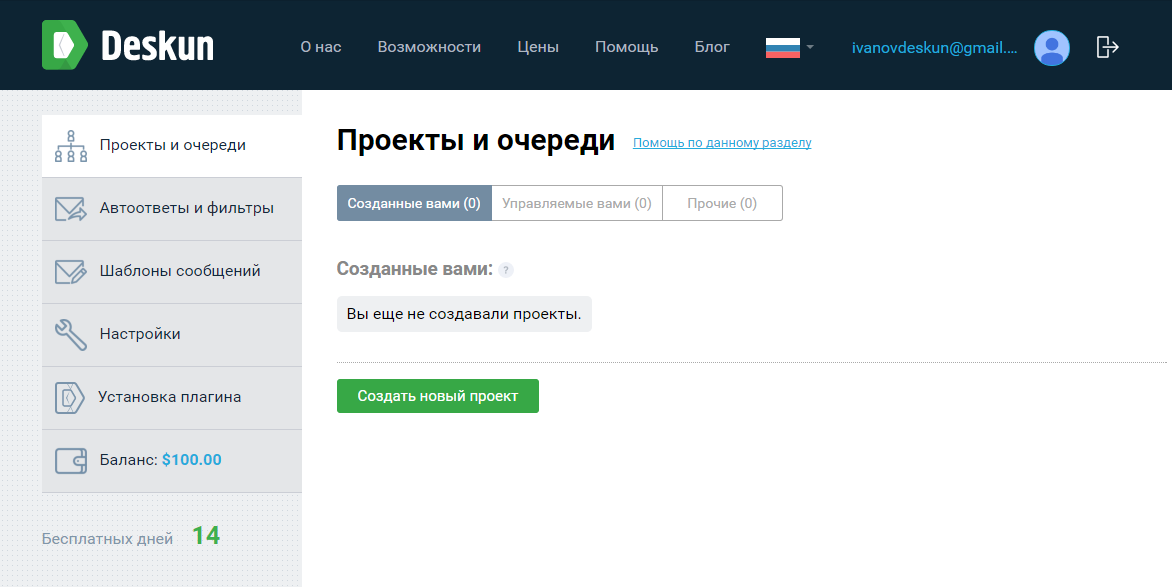
At the same time, the creation of a new project does not require any knowledge or complex actions from the user. Indicate the name, upload the logo and create the first. Queues at Deskun are individual business processes for your company. For example, you can streamline the flow of incoming applications by creating a separate queue for each topic and assigning a responsible employee to it.
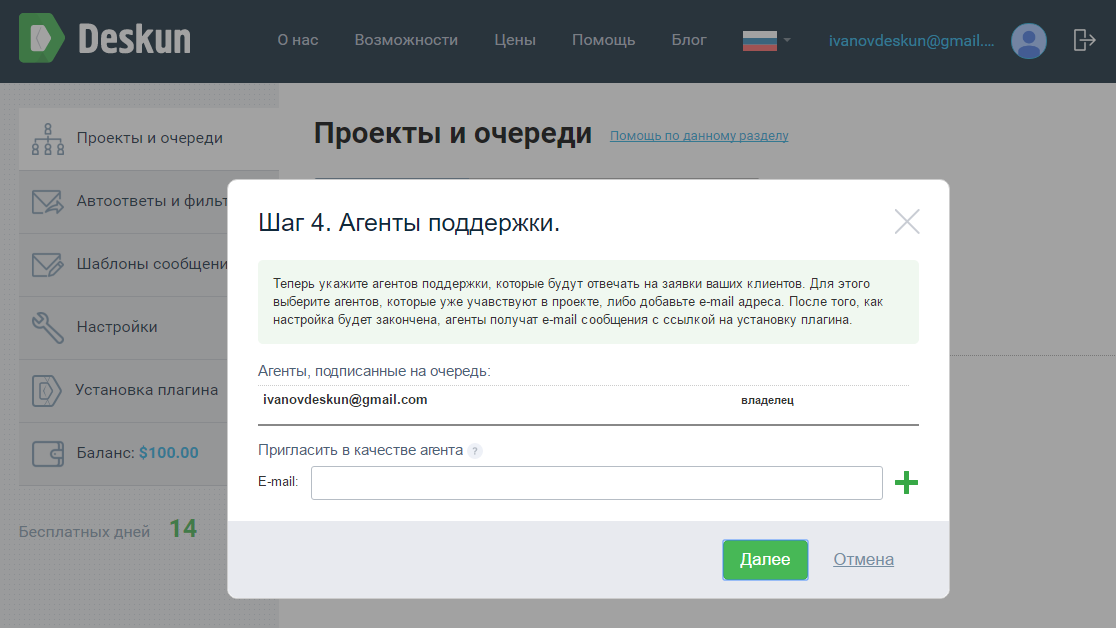
Also at this stage, you can immediately add employees (agents) of the company to the project. To do this, enter one or more e-mail addresses to which invitations will be sent.
After filling in the initial information, the service will offer you to select deployment scenarios for the new project. You can choose from “Customer Support (email)” and “Task Management”. Or you can manually configure the configuration.
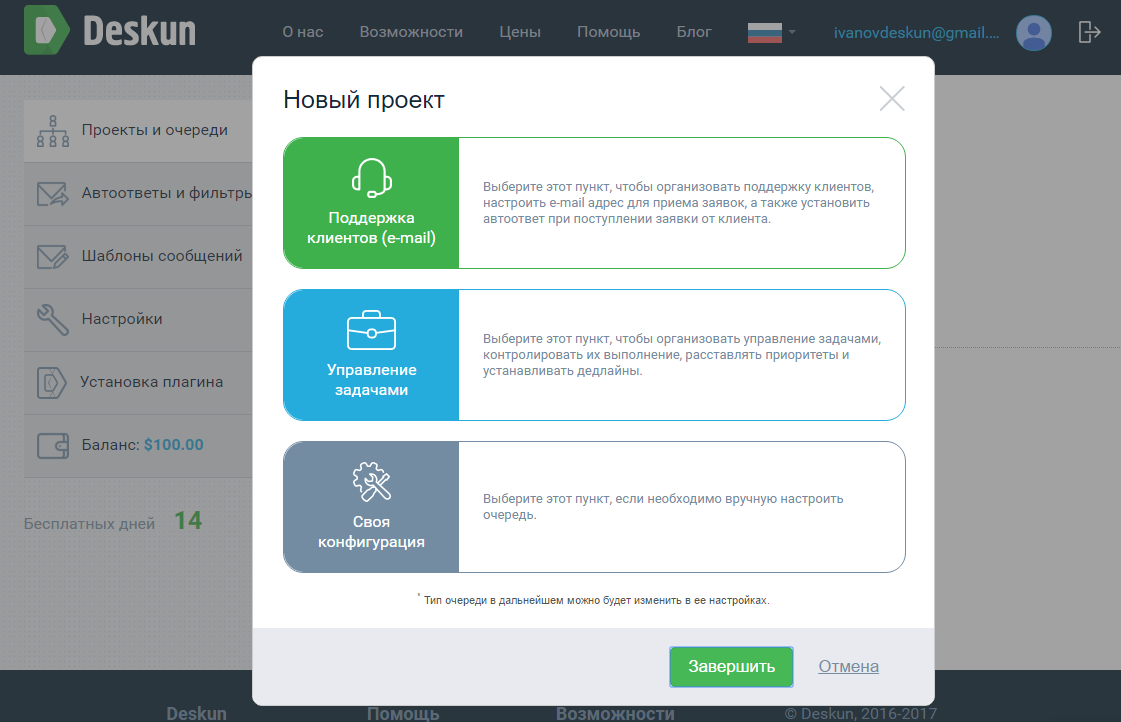
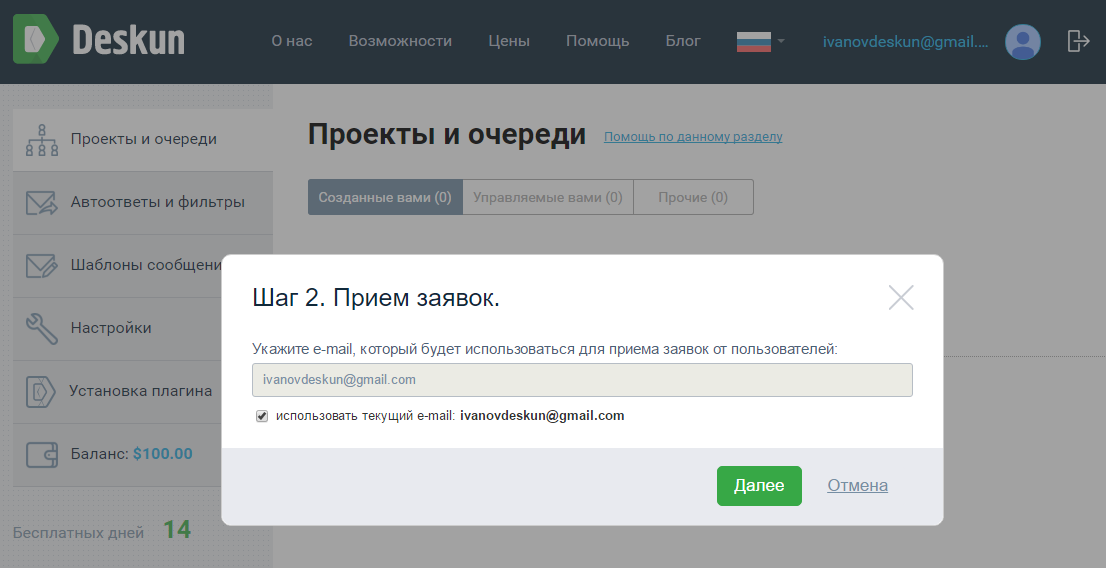
To create a customer support service, select the first item. You will immediately need to enter an email address that will be used to receive customer requests. You can use the Gmail that you specified when registering with Deskun, or any other. To confirm access to an external mailbox, you need data such as an SMTP server, port, login and password. Typically, the SMTP server and port are determined automatically by Deskun, but you can also manually configure the settings.
Now it remains only to add customer support agents, if this was not done when creating the project.
This completes the initial Deskun setup.

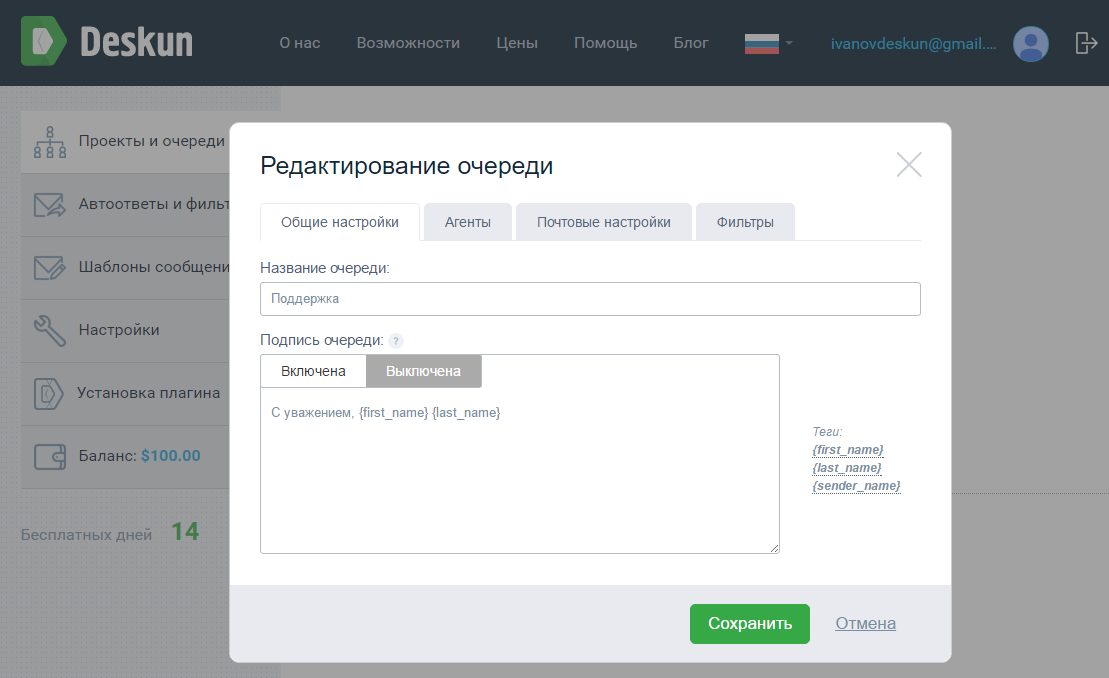
The settings that are set in the process of working according to the scenarios are enough only to create the simplest customer support service with one queue and without an answering machine for incoming user requests. Therefore, before going to Gmail, you must edit the project settings in your Deskun account.
In the General settings, you can change the name of the queue and set a signature for each response to a client’s request. At the same time, the personal signatures of the employees responding to applications are replaced by established ones.
For each project, you can create several queues with different settings. Thus, you can manage, for example, a customer support service at the same time, and control the work of other departments by creating queues of the type “Task Management” for them.
In the Agents tab, the responsible employee is selected, to whom by default all new applications from customers will come. In Deskun, as in other services, they are called “tickets”, but in our service these are, in fact, emails. For each ticket, the artist, priority, status and deadline are set. Depending on how you use Deskun, the role of the ticket may change: the external application is for customer support, the internal task is for the project management system. How to work with them we will tell a little lower.
In the same tab, you can add and remove employees who will work with a specific queue.

In the mail settings, the parameters of the e-mail that is attached to this queue are changed.
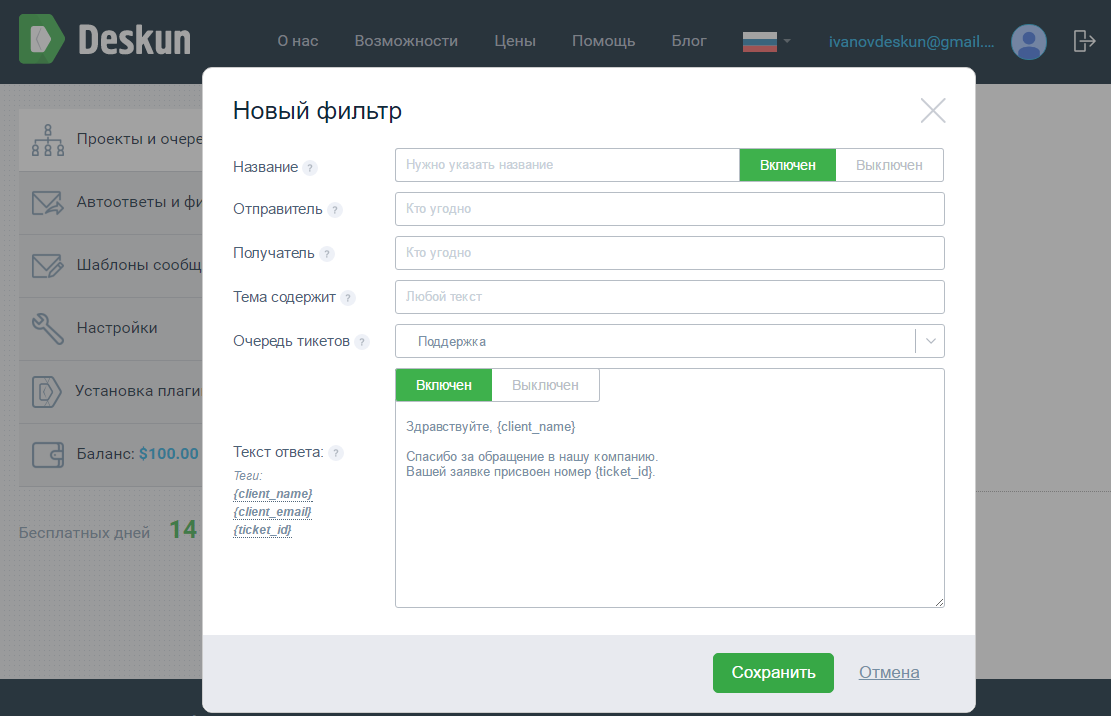
In the "Filters" tab, scripts are configured according to which letters from clients will fall into a custom queue. For example, you can create a filter that will trigger on applications sent from a specific e-mail, or, conversely, sent to a specific mailbox. Naturally, this mail should be tied to the account of the creator of the filter.
For more flexible settings, you can set filtering by subject line. If there is a certain trigger word in it, then the inbox will automatically fall into the specified ticket queue. This opportunity can be used if the client writes angry letters, and you need to respond urgently to them.
Each filter also has its own auto answer. The system can send a specially formed response to the user using predefined tags:
Deskun is now fully operational. Then you can return to your personal account to configure message templates. This is done to facilitate and speed up the work of customer support staff.
It remains to consider the last important concept - “ticket”. A ticket is a sequence of messages from users and support agents on a question or problem. Usually in programs they are started separately, indicating the responsible and urgency parameters. At Deskun, tickets are regular emails that are automatically or manually created from any incoming or outgoing message.
If you manually create a ticket in the window that opens, you must select the responsible agent, as well as the execution priority and deadline. When changing and supplementing the ticket, the data is synchronized with the mailbox of each support service employee.
You can work with tickets and control the execution of tasks from the Deskun folder in Gmail. Analytics on the work of your customer support service is also available there:
While you were reading this text, you could fully configure Deskun to work. Add all employees, create filters and write auto answers. At the same time, the possibilities of the service are not limited to this. You can send letters to clients at the time you set and track their reading. Postpone reading and execution of ticket letters for a certain time, quickly distribute tasks between employees and flexibly distribute access and responsibility zones. At the same time, part of the functionality that is responsible for working with email in Deskun is completely free. Thus, if you, for example, temporarily close the work in some areas, then it is enough to remove all projects from the service and it will automatically switch to free mode. And you can continue to track the reading of your letters, Use the send scheduler and defer reading. Deskun’s paid features start at just $ 0.99 per month.
Deskun is currently planning to implement multi-channel customer support.
According to the capabilities of the user support system can be divided into the following groups:
- Simple systems for tracking applications.
- Systems of medium complexity with the possibility of group work, automation of actions, support of the knowledge base, SLA accounting and reporting.
- Comprehensive solutions supporting ITSM / ITIL, designed to manage processes related to technical support and product development in large companies.
Complex integrated solutions, as a rule, require a lot of time and high implementation costs, while simple ones may not have the necessary functionality. Any company that needs to start customer support needs to assess its needs, capabilities and only then choose a service. It is also important to consider the possible development of their products and the increase in the load on the service. If the selected service does not cope, then the process of switching to another software will result in large financial and labor costs.
DeskunIt was developed on the basis of Gmail e-mail in order to minimize the time for launching customer support and training employees to work with the service. From the moment of authorization to launch, only 5 minutes can pass. Moreover, the system can be used in the future not only to track user requests, but also to manage tasks within the company.
Step 1: Install the extension
Work with Deskun begins with authorization on the site. Unlike other services, you do not need to register here, fill out questionnaires with information about the company and enter employee data. Log in with your Google account at Deskun and then install the browser extension. You can also simply install the plugin, and access to your personal account will happen automatically. The same process will need to be performed on all computers of employees who will work in the service. Recall that Deskun only works with the Google Chrome and Yandex.Browser browsers, but the developers will soon promise to launch a web version of the client.
After setting up the service, each employee will be able to carry out their work from anywhere. The main thing is to have access to the Internet and the installed extension. The tendency to let managers go home from office is gaining momentum, thereby saving on office rent and equipment purchase. With Deskun, you can easily implement this model of employee interaction.
Step 2: Create a New Project
After authorization and installation of the extension, you must do the initial setup of the system. To do this, go to your personal account on the Deskun website and create a new project. The concept of "project" means any service or activity of the company, within the framework of which user requests may arise. Depending on the size of your organization, you can make either one general project or separate ones for any area of activity.
At the same time, the creation of a new project does not require any knowledge or complex actions from the user. Indicate the name, upload the logo and create the first. Queues at Deskun are individual business processes for your company. For example, you can streamline the flow of incoming applications by creating a separate queue for each topic and assigning a responsible employee to it.
Also at this stage, you can immediately add employees (agents) of the company to the project. To do this, enter one or more e-mail addresses to which invitations will be sent.
Step 3: Scenario Selection
After filling in the initial information, the service will offer you to select deployment scenarios for the new project. You can choose from “Customer Support (email)” and “Task Management”. Or you can manually configure the configuration.
To create a customer support service, select the first item. You will immediately need to enter an email address that will be used to receive customer requests. You can use the Gmail that you specified when registering with Deskun, or any other. To confirm access to an external mailbox, you need data such as an SMTP server, port, login and password. Typically, the SMTP server and port are determined automatically by Deskun, but you can also manually configure the settings.
Now it remains only to add customer support agents, if this was not done when creating the project.
This completes the initial Deskun setup.
Step 4: Queue Setup
The settings that are set in the process of working according to the scenarios are enough only to create the simplest customer support service with one queue and without an answering machine for incoming user requests. Therefore, before going to Gmail, you must edit the project settings in your Deskun account.
General settings
In the General settings, you can change the name of the queue and set a signature for each response to a client’s request. At the same time, the personal signatures of the employees responding to applications are replaced by established ones.
For each project, you can create several queues with different settings. Thus, you can manage, for example, a customer support service at the same time, and control the work of other departments by creating queues of the type “Task Management” for them.
Agents
In the Agents tab, the responsible employee is selected, to whom by default all new applications from customers will come. In Deskun, as in other services, they are called “tickets”, but in our service these are, in fact, emails. For each ticket, the artist, priority, status and deadline are set. Depending on how you use Deskun, the role of the ticket may change: the external application is for customer support, the internal task is for the project management system. How to work with them we will tell a little lower.
In the same tab, you can add and remove employees who will work with a specific queue.
Mail Settings
In the mail settings, the parameters of the e-mail that is attached to this queue are changed.
Filters
In the "Filters" tab, scripts are configured according to which letters from clients will fall into a custom queue. For example, you can create a filter that will trigger on applications sent from a specific e-mail, or, conversely, sent to a specific mailbox. Naturally, this mail should be tied to the account of the creator of the filter.
For more flexible settings, you can set filtering by subject line. If there is a certain trigger word in it, then the inbox will automatically fall into the specified ticket queue. This opportunity can be used if the client writes angry letters, and you need to respond urgently to them.
Each filter also has its own auto answer. The system can send a specially formed response to the user using predefined tags:
- {client_name} - client name
- {client_email} - client email
- {ticket_id} - id of the ticket created (if a ticket was created)
Step 5: Working with tickets
Deskun is now fully operational. Then you can return to your personal account to configure message templates. This is done to facilitate and speed up the work of customer support staff.
It remains to consider the last important concept - “ticket”. A ticket is a sequence of messages from users and support agents on a question or problem. Usually in programs they are started separately, indicating the responsible and urgency parameters. At Deskun, tickets are regular emails that are automatically or manually created from any incoming or outgoing message.
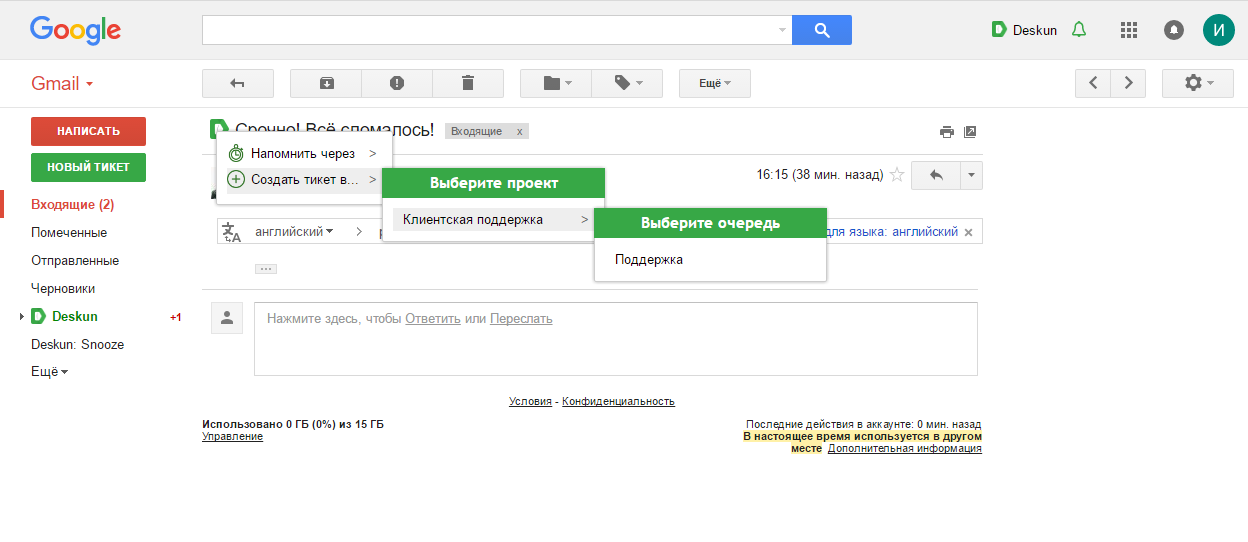
- To manually create a ticket, you need to open a letter from the client, click on the Deskun icon and select "Create ticket in ...". Next, the queue to which the task belongs is selected.
- If you specified the responsible employee in the queue settings, then all tickets will be automatically addressed to him.
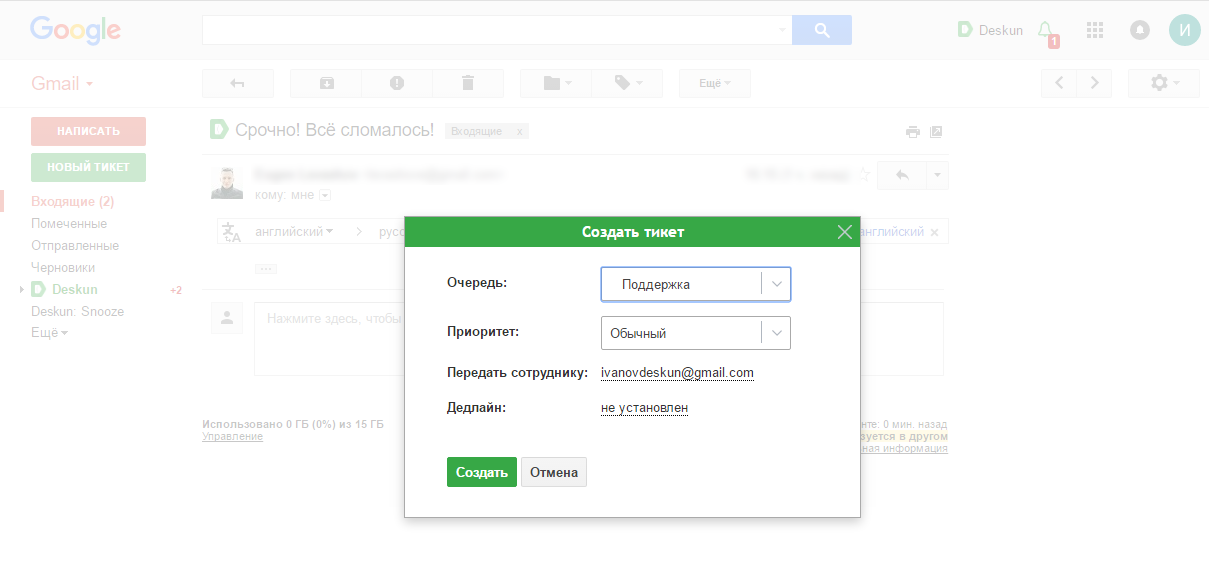
If you manually create a ticket in the window that opens, you must select the responsible agent, as well as the execution priority and deadline. When changing and supplementing the ticket, the data is synchronized with the mailbox of each support service employee.
You can work with tickets and control the execution of tasks from the Deskun folder in Gmail. Analytics on the work of your customer support service is also available there:
- Free information
- Recent Activity
- Information on open and closed tickets
Conclusion
While you were reading this text, you could fully configure Deskun to work. Add all employees, create filters and write auto answers. At the same time, the possibilities of the service are not limited to this. You can send letters to clients at the time you set and track their reading. Postpone reading and execution of ticket letters for a certain time, quickly distribute tasks between employees and flexibly distribute access and responsibility zones. At the same time, part of the functionality that is responsible for working with email in Deskun is completely free. Thus, if you, for example, temporarily close the work in some areas, then it is enough to remove all projects from the service and it will automatically switch to free mode. And you can continue to track the reading of your letters, Use the send scheduler and defer reading. Deskun’s paid features start at just $ 0.99 per month.
Deskun is currently planning to implement multi-channel customer support.