Tiled2Unity: Export from Tiled Map Editor to Unity
A lot of publications on resources for game developers have been devoted to creating a simple 2D platformer. Unity is often used as the engine, and Tiled Map Editor is used to create maps. The interaction of these two environments is carried out using the free utility Tiled2Unity, which creates prefabs from Unity in TME files.
How it works, we will tell on an example of development of our platformer “X-Drums”.
We will move according to the following scheme:
So, we have a project in Unity and there is a map created in the Tiled Map Editor. Launch Unity and import Tiled2Unity.unitypackage .

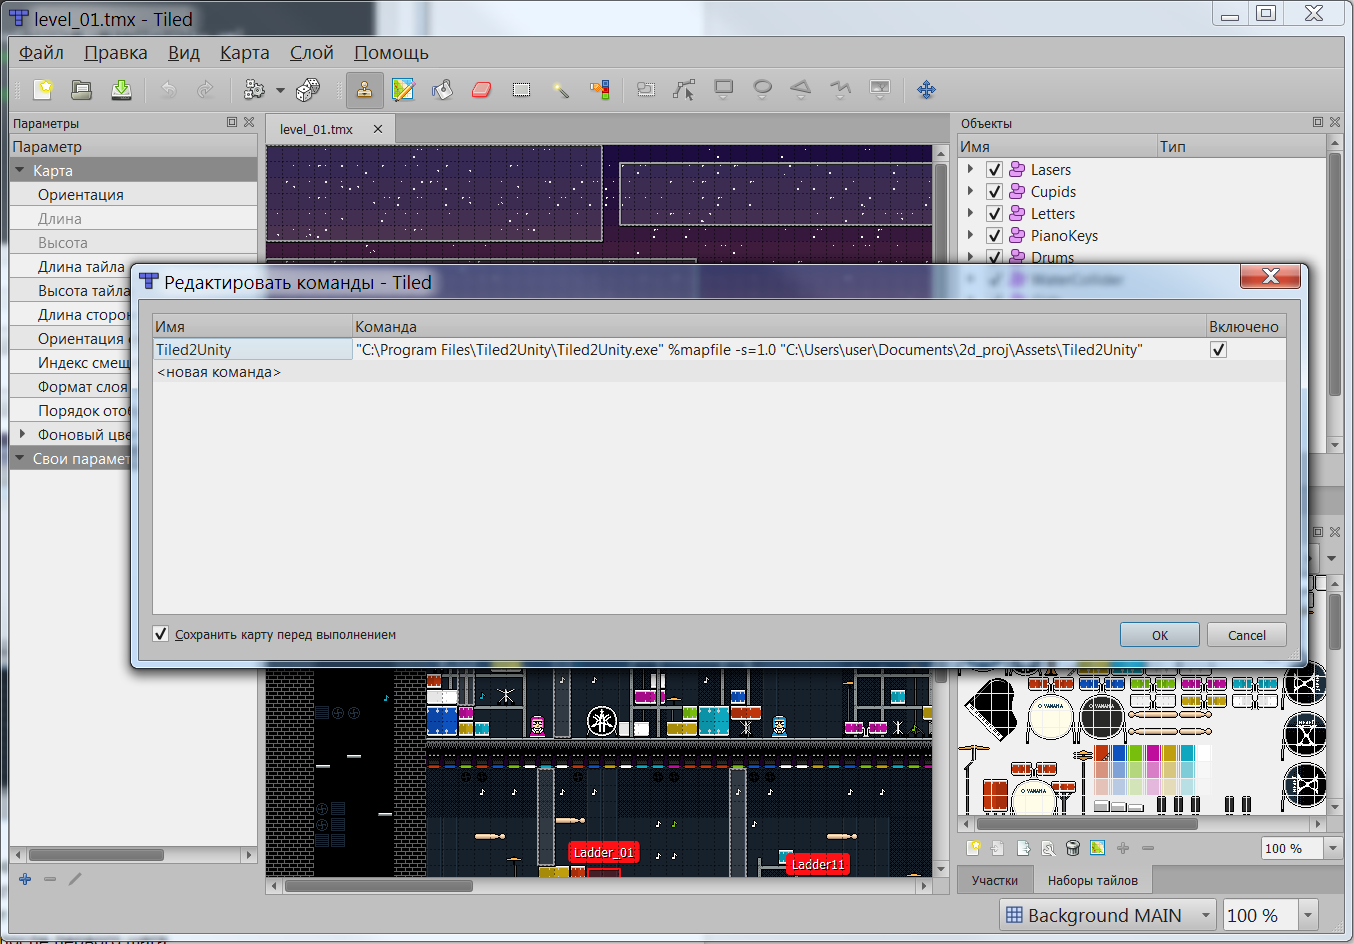
In the Tiled Map Editor, we call the command editing window:

Add a new command in which the path to the executable file Tiled2Unity.exe is registered. Instead,% mapfile Tiled will automatically substitute the path to the map file. The last argument to this command is the path to the Tiled2Unity folder, which should have appeared in the project after import.
Run the command and in the window that appears, click the big button.

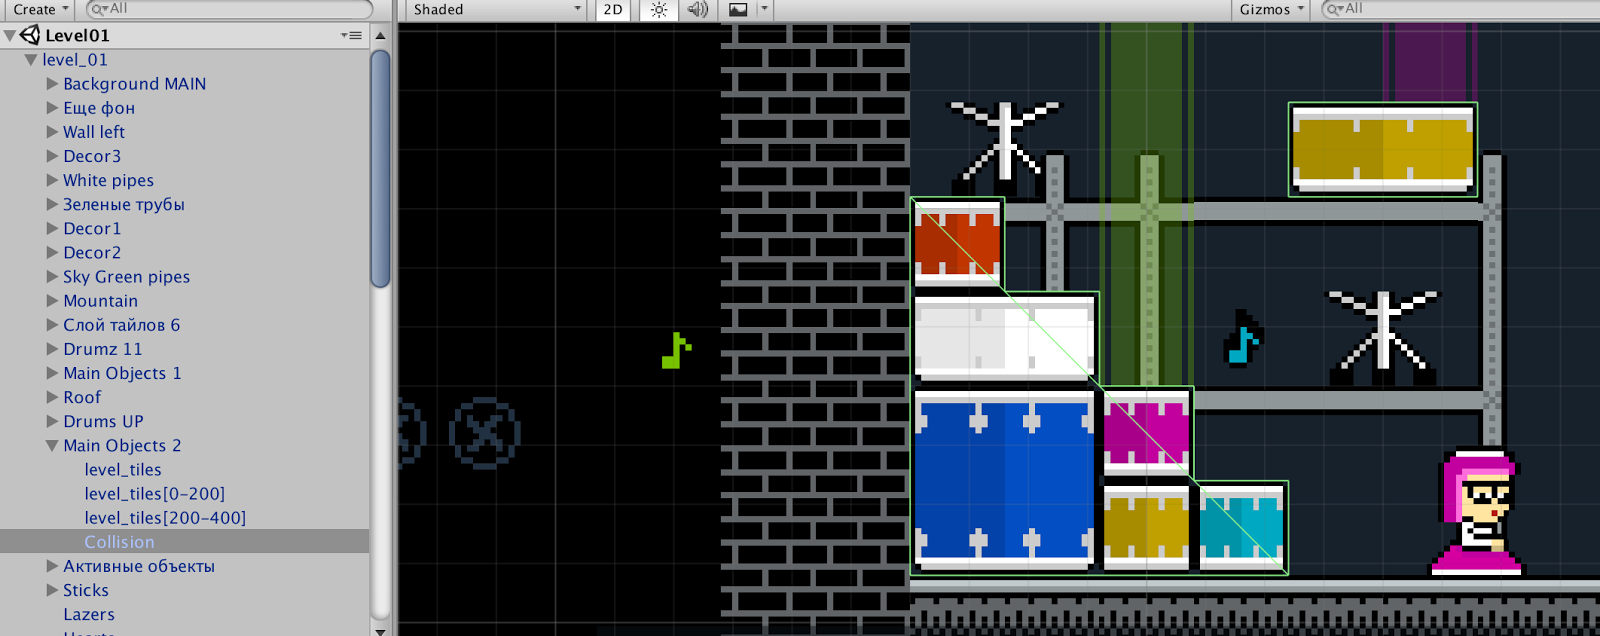
As a result of export, we get the prefab of the card, which is located in the Tiled2Unity folder. We place this prefab on stage in Unity. Now when working with a map in TME and its export, the prefab and object on the scene will change in accordance with the changes in TME.

So we set up the export of the map from Tiled to Unity and created a game environment.
Now let's set up objects on our map.
2. Collision Editor
First of all, we define the elements of the playing space that will be obstacles for the hero. These are the floor, walls, spotlights on the ceiling, as well as the drums acting as platforms on which the hero will jump.
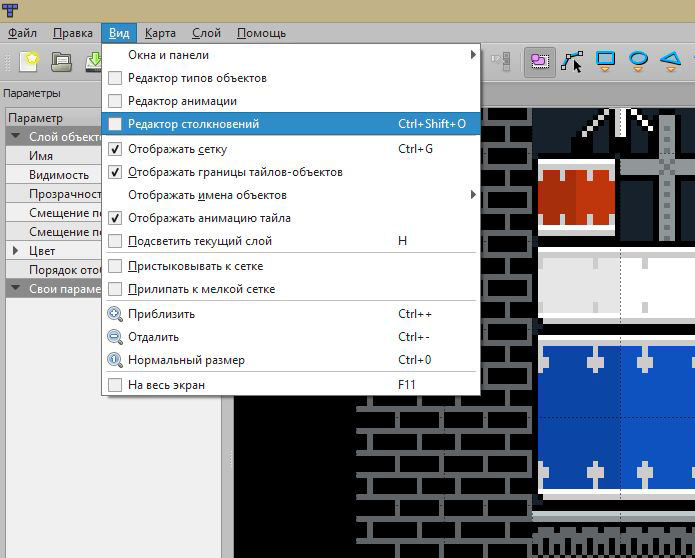
We start the collision editor in Tiled:
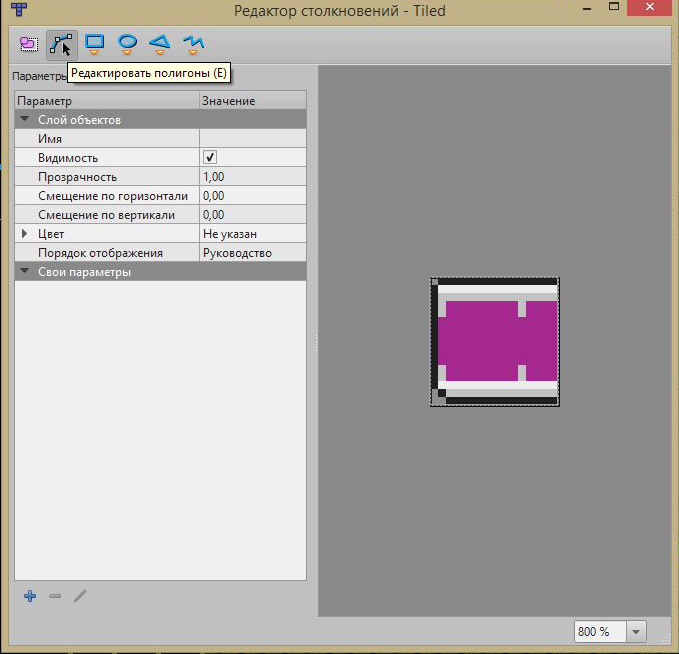
Select the tile we need, for example, a part of the drum, and edit the polygons:
Similarly, edit the other tiles we need (floor, walls, etc.). As a result, when exporting, Tiled2Unity will automatically create PolygonCollider2D colliders, which will act as obstacles for the hero.

However, other game objects that the hero can interact with are more complex. The behavior of cymbals, female fans, notes and other elements is controlled using components and scripts. To export such objects, you need to specify additional parameters in Tiled and then process them in Unity.
However, there is a list of parameters that we can use in Tiled without setting them in Unity, since Tiled2Unity has already done this for us. Among them:
We set the parameters we need for the drum sticks the hero will jump over:

When exporting to Unity, we get the following result: The

OneWayPlatform parameter is set to the layer, it is used for objects that are permeable from below.
We will configure the processing of other parameters, let's call them “custom”, and the export of objects with such parameters in Unity. You can set them in Tiled both for layers (objects) and for objects. In different cases, the first or second option may be convenient. Consider how to implement this.
4.1. Custom parameters for layers (objects)
We will set custom parameters for the layer. We use this option for objects of the same type. In our game, these are cymbals and notes. Their feature is that they interact equally with the hero and do not need to distinguish them from each other.
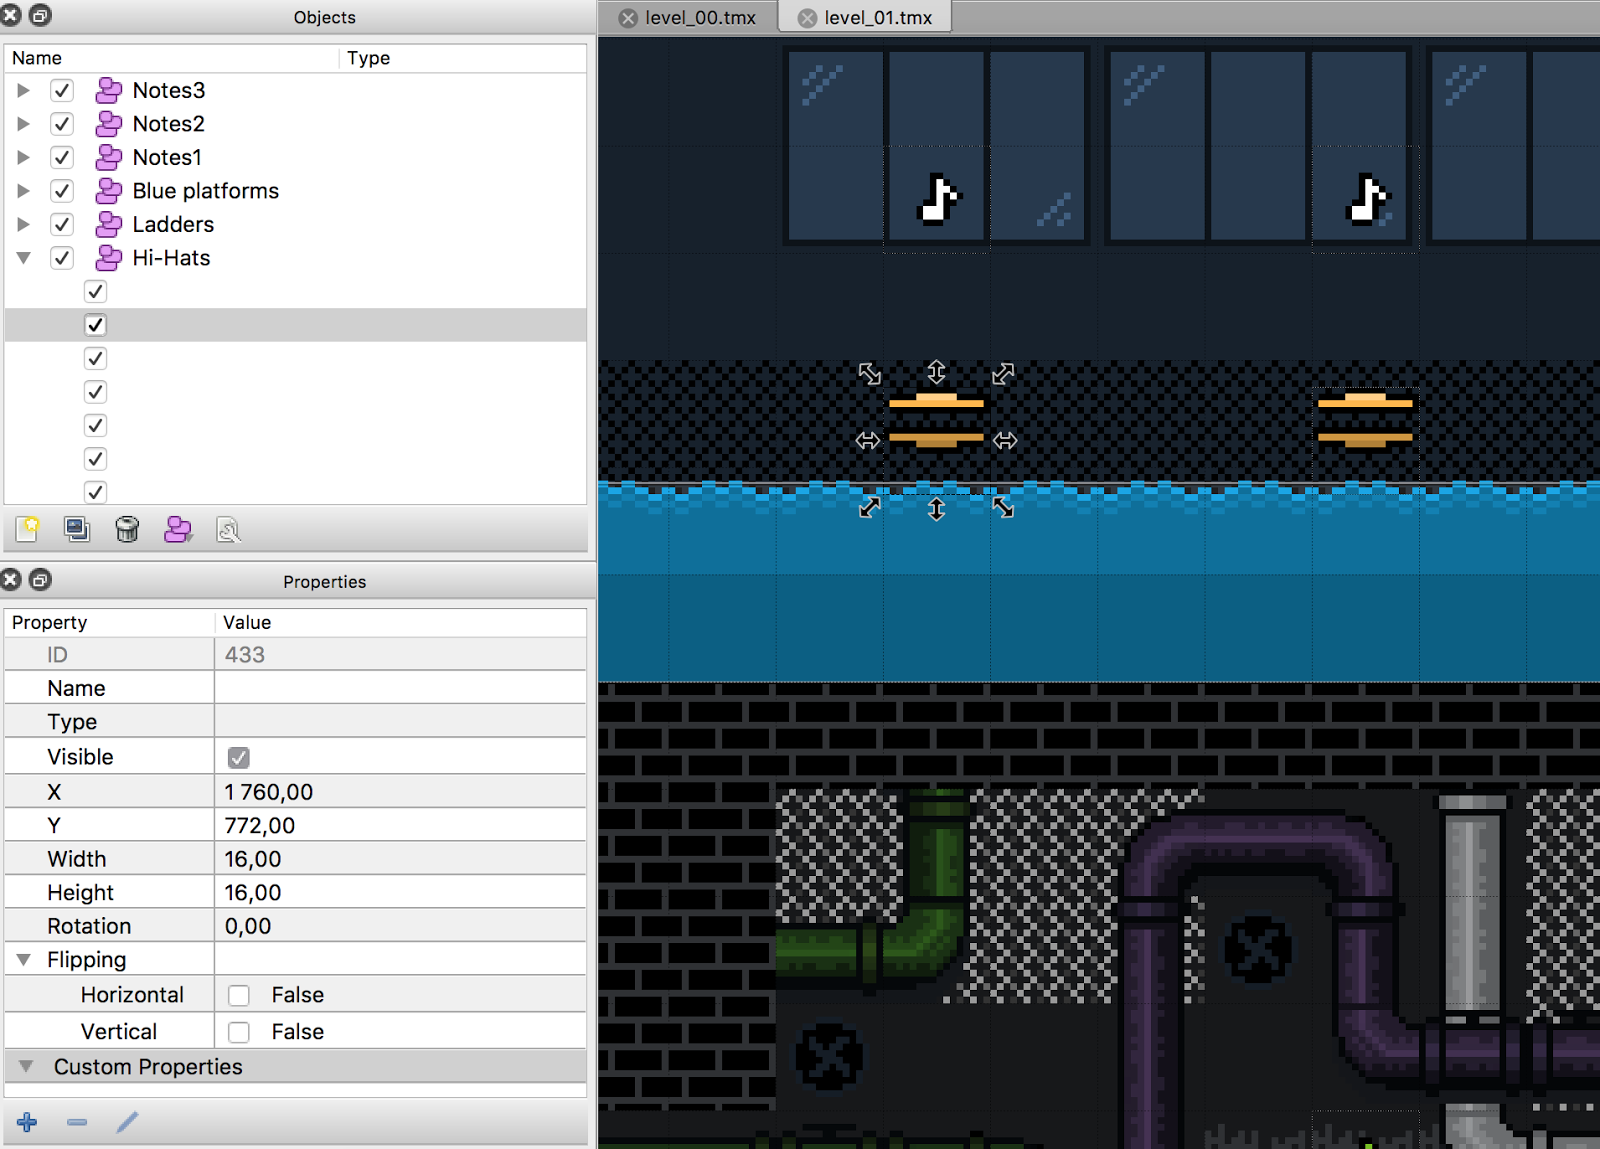
Create a layer of objects in Tiled and place our plates on it. Then, we set the AddObject parameter for the entire layer.

The field of its parameters for each plate remains empty.
Now we move to Unity, where for the plates we created a prefab and attached a script to it that determines their behavior when the hero jumps - they fall and return to their original position.
We will write a code that, when importing plates for each object from Tiled, will create an instance of our prefab. To do this, create a CustomTiledImporterForHiHats script with a class that inherits the Tiled2Unity.ICustomTiledImporter interface and the [Tiled2Unity.CustomTiledImporter] attribute.
This Tiled2Unity script will call for each layer and object imported from Tiled. And, respectively, those layers or objects will be processed that have the AddObject parameter with the value “Hi-hat” among the parameters.
The script is ready, and we can export the plates.

And so the hero interacts with them.
The export of notes is set up just like the export of cymbals. The only difference is that in the game there are several types of notes with different cost depending on the color. Therefore, for each type of note with its own denomination, we created a prefab in Unity and an object layer in Tiled, indicating the type of note in the AddObject parameter. The import script that creates prefab instances is identical to the cymbals script.
4.2. Custom options for objects
Now we will consider how to export objects of the same type, for which user parameters are set not by the layer, but by the object itself. We will classify our fans, cupids, moving platforms, etc. as such objects. Despite the same type, they have their own individual properties: speed, direction, etc.
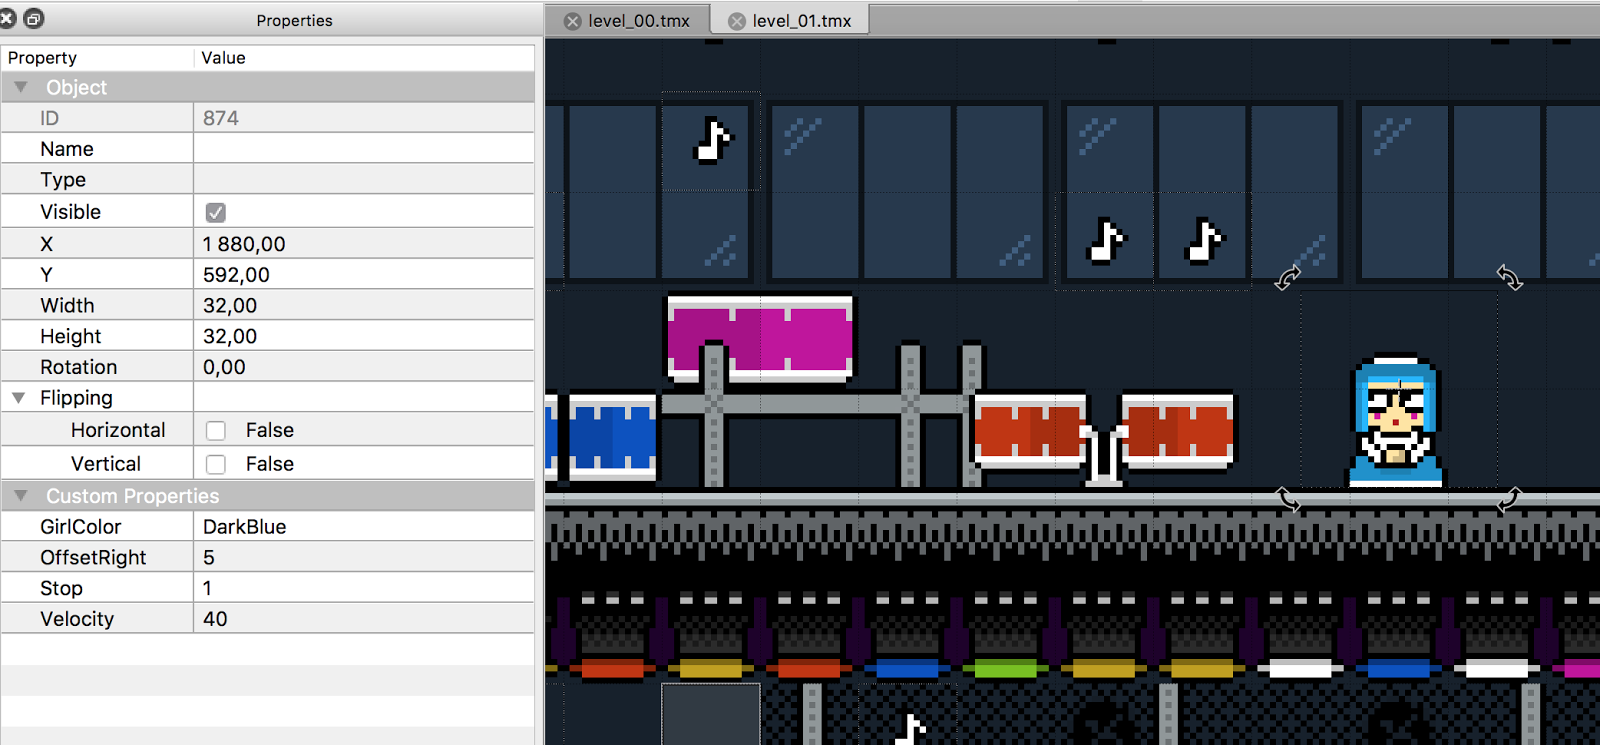
For example, fans differ in color, they move at different speeds for a given distance. They can stop to blink, and when meeting with the hero, they give out certain emotions to choose from. We set these parameters in Tiled for each object. “Own parameters” for the layer, respectively, remain empty.
In Unity, prefabs are created for female fans, to which the GirlController script is attached, which determines their behavior and reaction to the hero. The import will be similar to the import of plates, but just creating prefab instances in this case will not be enough. We need to turn to the GirlController script and set the properties that were set in Tiled individually for each fan.
We export to Unity and see that the parameters specified in Tiled were set by the GirlController script variable:

Repeat the described scheme for objects from other groups, and when exporting to Unity we get the configured prefabs of most components of the game.
The described approach was used by us to create our platformer. Working in conjunction with the Tiled Map Editor and Unity, namely in this game, accelerated the process of its creation, allowing both the level designer in TME and the programmer in Unity to work simultaneously, without interfering with each other. In projects like ours, the Tiled2Unity utility can be incredibly useful, and, based on the article, those who wish can use any of the options in their game development.
How it works, we will tell on an example of development of our platformer “X-Drums”.
We will move according to the following scheme:
- Tiled2Unity Export Setup
- Configure collisions in the Tiled Map Editor
- Configure settings that Tiled2Unity supports
- Customizing Tiled Map Editor
- User parameters for layers (objects)
- Custom options for objects
1. Export setup
So, we have a project in Unity and there is a map created in the Tiled Map Editor. Launch Unity and import Tiled2Unity.unitypackage .
In the Tiled Map Editor, we call the command editing window:
Add a new command in which the path to the executable file Tiled2Unity.exe is registered. Instead,% mapfile Tiled will automatically substitute the path to the map file. The last argument to this command is the path to the Tiled2Unity folder, which should have appeared in the project after import.
Run the command and in the window that appears, click the big button.
As a result of export, we get the prefab of the card, which is located in the Tiled2Unity folder. We place this prefab on stage in Unity. Now when working with a map in TME and its export, the prefab and object on the scene will change in accordance with the changes in TME.
So we set up the export of the map from Tiled to Unity and created a game environment.
Now let's set up objects on our map.
2. Collision Editor
First of all, we define the elements of the playing space that will be obstacles for the hero. These are the floor, walls, spotlights on the ceiling, as well as the drums acting as platforms on which the hero will jump.
We start the collision editor in Tiled:
Select the tile we need, for example, a part of the drum, and edit the polygons:
Similarly, edit the other tiles we need (floor, walls, etc.). As a result, when exporting, Tiled2Unity will automatically create PolygonCollider2D colliders, which will act as obstacles for the hero.
However, other game objects that the hero can interact with are more complex. The behavior of cymbals, female fans, notes and other elements is controlled using components and scripts. To export such objects, you need to specify additional parameters in Tiled and then process them in Unity.
3. Parameters supported by Tiled2Unity
However, there is a list of parameters that we can use in Tiled without setting them in Unity, since Tiled2Unity has already done this for us. Among them:
| unity: layer unity: sortingLayerName unity: tag unity: sortingOrder unity: isTrigger unity: ignore | The (physics) layer name in Unity The Name of the Sorting Layer in Unity The Name of the Tag in Unity The `sorting in layer` value in Unity Whether collider is a trigger or not Ignore layer (or parts of it) during import ( value = [false | true | collision | visual]) |
We set the parameters we need for the drum sticks the hero will jump over:
When exporting to Unity, we get the following result: The
OneWayPlatform parameter is set to the layer, it is used for objects that are permeable from below.
4. User Options in Tiled
We will configure the processing of other parameters, let's call them “custom”, and the export of objects with such parameters in Unity. You can set them in Tiled both for layers (objects) and for objects. In different cases, the first or second option may be convenient. Consider how to implement this.
4.1. Custom parameters for layers (objects)
We will set custom parameters for the layer. We use this option for objects of the same type. In our game, these are cymbals and notes. Their feature is that they interact equally with the hero and do not need to distinguish them from each other.
Create a layer of objects in Tiled and place our plates on it. Then, we set the AddObject parameter for the entire layer.
The field of its parameters for each plate remains empty.
Now we move to Unity, where for the plates we created a prefab and attached a script to it that determines their behavior when the hero jumps - they fall and return to their original position.
We will write a code that, when importing plates for each object from Tiled, will create an instance of our prefab. To do this, create a CustomTiledImporterForHiHats script with a class that inherits the Tiled2Unity.ICustomTiledImporter interface and the [Tiled2Unity.CustomTiledImporter] attribute.
This Tiled2Unity script will call for each layer and object imported from Tiled. And, respectively, those layers or objects will be processed that have the AddObject parameter with the value “Hi-hat” among the parameters.
using System.Collections.Generic;
using UnityEditor;
using UnityEngine;
[Tiled2Unity.CustomTiledImporter]
class CustomTiledImporterForHiHats : Tiled2Unity.ICustomTiledImporter
{
    public void HandleCustomProperties(GameObject gameObject, IDictionary props)
    {
        if (!props.ContainsKey("AddObject"))
            return;
        if (props["AddObject"] == "Hi-hat")
        {
            //Загружаем префаб тарелок
            string prefabPath = "Assets/8 - Prefabs/Hi-hat.prefab";
            Object obj = AssetDatabase.LoadAssetAtPath(prefabPath, typeof(GameObject));
            if (obj == null)
                return;
            //Для каждого тайла, который будет загружен из Tiled,
            //будет создан экземпляр префаба
            //Сами тайлы будут удалены со сцены
            List childrenToDestroy = new List();
            //Проходим по списку объектов слоя
            foreach (Transform child in gameObject.transform)
            {
                if (child.name == "TileObject")
                {
                    //Добавляем тайл для последующего удаления
                    childrenToDestroy.Add(child.gameObject);
                    //Создаем экземпляр префаба, настраиваем его положение на сцене
                    GameObject objInstance = (GameObject)GameObject.Instantiate(obj);
                    objInstance.name = obj.name;
                    objInstance.transform.parent = gameObject.transform;
                    objInstance.transform.position = child.transform.position;
                }
            }
            //Удаляем тайлы со сцены
            childrenToDestroy.ForEach(child => GameObject.DestroyImmediate(child));
        }
    }
    public void CustomizePrefab(GameObject prefab)
    {
    }
}
The script is ready, and we can export the plates.
And so the hero interacts with them.
The export of notes is set up just like the export of cymbals. The only difference is that in the game there are several types of notes with different cost depending on the color. Therefore, for each type of note with its own denomination, we created a prefab in Unity and an object layer in Tiled, indicating the type of note in the AddObject parameter. The import script that creates prefab instances is identical to the cymbals script.
4.2. Custom options for objects
Now we will consider how to export objects of the same type, for which user parameters are set not by the layer, but by the object itself. We will classify our fans, cupids, moving platforms, etc. as such objects. Despite the same type, they have their own individual properties: speed, direction, etc.
For example, fans differ in color, they move at different speeds for a given distance. They can stop to blink, and when meeting with the hero, they give out certain emotions to choose from. We set these parameters in Tiled for each object. “Own parameters” for the layer, respectively, remain empty.
In Unity, prefabs are created for female fans, to which the GirlController script is attached, which determines their behavior and reaction to the hero. The import will be similar to the import of plates, but just creating prefab instances in this case will not be enough. We need to turn to the GirlController script and set the properties that were set in Tiled individually for each fan.
using System.Collections.Generic;
using UnityEditor;
using UnityEngine;
[Tiled2Unity.CustomTiledImporter]
class CustomTiledImporterForGirls : Tiled2Unity.ICustomTiledImporter
{
    public void HandleCustomProperties(GameObject gameObject, IDictionary props)
    {
        if (!props.ContainsKey("GirlColor"))
            return;
        //Загружаем нужный префаб в зависимости от указанного в Tiled цвета
        string prefabPath = "Assets/8 - Prefabs/Girls/Girl_" + props["GirlColor"] + ".prefab";
        Object obj = AssetDatabase.LoadAssetAtPath(prefabPath, typeof(GameObject));
        //Создаем экземпляр префаба, настраиваем его положение на сцене
        GameObject objInstance = (GameObject)Object.Instantiate(obj);
        objInstance.name = obj.name;
        objInstance.transform.parent = gameObject.transform.parent;
        objInstance.transform.position = gameObject.transform.position;
        objInstance.transform.localScale = gameObject.transform.localScale;
        objInstance.transform.eulerAngles = gameObject.transform.eulerAngles;
        //Обращаемся к скрипту, который определяет поведение фанатки
        //Считываем параметры из Tiled и присваиваем переменным скрипта
        var girlController = objInstance.GetComponent();
        if (props.ContainsKey("OffsetRight"))
            float.TryParse(props["OffsetRight"], out girlController.OffsetMax);
        if (props.ContainsKey("OffsetLeft"))
            float.TryParse(props["OffsetLeft"], out girlController.OffsetMin);
        if (props.ContainsKey("Velocity"))
            float.TryParse(props["Velocity"], out girlController.Velocity);
        if (props.ContainsKey("Stop"))
            float.TryParse(props["Stop"], out girlController.StopCount);
        if (props.ContainsKey("Fatal"))
            bool.TryParse(props["Fatal"], out girlController.Fatal);
        if (props.ContainsKey("HeartType"))
        {
            string heartPrefabPath = "Assets/8 - Prefabs/Girls/" + props["HeartType"] + ".prefab";
            Object heartObj = AssetDatabase.LoadAssetAtPath(heartPrefabPath, typeof(GameObject));
            girlController.heartPrefab = heartObj;
        }
        //Удаляем тайл со сцены
        Object.DestroyImmediate(gameObject);
    }
    public void CustomizePrefab(GameObject prefab)
    {
    }
}
We export to Unity and see that the parameters specified in Tiled were set by the GirlController script variable:
Repeat the described scheme for objects from other groups, and when exporting to Unity we get the configured prefabs of most components of the game.
The described approach was used by us to create our platformer. Working in conjunction with the Tiled Map Editor and Unity, namely in this game, accelerated the process of its creation, allowing both the level designer in TME and the programmer in Unity to work simultaneously, without interfering with each other. In projects like ours, the Tiled2Unity utility can be incredibly useful, and, based on the article, those who wish can use any of the options in their game development.