Installing Mikrotik Cloud Hosted Router on Digital Ocean VPS Hosting
- Tutorial
... or other Linux hosting.
 I must say right away that since in the course of all the experiments I’m already tired of demolishing and reconfiguring the droplet in DO, I’ll run the example in VMware ESXi, but it won’t affect the final result, the commands will all be the same, in principle, this applies to any cloud-based VPS hosting where we have SSH access.
 The report of Dmitry Pichulin deemru at the last MUM in Moscow on September 30 was taken as the basis . Unlike Dmitry’s report, this article will not address the issues of choosing a hosting and its prices (in an effort to muddle up a cloud router cheaper), and settings of the received device. Only the technical side of the issue will be considered and a couple of problems will be solved.
Having returned from MUM, I was in anticipation, my hands itched to gash Mikrotik on Digital Ocean (at that moment, there was Ubuntu Server, which served as a VPN server). It was useful to watch the archive of performances, but it was not there yet and I wrote a letter to Dmitry with a request to share the slides. Having received the presentation, he rushed into the battle with a cold head - completely breaking his droplet. I did everything as in the presentation, everything started up. It’s easier to come up with. Download the image to the hosting, unpack it, transfer the file system to read-only, upload the image to disk via dd. But here the first inconsistency awaited me - when I first booted CHR , the file system expanded automatically and took up the entire disk, but this did not happen for me and I had to be content with 128 MB.
Someone will say 128 MB on the router is enough for everyone. But this situation fundamentally did not suit me, so I began to eliminate it. Everyone knows that RouterOS is based on Linux, but little is left of Linux, therefore, after installing the system, it is no longer possible to re-partition the disk using regular means. It is impossible to boot from any LiveCD and redistribute in it (well, at least DO cannot). Attempts to poke fdisk and parted after uploading the image to disk, but before rebooting also did not lead to any positive result (there was either no effect at all, or I got a system that did not boot).
Normal heroes always go around.
So, in order to get RouterOS installed on Digital Ocean,
- Actually, droplet itself with the Linux distribution installed (in this case the distribution will be Ubuntu Server 16.04 x64, and instead of droplet there will be a virtual machine in ESXi, but I repeat again that this will not play a role), to which we have access via SSH .
- A hypervisor installed on a computer or server (I originally did in VirtualBox, now I will do it again in ESXi, this does not affect the final result).
- LiveCD of your favorite Linux distribution (it is desirable that there was a GUI there, it will be more convenient).
As you can see, the list is not very large, there are no special requirements for its items, I tried to make the solution as universal and simple as possible so that everything could be built literally on the knee from what is.
Let's start with the droplet.
We need to find out what size we need the disk in the virtual machine, so:
fdisk -l /dev/sda
Диск /dev/sda: 16 GiB, 17179869184 байтов, 33554432 секторов
Единицы измерения: секторов из 1 * 512 = 512 байтов
Размер сектора (логический/физический): 512 байт / 512 байт
I/O size (minimum/optimal): 512 bytes / 512 bytes
Тип метки диска: dos
Идентификатор диска: 0x7b5dbf9c
Устр-во    Загрузочный    Start Конец Секторы  Size Id Тип
/dev/sda1  *               2048 31457279 31455232   15G 83 Linux
/dev/sda2              31459326 33552383  2093058 1022M  5 Расширенный
/dev/sda5              31459328 33552383  2093056 1022M 82 Linux своп / Solaris
As we see, we have a disk 17179869184 bytes, remember this value.
Preparing the intermediate machine
In the hypervisor, create a new virtual machine. Its parameters do not have special significance, but it is possible, for example, to make them close to the characteristics of the droplet. The disk size is best done with a small margin, just in case (for some reason, 20GB in DO turned out to be less than 20GB in VirtualBox). We configure loading of the virtual machine from LiveCD.

Turn it on and after downloading, download the latest version of CHR, which can be found at any link, in any convenient way :
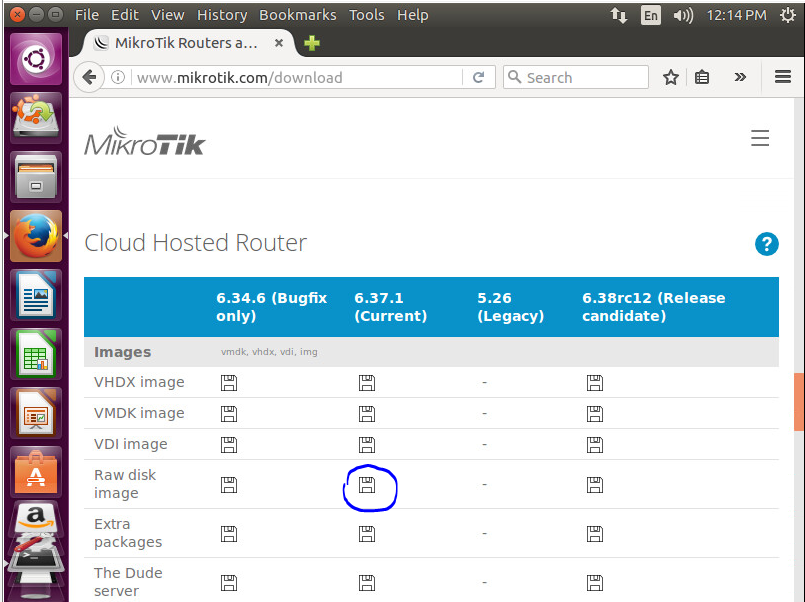
We need a Raw disk image image (for example chr-6.37.1.img.zip ). Unpack the archive:
unzip chr-6.37.1.img.zip
Archive:  chr-6.37.1.img.zip
  inflating: chr-6.37.1.img
And fill the image onto the hard drive using dd (Dmitry used the pv utility here, but I honestly don’t see the point, because the image is small and can be deployed quite quickly):
dd if=chr-6.37.1.img.zip of=/dev/sda
262144+0 records in
262144+0 records out
134217728 bytes (134 MB, 128 MiB) copied, 5.64304 s, 23.8 MB/s
instead of sda you need to specify your drive, its name may differ.
Extending the RouterOS File System
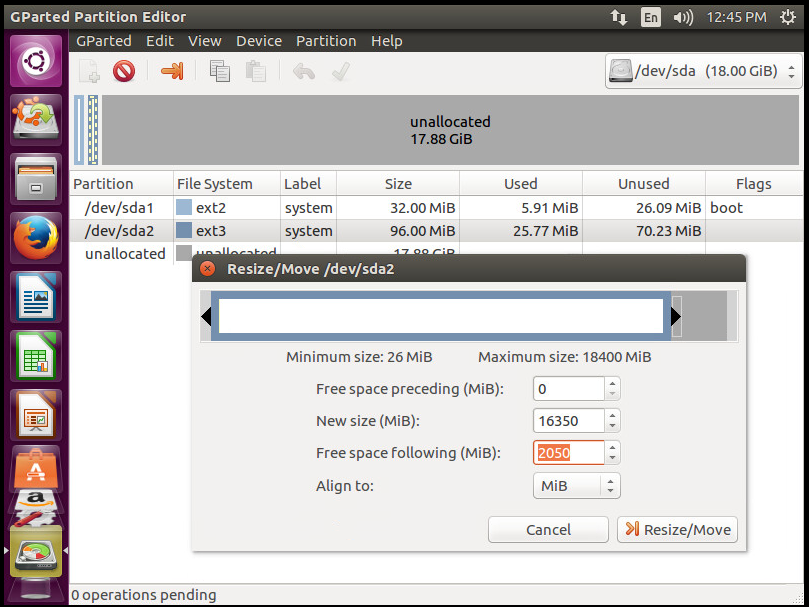
Fans can do everything in the console there, it seemed to me faster and easier to do everything in GParted.
We start GParted, select the disk on which RouterOS is installed and use the Resize / Move function to increase the size of the second partition. Please note that the size of the partition minus the size of the first partition should not exceed the disk size of your droplet, which we looked at the very beginning (i.e. the first partition we have 32 MiB, so the second should be no more than 17179869184 bytes / 1048576 = 16384 MiB and - 32, i.e. 16352 MiB)
Do not forget to apply changes to the disk layout.
Create a new image and click it with gzip:
dd if=/dev/sda bs=8196 count 17000 | gzip -9cf > chr.img.gz
17000+0 records in
17000+0 records out
139332000 bytes (139 MB, 133 MiB) copied, 3.30824 s, 42.1 MB/s
We get the value of 17000 by casting the size of the image when it is deployed to disk. There were 128 MiB, i.e. 128 * 1024 = 131072 KiB, divide the size by the block size and round off 131072/8 = 16384 ≈ 17000 blocks.
Fill the resulting image onto the droplet and set it
scp chr.img.gz user@host:~/
Where user is the username on your droplet, and host is its address. Copying will be performed to the user's home directory.
We accept the ssh server certificate, and enter the password when we are asked about it. After the copy is finished, we no longer need this virtual machine.
We pass to our droplet. You can connect to it via ssh or go through the console. Make sure that our image has been copied, those who wish can check the checksums. We put the file system in read-only mode and deploy the image to disk via gzip and dd:
echo u > /proc/sysrq-trigger && gunzip -c chr.img.gz | dd of=/dev/vda
All! CHR is installed on our droplet. Reboot:
reboot
Welcome to Mikrotik Cloud Hosted Router
@gexogen is a trickster !!!
In fact, although I promised that there is no difference, in Digital Ocean we do it or in ESXi, there is still a difference. Everything works in DO, but ESXi after a reboot fell into Kernel Panic. But, in ESXi, the file system is stretched, and so at the first boot, no data manipulation is required.
After the reboot, we log in as admin without a password, after which we set a password, enter the ip address and default route:
/ system user set admin password = YOURPASSWORD
/ ip address add address = YOUR.IP.ADD.RESS / MASK
/ ip route add gateway = YOUR.GATE.WAY.IP
Then you can connect to it and configure through Winbox.
Conclusion

At an accessible place, you can install a Linux virtual machine inside RouterOS or use it in some other way - at your discretion (raise an FTP server or something else).
References:
Dmitry's presentation in a PDF format.
Recording of his speech.
Just in case, a link to the finished image for the 20 GB file system (i.e. the minimum DO tariff for $ 5)