Creating an outline for LWRP in Unity
Hello.
I will tell you how to create a simple outline effect on the new Lightweight Render Pipeline (LWRP) in Unity. This requires a version of Unity 2018.3 and above, as well as LWRP version 4.0.0 and above.
The classic outline consists of a two-pass shader (two pass shader), but the LWRP only supports a single pass shader. To fix this flaw in LWRP, it became possible to add user pass to certain rendering steps using interfaces:
We need two shaders.
First I will use Unlit Color. Instead, you can use another one, the main thing is to add the Stencil construct to the shader.
The second is the simplest outline shader itself.
Writing a user pass begins with the creation of the usual MonoBehaviour and the implementation of one of the interfaces mentioned above. We use IAfterOpaquePass, as the outline will be applied only to orca objects.
This script should be added to the camera. And through it we will organize the interaction of our passage with the game logic, but more on that later.
Now let's start writing the passage itself. To do this, create a class that inherits from ScriptableRenderPass
In the constructor, we register the name of the passage, create the material and settings for filtering visible objects after cooling. In the filter, we will install only opaque objects, since we will add our pass after the Opaque pass.
The Execute function is a rendering function for the pass. In it, we create settings for rendering, set the material created in the constructor, and render all the visible objects that satisfy the created filter.
Now we add the class OutlinePass. It's all very easy to create an instance of the OutlinePassImpl class and through the link you can interact with the user pass in runtime mode. For example, to change the color outline.
Now set up the scene for the test.
Outline will be visible only in Game View.
That is the result should be obtained.
Using the setting to filter visible objects, you can specify a layer or render layer in order to apply this pass to a specific object or group of objects and associate it with the logic of the game.
Let's change our pass so that all objects with the “Friend” layer will have a green outline, and with the “Enemy” layer red.
On the scene, add the “Friend” and “Enemy” layers, duplicate the cube several times, assign them layers to “Friend” or “Enemy”, configure the Outline Pass and launch it.
And that's what we get.

The new rendering in Unity expands perfectly, which makes it possible to create interesting effects very simply.
I hope the article was useful for reading. If anyone has any questions - see you in the comments.
I will tell you how to create a simple outline effect on the new Lightweight Render Pipeline (LWRP) in Unity. This requires a version of Unity 2018.3 and above, as well as LWRP version 4.0.0 and above.
The classic outline consists of a two-pass shader (two pass shader), but the LWRP only supports a single pass shader. To fix this flaw in LWRP, it became possible to add user pass to certain rendering steps using interfaces:
IAfterDepthPrePass
IAfterOpaquePass
IAfterOpaquePostProcess
IAfterSkyboxPass
IAfterTransparentPass
IAfterRender
Training
We need two shaders.
First I will use Unlit Color. Instead, you can use another one, the main thing is to add the Stencil construct to the shader.
Unlit color
Shader "Unlit/SimpleColor"
{
    SubShader
    {
        Tags { "RenderType"="Opaque" }
        LOD 100
        Pass
        {
			Tags { "LightMode" = "LightweightForward" }
			Stencil
			{
				Ref 2
				Comp always
				Pass replace
			}
            HLSLPROGRAM
            #pragma vertex vert
            #pragma fragment frag
            #include "Packages/com.unity.render-pipelines.lightweight/ShaderLibrary/Core.hlsl"
            struct appdata
            {
                float4 vertex : POSITION;
            };
            structv2f
            {
                float4 vertex : SV_POSITION;
            };
            v2f vert(appdata v){
                v2f o;
		o.vertex = TransformObjectToHClip(v.vertex.xyz);
                return o;
            }
            half4 frag(v2f i) : SV_Target
            {
                return half4(0.5h, 0.0h, 0.0h, 1.0h);
            }
            ENDHLSL
        }
    }
}
The second is the simplest outline shader itself.
Simple outline
Shader "Unlit/SimpleOutline"
{
    SubShader
    {
        Tags { "RenderType"="Opaque" }
        LOD 100
        Pass
        {
            Stencil {
                Ref 2
                Comp notequal
                Pass keep
            }
            HLSLPROGRAM
            #pragma vertex vert
            #pragma fragment frag
            #include "Packages/com.unity.render-pipelines.lightweight/ShaderLibrary/Core.hlsl"
            struct appdata
            {
                float4 vertex : POSITION;
            };
            structv2f
            {
                float4 vertex : SV_POSITION;
            };
            half4 _OutlineColor;
            v2f vert(appdata v){
                v2f o;
		v.vertex.xyz += 0.2 * normalize(v.vertex.xyz);
		o.vertex = TransformObjectToHClip(v.vertex.xyz);
                return o;
            }
            half4 frag(v2f i) : SV_Target
            {
                return _OutlineColor;
            }
            ENDHLSL
        }
    }
}
User Pass
Writing a user pass begins with the creation of the usual MonoBehaviour and the implementation of one of the interfaces mentioned above. We use IAfterOpaquePass, as the outline will be applied only to orca objects.
publicclassOutlinePass : MonoBehaviour, IAfterOpaquePass
{
    public ScriptableRenderPass GetPassToEnqueue(RenderTextureDescriptor baseDescriptor, RenderTargetHandle colorAttachmentHandle, RenderTargetHandle depthAttachmentHandle)
    {
        //...
    }
}
This script should be added to the camera. And through it we will organize the interaction of our passage with the game logic, but more on that later.
Now let's start writing the passage itself. To do this, create a class that inherits from ScriptableRenderPass
publicclassOutlinePassImpl : ScriptableRenderPass
{
    publicOutlinePassImpl()
    {
        //...
    }
    publicoverridevoidExecute(ScriptableRenderer renderer, ScriptableRenderContext context, ref RenderingData renderingData)
    {
        //...
    }
}
In the constructor, we register the name of the passage, create the material and settings for filtering visible objects after cooling. In the filter, we will install only opaque objects, since we will add our pass after the Opaque pass.
The Execute function is a rendering function for the pass. In it, we create settings for rendering, set the material created in the constructor, and render all the visible objects that satisfy the created filter.
OutlinePassImpl which turned out at me
publicclassOutlinePassImpl : ScriptableRenderPass
{
    private Material outlineMaterial;
    private FilterRenderersSettings m_OutlineFilterSettings;
    privateint OutlineColorId;
    publicOutlinePassImpl(Color outlineColor){
        // Должно совпадать с тегом прохода шейдера, висящем на объекте, как в шейдере // SimpleColor
        RegisterShaderPassName("LightweightForward");
        // Соответствует имени outline shader, указанному выше
        outlineMaterial = CoreUtils.CreateEngineMaterial("Unlit/SimpleOutline");
        OutlineColorId = Shader.PropertyToID("_OutlineColor");
        outlineMaterial.SetColor(OutlineColorId, outlineColor);
        m_OutlineFilterSettings = new FilterRenderersSettings(true)
        {
            renderQueueRange = RenderQueueRange.opaque,
        };
    }
    public override voidExecute(ScriptableRenderer renderer, ScriptableRenderContext context, ref RenderingData renderingData){
        Camera camera = renderingData.cameraData.camera;
        SortFlags sortFlags = renderingData.cameraData.defaultOpaqueSortFlags;
        // Создaём настройки для рендерига для текущей камеры
        DrawRendererSettings drawSettings = CreateDrawRendererSettings(camera, sortFlags, RendererConfiguration.None,
            renderingData.supportsDynamicBatching);
        drawSettings.SetOverrideMaterial(outlineMaterial, 0);
        context.DrawRenderers(renderingData.cullResults.visibleRenderers, ref drawSettings,
            m_OutlineFilterSettings);
    }
}
Now we add the class OutlinePass. It's all very easy to create an instance of the OutlinePassImpl class and through the link you can interact with the user pass in runtime mode. For example, to change the color outline.
OutlinePass which turned out at me
publicclassOutlinePass : MonoBehaviour, IAfterOpaquePass
{
    public Color OutlineColor;
    private OutlinePassImpl outlinePass;
    public ScriptableRenderPass GetPassToEnqueue(RenderTextureDescriptor baseDescriptor, RenderTargetHandle colorAttachmentHandle, RenderTargetHandle depthAttachmentHandle)
    {
        return outlinePass ?? (outlinePass = new OutlinePassImpl(OutlineColor));
    }
}
Now set up the scene for the test.
- Create material from the SimpleColor shader.
- Create a cube and hang material on it
- Add the OutlinePass script to the camera and set the color
- And click play
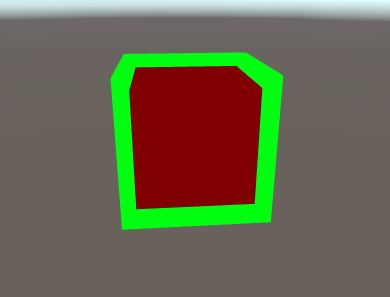
Outline will be visible only in Game View.
That is the result should be obtained.
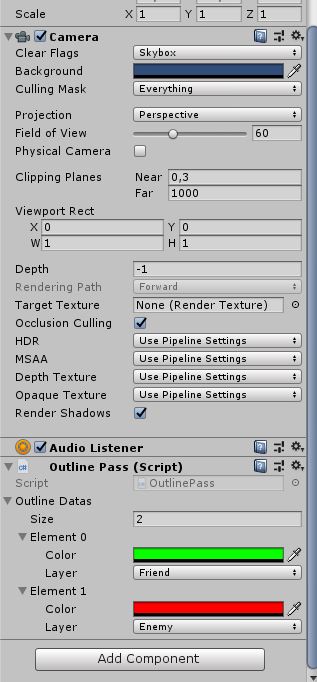
Bonus: friend-enemy type lights
Using the setting to filter visible objects, you can specify a layer or render layer in order to apply this pass to a specific object or group of objects and associate it with the logic of the game.
Let's change our pass so that all objects with the “Friend” layer will have a green outline, and with the “Enemy” layer red.
OutlinePass and OutlinePassImpl
publicclassOutlinePass : MonoBehaviour, IAfterOpaquePass
{
    [System.Serializable]
    publicclassOutlineData
    {
        public Color Color;
        public LayerMask Layer;
    }
    public List<OutlineData> outlineDatas = new List<OutlineData>();
    private OutlinePassImpl outlinePass;
    public ScriptableRenderPass GetPassToEnqueue(RenderTextureDescriptor baseDescriptor, RenderTargetHandle colorAttachmentHandle, RenderTargetHandle depthAttachmentHandle)
    {
        return outlinePass ?? (outlinePass = new OutlinePassImpl(outlineDatas));
    }
}
publicclassOutlinePassImpl : ScriptableRenderPass
{
    private Material[] outlineMaterial;
    private FilterRenderersSettings[] m_OutlineFilterSettings;
    publicOutlinePassImpl(List<OutlinePass.OutlineData> outlineDatas)
    {
        RegisterShaderPassName("LightweightForward");
        outlineMaterial = new Material[outlineDatas.Count];
        m_OutlineFilterSettings = new FilterRenderersSettings[outlineDatas.Count];
        Shader outlineShader = Shader.Find("Unlit/SimpleOutline");
        int OutlineColorId = Shader.PropertyToID("_OutlineColor");
        for (int i = 0; i < outlineDatas.Count; i++)
        {
            OutlinePass.OutlineData outline = outlineDatas[i];
            Material material = CoreUtils.CreateEngineMaterial(outlineShader);
            material.SetColor(OutlineColorId, outline.Color);
            outlineMaterial[i] = material;
            m_OutlineFilterSettings[i] = new FilterRenderersSettings(true)
            {
                renderQueueRange = RenderQueueRange.opaque,
                layerMask = outline.Layer
            };
        }
    }
    publicoverridevoidExecute(ScriptableRenderer renderer, ScriptableRenderContext context, ref RenderingData renderingData)
    {
        Camera camera = renderingData.cameraData.camera;
        SortFlags sortFlags = renderingData.cameraData.defaultOpaqueSortFlags;
        DrawRendererSettings drawSettings = CreateDrawRendererSettings(camera, sortFlags, RendererConfiguration.None,
            renderingData.supportsDynamicBatching);
        for (int i = 0; i < outlineMaterial.Length; i++)
        {
            drawSettings.SetOverrideMaterial(outlineMaterial[i], 0);
            context.DrawRenderers(renderingData.cullResults.visibleRenderers, ref drawSettings,
                m_OutlineFilterSettings[i]);
        }
    }
}
On the scene, add the “Friend” and “Enemy” layers, duplicate the cube several times, assign them layers to “Friend” or “Enemy”, configure the Outline Pass and launch it.
And that's what we get.
Conclusion
The new rendering in Unity expands perfectly, which makes it possible to create interesting effects very simply.
I hope the article was useful for reading. If anyone has any questions - see you in the comments.