Data transfer via animated QR to Gomobile and GopherJS
In this article I want to talk about a small and fun project of the day off on the transfer of files through animated QR codes. The project is written on Go, using Gomobile and Gopherjs - the last one for a web-based application to automatically measure the speed of data transfer. If you are interested in the idea of transferring data through visual codes, web application development is not on JS or Go’s true cross platform platform - well-known as a cat.

The idea of the project was born from a specific task for a mobile application - how to transfer a small portion of data (~ 15KB) to a different device most easily and quickly to another device, in terms of network locks. The first thought was to use Bluetooth, but this is not as convenient as it seems - the relatively long and not always working process of detecting and pairing devices makes the task too difficult. A good idea would be to use NFC (Near Field Communication), but there are still too many devices in which NFC support is limited or absent altogether. It was necessary that something simpler and more accessible.
What about QR codes?
QR codes
QR (Quick Response) code is the most popular type of visual codes in the world. It allows you to encode up to 3K of arbitrary data and has various levels of error correction, allowing you to confidently read even a third of a closed or dirty code.
But with QR codes there are two problems:
- 3KB is not enough
- the more data is encoded, the higher the quality requirements of the image to scan
Here is the QR code of the 40th version (the highest recording density) with 1276 bytes:

For my task, it was necessary to learn how to transfer ~ 15KB of data on standard devices (smartphones / tablets), so the question arose by itself - why not animate the sequence of QR codes and transfer the data in chunks?
A quick search on ready-made implementations led to several such projects — mostly projects on hackathons (although the thesis was met ) —but all were written in Java, Python or JavaScript, which, unfortunately, made the code almost unportable and unused. But given the large popularity of QR codes and the low technical complexity of the idea, it was decided to write from scratch on Go - a cross-platform, readable and fast language. Usually, cross-platform means the ability to build binary code for Windows, Mac and Linux, but in my case it was also important to build for web (gopherjs) and for mobile systems (iOS / Android). Go gives it all out of the box with minimal effort.
I also considered alternative versions of visual codes, such as HCCB or JAB Code , but for them I would have to write an OpenCV scanner, implement a coder / decoder from scratch and that was too much for a project for one weekend. Circular QR codes ( shotcodes ), and their counterparts used in Facebook, Kik and Snapchat allow you to encode much less information, and Apple’s incredibly cool Apple’s patented approach to pairing the Apple Watch and iPhone — an animated cloud of multicolored particles — is also optimized for the wow effect, and not under maximum bandwidth. QR codes are integrated into native SDK cameras of mobile OS, which greatly facilitates work with them.
TXQR
Thus was born the project txqr (from Tx - transmission, and QR), implementing the library for encoding / decoding QR on pure Go and the protocol for data transmission.
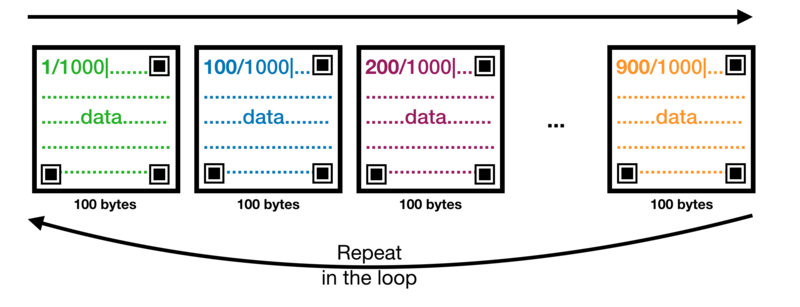
The main idea is as follows: one client selects a file or data to be sent, the program on the device splits the file into pieces, encodes each of them into QR frames and shows them in an infinite loop with a given frame rate until the recipient receives all the data. The protocol is made in such a way that the recipient can start from any frame, receive QR frames in any order - thus avoiding the problem of the need to synchronize the animation frequency and the scanning frequency. The recipient may be an old device, the power of which allows you to decode 2 frames per second, and the sender - a new smartphone issuing 120Hz animation, or vice versa, and this will not be a fundamental problem for the protocol.
This is achieved as follows - when a file is broken into pieces ( frames further), a prefix is added to each frame at the beginning with information about the offset for all data and the total length is OFFSET/TOTAL|(where OFFSET and TOTAL are integer values of offset and length, respectively). Binary data is currently encoded in Base64, but this is not really necessary - the QR specification allows not only to encode data as binary, but also to optimize different parts of data for different encodings (for example, the prefix with minor changes can be encoded as alphanumeric , and the rest is - like binary ), but for simplicity Base64 performed its function perfectly.
Moreover, the frame size and frequency can even be changed dynamically, adapting to the capabilities of the recipient.
The protocol itself is very simple, and its main disadvantage is that for large files (although this goes beyond the scope of the task, but still), one frame skipped during scanning will double the scanning time - the recipient will have to wait for the full cycle again. In coding theory, there are solutions for such cases - fountain codes , but I will leave this for some of the next free weekend.
The most interesting point was to write a mobile application that can use this protocol.
Goomobile
If you have not heard of gomobile , then this is a project that allows you to use Go libraries in iOS and Android projects and does so until propriety is a simple procedure.
The standard process is:
- you write plain go code
- launch
gomobile bind ... - copy the resulting artifact (s) (
yourpackage.framework.oryourpackage.aar) into your mobile project - import
yourpackageand work with it as with a regular library
You can try it yourself how easy it is.
Therefore, I pretty quickly wrote an application on Swift, which scans QR codes (thanks to this wonderful article ) and decodes them, sticks together and, when the entire file is received, it shows in the preview window.
Being new to Swift (even though I read the book on Swift 4), there were many moments when I was stuck on something simple, trying to figure out how to do it correctly and, as a result, the best solution was to implement this functionality on Go and use via Gomobile. Don't get me wrong, Swift is a great language in many ways, but, like most other programming languages, it gives you too many ways to do the same thing, and already has a decent history of backwards-incompatible changes. For example, I had to do a simple thing - measure the duration of an event with millisecond precision. Google search and StackOverflow led to a lot of different, controversial and often outdated solutions, none of which, in the end, looked neither beautiful for me nor correct for the compiler. After 40 minutes of time spenttime.Since(start) / time.Millisecond and used its result from Swift directly.
I also wrote a console utility txqr-asciito quickly test the application. It encodes the file and animates QR codes in the terminal. All together it worked surprisingly well - I could send a small picture in a few seconds, but as soon as I started testing different frame rates, the number of bytes in each QR frame and the level of error correction in the QR encoder, it became clear that the terminal solution was not copes a lot with high frequency (more than 10) animations, and that manually testing and measuring results is a bad job.
TXQR Tester
To find the optimal combination of frame rate, data size in a QR frame and error correction level among the reasonable limits of these values, I needed to run over 1000 tests, manually changing parameters, waiting for a full cycle with the phone in my hand and writing the results on a tablet. Of course, this should be automated!
Here is the idea of the next application txqr-tester. I originally planned to use x / exp / shiny - an experimental UI framework for native desktop applications on Go, but it looks like it was abandoned. About a year ago I tried it, and the impression was not bad - it fit perfectly for low-level things. But today the master branch has not even compiled. It seems that there are no incentives to invest in the development of desktop frameworks - a complex and cumbersome task, with almost zero demand now, all UI solutions have been transferred to the web long ago.
As we know, programming languages just started to go into web programming, thanks to WebAssembly, but this is just the first steps for children. Of course, there are also JavaScript and add-ons, but friends do not allow friends to write applications in JavaScript, so I decided to use my recent discovery - the Vecty framework , which allows you to write frontends on pure Go, which are automatically converted to JavaScript using a very adult and surprisingly well-working project GopherJS .
Vecty and GopherJS

I have never received such pleasure from the development of front-end interfaces in life.
A little later, I plan to write a couple more articles about my experience in developing frontends on Vecty, including WebGL applications, but the point is that after several projects on React, Angulyarah and Ember, writing frontend in a thoughtful and simple programming language is a breath of fresh air! I can write quite nice front-ends in a short time and at the same time not write a single line in JavaScript!
To seed, here’s how you start a new project on Vecty (no “initial project” code generators creating tons of files and folders) - just main.go:
ackage main
import (
    "github.com/gopherjs/vecty"
)
funcmain() {
    app := NewApp()
    vecty.SetTitle("My App")
    vecty.AddStylesheet(/* ... add your css... */)
    vecty.RenderBody(app)
}
An application, like any UI component, is just a type: a structure that includes a type vecty.Coreand must implement an interface vecty.Component(consisting of one method Render()). And it's all! Then you operate with types, methods, functions, libraries for the work of the DOM, and so on - no hidden magic and new terms and concepts. Here is the simplified code for the main page:
/ App is a top-level app component.
type App struct {
    vecty.Core
    session      *Session
    settings     *Settings
    // any other stuff you need,// it's just a struct
}
// Render implements the vecty.Component interface.func(a *App)Render()vecty.ComponentOrHTML {
    return elem.Body(
        a.header(),
        elem.Div(
            vecty.Markup(
                vecty.Class("columns"),
            ),
            // Left half
            elem.Div(
                vecty.Markup(
                    vecty.Class("column", "is-half"),
                ),
                elem.Div(a.QR()), // QR display zone
            ),
            // Right half
            elem.Div(
                vecty.Markup(
                    vecty.Class("column", "is-half"),
                ),
                vecty.If(!a.session.Started(), elem.Div(
                    a.settings,
                )),
                vecty.If(a.session.Started(), elem.Div(
                    a.resultsTable,
                )),
            ),
        ),
        vecty.Markup(
            event.KeyDown(a.KeyListener),
        ),
    )
}
You, for certain, now look at the code and think - how much is this unfounded work with the DOM! I also thought so at first, but as soon as I started working, I realized how convenient it is:
- There is no magic - each block (Markup or HTML) is only a variable of the desired type, with clear limits to where that can be put, thanks to static typing.
- There are no opening / closing tags that you should either remember to change when refactoring, or use an IDE that does this for you.
- The structure suddenly becomes clear - I never, for example, understood why in React until the 16th version it was impossible to return several tags from a component - this is “just a string”. Seeing how this is done in Vecty, it suddenly became clear where the roots of this restriction grew in React. All the same, it is not clear, however, why after React 16 it became possible, but not necessary.
In general, as soon as you try this approach of working with the DOM, its advantages will become very obvious. Cons, too, of course, but after the minuses of the usual methods, they are invisible.
Vecty is called a React-like framework, but this is not the case. For React, there is a native GopherJS library — myitcv.io/react , but I don't think it's a good idea to repeat the React architectural solutions for Go. When you write frontend on Vecty, it suddenly becomes clear how much simpler everything is. Suddenly, all this hidden magic and new terms and concepts that each JavaScript framework invents become superfluous - they are just an added complexity , nothing more. All that is needed is to clearly and clearly describe the components, their behavior, and link them together - types, methods and functions, that's all.
For CSS, I used a surprisingly decent Bulma framework - it has a very clear class naming and a good structure, and the declarative UI code with its help is very readable.
True magic, however, begins when you compile Go code in JavaScript. It sounds very scary, but, in fact, you just call gopherjs buildand in less than a second, you have an auto-generated JavaScript file ready to include in your basic HTML page (a normal application consists only of an empty body tag and the inclusion of this JS- script). When I first started this command, I expected to see a lot of messages, warnings and errors, but no - it works fantastically fast and silently, only one-liners in case of compilation errors that are generated by the Go compiler output to the console, so they are very clear. But it was even cooler to see errors in the browser console, with the spectra pointing to the .go files and the correct line! It is very cool.
Testing parameters of QR animation
In a few hours, I had a web application ready that allowed me to quickly change the parameters for testing:
- FPS - frame rate
- QR Frame Size - how many bytes should be in each frame
- QR Recovery Level - QR error correction level
and run the test automatically.

The mobile application, of course, also had to be automated - it had to understand when the next round begins with new parameters, understand when the reception takes too much time and terminate the round, send the results to the application, and so on.
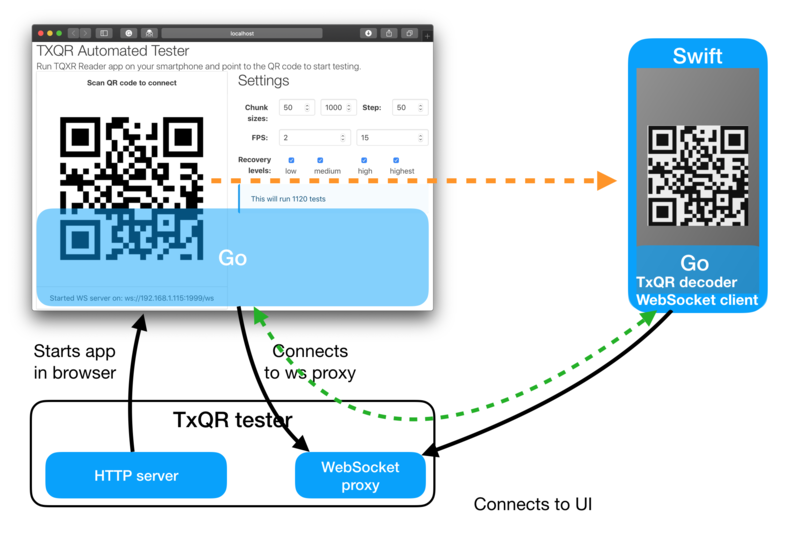
The snag was that the web application, being launched in the browser sandbox, cannot create new connections, and if I'm not mistaken, the only possibility of a real peer-to-peer connection to the browser is only through WebRTC (I don’t need to punch NAT ), but it was too cumbersome. A web application could only be a client.
The solution was simple - a web service on Go, which gave the web application (and launched the browser to the desired URL), also launched the WebSocket proxy for two clients. As soon as two clients join it, it transparently sends messages from one connection to another, allowing clients (the web application and the mobile client) to communicate directly. They must be for this, in one WIFI network, of course.
There remained the problem of how to tell the mobile device where to actually connect, and it was solved with the help of a ... QR code!
The testing process looks like this:
- mobile application searches for a QR code with a start marker and a link to a WebSocket proxy
- as soon as the token is read, the application connects to this WebSocket proxy
- the web application (already connected to the proxy) understands that the mobile application is ready and shows a QR code with the marker "ready for the next round?"
- The mobile application recognizes the signal, resets the decoder, and sends a “Yeah” message via the WebSocket.
- Web application, having received confirmation, generates a new QR animation and turns it until it receives results or timeout.
- the results are added to a table next to it, which can be immediately downloaded as a CSV
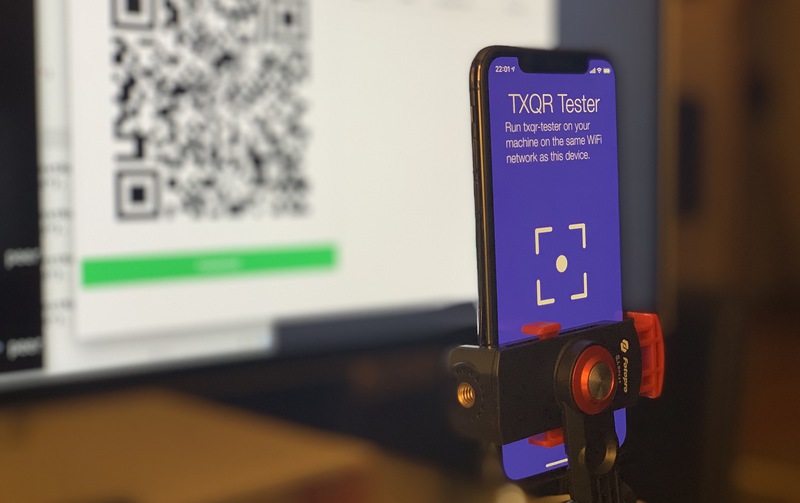
In the end, all I had to do was just to put the phone on a tripod, run the application and then the two programs did all the dirty work themselves, politely communicating via QR codes and WebSocket :)
At the end, I downloaded the CSV results file, drove it to RStudio, and analyzed the results in Plotly Online Chart Maker .
results
The full cycle of testing takes about 4 hours (unfortunately, the hardest part of the process - generating an animated GIF image with QR frames, had to run in the browser, and since the resulting code is still in JS, only one processor is used), during which, it was necessary to monitor, so that suddenly the screen did not go out or some application did not close the window with the web application. The following parameters were tested:
- FPS - from 3 to 12
- QR frame size - from 100 to 1000 bytes (in increments of 50)
- All 4 levels of QR error correction (Low, Medium, High, Highest)
- The size of the file being transferred is 13KB of randomly generated bytes.
A few hours later I downloaded CSV and began to analyze the results.
A picture is more important than a thousand words, but interactive 3D visualizations are more important than a thousand pictures. Here is a visualization of the results (clickable):
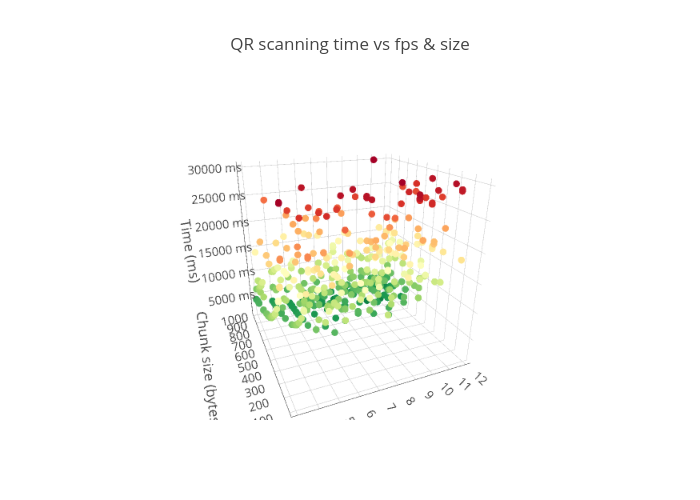
The best result was 1.4 seconds, which is about 9KB / s! This result was recorded at a frequency of 11 frames per second, a frame size of 850 bytes, and an average level of error correction. In most cases, however, the camera decoder missed some frames at such a speed, and you had to wait for the next repeat of the missed frame, which had a negative effect on the results - instead of two seconds, it could easily turn out to be 15, or a timeout that was set to 30 seconds.
Here are graphs of the results of variable variables:
Time / frame size
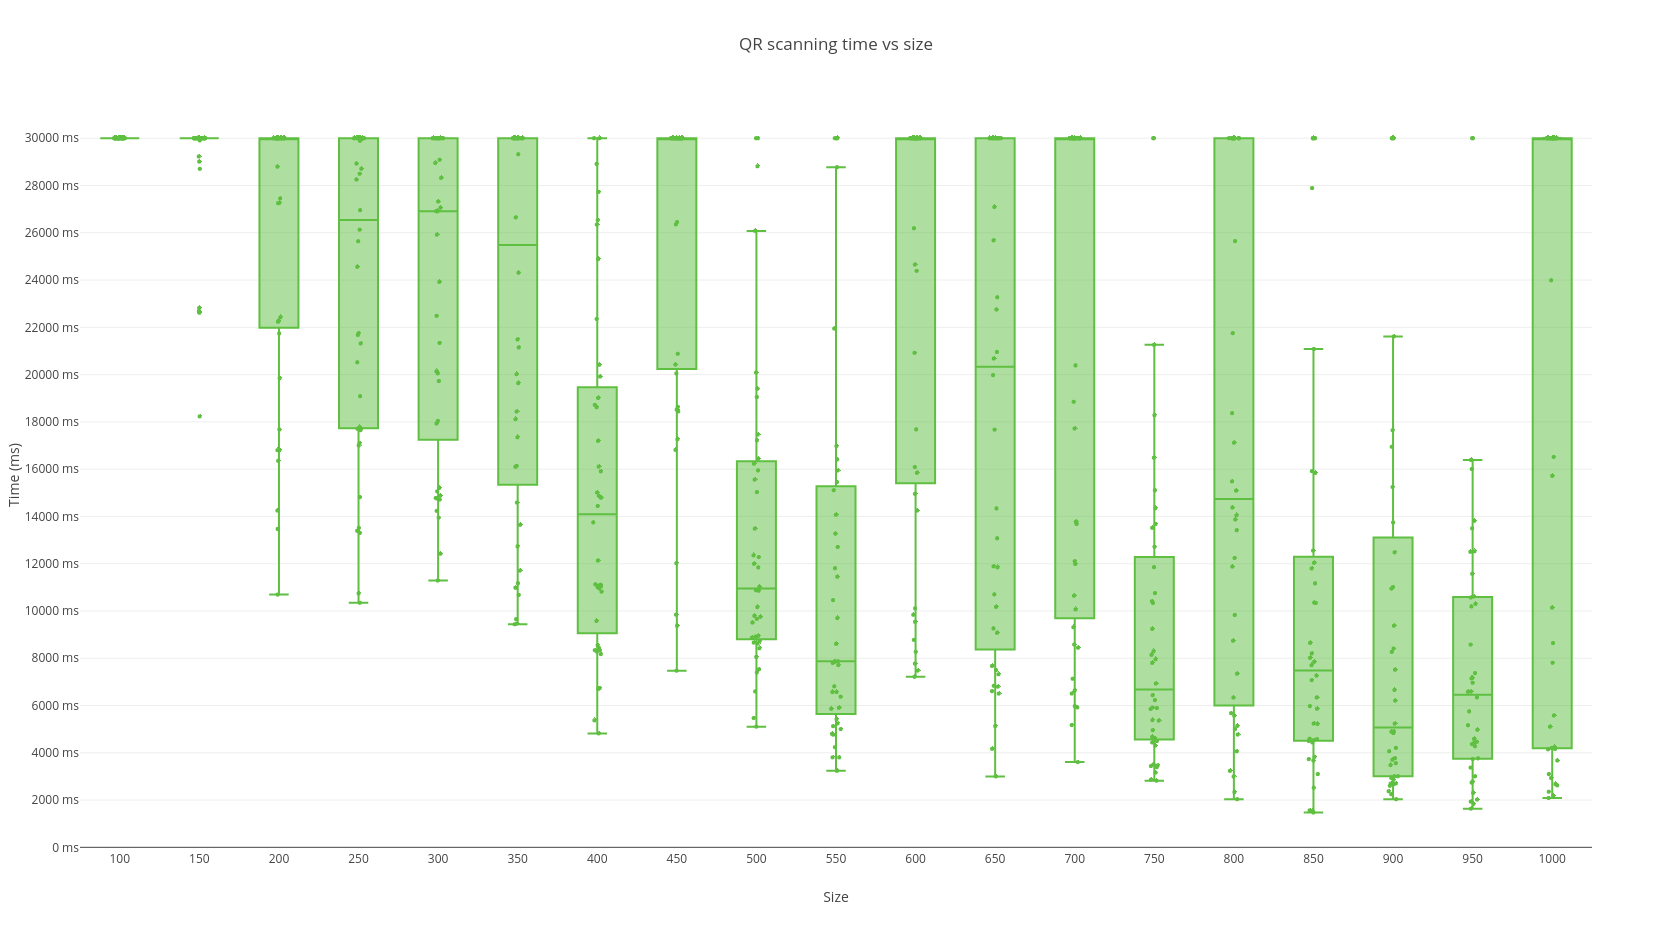
As you can see, at low values of the number of bytes in each frame, the excess coding is too large and the total reading time, respectively, too. There is a local minimum at 500-600 bytes per frame, but the values alongside still lead to lost frames. The best result was observed at 900 bytes, but 1000 and higher is almost guaranteed loss of frames.
Time / FPS
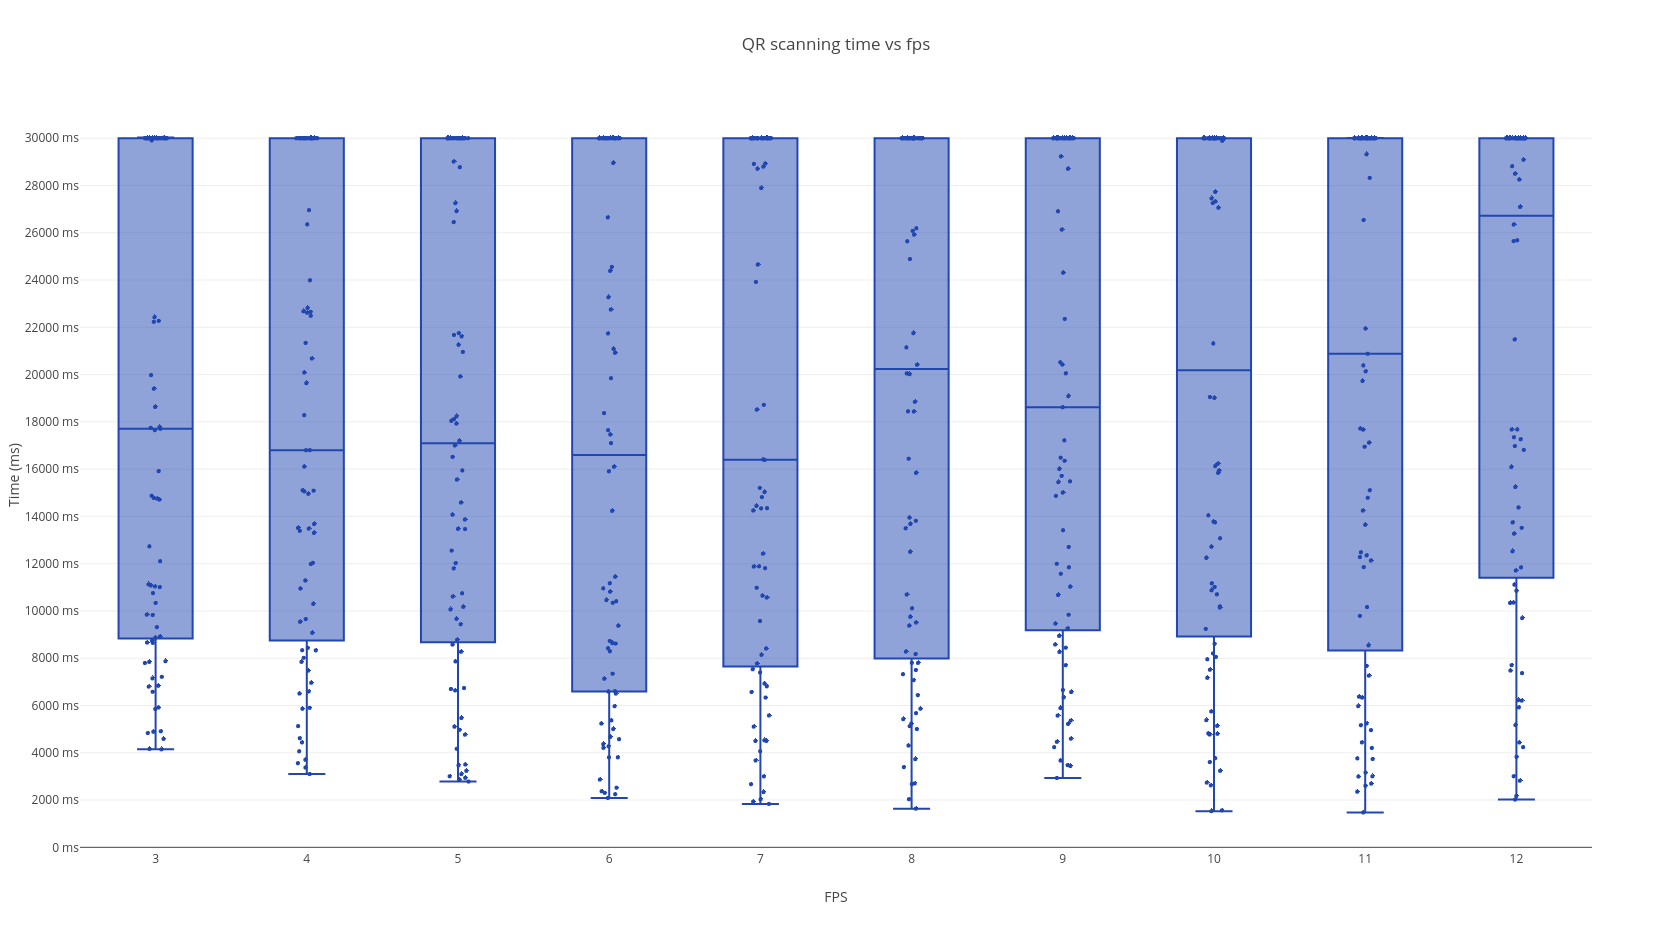
The value of the number of frames per second, to my surprise, didn’t have much effect - small values increased the total transmission time too much, and large ones increased the probability of a missing frame. The optimal value, judging by these tests, is around 6-7 frames per second for those devices on which I tested.
Time / Error Correction Level
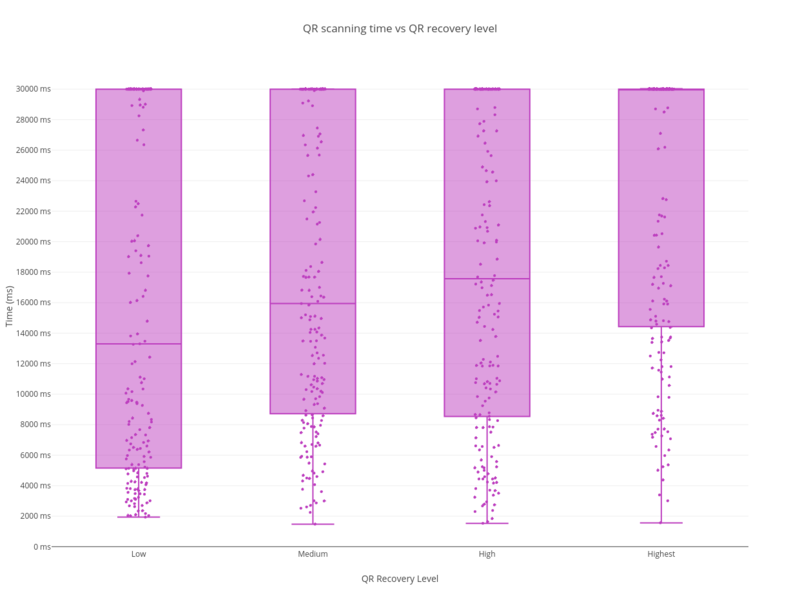
The level of error correction showed a clear relationship between the file transfer time and the level of redundancy, which is not surprising. The unequivocal winner here is a low (L) correction level - the less redundant data, the more readable the QR code for the scanner with the same data size. In fact, for this experiment, redundancy is not needed at all, but the standard does not offer such an option.
Of course, for more objective data, this test should be run hundreds and thousands of times, on different devices and different screens, but for my weekend experiment, it was more than enough results.
findings
This fun project proved that one-way data transfer via animated codes is certainly possible, and for situations where you need to transfer a small amount in the absence of any kind of networks, it is quite suitable. Although my maximum result was about 9KB / s, in most cases the actual speed was 1-2KB / s.
I also really enjoyed using Gomobile and GopherJS with Vecty as an everyday tool for problem solving. These are very mature projects, with an excellent speed of work, and, in most cases, giving the experience "it just works."
Finally, I still admire how productive you can be with Go, when you clearly know what you want to implement - an extremely short cycle “change” - “collect” - “check” allows you to experiment a lot and often, simple code and the lack of a class hierarchy in the structure programs make it easy and painless to refactor them on the go, and the fantastic cross-platform built into the language from the very beginning allows you to write code once and use it on the server, on the web client and in the native mobile application. At the same time, despite more than enough performance out of the box, there is still plenty of space for optimization and acceleration.
So if you have never tried Gomobile or GopherJS - I would recommend you to try it at the next opportunity. It will take an hour of your time, but perhaps it will open you a whole new layer of opportunities in web or mobile development. Feel free to try!