Intel Edison, Windows Phone, and Microsoft Azure: Cloud-Based Console and LED
- Transfer
The capabilities of modern technologies are most clearly manifested when they are used together. For example, what can you do if you combine Intel Edison, Microsoft Azure, and Windows Phone? In fact, a lot of things. Here we will consider one of the options - remote on and off LED, connected to one of the digital outputs Edison with the Arduino circuit board.
The Azure mobile service connects Edison and the “control panel,” which plays an application that runs on the Windows Phone platform. Edison reads the attribute value from the table of the mobile service and performs certain actions in accordance with the received data. The smartphone application changes the value in the table, which allows it to affect the board.

We assume that the reader has basic application development skills for the Windows Phone platform and is able to associate such an application with the Azure mobile service. If you do not know how to create the server side of the application, take a look at this material .
To implement the project, you will need the following hardware and software:
First, create an Azure mobile service. How this is done is the subject of many publications. For example, you can use this guide and create a mobile service that contains one table. Call this table “ controltable ”. It should have two columns. One - with the name " status ", the second - " name ". The value of “ status ” will be either 1 or 0. In the “ name ” will be “Edison / Arduino”.
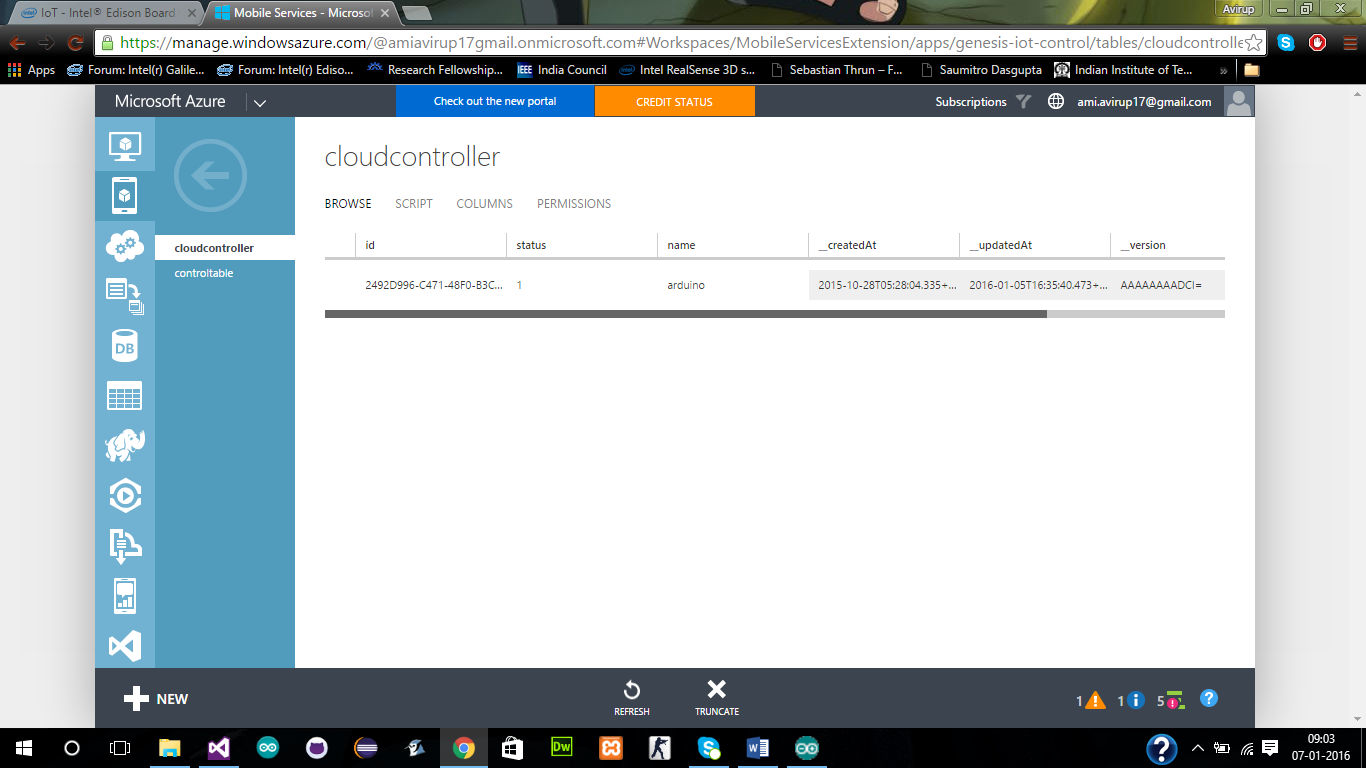
Azure Mobile Service
Please note that the “device” attribute in the Azure SQL table does not matter. You can delete it if you want.
Now we are going to develop an application for Windows Phone that will add or modify the attribute value.
Here we do not go into the development details for Windows Phone. If you need more information about this, take a look at the materials posted on this resource .
In our application there will be only two buttons: “ on ” and “ off ”. This is how it all looks.
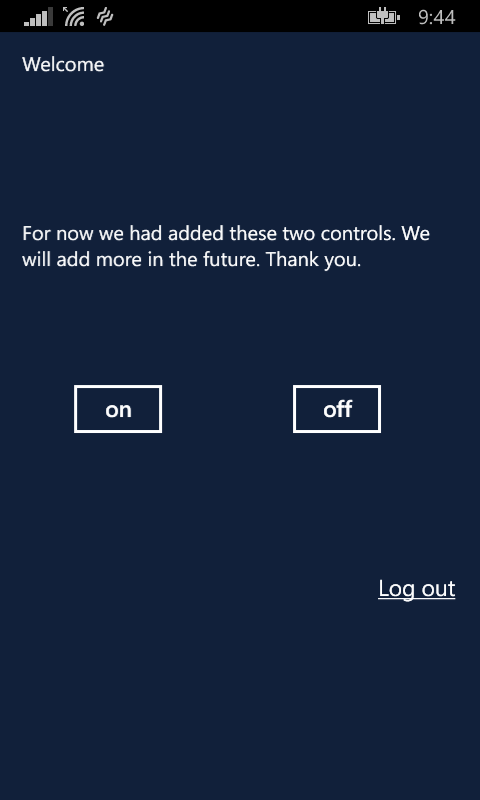
Application screen for Windows Phone
You can ignore the link button “ Log out ”.
So how does the application work? When you click on the on and off buttons, the status attribute in the Azure table changes , it is set to either 1 or 0.
However, here we encounter a problem. The fact is that in order to write 1 or 0 to a field, you must first create this field. Therefore, the application performs a dual function. The first time you connect to the cloud, it creates a table and populates it with some default values, and the next time it only updates the data.
When the application is ready, it will need to be tested, to check whether clicking the buttons really updates the "status" field. When everything works as planned, you can move on.
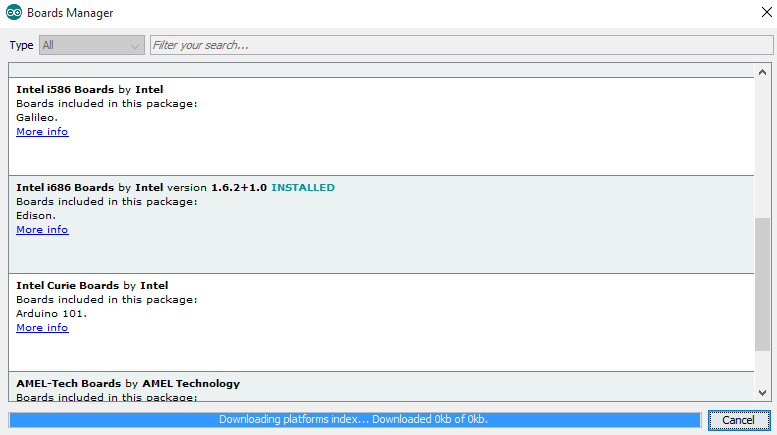
Let's take a look at development for Edison. Before you begin, you need to configure the board. After connecting Edison to the computer, find out the COM port number that corresponds to the board. Then run the Arduino IDE and, from the list of supported devices, select Edison. If you cannot find the required board in the list, you need to download the necessary files using the Boards Manager tool.
Upload files for Edison in the IDE Arduino
Once you open the IDE Arduino, your service will be the pair of functions - it's
This piece of code allows you to connect Edison to the Internet over Wi-Fi. In addition, we set PIN 13 to output mode and put it in the off state. We will use the serial port to monitor the process in the Arduino IDE.
Now let's get down to the method
These functions will load data from the cloud service table. But, before considering the function code, we need to add several global constants to the project that will store the data needed to connect Edison to Azure.
The application key (
We performed an HTTP request and called GET, where we first specified the table name, server name and key code. This is necessary to successfully receive data from the cloud. Then we indicated in which format we want to receive the data, in our case it is JSON. Now let's take a look at the function code
After the data is received, they must be read. Since we are dealing with the JSON format, we need to parse the resulting string in order to extract from it what we need. Here's how such a line might look:
There is a very efficient library for parsing JSON, ArduinoJson. She performs the bulk of the work. But the resulting string with JSON data is enclosed in brackets “[]”. Before passing a string to the library, these brackets must be removed. So, first we include the library in our code and add the following global variables:
Now, in the method
The above code reads the response. The method is
In this code, the variable
It is likely that after compiling this program you will encounter unexpected errors. They need to be dealt with. The cause of the errors is described here . The fact is that some necessary code is missing in the WString.h file . Here you can evaluate the differences between the correct and incorrect files. The working file must be placed in this way:
After this, the errors disappear, it will be possible to achieve the correct compilation of the code and flash it on Edison. Now connect the LED to the board by attaching a longer leg (you can also add a 233 ohm resistor here) to PIN 13 , and a short one to GND . Now the system, consisting of the Intel Edison motherboard, Microsoft Azure cloud service and Windows Phone, is ready for testing.
Recall: we are going to control the LED connected to Edison using a device on Windows Phone, using the Azure cloud service, which is the connecting link of the project. Take a look at the debug window that comes from Edison. The first stage of work is an attempt to connect to a Wi-Fi network.

Edison connects to a Wi-Fi network
The next step is to connect to the Azure mobile service. After connecting, Edison loads the data in JSON format, then it is parsed using the appropriate library, the indicator we are interested in is extracted from the data. The LED connected to PIN 13 turns on or off in accordance with the value of this indicator.

Intel Edison connected to the cloud and received data
In this article, you learned how to manage an Intel Edison board using Microsoft Azure mobile services. In our case, a mobile service is a connecting link. It allows an application running on a Windows Phone to communicate with an Intel Edison board. This is done due to the fact that the application running on the smartphone writes data to the table, and Edison reads this data and responds accordingly.
In our project, everything is arranged very simply: the LED lights up or turns off in response to a press of the on-screen button. But it is easy to notice that by the same model it is possible to implement much more complex schemes for the interaction of intelligent “things” connected to the Internet and the modules for managing them.
Prerequisites
We assume that the reader has basic application development skills for the Windows Phone platform and is able to associate such an application with the Azure mobile service. If you do not know how to create the server side of the application, take a look at this material .
To implement the project, you will need the following hardware and software:
- Intel Edison Board with Arduino Patch Board
- Light-emitting diode
- Visual studio
- Arduino IDE
- Azure Mobile Service
First, create an Azure mobile service. How this is done is the subject of many publications. For example, you can use this guide and create a mobile service that contains one table. Call this table “ controltable ”. It should have two columns. One - with the name " status ", the second - " name ". The value of “ status ” will be either 1 or 0. In the “ name ” will be “Edison / Arduino”.
Azure Mobile Service
Please note that the “device” attribute in the Azure SQL table does not matter. You can delete it if you want.
Now we are going to develop an application for Windows Phone that will add or modify the attribute value.
Windows Phone App
Here we do not go into the development details for Windows Phone. If you need more information about this, take a look at the materials posted on this resource .
In our application there will be only two buttons: “ on ” and “ off ”. This is how it all looks.
Application screen for Windows Phone
You can ignore the link button “ Log out ”.
So how does the application work? When you click on the on and off buttons, the status attribute in the Azure table changes , it is set to either 1 or 0.
However, here we encounter a problem. The fact is that in order to write 1 or 0 to a field, you must first create this field. Therefore, the application performs a dual function. The first time you connect to the cloud, it creates a table and populates it with some default values, and the next time it only updates the data.
When the application is ready, it will need to be tested, to check whether clicking the buttons really updates the "status" field. When everything works as planned, you can move on.
Development for Edison
Let's take a look at development for Edison. Before you begin, you need to configure the board. After connecting Edison to the computer, find out the COM port number that corresponds to the board. Then run the Arduino IDE and, from the list of supported devices, select Edison. If you cannot find the required board in the list, you need to download the necessary files using the Boards Manager tool.
Upload files for Edison in the IDE Arduino
Once you open the IDE Arduino, your service will be the pair of functions - it's
void setup()and void loop(). Edison has a built-in Wi-Fi adapter. We will use it to connect the device to the Internet. Therefore, the first thing we import into the project is a library to support Wi-Fi. To do this, run the command Sketch-> include library-> Wi-Fi . Now add the following code to the project, which will allow you to connect the device to a Wi-Fi network.#include
#include
WiFiClient client;
char ssid[] = "networkssid"; // SSID (имя) сети
char pass[] = "password"; // пароль для подключения к сети (для сети с поддержкой WPA), или ключ (для сети с поддержкой WEP)
int keyIndex = 0; // индекс ключа сети (нужен только для WEP)
int status = WL_IDLE_STATUS;
void setup()
{
pinMode(13,OUTPUT);
digitalWrite(13,HIGH);
Serial.begin(115200);
while (!Serial) {
; // ожидаем подключение по последовательному порту. Нужно только для Leonardo
}
// Проверка наличия платы расширения:
if (WiFi.status() == WL_NO_SHIELD) {
Serial.println("WiFi shield not present");
// не будем продолжать:
while(true);
}
String fv = WiFi.firmwareVersion();
if( fv != "1.1.0" )
Serial.println("Please upgrade the firmware");
// пытаемся подключиться к Wi-Fi-сети:
while (status != WL_CONNECTED) {
Serial.print("Attempting to connect to SSID: ");
Serial.println(ssid);
// Подключение к сети WPA/WPA2. Измените эту строчку, если используете открытую сеть или сеть с поддержкой WEP:
status = WiFi.begin(ssid, pass);
}
} This piece of code allows you to connect Edison to the Internet over Wi-Fi. In addition, we set PIN 13 to output mode and put it in the off state. We will use the serial port to monitor the process in the Arduino IDE.
Now let's get down to the method
void loop(). Retrieving data from Azure is done using the GET method.void loop()
{
send_request();
wait_response();
read_response();
end_request();
delay(100);
}These functions will load data from the cloud service table. But, before considering the function code, we need to add several global constants to the project that will store the data needed to connect Edison to Azure.
const char* server= "YourAzureService.azure-mobile.net";
const char* table_name= "TableName";
const char* ams_key="YourApplicationKey";
char buffer[64];
The application key (
ams_key) can be found in the key management section of your Azure account. Now consider the code of the methods used in void loop().void send_request()
{
Serial.println("\nconnecting...");
if (client.connect(server, 80))
{
sprintf(buffer, "GET /tables/%s HTTP/1.1", table_name);
client.println(buffer);
// Заголовок хоста
sprintf(buffer, "Host: %s", server);
client.println(buffer);
// Ключ приложения Azure Mobile Services
sprintf(buffer, "X-ZUMO-APPLICATION: %s", ams_key);
client.println(buffer);
// Тип содержимого – JSON
client.println("Content-Type: application/json");
// Размер содержимого
client.print("Content-Length: ");
client.println(strlen(buffer));
// Окончание заголовка
client.println();
// Тело запроса
client.println(buffer);
}
else
{
Serial.println("connection failed");
}
}We performed an HTTP request and called GET, where we first specified the table name, server name and key code. This is necessary to successfully receive data from the cloud. Then we indicated in which format we want to receive the data, in our case it is JSON. Now let's take a look at the function code
wait_response().void wait_response()
{
while (!client.available())
{
if (!client.connected())
{
return;
}
}
}After the data is received, they must be read. Since we are dealing with the JSON format, we need to parse the resulting string in order to extract from it what we need. Here's how such a line might look:
{"id":"2492D996-C471-48F0-B3C9-F33E3B37477F","status":"0","name":"arduino"}There is a very efficient library for parsing JSON, ArduinoJson. She performs the bulk of the work. But the resulting string with JSON data is enclosed in brackets “[]”. Before passing a string to the library, these brackets must be removed. So, first we include the library in our code and add the following global variables:
#include
#define RESPONSE_JSON_DATA_LINENNO 10
int charIndex=0;
StaticJsonBuffer<200> jsonbuffer;
Now, in the method
read_response(), write the following:void read_response()
{
boolean bodyStarted;
int jsonStringLength;
int jsonBufferCntr=0;
int numline=RESPONSE_JSON_DATA_LINENNO;
//Во всём ответе нам интересна лишь десятая строка
while (client.available())
{
//Serial.println("Reading:");
char c = client.read();
if (c == '\n')
{
numline -=1;
}
else
{
if (numline == 0 && (c!='[')&& (c!=']') )
{
buffer[jsonBufferCntr++] = c;
buffer[jsonBufferCntr] = '\0';
}
}
}
Serial.println("Received:");
Serial.println(buffer);
Serial.println("");
parse();
}The above code reads the response. The method is
parseresponsible for parsing the string. Here is the code for this method. Here we change the status of PIN 13 output on the board in accordance with the received data.void parse()
{
StaticJsonBuffer<150> jsonbuffer;
JsonObject& root = jsonbuffer.parseObject(buffer);
if(!root.success())
{
Serial.println("PARSING FAILED!!!");
return;
}
int f= root["status"];
Serial.println("Decoded: ");
Serial.println(f);
if(f==0)
digitalWrite(13,LOW);
else
digitalWrite(13,HIGH);
}In this code, the variable
fstores the value of the status attribute . We check this value and, depending on whether 0 or 1 turns out to be a variable, we set the output on the board to the HIGH or LOW state . It remains to consider the code is only one method end_request(). Here he is.void end_request()
{
client.stop();
}It is likely that after compiling this program you will encounter unexpected errors. They need to be dealt with. The cause of the errors is described here . The fact is that some necessary code is missing in the WString.h file . Here you can evaluate the differences between the correct and incorrect files. The working file must be placed in this way:
C:\Users\Username\AppData\Roaming\Arduino15\packages\Intel\hardware\i686\1.6.2+1.0\cores\arduino\WString.hAfter this, the errors disappear, it will be possible to achieve the correct compilation of the code and flash it on Edison. Now connect the LED to the board by attaching a longer leg (you can also add a 233 ohm resistor here) to PIN 13 , and a short one to GND . Now the system, consisting of the Intel Edison motherboard, Microsoft Azure cloud service and Windows Phone, is ready for testing.
Recall: we are going to control the LED connected to Edison using a device on Windows Phone, using the Azure cloud service, which is the connecting link of the project. Take a look at the debug window that comes from Edison. The first stage of work is an attempt to connect to a Wi-Fi network.
Edison connects to a Wi-Fi network
The next step is to connect to the Azure mobile service. After connecting, Edison loads the data in JSON format, then it is parsed using the appropriate library, the indicator we are interested in is extracted from the data. The LED connected to PIN 13 turns on or off in accordance with the value of this indicator.
Intel Edison connected to the cloud and received data
Summary
In this article, you learned how to manage an Intel Edison board using Microsoft Azure mobile services. In our case, a mobile service is a connecting link. It allows an application running on a Windows Phone to communicate with an Intel Edison board. This is done due to the fact that the application running on the smartphone writes data to the table, and Edison reads this data and responds accordingly.
In our project, everything is arranged very simply: the LED lights up or turns off in response to a press of the on-screen button. But it is easy to notice that by the same model it is possible to implement much more complex schemes for the interaction of intelligent “things” connected to the Internet and the modules for managing them.