Implementation of Zimbra Collaboration Open Source, authorization through AD and automatic creation of mailboxes
- From the sandbox
- Tutorial
1. Baseline
Server OS : CentOS 7
About the OS
In fact, the difference between CentOS7 and any other system will be solely in the commands to the server to install dependencies, and possibly the location of some files. The work is carried out mainly with Zimbra cmdlets, so the configuration differences will be minimal.
Windows domain : home.local
Address and mail server name : 10.40.0.80 / zimbramail.home.local
User for accessing the AD directory : ZimbraLDAP with password qwe123
2. Pitfalls
The Zimbra installation process itself is fairly simple. You need to install the dependent packages, download the archive, run the script and correctly answer the installer's questions. But, as elsewhere, there are some small difficulties.
1) Zimbra is sensitive to hostname. The first thing to do before installing is to bring the / etc / hosts file to the form:
127.0.0.1	 localhost.localdomain	localhost
10.40.0.80	 zimbramail.home.local	zimbramail
2) Without access to the internet miracle will not happen. If there is no access to the Internet, the script will hang for 20-40 minutes, and as a result, of course, it will end with an error. It would seem, why do we need a mail server without access to the Internet, but "what just does not happen in the sublunary world."
3. Directly installation
So, to the point!
1) Installing dependencies:
$ yum install perl perl-core ntpl nmap sudo libidn gmp libaio libstdc++ unzip sysstat sqlite wget2) Download archive:
$ wget https://files.zimbra.com/downloads/8.8.11_GA/zcs-8.8.11_GA_3737.RHEL7_64.20181207111719.tgz3) Unzip the downloaded archive, go to the directory and start the installation:
$ tar –xzf zcs-8.8.11_GA_3737.RHEL7_64.20181207111719.tgz
$ cd zcs-8.8.11_GA_3737.RHEL7_64.20181207111719
$ ./install.sh --platform-override
4) Agree with the license agreement and use of the Zimbra repository:
Do you agree with the terms of the software license agreement? [N] Y
Use Zimbra's package repository [Y] Y
5) Select the necessary components and confirm the change:
Text output
Select the packages to install
Install zimbra-ldap [Y] Y
Install zimbra-logger [Y] Y
Install zimbra-mta [Y] Y
Install zimbra-dnscache [Y] N
Install zimbra-snmp [Y] Y
Install zimbra-store [Y] Y
Install zimbra-apache [Y] Y
Install zimbra-spell [Y] Y
Install zimbra-memcached [Y] Y
Install zimbra-proxy [Y] N
The system will be modified.  Continue? [N] Y
6) Next you need to enter the administrator password for Zimbra:
Text output
Main menu
   1) Common Configuration:
   2) zimbra-ldap:                             Enabled
   3) zimbra-logger:                           Enabled
   4) zimbra-mta:                              Enabled
   5) zimbra-snmp:                             Enabled
   6) zimbra-store:                            Enabled
        +Create Admin User:                    yes
        +Admin user to create:                 admin@zimbramail.home.local
******* +Admin Password                        UNSET
        +Anti-virus quarantine user:           virus-quarantine.2hwbbw7msh@zimbramail.ciam.local
        +Enable automated spam training:       yes
        +Spam training user:                   spam.jedk1fhggz@zimbramail.home.local
        +Non-spam(Ham) training user:          ham.y4nb2o4bt@zimbramail.home.local
        +SMTP host:                            zimbramail.home.local
        +Web server HTTP port:                 8080
        +Web server HTTPS port:                8443
        +Web server mode:                      https
        +IMAP server port:                     7143
        +IMAP server SSL port:                 7993
        +POP server port:                      7110
        +POP server SSL port:                  7995
        +Use spell check server:               yes
        +Spell server URL:                     http:// zimbramail.home.local :7780/aspell.php
        +Enable version update checks:         TRUE
        +Enable version update notifications:  TRUE
        +Version update notification email:    admin@zimbramail.home.local
        +Version update source email:          admin@zimbramail.home.local
        +Install mailstore (service webapp):   yes
        +Install UI (zimbra,zimbraAdmin webapps): yes
   7) zimbra-spell:                            Enabled
   8) zimbra-proxy:                            Enabled
   9) Default Class of Service Configuration:
   s) Save config to file
   x) Expand menu
   q) Quit
Address unconfigured (**) items  (? - help) 6
Select, or 'r'for previous menu [r] 4
Password for admin@example.com  (min 6 characters): [MFSPcRW18] qwe123
The rest of this menu does not particularly interest us. But. By default, Zimbra will create its own internal domain in the image of its zmhostname (read hostname), that is, it will be the zimbramail.home.local domain. I am satisfied with this option, if you are not, and the domain name must strictly correspond to [home.local], I recommend immediately changing the receiving addresses of Version update notification and Version update source to admin@home.local
7) Then you need to press the [a] button to apply the changes, then agree to save the configuration to a file and press [Enter] again to continue the installation.
The system did not freeze after the word “done”, it waits for the key to be pressed.
Text output
Select from menu, or press 'a' to apply config (? - help) a
Save configuration data to a file? [Yes]
Save config in file: [/opt/zimbra/config.10925]
Saving config in /opt/zimbra/config.10925...done.
Next, the installation script works, after which it offers to press any key to continue
8) After the installation is completed, you need to open the necessary ports in the firewall. The list of ports can be found in the developer’s wiki by reference
9) I also strongly recommend that you make sure that Zimbra understood everything correctly, and her zmhostname matches the server’s hostname:
$ su – zimbra
$ zmhostname
  zimbramail.home.local
If the name does not match, we do the following:
a) first of all, we check if DNS A and MX records are in our new zmhostname, if not, create them
b)
$ su – zimbra
/opt/zimbra/libexec/zmsetservername -n [servername]
c) clean zmloggerhostmap:
$ zmloggerhostmapThis command lists all Hostname Map.
Delete with the command:
$ zmloggerhostmap -d localhost localhost.localdomainwhere localhost and localhost.localdomain need to be replaced with a string from the Hostname Map list
and then restarted Zimbra
10) Start the server:
$ su – zimbra
$ zmcontrol start
Text output
 Host zimbramail.home.local
    Starting zmconfigd...Done.
    Starting logger...Done.
    Starting mailbox...Done.
    Starting memcached...Done.
    Starting proxy...Done.
    Starting amavis...Done.
    Starting antispam...Done.
    Starting antivirus...Done.
    Starting opendkim...Done.
    Starting snmp...Done.
    Starting spell...Done.
    Starting mta...Done.
    Starting stats...Done.
    Starting service webapp...Done.
    Starting zimbra webapp...Done.
    Starting zimbraAdmin webapp...Done.
    Starting zimlet webapp...Done.
Now the server is available at https: //zimbramail.home.local: 7071

11) In order to be able to access the server, both via https and http, we do the following:
$ su – zimbra
$ zmtlsctl both
$ zmcontrol restart
12) For those who do not have access to the Internet, or if the server lives behind NAT, you will need to also register the command:
$ su – zimbra
$ zmprov ms mail.example.com zimbraMtaLmtpHostLookup native
$ zmcontrol restart
zmprov is a utility for managing server settings, we still need it when we need to configure automatic creation of mailboxes
13) The problem with the self-signed certificate is solved by importing the certificate from the Zimbra server:
$ cd /opt/zimbra/ssl/zimbra/ca
$ openssl x509 -in ca.pem -outform DER -out ~/zimbra-mail-example.cer
with the subsequent export to its client machines or hands, or domain group policies, by installing the certificate in "Trusted Root Certification Authorities".
This completes the installation and initial setup.
4. Configure authorization via LDAP
First of all, you need to create a user in AD to access the directory. I have this ZimbraLDAP, then go to the administrator console via the web and set up authorization in the zimbramail.home.local domain.
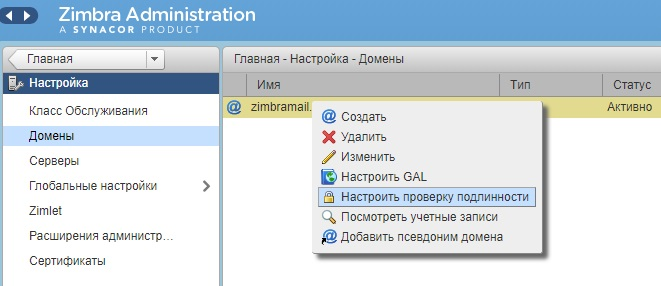
1) Go to “setup” - “domains”, PCM by domain name - “configure authentication”:
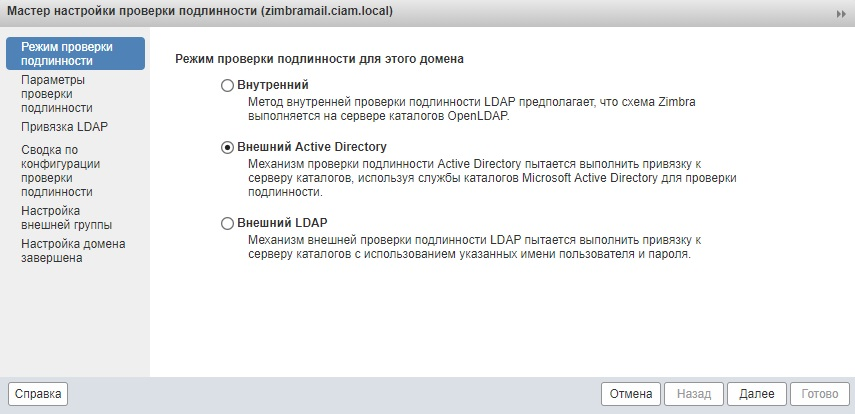
2) Select “External Active Directory”, click next:
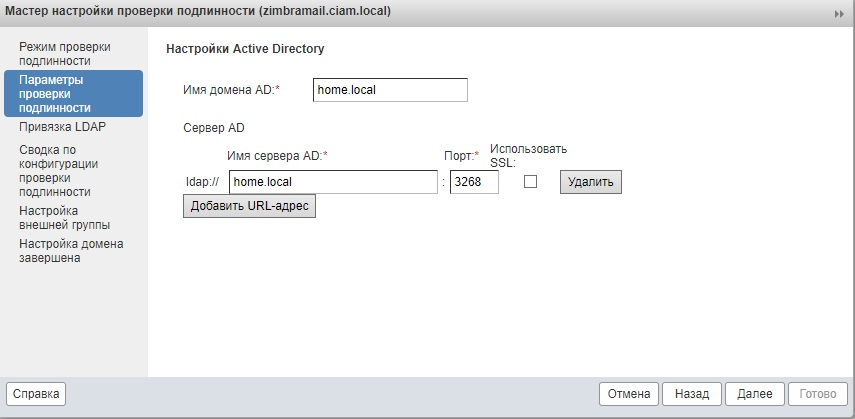
3) In the “Domain name AD” field, enter the domain name, in the field "Ldap: //" write the domain name or the name of the domain controller, or IP domain controller. I have several controllers, so I am writing a domain name. Port left unchanged. Click next:
4) Leave the LDAP binding unchanged.
5) Authentication configuration summary. ZimbraLDAP username, password qwe123. Click the button "test":

Setting up an external group is responsible for exactly where in AD Zimbra will look for users and which filters it will apply. You can apply the filter:
(&(objectClass=user)(objectClass=person))in this case, only objects AD "users" and "persons" will be selected. And the External Group LDAP Search Base parameter will not be used, it will be replaced with “ zimbraAutoProvLdapSearchBase ” during the configuration of the EAGER mode.
Now users will be logged in using their passwords from AD. And even when creating a new mailbox, the password will not be set.
5. Setting up automatic mailbox creation
A bit of theory:
Zimbra knows how to create mailboxes in 3 ways:
EAGER is fully automatic, which at regular intervals scans AD and creates mailboxes for new users.
LAZY - semi-automatic, which creates a mailbox when the user first logs on to the mail server under domain credentials.
MANUAL - manual search and selection of accounts for which you want to create mailboxes.
For obvious reasons, the MANUAL mode is suitable only for small companies with a sluggish turnover of personnel. LAZY-mode is suitable for using mail with a web-interface, without connecting an email client. I was not satisfied with both options, since the task was to automate to the maximum (automatic installation of the Zimbra Desktop client application, so that the user just needed to enter the login password and get access to the mail). Therefore, only EAGER. Yes, it is more convenient, to be honest.
For ease of editing and applying the parameters easier and more convenient to create a file. Let there be / tmp / prov
The file will be the following:
File contents
md zimbramail.home.local zimbraAutoProvAccountNameMap "samAccountName"
md zimbramail.home.local +zimbraAutoProvAttrMap description=description
md zimbramail.home.local +zimbraAutoProvAttrMap displayName=displayName
md zimbramail.home.local +zimbraAutoProvAttrMap givenName=givenName
md zimbramail.home.local +zimbraAutoProvAttrMap cn=cn
md zimbramail.home.local +zimbraAutoProvAttrMap sn=sn
md zimbramail.home.local zimbraAutoProvAuthMech LDAP
md zimbramail.home.local zimbraAutoProvBatchSize 300
md zimbramail.home.local zimbraAutoProvLdapAdminBindDn "CN=ZimbraLDAP,OU=HOME_Users,DC=home,DC=local"
md zimbramail.home.local zimbraAutoProvLdapAdminBindPassword qwe123
md zimbramail.home.local zimbraAutoProvLdapBindDn "admin@zimbramail.home.local"
md zimbramail.home.local zimbraAutoProvLdapSearchBase "CN=HOME_Users,dc=home,dc=local"
md zimbramail.home.local zimbraAutoProvLdapSearchFilter "(&(objectClass=user)(objectClass=person))"
md zimbramail.home.local zimbraAutoProvLdapURL "ldap://home.local:389"
md zimbramail.home.local zimbraAutoProvMode EAGER
md zimbramail.home.local zimbraAutoProvNotificationBody "Your account has been auto provisioned.  Your email address is ${ACCOUNT_ADDRESS}."
md zimbramail.home.local zimbraAutoProvNotificationFromAddress prov-admin@zimbramail.home.local
md zimbramail.home.local zimbraAutoProvNotificationSubject "New account auto provisioned"
ms zimbramail.home.local zimbraAutoProvPollingInterval "1m"
ms zimbramail.home.local +zimbraAutoProvScheduledDomains "zimbramail.home.local"
Some more theory:
This file contains commands for assigning variables. So, for example, the parameter zimbraAutoProvAttrMap cn = cn means that Zimbra will form its boxes in such a way that “the display name (CN in AD) will be substituted in the field“ display name ”in Zimbra.
The zimbraAutoProvLdapAdminBindDn parameter is responsible for the account that Zimbra will use to access the AD directory. In this case, “CN = ZimbraLDAP, OU = HOME_Users, DC = home, DC = local”, which means the following: an account with the display name ZimbraLDAP stored in the OU HOME_Users, which is located in the root of the home.local
zimbraAutoProvLdapAdminBindPassword stores the password from your ZimbraLDAP account
zimbraAutoProvLdapBindDn stores the Zimbra server administrator account for the zimbramail.home.local domain.
zimbraAutoProvLdapSearchBase is responsible for the OU, in which Zimbra will look for domain accounts to create mailboxes. In my case, this is the same container in which the ZimbraLDAP user zimbraAutoProvPollingInterval is
lying. This is the period of access to AD to find new accounts.
With the other parameters, everything is clear.
It’s written on the developer’s website that if you use Zimbra version up to 8.0.8, then for the EAGER mode to work, you need to set the zimbraAutoProvLastPolledTimestamp parameter to the empty “” value, otherwise it will not work more than once.
Next, execute the command:
$ su – zimbra
$ zmprov < /tmp/prov
To view all zmprov values, you can enter the command:
$ su – zimbra
$ zmprov gd zimbramail.home.local
You can edit the parameters using the same utility zmprov, rewriting the values of variables (utility - action - domain - variable - value), can help for debugging:
$ su – zimbra
$ zmprov md zimbramail.home.local zimbraAutoProvBatchSize 200
On the developer's site there is a small sign of troubleshooting of LDAP errors. Logs are autoruns written in /opt/zimbra/log/mailbox.log
Link
6. Installing client applications
Download from the official site msi-package of the latest version. We copy it in the shared network folder accessible to all for reading. You can also copy to Netlogon, but the package weighs more than 100 MB, so I decided to use the balloon.
Zimbra Desktop uses java, which means you need to download it also, and put it in the same folder.
Next to taste - KIX, GPO, hands. I am using GPO.
In the same ball, create the installZimbra.cmd file with the following content:
\\SharedFolder\jrex64.exe INSTALL_SILENT=Enable
\\SharedFolder\ZimbraInstall.msi /q /norestart
Add to the section "computer configuration" - "Windows configuration" - "Scripts (start / stop)" - "Startup" installation script created earlier. The script will install java and Zimbra Desktop in silent mode and will not require a reboot. Next - a rampant fantasy administrator.
But. In order for Zimbra Desktop to be configured on our server, you need to drive the parameters by hand.
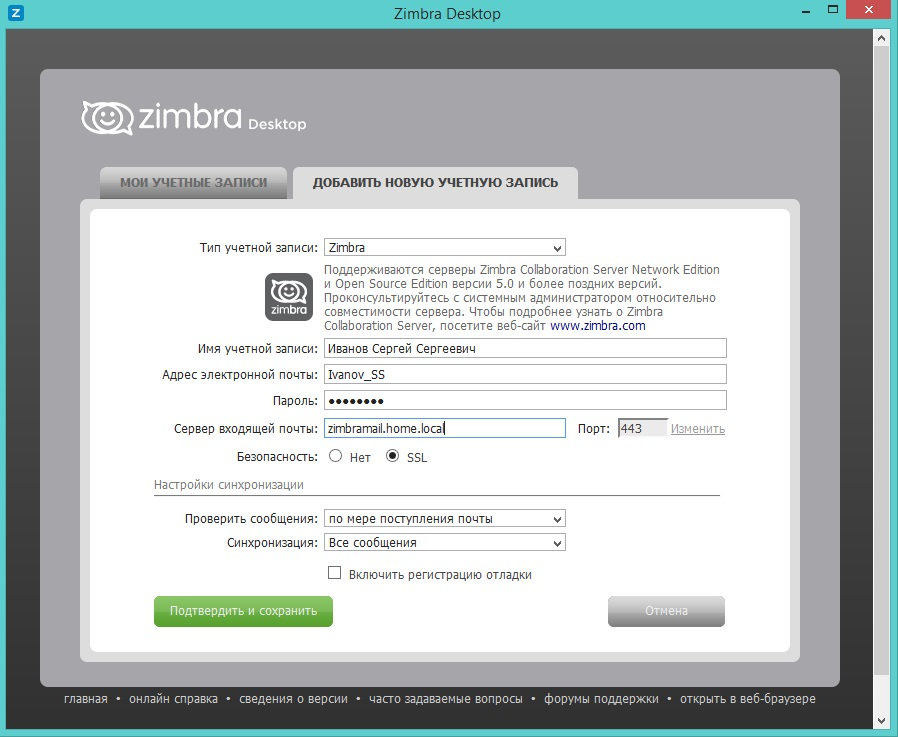
Therefore, users need to create some kind of instruction sheet, in which fields they need to be driven in, and which button to press to get access to the mail. In general - not difficult.
Conclusion
Thus, we very easily and quickly introduced a completely free corporate interaction system based on the Zimbra Collaboration Suite, set up its interaction with the domain, simplifying the creation of mailboxes and getting rid of problems with a bunch of unnecessary accounts.
In my opinion, Zimbra is quite a powerful tool for the corporate segment. But on this occasion the articles have already been written a great many, I will not be sprayed.