ArduPilot for beginners. Installation and configuration on BeagleBone Blue
- Tutorial
We with a team ( which you can join ) like-minded people from Habr are developing a robot for collecting golf balls at the driving range . This is a highly specialized service robot, so we are planning to simultaneously develop a single hardware and software system that could later be used as a basis for other service robots and UGVs .

In the last post, we described why we stopped at this software. When setting up our project, we used the information from the article . Actually, here we present the translation of this brief guide, perhaps for someone it will be useful and help you make your first or next robot.
Before I begin, I want to emphasize that it is worth using BeagleBone Blue (She is still blue). As a rule, we will attach quite a lot of peripherals associated with navigation, and they will not work properly without enough power.
Go to https://rcn-ee.net/rootfs/bb.org/testing/ and select the directory with the latest date. Then open the stretch-console subdirectory . Here you will see several files. Download a file called Something like 'bone-debian-VV-console-armhf-20YY-MM-DD-1gb.img.xz' . This is the minimum distribution of Debian, containing only the most necessary. An alternative is the "IoT" image (IoT = Internet of Things), which comes with additional software and can make work more comfortable if you are new to Linux. It is available from the same site.
We use: https://rcn-ee.net/rootfs/bb.org/testing/2018-10-07/stretch-console/bone-debian-9.5-console-armhf-2018-10-07-1gb.img .xz .
Next, you will need to flash the image on the microSD card. Whether you use Linux or Windows, I highly recommend a program called Etcher for this task ( https://etcher.io/ ).
Now you can download BeagleBone Blue from the microSD card. It is beyond the scope of this document to describe in detail all methods of interaction, but often this is achieved by connecting via a micro USB cable either via SSH (to 'debian@192.168.7.2', password 'temppwd') or via the COM port ( user for Debian ', password' temppwd) in a program like minicom or PuTTY. This is a connection to the Linux console through the COM port. UART1 on BBB builds always zabinden console, first U-boot, and then Linux. More information can be found here: https://beagleboard.org/blue
BeagleBone drivers come with Windows 10. In BBB Linux, as a universal USB COM port, it may not pick up. If you have problems, try the following:
Hope you are logged in at the command prompt now. We will start by allowing the debian user to run sudo without having to enter a password every (subsequent) time:
The next job is to upgrade and install software using an available internet connection, so it's time to set up connman for Wi-Fi access. I do it because it will facilitate the work in the future. First, write down your router's SSID and WiFi password. Then enter the following:
The answer will look something like this: 'wifi_38d279e099a8_4254487562142d4355434b_managed_psk'. If you can't see anything, try again — you probably made a typo.
Now, using this network ID, we are going to enter the file directly from the keyboard (stdin) using cat, one line at a time:
Important! Before Ctrl + C, be sure to press Enter, otherwise the entire current line will be lost.
Press Ctrl-C to exit, and then type: exit The
prominent green LED will light up, meaning that Wi-Fi is on. BBBlue is connected to the router, and its IP address on your Wi-Fi network can be found using:
If for any reason you cannot request BBBlue directly, use other methods to find its IP address utilities such as nmap (sudo nmap 192.168.0.0/24) or by logging into your router and looking there.
Now try to connect over SSH using its Wi-Fi IP address. Remember that 192.168.7.2 will also work.
If you can't get WiFi to work with connman, or you just don't want to use connman, you can use the following method. First, enter: sudo systemctl disable connman. Then, with your SSID and WiFi password, edit / etc / network / interfaces
Now restart BBBlue with: sudo reboot
After logging in, enter: sudo ifup wlan0. The green LED should light up.
If you want BB to have a static IP (say, 192.168.0.99), change "# WiFi w / onboard device (dynamic IP)." To read the / etc / network / interfaces section:
Update and install all the necessary support programs:
Update scripts: cd / opt / scripts & & git pull
Real-time kernel currently has errors! Use the following fix: Specify Ti real-time kernel 4_4. Do not use 4_14.
Finally, copy the am335x-bone blue.dtb (from the bin directory in this repository) to / boot / dtbs/4.4.113-ti-rt-r149
Install the script on autorun
Set the frequency
Configuring bb-wl18xx-wlan0.service
Configuring bb-wl18xx-wlan0.service
Disable Bluetooth (optional)
Expand the existing microSD card section (/ dev / mmcblk0p1):
Reboot now:
When BeagleBone reboots, we need to create some text files. First, improving the environment configuration file, / etc / default / ardupilot:
(Hint: enter sudoedit / etc / default / ardupilot and insert your own target IP address, for example 192.168.0.13)
This is a fairly typical configuration.
This is the launch option -C maps ArduPilot's "Telem1" serial port (SERIAL1, default 57600) for UART1 in BBBlue. For example, I have an RFDesign radio modem 868x connected to UART1. This is a bi-directional data link with my drone. It sends various telemetry data to the base station and receives commands and RTK differential corrections from the base station.
This is the launch option -A maps ArduPilot's "Console" serial port (SERIAL0, default is 115200) with the protocol, target IP address and a selectable port number. For example, it allows me to receive MAVLink data received via Wi-Fi for test purposes. Really useful, especially since data can immediately go to Mission Planner and QGroundControl.
This is the launch option for -B maps ArduPilot's “GPS” serial port (SERIAL3, default 57600) with Uart2 BBBlue (UART, vaguely marked 'GPS' on the board itself). For example, I have a U-blox NEO-M8P connected to UART2.
There are other possibilities - there are other launch parameters, with predefined port speeds and the ports themselves:
Refer to the official ArduPilot documentation for more details on the various serial ports: http://ardupilot.org/plane/docs/parameters.html?highlight=parameters
Next, we will create the ArduPilot systemd service files, one for ArduCopter, / lib / systemd / system / arducopter.service:
One for ArduPlane, /lib/systemd/system/arduplane.service:
One for ArduRover, /lib/systemd/system/ardurover.service:
What about AntennaTracker, too? Create /lib/systemd/system/antennatracker.service:
Go to the sudo folder mkdir -p / usr / bin / ardupilot
Create a hardware configuration file for ArduPilot, / usr / bin / ardupilot / aphw, which runs before the executable files.
Lines 5-7 include the power supply to the BBBlue + 5V servo, i.e. when you are using the servos. No need for ESC.
Line 8 includes the PRU.
Use sudo chmod 0755 / usr / bin / ardupilot / aphw to set permissions for this file.
Almost got it! Now you should get the latest ArduCopter, ArduPlane, etc. executable files created specifically for the Arm BBBlue architecture and put them in the / usr / bin / ardupilot directory. Mirko Denecke downloaded them on his website here: http://bbbmini.org/download/blue/
Copy to this repository: https://github.com/imfatant/test/blob/master/bin/
Don't forget to set permissions: sudo chmod 0755 / usr / bin / ardupilot / a *
If you find that you need to compile from source, do not worry - it is not so difficult. In addition, this means that you can create your own ArduPilot software.
Picking them up at the BBBlue itself will take too much time. Patrick Poirier explains the BBBMINI process (based on black BeagleBone) on his website. Here is a BBBlue-specific procedure, assuming that you have completed all the steps so far and are in the / home / debian directory:
Patrick also provides instructions for cross-compiling them on a relatively powerful desktop x64 PC in Ubuntu, which is much, much faster.
Depending on which version of software you need,
sudo systemctl enable arducopter.service
or
sudo systemctl enable arduplane.service
or
sudo systemctl enable ardurover.service
or
sudo systemctl enable antennatracker.service
After rebooting, your ArduPilot should start automatically. You will see a flashing red LED!
You can familiarize yourself with the systemctl ( https://www.freedesktop.org/software/systemd/man/systemctl.html ). Some useful command examples are:
The basic minimum configuration is likely to include:
A few words about the connectors, cables and tools that you need. I am going to give a few recommendations, otherwise, if you are a beginner, you can spend a lot of time, effort and money. Mainly used connector type JST-SH 1.0 mm. You should buy several female connectors in 4 and 6 position sizes and crimp contacts. Then get a couple of meters of wires in different colors.
So back to connecting peripheral devices:
R / C receiver: can be turned off at any + 5V contact and GND. All that remains is to connect the SBUS output of the receiver, DSM output or PPM output to one of the two SBUS pins marked in the diagram. The following receivers have been tested and work:
FrSky ( https://www.frsky-rc.com/): R-XSR, XR4SB, X6R, X8R, R9 Slim and R9 Mini (both EU LBT 868 MHz and Universal 915 MHz firmwares).
Spektrum ( https://www.spektrumrc.com/ ): AR7700 DSMX with PPM / SRXL / Remote Rx.
TBS ( http://team-blacksheep.com/ ): 'Full' Crossfire with Nano Rx (Rx set to SBUS mode).
By the way, they talk a lot about “turned SBUS”. In fact, SBUS is just a serial data transfer protocol that Futaba came up with and copied FrSky. He turned upside down compared to the "standard" UART. Fortunately, the Ardupilot Blue expects this inverted SBUS signal, so there is no need for a signal inverter.
GPS receiver: most people use u-blox receivers, especially the NEO-M8N and NEO-M8P. NEO-M8N is cheap and available from Chinese companies such as HobbyKing, usually in the form of a disk. Conveniently, these they contain the receiver itself, a very small ceramic antenna of the patch, and often include a compass. While BBBlue already has a built-in compass (AKM AK8963), the ArduPilot can be configured to use this “external” compass instead of its own to eliminate pickups.
A (much) more expensive alternative to the NEO-M8N is the NEO-M8P. This receiver supports a mode of operation known as “RTK”, or kinematic in real time, which can achieve positioning accuracy of a few centimeters in real time. However, this type of presentation comes at a price about 10 times as expensive as the NEO-M8N, and this is without a base station. Later in the guide I will devote a special section of the M8P.
I2C ArduPilot configuration file: /var/APM/{ArduCopter.stg,ArduPlane.stg,APMrover2.stg,AntennaTracker.stg}
68 = InvenSense MPU-9250 IMU (onboard), 0c = AKM AK8963 compass (onboard), 76 = Bosch BMP280 barometer (onboard).
1e = Honeywell HMC5843 compass (external) - often integrated into u-blox NEO-M8N-based GPS modules.
Download any mission planner (http://firmware.ardupilot.org/Tools/MissionPlanner/MissionPlanner-latest.msi) for Windows or QGroundControl (http://qgroundcontrol.com/) for Linux and Windows. Both of these programs will connect to MAVLink data streams incoming over the network (for example, via UDP port 14550) or via COM ports.
Equipping your drone-based bbblue with a Bluetooth speaker can be fun, provided that the Bluetooth RF transmissions do not interfere with any other systems. BlueZ / PulseAudio / ALSA has a lot of information, but fortunately, it all comes down to something rather simple.
a) first install the necessary software (using the console or an IoT image):
b) Enable Bluetooth (if disabled): sudo systemctl enable bb-wl18xx-bluetooth.service
c) Edit /etc/pulse/default.pa:
d) Reboot: sudo reboot
e) After downloading BBBlue, turn on the Bluetooth column in connection mode:
f) Finally:
That's all! By the way, if you're going to use a speech synthesizer, I recommend Festival.
If you want to help - please write to me in the LAN or VC , FB .
 habrastorage.org/webt/mt/lh/91/mtlh91x8jag1t-ibt_np3uayuke.jpeg
Thank you for reading , ask and criticize us completely.
In the last post, we described why we stopped at this software. When setting up our project, we used the information from the article . Actually, here we present the translation of this brief guide, perhaps for someone it will be useful and help you make your first or next robot.
Before I begin, I want to emphasize that it is worth using BeagleBone Blue (She is still blue). As a rule, we will attach quite a lot of peripherals associated with navigation, and they will not work properly without enough power.
Part 1. Preparing BeagleBone
Go to https://rcn-ee.net/rootfs/bb.org/testing/ and select the directory with the latest date. Then open the stretch-console subdirectory . Here you will see several files. Download a file called Something like 'bone-debian-VV-console-armhf-20YY-MM-DD-1gb.img.xz' . This is the minimum distribution of Debian, containing only the most necessary. An alternative is the "IoT" image (IoT = Internet of Things), which comes with additional software and can make work more comfortable if you are new to Linux. It is available from the same site.
We use: https://rcn-ee.net/rootfs/bb.org/testing/2018-10-07/stretch-console/bone-debian-9.5-console-armhf-2018-10-07-1gb.img .xz .
Next, you will need to flash the image on the microSD card. Whether you use Linux or Windows, I highly recommend a program called Etcher for this task ( https://etcher.io/ ).
Now you can download BeagleBone Blue from the microSD card. It is beyond the scope of this document to describe in detail all methods of interaction, but often this is achieved by connecting via a micro USB cable either via SSH (to 'debian@192.168.7.2', password 'temppwd') or via the COM port ( user for Debian ', password' temppwd) in a program like minicom or PuTTY. This is a connection to the Linux console through the COM port. UART1 on BBB builds always zabinden console, first U-boot, and then Linux. More information can be found here: https://beagleboard.org/blue
BeagleBone drivers come with Windows 10. In BBB Linux, as a universal USB COM port, it may not pick up. If you have problems, try the following:
sudo -s
cat >/etc/udev/rules.d/73-beaglebone.rules <<EOF
ACTION=="add", SUBSYSTEM=="usb", ENV{DEVTYPE}=="usb_interface", ATTRS{idVendor}=="0403", ATTRS{idProduct}=="a6d0", DRIVER=="", RUN+="/sbin/modprobe -b ftdi_sio"
ACTION=="add", SUBSYSTEM=="drivers", ENV{DEVPATH}=="/bus/usb-serial/drivers/ftdi_sio", ATTR{new_id}="0403 a6d0"
ACTION=="add", KERNEL=="ttyUSB*", ATTRS{interface}=="BeagleBone", ATTRS{bInterfaceNumber}=="00", SYMLINK+="beaglebone-jtag"
ACTION=="add", KERNEL=="ttyUSB*", ATTRS{interface}=="BeagleBone", ATTRS{bInterfaceNumber}=="01", SYMLINK+="beaglebone-serial"
EOF
udevadm control --reload-rules
exit
Hope you are logged in at the command prompt now. We will start by allowing the debian user to run sudo without having to enter a password every (subsequent) time:
echo"debian ALL=(ALL) NOPASSWD: ALL" | sudo tee -a /etc/sudoers.d/debian >/dev/null
The next job is to upgrade and install software using an available internet connection, so it's time to set up connman for Wi-Fi access. I do it because it will facilitate the work in the future. First, write down your router's SSID and WiFi password. Then enter the following:
 sudo -s
 connmanctl services | grep '<your SSID>' | grep -Po 'wifi_[^ ]+'
The answer will look something like this: 'wifi_38d279e099a8_4254487562142d4355434b_managed_psk'. If you can't see anything, try again — you probably made a typo.
Now, using this network ID, we are going to enter the file directly from the keyboard (stdin) using cat, one line at a time:
 cat >/var/lib/connman/wifi.config
 [service_<your hash>]
 Type = wifi
 Security = wpa2
 Name = <your SSID>
 Passphrase = <your WiFi password>
Important! Before Ctrl + C, be sure to press Enter, otherwise the entire current line will be lost.
Press Ctrl-C to exit, and then type: exit The
prominent green LED will light up, meaning that Wi-Fi is on. BBBlue is connected to the router, and its IP address on your Wi-Fi network can be found using:
ip addr show wlan0
If for any reason you cannot request BBBlue directly, use other methods to find its IP address utilities such as nmap (sudo nmap 192.168.0.0/24) or by logging into your router and looking there.
Now try to connect over SSH using its Wi-Fi IP address. Remember that 192.168.7.2 will also work.
If you can't get WiFi to work with connman, or you just don't want to use connman, you can use the following method. First, enter: sudo systemctl disable connman. Then, with your SSID and WiFi password, edit / etc / network / interfaces
# The loopback network interface.
auto lo
iface lo inet loopback
# WiFi w/ onboard device (dynamic IP).
auto wlan0
iface wlan0 inet dhcp
wpa-ssid "<your SSID>"
wpa-psk "<your WiFi password>"
dns-nameservers 8.8.8.8 1.1.1.1
# Ethernet/RNDIS gadget (g_ether).# Used by: /opt/scripts/boot/autoconfigure_usb0.sh
iface usb0 inet static
address 192.168.7.2
netmask 255.255.255.252
network 192.168.7.0
gateway 192.168.7.1
Now restart BBBlue with: sudo reboot
After logging in, enter: sudo ifup wlan0. The green LED should light up.
If you want BB to have a static IP (say, 192.168.0.99), change "# WiFi w / onboard device (dynamic IP)." To read the / etc / network / interfaces section:
# WiFi w/ onboard device (static IP).
auto wlan0
iface wlan0 inet static
wpa-ssid "<your SSID>"
wpa-psk "<your WiFi password>"
address 192.168.0.99  # <--- The desired static IP address of the BBBlue.
netmask 255.255.255.0
gateway 192.168.0.1  # <--- The address of your router.
dns-nameservers 8.8.8.8 1.1.1.1
Update and install all the necessary support programs:
sudo apt-get -y update
sudo apt-get -y dist-upgrade
sudo apt-get install -y cpufrequtils git
Update scripts: cd / opt / scripts & & git pull
Real-time kernel currently has errors! Use the following fix: Specify Ti real-time kernel 4_4. Do not use 4_14.
sudo /opt/scripts/tools/update_kernel.sh --ti-rt-channel --lts-4_4
sudo sed -i 's|uboot_overlay_pru=/lib/firmware/AM335X-PRU-RPROC-4-14-TI-00A0.dtbo|#uboot_overlay_pru=/lib/firmware/AM335X-PRU-RPROC-4-14-TI-00A0.dtbo|g' /boot/uEnv.txt
sudo sed -i 's|#uboot_overlay_pru=/lib/firmware/AM335X-PRU-RPROC-4-4-TI-00A0.dtbo|uboot_overlay_pru=/lib/firmware/AM335X-PRU-RPROC-4-4-TI-00A0.dtbo|g' /boot/uEnv.txt
Finally, copy the am335x-bone blue.dtb (from the bin directory in this repository) to / boot / dtbs/4.4.113-ti-rt-r149
Install the script on autorun
sudo sed -i 's/#dtb=/dtb=am335x-boneblue.dtb/g' /boot/uEnv.txt
Set the frequency
sudo sed -i 's/GOVERNOR="ondemand"/GOVERNOR="performance"/g' /etc/init.d/cpufrequtils
Configuring bb-wl18xx-wlan0.service
sudo sed -i 's/RestartSec=5/RestartSec=1/g' /lib/systemd/system/bb-wl18xx-wlan0.service
Configuring bb-wl18xx-wlan0.service
sudo sed -i 's/RestartSec=5/RestartSec=1/g' /lib/systemd/system/bb-wl18xx-wlan0.service
Disable Bluetooth (optional)
sudo systemctl disable bb-wl18xx-bluetooth.service
Expand the existing microSD card section (/ dev / mmcblk0p1):
sudo /opt/scripts/tools/grow_partition.sh
Reboot now:
sudo reboot
Part 2. Installing ArduPilot on BeagleBone
When BeagleBone reboots, we need to create some text files. First, improving the environment configuration file, / etc / default / ardupilot:
(Hint: enter sudoedit / etc / default / ardupilot and insert your own target IP address, for example 192.168.0.13)
TELEM1="-C /dev/ttyO1"
TELEM2="-A udp:<target IP address>:14550"
GPS="-B /dev/ttyS2"
This is a fairly typical configuration.
This is the launch option -C maps ArduPilot's "Telem1" serial port (SERIAL1, default 57600) for UART1 in BBBlue. For example, I have an RFDesign radio modem 868x connected to UART1. This is a bi-directional data link with my drone. It sends various telemetry data to the base station and receives commands and RTK differential corrections from the base station.
This is the launch option -A maps ArduPilot's "Console" serial port (SERIAL0, default is 115200) with the protocol, target IP address and a selectable port number. For example, it allows me to receive MAVLink data received via Wi-Fi for test purposes. Really useful, especially since data can immediately go to Mission Planner and QGroundControl.
This is the launch option for -B maps ArduPilot's “GPS” serial port (SERIAL3, default 57600) with Uart2 BBBlue (UART, vaguely marked 'GPS' on the board itself). For example, I have a U-blox NEO-M8P connected to UART2.
There are other possibilities - there are other launch parameters, with predefined port speeds and the ports themselves:
Switch -A  -->  "Console", SERIAL0, default 115200
Switch -B  -->  "GPS", SERIAL3, default 57600
Switch -C  -->  "Telem1", SERIAL1, default 57600
Switch -D  -->  "Telem2", SERIAL2, default 38400
Switch -E  -->  Unnamed, SERIAL4, default 38400
Switch -F  -->  Unnamed, SERIAL5, default 57600
Refer to the official ArduPilot documentation for more details on the various serial ports: http://ardupilot.org/plane/docs/parameters.html?highlight=parameters
Next, we will create the ArduPilot systemd service files, one for ArduCopter, / lib / systemd / system / arducopter.service:
[Unit]
Description=ArduCopter Service
After=networking.service
StartLimitIntervalSec=0
Conflicts=arduplane.service ardurover.service antennatracker.service
[Service]
EnvironmentFile=/etc/default/ardupilot
ExecStartPre=/usr/bin/ardupilot/aphw
ExecStart=/usr/bin/ardupilot/arducopter $TELEM1$TELEM2$GPS
Restart=on-failure
RestartSec=1
[Install]
WantedBy=multi-user.target
One for ArduPlane, /lib/systemd/system/arduplane.service:
[Unit]
Description=ArduPlane Service
After=networking.service
StartLimitIntervalSec=0
Conflicts=arducopter.service ardurover.service antennatracker.service
[Service]
EnvironmentFile=/etc/default/ardupilot
ExecStartPre=/usr/bin/ardupilot/aphw
ExecStart=/usr/bin/ardupilot/arduplane $TELEM1$TELEM2$GPS
Restart=on-failure
RestartSec=1
[Install]
WantedBy=multi-user.target
One for ArduRover, /lib/systemd/system/ardurover.service:
[Unit]
Description=ArduRover Service
After=networking.service
StartLimitIntervalSec=0
Conflicts=arducopter.service arduplane.service antennatracker.service
[Service]
EnvironmentFile=/etc/default/ardupilot
ExecStartPre=/usr/bin/ardupilot/aphw
ExecStart=/usr/bin/ardupilot/ardurover $TELEM1$TELEM2$GPS
Restart=on-failure
RestartSec=1
[Install]
WantedBy=multi-user.target
What about AntennaTracker, too? Create /lib/systemd/system/antennatracker.service:
[Unit]
Description=AntennaTracker Service
After=networking.service
StartLimitIntervalSec=0
Conflicts=arducopter.service arduplane.service ardurover.service
[Service]
EnvironmentFile=/etc/default/ardupilot
ExecStartPre=/usr/bin/ardupilot/aphw
ExecStart=/usr/bin/ardupilot/antennatracker $TELEM1$TELEM2$GPS
Restart=on-failure
RestartSec=1
[Install]
WantedBy=multi-user.target
Go to the sudo folder mkdir -p / usr / bin / ardupilot
Create a hardware configuration file for ArduPilot, / usr / bin / ardupilot / aphw, which runs before the executable files.
#!/bin/bash# aphw# ArduPilot hardware configuration.
/bin/echo 80 >/sys/class/gpio/export
/bin/echo out >/sys/class/gpio/gpio80/direction
/bin/echo 1 >/sys/class/gpio/gpio80/value
/bin/echo pruecapin_pu >/sys/devices/platform/ocp/ocp:P8_15_pinmux/state
Lines 5-7 include the power supply to the BBBlue + 5V servo, i.e. when you are using the servos. No need for ESC.
Line 8 includes the PRU.
Use sudo chmod 0755 / usr / bin / ardupilot / aphw to set permissions for this file.
Almost got it! Now you should get the latest ArduCopter, ArduPlane, etc. executable files created specifically for the Arm BBBlue architecture and put them in the / usr / bin / ardupilot directory. Mirko Denecke downloaded them on his website here: http://bbbmini.org/download/blue/
Copy to this repository: https://github.com/imfatant/test/blob/master/bin/
Don't forget to set permissions: sudo chmod 0755 / usr / bin / ardupilot / a *
If you find that you need to compile from source, do not worry - it is not so difficult. In addition, this means that you can create your own ArduPilot software.
Picking them up at the BBBlue itself will take too much time. Patrick Poirier explains the BBBMINI process (based on black BeagleBone) on his website. Here is a BBBlue-specific procedure, assuming that you have completed all the steps so far and are in the / home / debian directory:
sudo apt-get install g++ make pkg-config python python-dev python-lxml python-pip
sudo pip install future
git clone https://github.com/ArduPilot/ardupilot
cd ardupilot
git checkout Copter-3.6  # <-- For ArduCopter.
git submodule update --init --recursive
./waf configure --board=blue  # <-- BeagleBone Blue.
./waf
sudo cp ./build/blue/bin/a* /usr/bin/ardupilot
Patrick also provides instructions for cross-compiling them on a relatively powerful desktop x64 PC in Ubuntu, which is much, much faster.
Depending on which version of software you need,
sudo systemctl enable arducopter.service
or
sudo systemctl enable arduplane.service
or
sudo systemctl enable ardurover.service
or
sudo systemctl enable antennatracker.service
After rebooting, your ArduPilot should start automatically. You will see a flashing red LED!
You can familiarize yourself with the systemctl ( https://www.freedesktop.org/software/systemd/man/systemctl.html ). Some useful command examples are:
sudo systemctl disable ...
sudo systemctl start ...
sudo systemctl stop ...
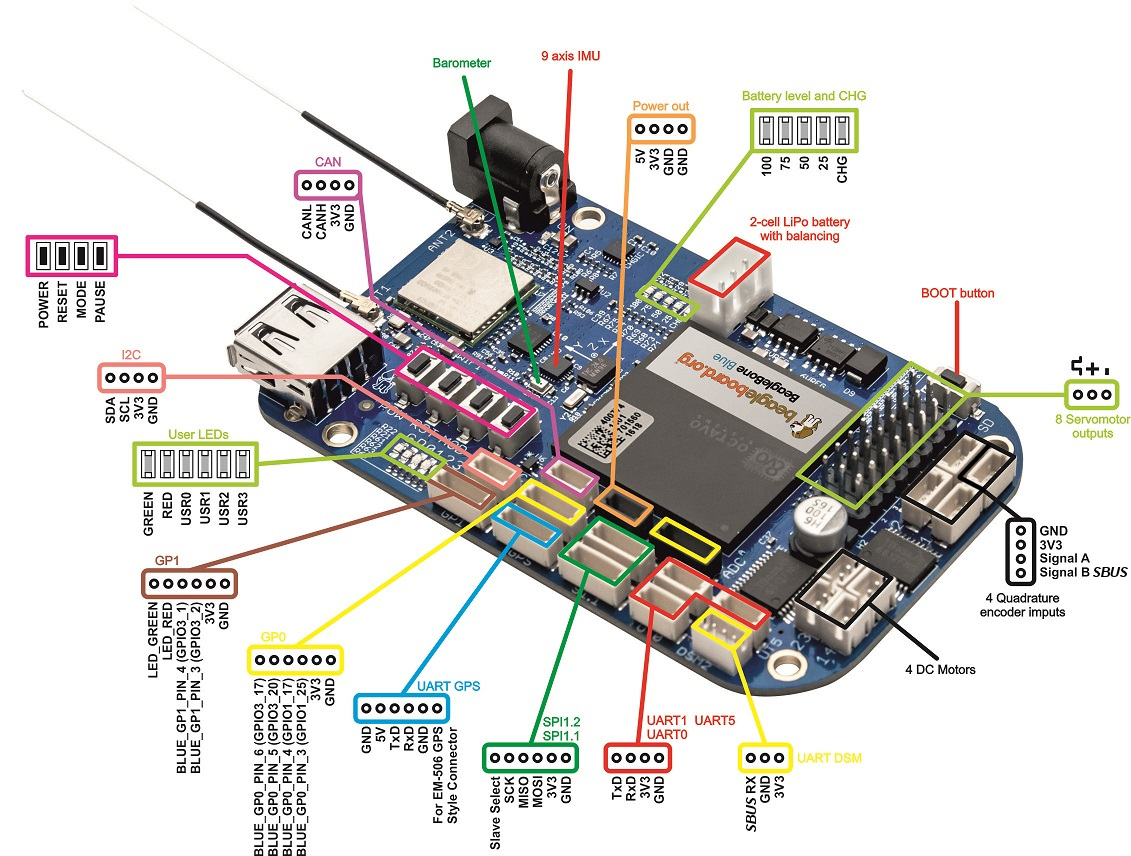
Part 3. Connection of peripheral devices
The basic minimum configuration is likely to include:
- R / C receiver.
- GPS receiver (with or without integrated compass).
- Radio modem for bidirectional data transmission channel, especially over long distances.
- (BBBlue's built-in WiFi is great for debugging and testing at close range if 2.4 GHz is available, but a dedicated bidirectional data channel is recommended for something more interesting. Also keep in mind the type and placement of the antennas that use all these elements. )
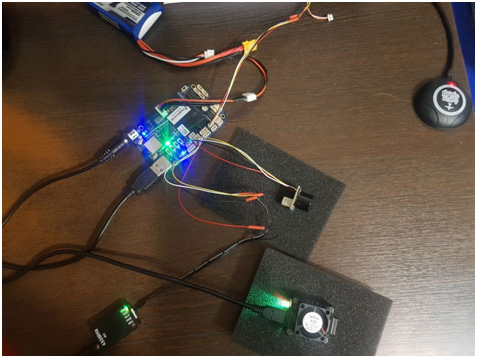
A few words about the connectors, cables and tools that you need. I am going to give a few recommendations, otherwise, if you are a beginner, you can spend a lot of time, effort and money. Mainly used connector type JST-SH 1.0 mm. You should buy several female connectors in 4 and 6 position sizes and crimp contacts. Then get a couple of meters of wires in different colors.
So back to connecting peripheral devices:
R / C receiver: can be turned off at any + 5V contact and GND. All that remains is to connect the SBUS output of the receiver, DSM output or PPM output to one of the two SBUS pins marked in the diagram. The following receivers have been tested and work:
FrSky ( https://www.frsky-rc.com/): R-XSR, XR4SB, X6R, X8R, R9 Slim and R9 Mini (both EU LBT 868 MHz and Universal 915 MHz firmwares).
Spektrum ( https://www.spektrumrc.com/ ): AR7700 DSMX with PPM / SRXL / Remote Rx.
TBS ( http://team-blacksheep.com/ ): 'Full' Crossfire with Nano Rx (Rx set to SBUS mode).
By the way, they talk a lot about “turned SBUS”. In fact, SBUS is just a serial data transfer protocol that Futaba came up with and copied FrSky. He turned upside down compared to the "standard" UART. Fortunately, the Ardupilot Blue expects this inverted SBUS signal, so there is no need for a signal inverter.
GPS receiver: most people use u-blox receivers, especially the NEO-M8N and NEO-M8P. NEO-M8N is cheap and available from Chinese companies such as HobbyKing, usually in the form of a disk. Conveniently, these they contain the receiver itself, a very small ceramic antenna of the patch, and often include a compass. While BBBlue already has a built-in compass (AKM AK8963), the ArduPilot can be configured to use this “external” compass instead of its own to eliminate pickups.
A (much) more expensive alternative to the NEO-M8N is the NEO-M8P. This receiver supports a mode of operation known as “RTK”, or kinematic in real time, which can achieve positioning accuracy of a few centimeters in real time. However, this type of presentation comes at a price about 10 times as expensive as the NEO-M8N, and this is without a base station. Later in the guide I will devote a special section of the M8P.
I2C ArduPilot configuration file: /var/APM/{ArduCopter.stg,ArduPlane.stg,APMrover2.stg,AntennaTracker.stg}
sudo apt-get install i2c-tools
sudo i2cdetect -r -y 0 sudo i2cdetect -r -y 1 sudo i2cdetect -r -y 2
$ sudo i2cdetect -r -y 2
0  1  2  3  4  5  6  7  8  9  a  b  c  d  e  f
00:          -- -- -- -- -- -- -- -- -- 0c -- -- --
10: -- -- -- -- -- -- -- -- -- -- -- -- -- -- -- --
20: -- -- -- -- -- -- -- -- -- -- -- -- -- -- -- --
30: -- -- -- -- -- -- -- -- -- -- -- -- -- -- -- --
40: -- -- -- -- -- -- -- -- -- -- -- -- -- -- -- --
50: -- -- -- -- -- -- -- -- -- -- -- -- -- -- -- --
60: -- -- -- -- -- -- -- -- 68 -- -- -- -- -- -- --
70: -- -- -- -- -- -- 76 --
68 = InvenSense MPU-9250 IMU (onboard), 0c = AKM AK8963 compass (onboard), 76 = Bosch BMP280 barometer (onboard).
$ sudo i2cdetect -r -y 1
0  1  2  3  4  5  6  7  8  9  a  b  c  d  e  f
00:          -- -- -- -- -- -- -- -- -- -- -- -- --
10: -- -- -- -- -- -- -- -- -- -- -- -- -- -- 1e --
20: -- -- -- -- -- -- -- -- -- -- -- -- -- -- -- --
30: -- -- -- -- -- -- -- -- -- -- -- -- -- -- -- --
40: -- -- -- -- -- -- -- -- -- -- -- -- -- -- -- --
50: -- -- -- -- -- -- -- -- -- -- -- -- -- -- -- --
60: -- -- -- -- -- -- -- -- -- -- -- -- -- -- -- --
70: -- -- -- -- -- -- -- --
1e = Honeywell HMC5843 compass (external) - often integrated into u-blox NEO-M8N-based GPS modules.
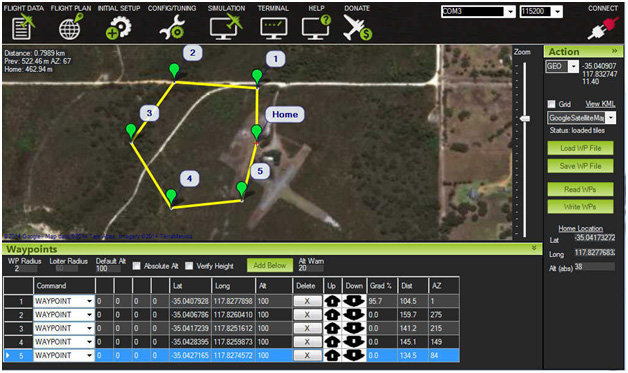
Getting Started with Ground Management Station Software (GCS)
Download any mission planner (http://firmware.ardupilot.org/Tools/MissionPlanner/MissionPlanner-latest.msi) for Windows or QGroundControl (http://qgroundcontrol.com/) for Linux and Windows. Both of these programs will connect to MAVLink data streams incoming over the network (for example, via UDP port 14550) or via COM ports.
Additionally
Equipping your drone-based bbblue with a Bluetooth speaker can be fun, provided that the Bluetooth RF transmissions do not interfere with any other systems. BlueZ / PulseAudio / ALSA has a lot of information, but fortunately, it all comes down to something rather simple.
a) first install the necessary software (using the console or an IoT image):
sudo apt-get install -y bluetooth pulseaudio pulseaudio-module-bluetooth alsa-utils
b) Enable Bluetooth (if disabled): sudo systemctl enable bb-wl18xx-bluetooth.service
c) Edit /etc/pulse/default.pa:
### Automatically suspend sinks/sources that become idle for too long# load-module module-suspend-on-idled) Reboot: sudo reboot
e) After downloading BBBlue, turn on the Bluetooth column in connection mode:
   bluetoothctl
   scan on
   agent on
   default-agent
   pair <Bluetooth speaker's MAC address>  # <--- e.g. AB:58:EC:5C:0C:03
   connect <Bluetooth speaker's MAC address>  # <--- Sometimes unnecessary.
   trust <Bluetooth speaker's MAC address>
   scan off
   exit
f) Finally:
   pulseaudio --start
   echo"connect <Bluetooth speaker's MAC address>" | bluetoothctl
   pactl list  # <--- Use this to check that your Bluetooth speaker has been picked up by PulseAudio.
   pacmd set-card-profile 0 a2dp_sink
   aplay /usr/share/sounds/alsa/Front_Center.wav
That's all! By the way, if you're going to use a speech synthesizer, I recommend Festival.
If you want to help - please write to me in the LAN or VC , FB .
habrastorage.org/webt/mt/lh/91/mtlh91x8jag1t-ibt_np3uayuke.jpegThank you for reading , ask and criticize us completely.