Deploying Cisco ISE in Hyper-V and More
Learning in IT is a permanent process. An IT specialist is simply obliged to learn every day in order not only to learn something new, but also not to lose the old. And since I started my article with the topic of training, I want to thank the team of the CCIE project for a year for the excellent opportunity to prepare for the CCIE exam in a team of like-minded people and under the strict guidance of competent specialists / trainers.
In preparation for the 300-208 SISAS exam from the CCNP Security track, you'll have to deal with a network security product such as the Cisco Identity Service Engine. Having studied the theory, you will definitely want to go to practice. A virtual machine is perfect for this. But the virtual machine image is available only for VMWare, which, in principle, is not a problem, but it introduces some inconvenience. For example, I have 2 OS installed - Windows 10 and Ubuntu 15.10, and I prefer to use native Hyper-V on Windows or integrated into GNS3 VirtualBox on Ubuntu. In this case, you can use the Cisco ISE Clean Install option from the iso image available on cisco.com.
After the first attempts to install ISE in one of the officially unsupported hypervisors, it turned out that this is not so simple. The installer closes at the very beginning of the installation with a tex error that ISE cannot be installed in this environment. But this is not a sentence ... So, we have an iso image and we are ready to proceed with the installation of Cisco ISE 2.0 in a Hyper-V environment.
Installation is carried out by the Anaconda installer using Kickstart , the entire process of preliminary compatibility checking is implemented in a kickstart file. We start by unpacking the iso image with any archiver into the local drive directory. After the unpacking is completed, go to the directory with the unpacked image and find the ks.cfg file. Open it in a text editor and make changes:
1. It is necessary to comment out all halt calls - add # before all lines / sbin / halt -f ;
2. It is necessary to replace all calls to the cars_udi_util application with various parameters with static entries:
Lines of the form:
It is necessary to replace with lines of the form:
3. It is also necessary to rigidly specify the UDI_PID in the first line of the validate_hwinfo () function . To do this, after the line "validate_hwinfo () {" insert a new line of the form UDI_PID = "Cisco-VM-SPID" .
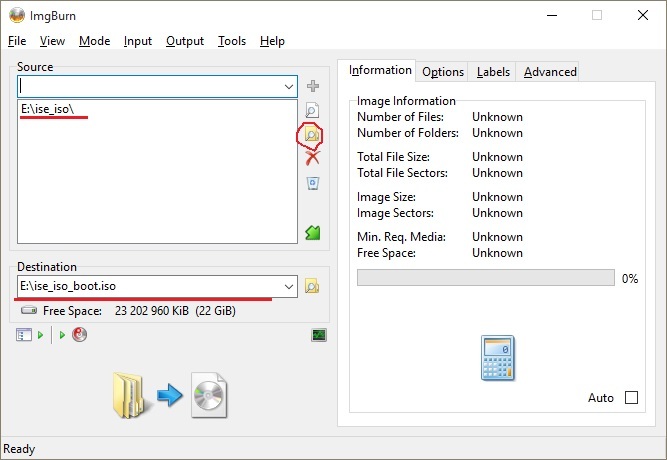
Save all changes to the source file. Now you need to rebuild the iso file. For this task, I recommend using the ImgBurn application . After installing the application, run it and select the menu “Create image file from files / folders”.
In the window that opens, specify the source folder with the files of the previously extracted iso image (Source) and the destination file (Destination).
Go to the “Options” tab and set the following values:

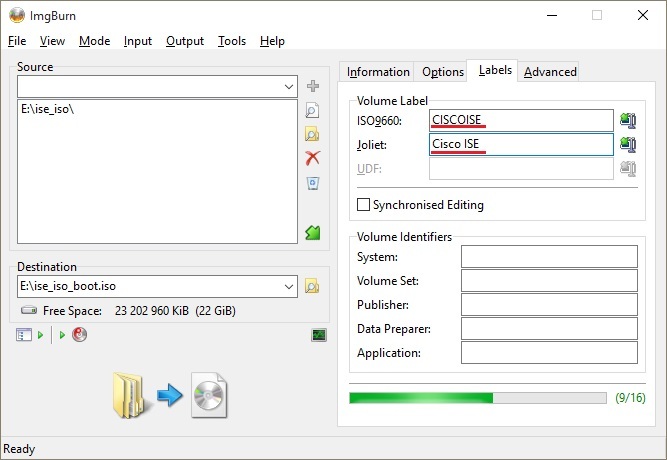
On the Labels tab, you must specify volume labels.
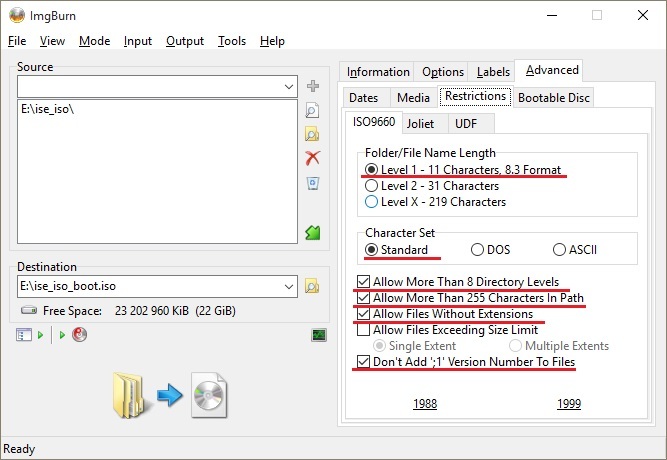
Go to the “Advanced” tab. First, set the restrictions on the “Restrictions -> ISO9660” tab:
Go to the tab "Restrictions -> Joliet":

We complete the configuration on the “Bootable Disc” tab:
After that, click the button at the bottom of the window on the left and the process of creating a bootable iso image begins.
Now that we have the modified Cisco ISE installation image, we can proceed with the installation. We create the first generation Hyper-V virial machine that meets the minimum parameters . We select the created iso image as bootable media, save the virtual machine configuration and start it.

At startup, a series of checks will be launched that will return scary error messages to the virtual machine console. They are not afraid of them, because you and I previously commented on all the halt calls in the ks script. Installation is quite simple and should not cause problems, the official guide is located here .
After the installation is complete, the virtual machine will reboot and after startup we will be asked to enter the word setup for the initial software configuration. Next, a script will be launched, which in the dialog mode will perform the basic configuration and deploy the database schema. This process usually takes 15-20 minutes. At the end, the machine will restart. We now have a working trial Cisco ISE with a trial license deployed in a Hyper-V virtual environment.

True, there are licensing nuances - the software incorrectly determines VID / PID / Serial, working under Hyper-V. But it is solvable ...

We will need an iso image of CentOS 7 Minimal, the current version is available here . Download the image and specify it as the boot for our virtual machine. We reboot the machine and find ourselves in the boot menu of the CentOS installer. Select the menu item "Troubleshooting -> Rescue a CentOS system". We will be asked to automatically detect and mount the existing file system (by default, the FS will be mounted in the / mnt / sysimage / directory). Go to the / mnt / sysimage / opt / system / bin / directory :
Rename the existing cars_udi_util application to cars_udi_util.bak :
Create a shell script cars_udi_util or copy it from an external source:
Set the rights to the cars_udi_util file
Turn off the virtual machine, unmount the bootable iso image of CentOS 7 Minimal, and start the VM again. After starting all the services, we try to connect to the Cisco ISE web interface and check the VID / PID / Serial.

Now we can install the officially acquired licenses in Cisco ISE running in a virtual Hyper-V environment.
In preparation for the 300-208 SISAS exam from the CCNP Security track, you'll have to deal with a network security product such as the Cisco Identity Service Engine. Having studied the theory, you will definitely want to go to practice. A virtual machine is perfect for this. But the virtual machine image is available only for VMWare, which, in principle, is not a problem, but it introduces some inconvenience. For example, I have 2 OS installed - Windows 10 and Ubuntu 15.10, and I prefer to use native Hyper-V on Windows or integrated into GNS3 VirtualBox on Ubuntu. In this case, you can use the Cisco ISE Clean Install option from the iso image available on cisco.com.
After the first attempts to install ISE in one of the officially unsupported hypervisors, it turned out that this is not so simple. The installer closes at the very beginning of the installation with a tex error that ISE cannot be installed in this environment. But this is not a sentence ... So, we have an iso image and we are ready to proceed with the installation of Cisco ISE 2.0 in a Hyper-V environment.
Installation is carried out by the Anaconda installer using Kickstart , the entire process of preliminary compatibility checking is implemented in a kickstart file. We start by unpacking the iso image with any archiver into the local drive directory. After the unpacking is completed, go to the directory with the unpacked image and find the ks.cfg file. Open it in a text editor and make changes:
1. It is necessary to comment out all halt calls - add # before all lines / sbin / halt -f ;
2. It is necessary to replace all calls to the cars_udi_util application with various parameters with static entries:
Lines of the form:
UDI_PID=`/sbin/cars_udi_util -p`
UDI_VID=`/sbin/cars_udi_util -v`
UDI_SN=`/sbin/cars_udi_util -s`
It is necessary to replace with lines of the form:
UDI_PID="Cisco-VM-SPID"
UDI_VID="1.0"
UDI_SN="123456789"
3. It is also necessary to rigidly specify the UDI_PID in the first line of the validate_hwinfo () function . To do this, after the line "validate_hwinfo () {" insert a new line of the form UDI_PID = "Cisco-VM-SPID" .
Save all changes to the source file. Now you need to rebuild the iso file. For this task, I recommend using the ImgBurn application . After installing the application, run it and select the menu “Create image file from files / folders”.
In the window that opens, specify the source folder with the files of the previously extracted iso image (Source) and the destination file (Destination).
Go to the “Options” tab and set the following values:
File System: ISO9660 + Joliet
Recurse Subdirectories: Enabled
Include Hidden Files: Enabled
Include System Files: Enabled
On the Labels tab, you must specify volume labels.
Go to the “Advanced” tab. First, set the restrictions on the “Restrictions -> ISO9660” tab:
Folder/File Name Length: Level 1 - 11 Charachters, 8.3 Format
Charachter Set: Standard
Allow More Than 8 Directory Levels: Enabled
Allow More Than 255 Characters In Path: Enabled
Allow Files Without Extensions: Enabled
Don't Add ';1' Version Number To Files: Enabled
Go to the tab "Restrictions -> Joliet":
Folder/File Name Length: Level 1 - 64 Characters
Allow Files Without Extensions: Enabled
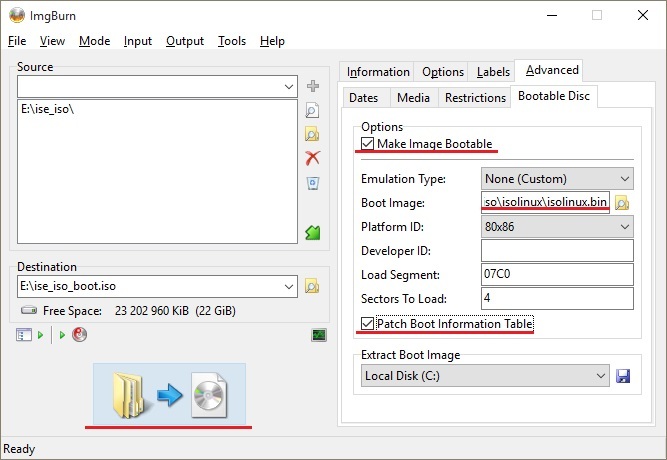
We complete the configuration on the “Bootable Disc” tab:
Make Image Bootable: Enabled
Boot Image: указываем путь к файлу isolinux.bin (находится в папке isolinux распакованного iso образа)
Patch Boot Information Table: Enabled
After that, click the button at the bottom of the window on the left and the process of creating a bootable iso image begins.
Now that we have the modified Cisco ISE installation image, we can proceed with the installation. We create the first generation Hyper-V virial machine that meets the minimum parameters . We select the created iso image as bootable media, save the virtual machine configuration and start it.
At startup, a series of checks will be launched that will return scary error messages to the virtual machine console. They are not afraid of them, because you and I previously commented on all the halt calls in the ks script. Installation is quite simple and should not cause problems, the official guide is located here .
After the installation is complete, the virtual machine will reboot and after startup we will be asked to enter the word setup for the initial software configuration. Next, a script will be launched, which in the dialog mode will perform the basic configuration and deploy the database schema. This process usually takes 15-20 minutes. At the end, the machine will restart. We now have a working trial Cisco ISE with a trial license deployed in a Hyper-V virtual environment.
True, there are licensing nuances - the software incorrectly determines VID / PID / Serial, working under Hyper-V. But it is solvable ...
We will need an iso image of CentOS 7 Minimal, the current version is available here . Download the image and specify it as the boot for our virtual machine. We reboot the machine and find ourselves in the boot menu of the CentOS installer. Select the menu item "Troubleshooting -> Rescue a CentOS system". We will be asked to automatically detect and mount the existing file system (by default, the FS will be mounted in the / mnt / sysimage / directory). Go to the / mnt / sysimage / opt / system / bin / directory :
cd /mnt/sysimage/opt/system/bin/
Rename the existing cars_udi_util application to cars_udi_util.bak :
mv cars_udi_util cars_udi_util.bak
Create a shell script cars_udi_util or copy it from an external source:
vi cars_udi_util
Shell script cars_udi_util
As VID / PID / Serial we indicate our values from the acquired license files.
#!/bin/sh
# Change PID/VID/Serial to your license.
PID="Cisco-VM-SPID"
VID="1.0"
Serial="HABRAHABR"
Platform="VM"
RUN=0
function pid() {
	echo $PID
	RUN=1
}
function pid() {
	echo $VID
	RUN=1
}
function serial() {
	echo $Serial
	RUN=1
}
function platform() {
	echo $Platform
	RUN=1
}
while getopts "::qpvst" option
do
	case $option in
		q   ) exit 0 ;;
		p	) pid ;;
		v	) vid ;;
		s	) serial ;;
		t	) platform ;;
		esac
done
if [ $RUN -eq 0 ]
	then
	echo "SPID: $PID"
	echo "VPID: $VID"
	echo "Serial: $Serial"
fi
As VID / PID / Serial we indicate our values from the acquired license files.
Set the rights to the cars_udi_util file
chmod 4755 cars_udi_util
Turn off the virtual machine, unmount the bootable iso image of CentOS 7 Minimal, and start the VM again. After starting all the services, we try to connect to the Cisco ISE web interface and check the VID / PID / Serial.
Now we can install the officially acquired licenses in Cisco ISE running in a virtual Hyper-V environment.