Setting up PhpStorm for layout on Windows OS
good day
It so happened that there was a need to prepare a unified work environment for all typesetters in a group on Windows. The main goal is to transfer the minimum of necessary knowledge to all members of the group in the shortest possible time. The main problem was that many were not familiar with unix systems and had no idea how to get the same SASS on Windows. Therefore, it was decided to compile an introductory article (step-by-step instruction) on setting up the working environment.
On the advice of colleagues decided to put it in the public domain. I think this will come in handy for beginning coders, as I once spent a lot of time to come to simple truths.
I must say right away that the choice of tools is a purely personal matter, and everything that is described below was done consciously for a specific group. Whether or not to use this instruction is up to you.
So, let's begin!
This article will contain 3 stages:
- Stage 1 - Installing and Introducing the Phpstorm IDE
- Stage 2 - installation and configuration of the style compiler (sass, scss)
- Stage 3 - installation of the project collector, example setup (gulp)
Stage 1 - Installing and Introducing the Phpstorm IDE
Install Phpstorm IDE
We go to the official website and download the 30-day free version. After 30 days, you can reinstall the IDE and use it further, or buy a subscription
picture
I think everything is clear on the installation process, we indicate where you want to install the program. At one stage of the installation, you will be asked to choose which files to open in the IDE , and whether to create a shortcut on the desktop.
picture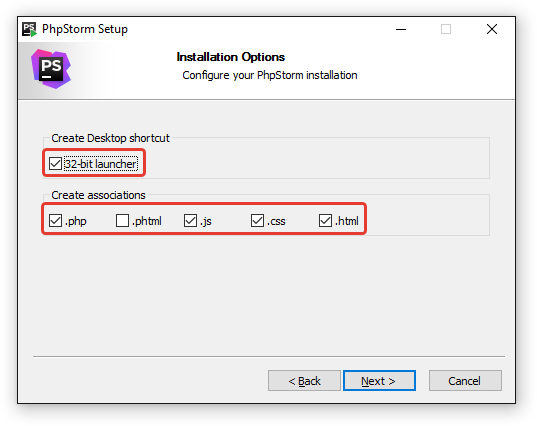
At the end of the installation, run the IDE , at the first installation you will be asked to import your settings or use the standard ones.
picture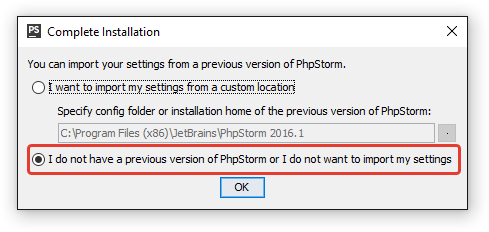
Next, it will be offered to purchase a license (subscription) or use a trial period of 30 days. Click "evaluate for free 30-day."
picture
Next, you will be prompted to select a design style and predefined settings for hot keys (keymap). If necessary, you can visit the site Phpstorm themes and choose the theme that you prefer.
picture
This completes the installation of the IDE .
Creating a new project in the Phpstorm IDE
IDE allows you to create 2 types of projects:
We will consider both options in more detail, as well as configure the visual interface using an example of a local project.
Create a new local project
Create a local project. To do this, in the IDE's welcome window, select “Create new project”. You can also create a new project from the IDE File menu .
picture
A window will open, in which we will be asked to select:
- Project template
- Indicate the location of the project
- Specify the name of the project
picture
If you select a project using the template, you can select the version of the template. For example, the boostrap template will automatically load from the repository on github.
picture
As a result, our new project window will open. In which a folder with the name of our project will be created. The ".idea" folder is also located here , in no case do not delete it ! It stores all the settings associated with the project.
picture
I also draw your attention to the fact that when creating a new project, the program will ask you to configure the namespace namespace. In general, you can not bother and entrust this to the program itself.
To do this, click on the "automatically" link in a pop-up window. If you accidentally closed this window or it "closed" itself, click on the status bar and in the terminal click on the "automatically" link. If you did everything correctly, you will see the corresponding message: “Detect psr-0 namespace roots: no psr-0 namespace roots was detected”. To hide the window, click on the icon with a perpendicular arrow.
picture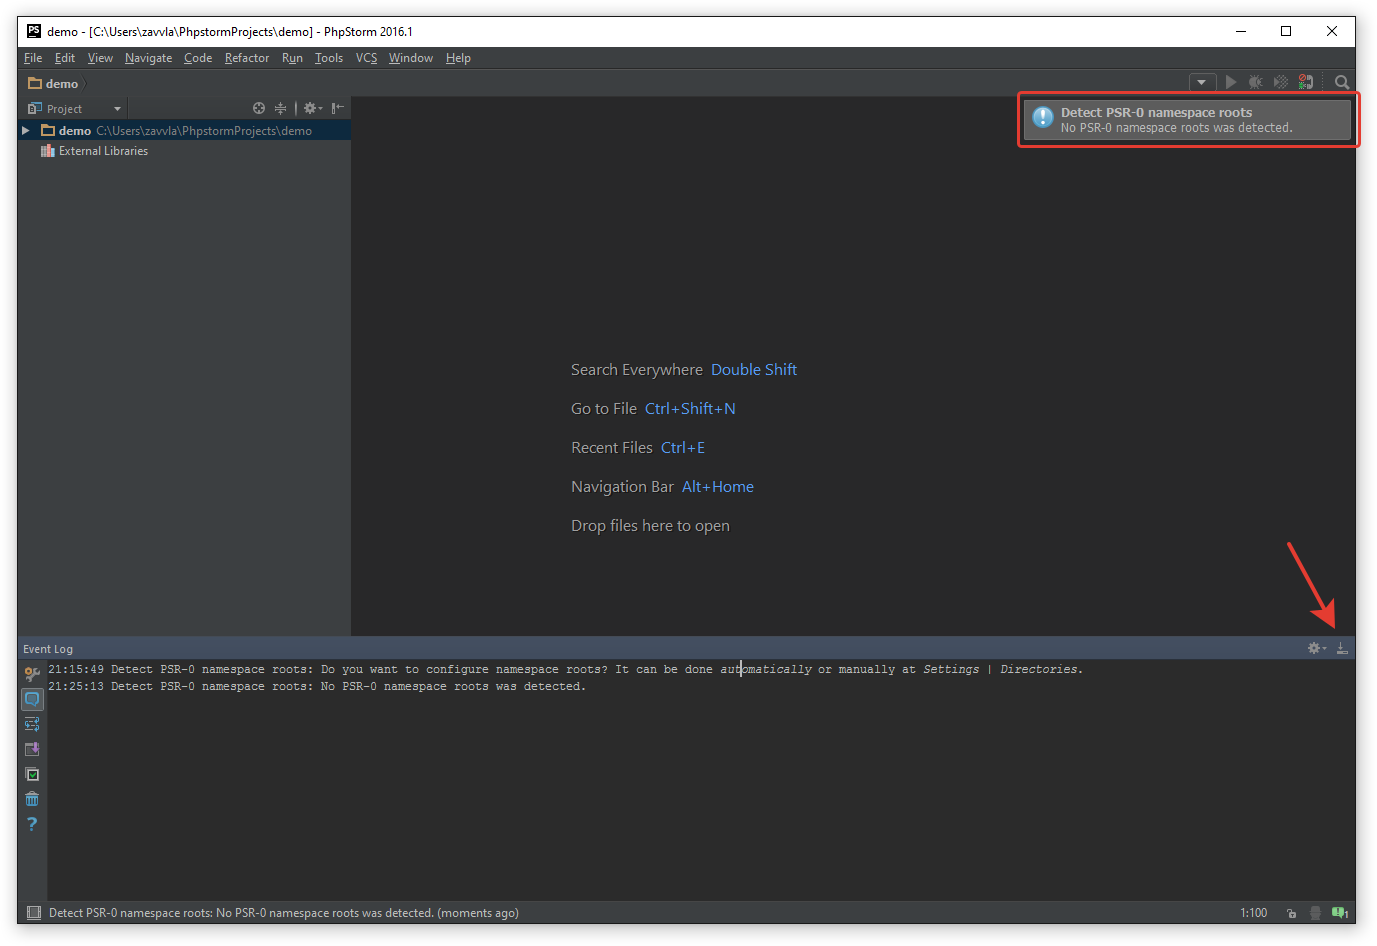
Congratulations, you have created a new local project. This version of the project is very convenient if only you are working on it and you do not need to upload it to the network.
Creating a new project related to the remote server
To create a project associated with a remote server, in the welcome window, select "Create New Projects from Existing Files" or in the IDE menu "File - New Projects from Existing Files".
picture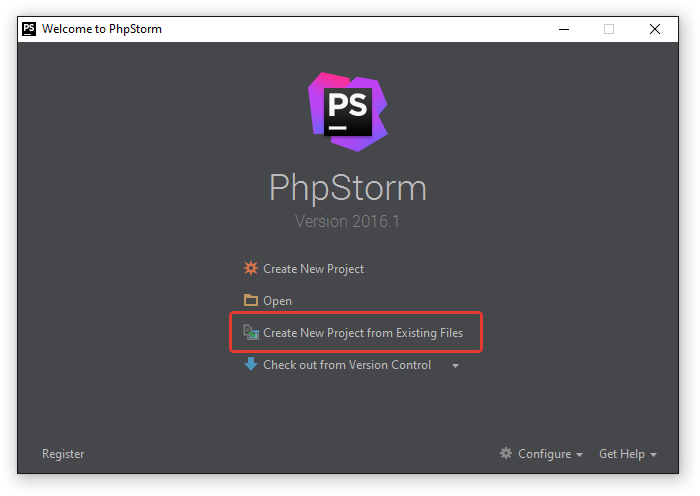
picture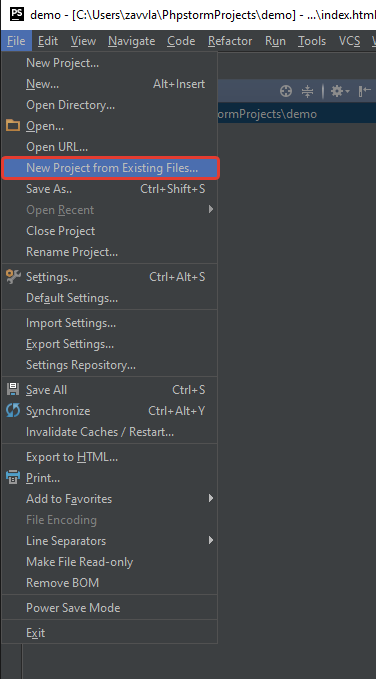
Next, you will be asked to select a usage scenario, we need the option “Web server is on remote host, files are accessible via ftp / sftp / ftps”.
picture
Next, enter the name of the project, as well as indicate where it will be stored on your PC. If you want to change the storage path for projects, you need to select the "Custom" option and specify the folder where you want to place the project.
Important! Use only Latin in naming files, folders, storage paths. Since some tools may simply not support the Cyrillic alphabet.
For example:
- "C: // my documents / project / demo" is a bad option: the path and name of the project contains Cyrillic
- “C: // project / demo” - everything is fine here, the path and name of the project contain only Latin letters
picture
Next, you will be prompted to create a new remote connection or select from existing ones. Create a new sftp (shh) connection, specify the parameters for connecting to the remote server.
- Name - the name of the connection, understandable to you. I recommend writing the fully qualified domain name, as it happens that several test sites can be located on the same ip
- Type - ftp or sftp (shh) connection format
- Sftp host - ip address of the server or host (for example, mysite.ru or demo.mysite.ru)
- Port - port number (by default for ftp (21), sftp (22))
- Root path - the path to the parent directory (by default, leave "/"), for example, if you have 2 folders on the server (dev, www), and you want the entire connection to show the dev folder immediately, you can specify the path (/ dev /)
- User name - login to access the server
- Password - password for access to the server (do not forget to check the “save password” box so as not to enter a password every time you connect to the server, terminal). You can also connect using the ssh key.
- “Don’t check http connection to server - check the box to not check the connection every time.”
The button "Test sftp connection ..." allows you to check whether the access parameters are entered correctly. If successful, a corresponding message will be issued.
“Web server root url” is the path where files will be opened for viewing on a remote server. The path will be automatically assigned as soon as the sftp host line is filled.
picture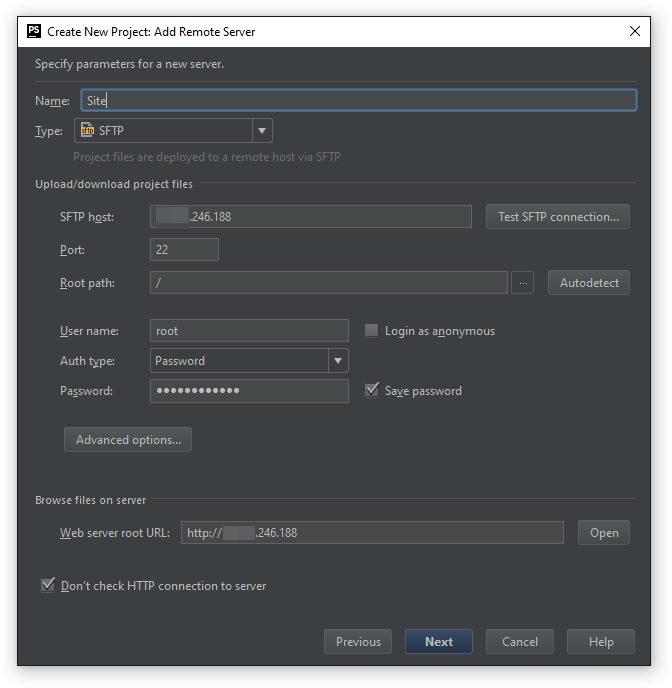
Next, the program will prompt you to specify which files belong to the project, for this we indicate the folder with the project on the remote server and click on the "Project root" button. In my case, this is all that lies on the server. As a result, you will see a green background that the files are marked.
picture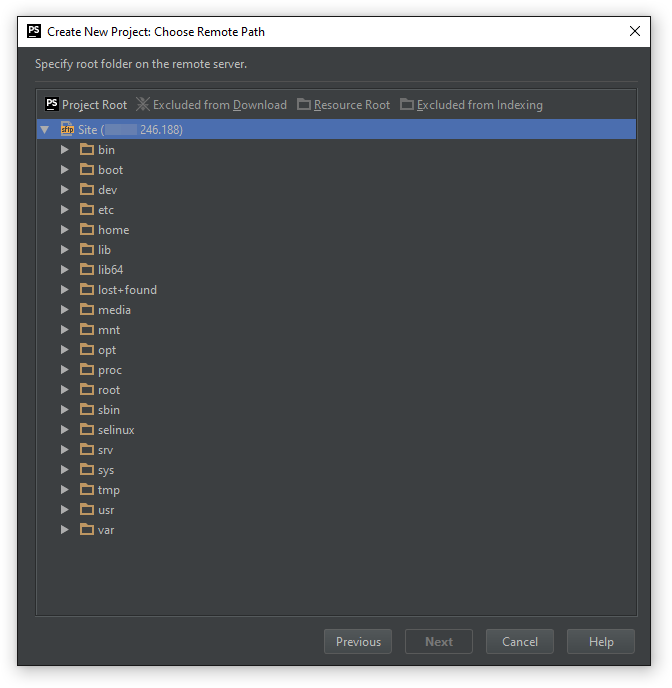
picture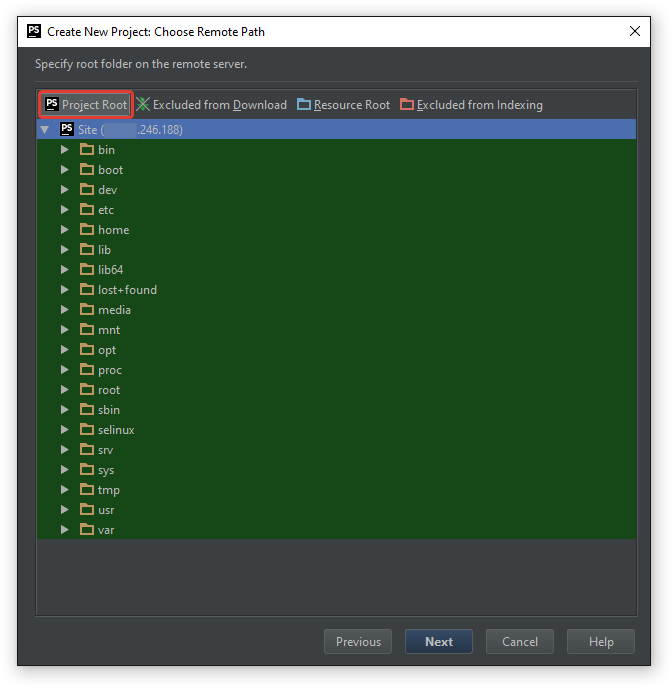
If we click continue, the program will start downloading the marked files to the PC from the server. Since projects are usually very large in volume and number of files, we will not do this. To do this, add files to the exception by clicking on the “Excluded from download” button. In the future, we will discuss how to download only the files we need.
picture
Click "next" the program will offer, show us your path for the root folder of the project. Here you can put "/" or just click the "Finish" button.
picture
Done! We linked our project with a remote server. Now we will try to download some file from the server, make an edit to it and send it back to the server. First, we need to adjust the settings. If you remember above, we added the entire project to the exception so as not to download it completely. Press the Ctrl + Alt + S key combination, go to the Build, Execution, Deployment - Deployment section, click on the Excluded path tab and remove the exceptions by clicking on the path and then clicking on the Remove path button, after which click the "OK" button.
picture
As a result, if everything is done correctly, then in the “Remote host” tab our files will be highlighted in green.
picture
In order to download a file or folder to your PC, you need to right-click and select “Download from here” in the pop-up menu that appears. Then the files will be downloaded to your PC.
picture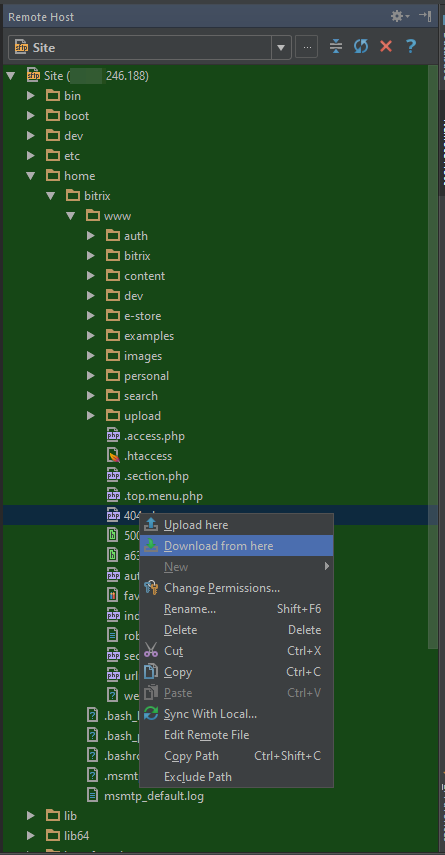
As soon as the files are downloaded, they will be displayed in the “Project” tab and a message will appear in the file transfer window “File transfer * remote server name *”.
picture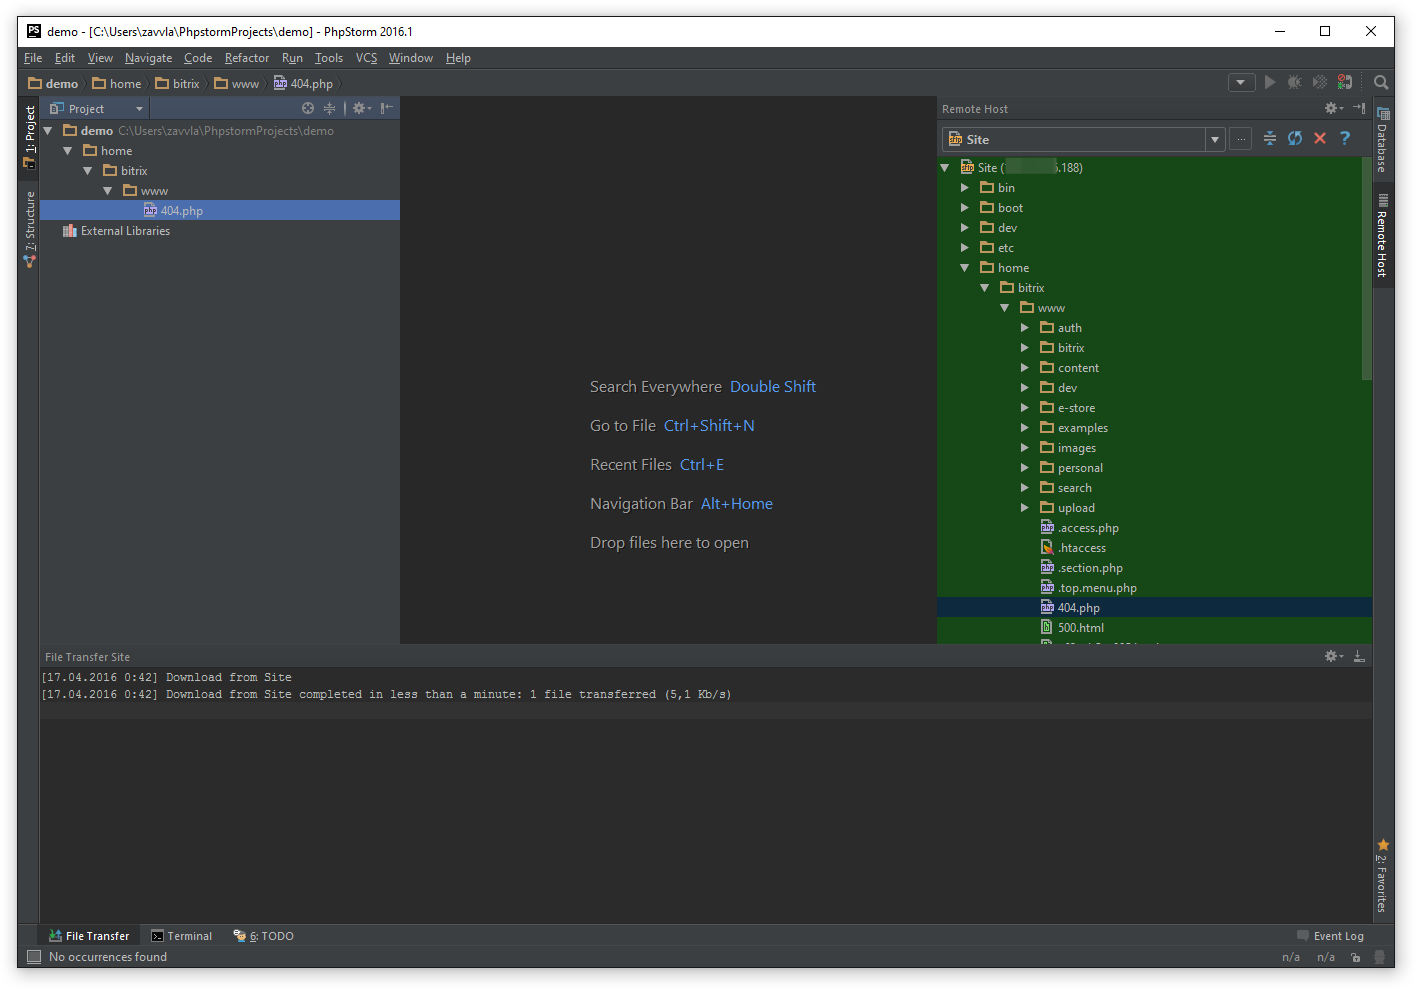
After that we make an edit to the file we need and send it back to the server. To do this, right-click on the file in the “Project” tab, and select “Upload to” in the pop-up menu.
picture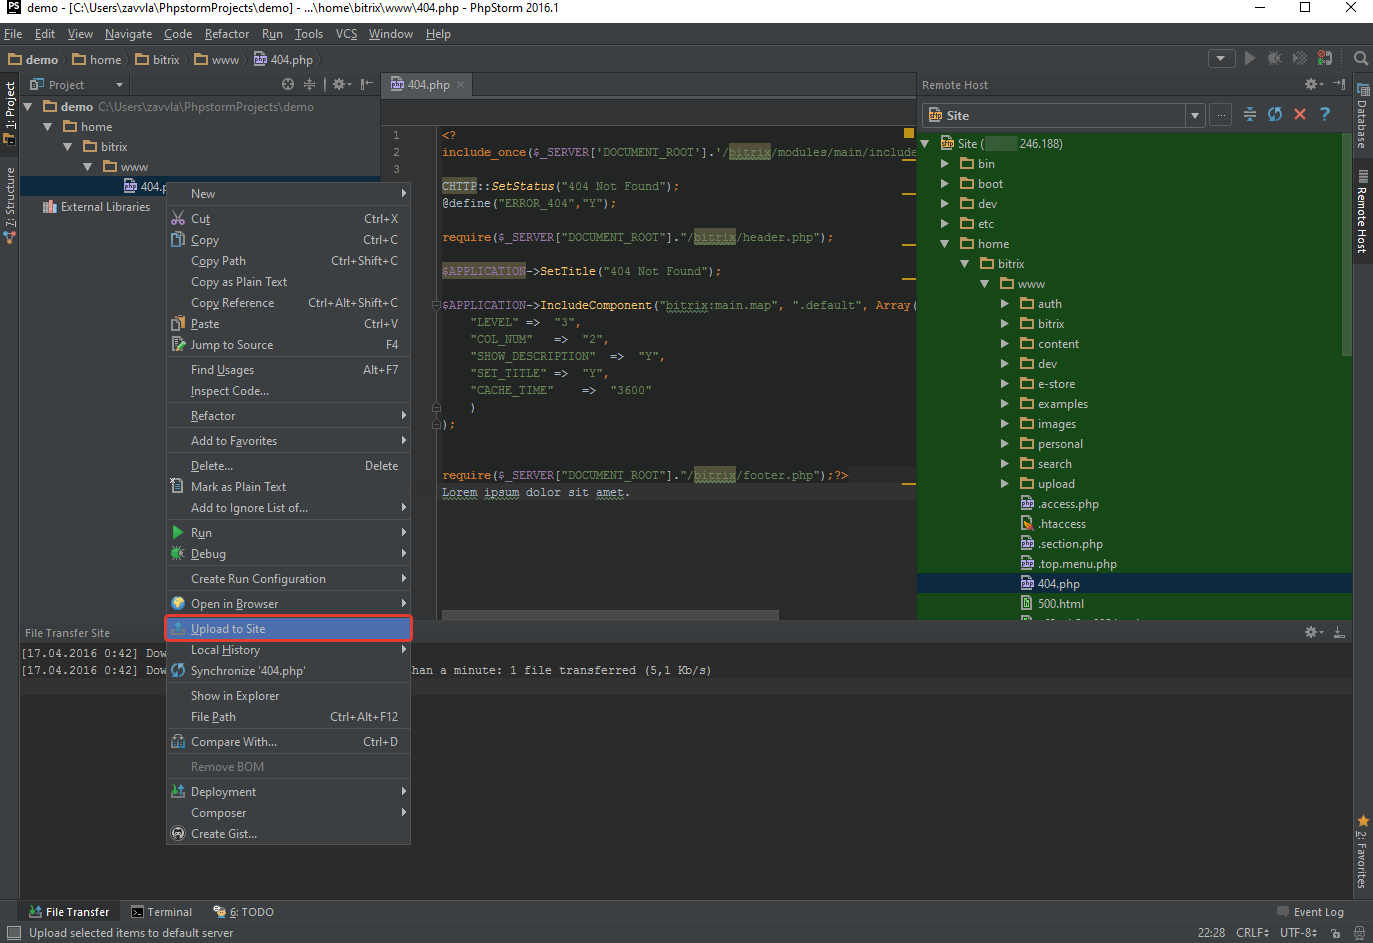
picture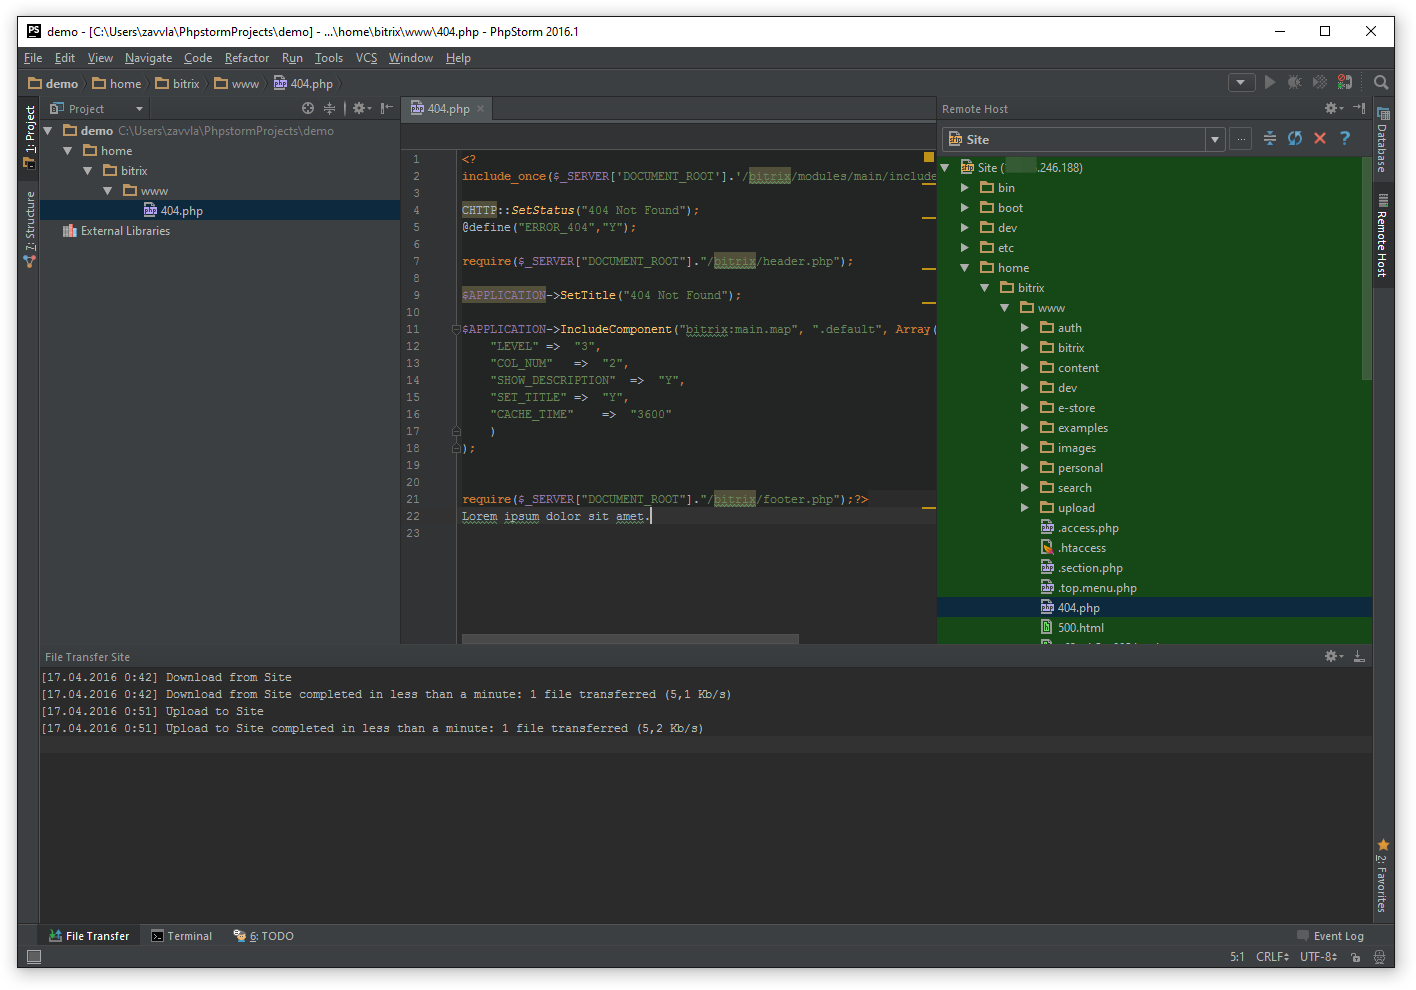
Optionally, you can assign hot keys (keymap) for quick download and upload files.
This method is convenient if we need to fix only one file, but for full development, it is better to configure automatic sending of files to the server. To do this, press the key combination "Ctrl + Alt + S" or in the menu "Tools - Deployment - Options" and make changes:
- Create empty direcory - after creating an empty folder, it will also upload it to the server.
- Upload changed files automatically to the default server - select "always"
- Upload external change - check the box, let you upload files that are modified by other programs. e.g. cards css, js
- Warn then uploading over newer file - select the item “compare timestamp & size”, check if the file was modified by time and size
- notify about remote changes - warns if we try to upload a non-current version of the source file. For example, if the file was simultaneously corrected by 2 people. It will be offered to overwrite, hold, skip.
picture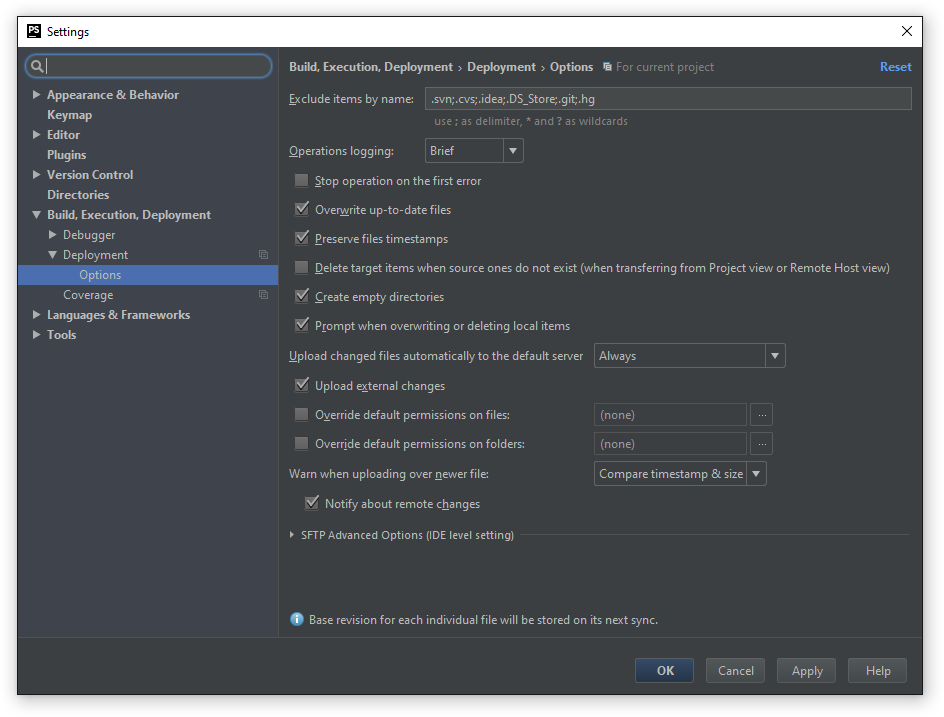
picture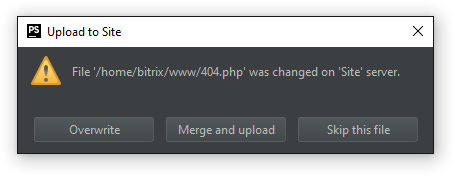
This completes the configuration of the project associated with the remote server. Next, we will cover the basic settings and features of the IDE . this is necessary so that the team has a minimum threshold of the same knowledge.
Visual Interface Customization and IDE Overview
First of all, enable the support for “Tool windows”, these are special tabs that allow you to visually switch between the capabilities of the IDE . This will be done simply, you need to click on the icon in the lower left corner, after which bookmarks will appear on the left, right, bottom. This can also be done from the IDE menu “View - Tools buttons”.
picture
To remove unnecessary tabs, you can right-click on the tab and select "Remove from sidebar".
picture
I recommend tabs as follows:
- In the left pane, arrange the tabs "project", "gulp", "npm"
- On the bottom panel, arrange the tabs “terminal”, “version control”, “file transfer” “rest”, “todo”, “event log”
- In the right pane, arrange the “remote host” tabs
In the future, we will consider all these tools.
Display the numbering of lines, indents, colors in the IDE
Let's go to the IDE settings by pressing the Ctrl + Alt + S keys or from the File - Settings program menu and go to the Editor - General - Appearance section and check the boxes:
- “Show line number” - show the number of lines in the document
- "Show vertical indent guides" - show the vertical alignment
- "Show css color preview icon in gutters" - shows a small box, near the line number, with the current color
- "Show whitespace" - shows indents in tabs or spaces. customization is suitable for novice coders to comply with semantics.
Other settings can not be changed.
picture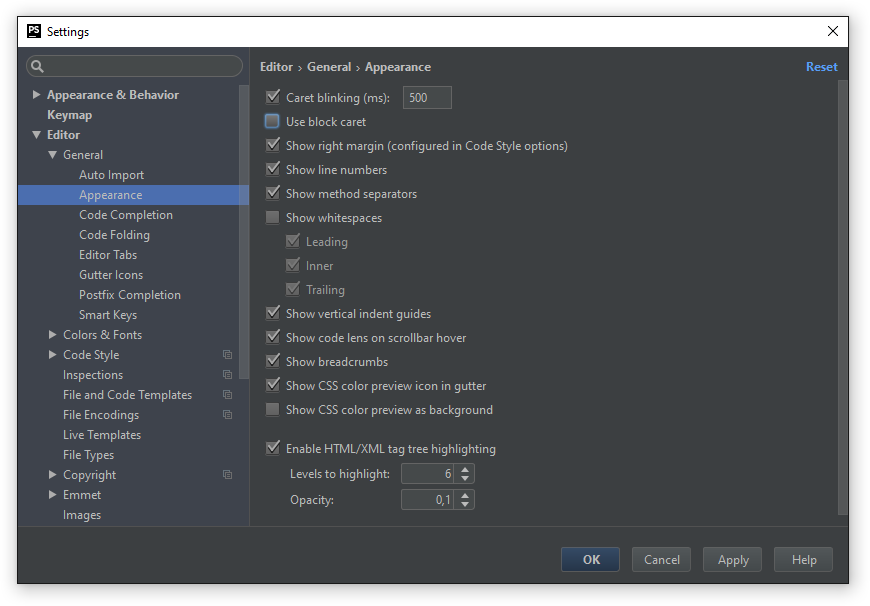
As a result, everything should display approximately as shown in the images below.
picture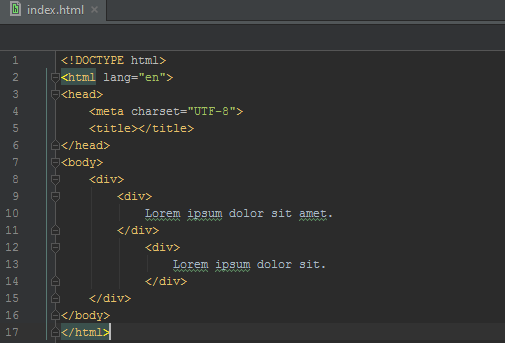
picture
Code Tips
By default, the editor will tell you if there are comments or errors in the code. On the right, yellow or red stripes will be displayed in the current document. By clicking on the strip you will immediately be transferred to the line where an error or comment occurred. You can also view the error \ remark simply by hovering over the strip.
picture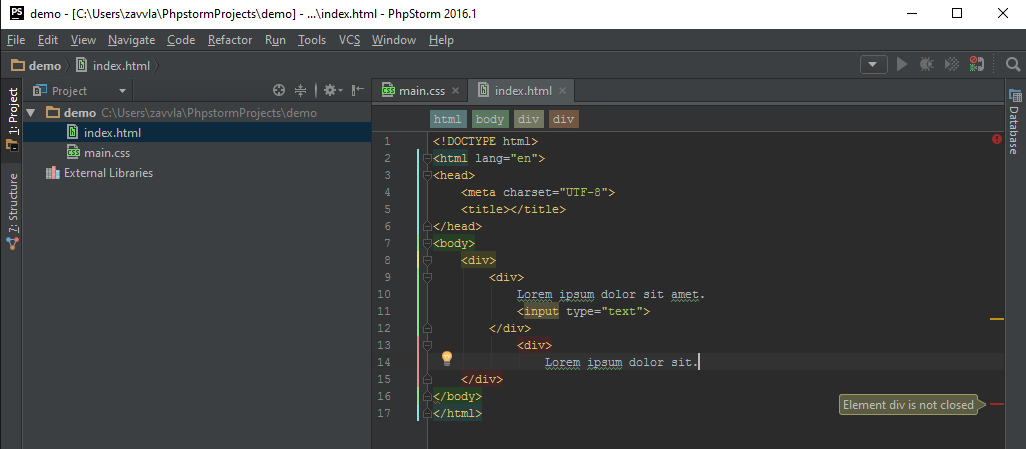
View page in browser
To view the page in a browser, move the mouse to the right corner of the document, a window will appear asking you to choose which browser you want to view the page in. This can also be done by pressing the key combination “Alt + F2” (attention to the key combination may vary!).
By default, the IDE will open a page on localhoste for viewing. If your project is connected to a remote server, the page specified in the path (Web server root url) will open.
picture
You can also configure the list of browsers, specify which browser to open by default, and disable the tooltip in the upper right corner of the document. To do this, press the key combination “Ctrl + Alt + S” and go to the “Tools - Web browsers” section or use the search, as shown in the image below.
picture
Emmet tool
This tool is already preinstalled, therefore, no additional settings need to be done, you can immediately use it. The documentation for the emmet tool can be viewed on the website , examples , cheat sheet .
Editing files only on a remote server
To edit files on a remote server, click on the “remote host” tab, open the file without downloading it to your PC (click 2 times on the file in the remote host tab). In order to send the file to the server, click on the icon
 . It is also possible to roll back edits by clicking on the icon
  , or see the changes by clicking on the icon
  .
.picture
Working with local file history
In order to view the local history of file changes, you need to right-click on the file and select “Local History - Show History”.
picture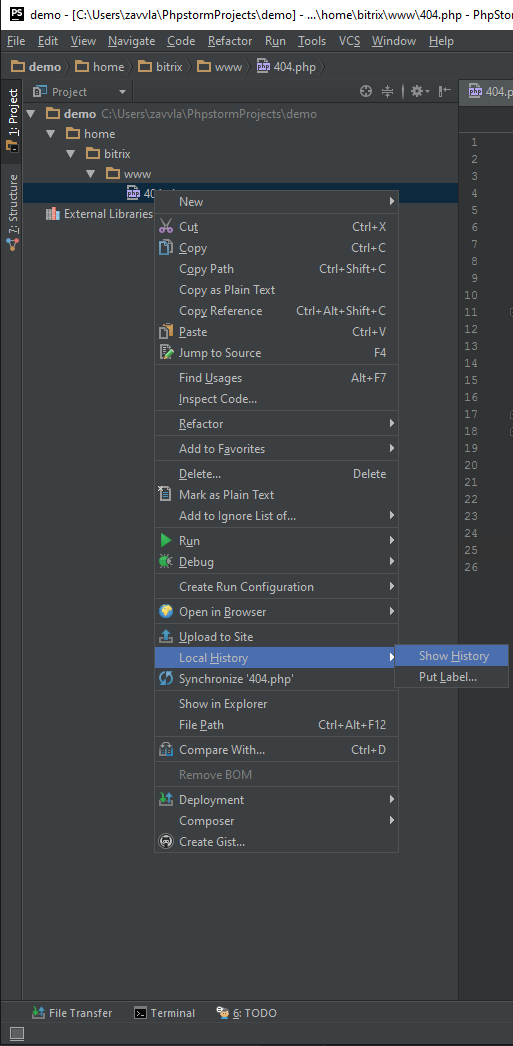
As a result, a window will open in which the entire available history of file changes and 2 columns will be displayed on the left. The left column is the state of the file from the history, and the right is the current one. Please note that you can only make edits to the right column. Buttons are also available to roll back changes or to save a patch. After closing the window, all changes in the right column are automatically saved.
picture
Comparison of the contents of 2 files
In order to compare 2 files on your PC, you need to right-click on the file and select “Compare with” in the window that appears, indicate which file we want to compare with.
picture
In order to compare the local file with the file on the remote server, you must right-click on the file and select "Deploymet - Compare with deployed version on * remote server name *".
picture
Encoding change
It happens that you need to transcode files from cp-1251 to utf-8. To do this, right-click in the file and select “File Encode”. This can also be done by clicking on the choice of encoding.
picture
picture
Fix hyphen characters
On unix systems, newlines are different from characters on Windows. Because of this, it may happen that when comparing files, the entire file will be highlighted as modified, in fact, you have changed only 1 character.
Using unix hyphenation is recommended. In the program menu "file - file encoding".
picture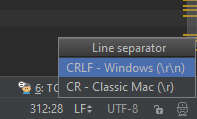
Tab settings, conversion of tabs / spaces
If the document contains several tabulation options, the editor will tell you this and offer to select.
picture
This can also be done in the settings by pressing "Ctrl + Alt + S" and going to the "Editor - Code Style" section, select the desired document format and check the "Use tab charaster" checkbox.
picture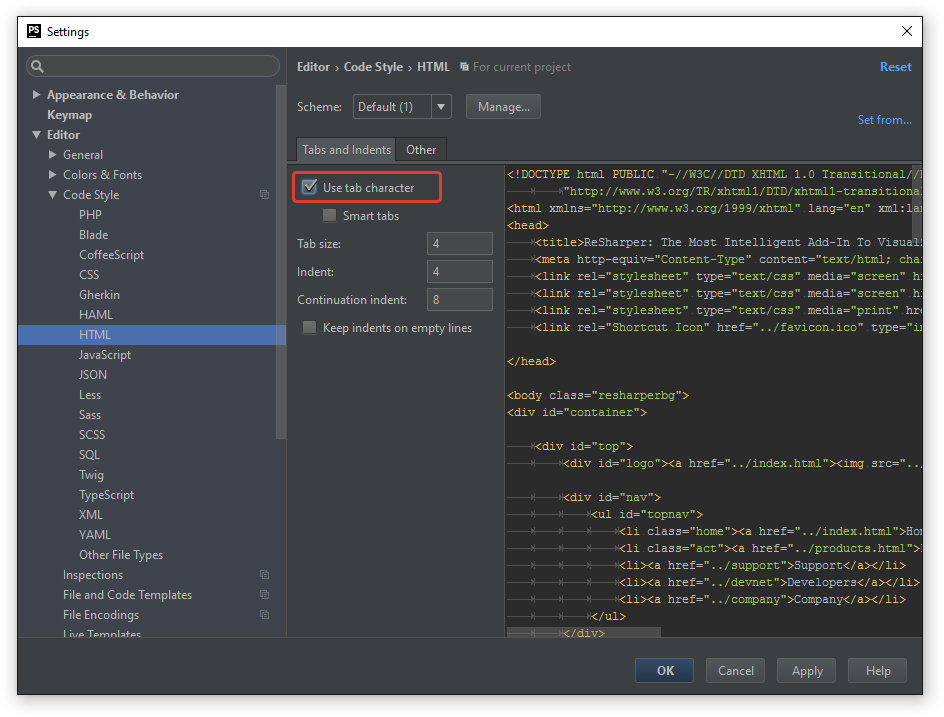
To quickly reformat a document, you need to select which symbol to use in the menu of the "Edit - Convert Indents" program.
picture
Finding file locations on a PC
To quickly find the location of a file on a PC, you need to right-click on the file and select “Show in Explorer”, the folder with the selected file will open.
picture
Quick format to semantic code
Sometimes you come across files that are not possible to read due to poor formatting or minimization. Here the code reforming will help us, in the program menu, select the item “Code - Reformat Code”.
picture
Work with the terminal and ssh session
You can call the terminal using the menu tools of the program “View - Tools Windows - Terminal”, using the key combination (Alt + F12), from the quick access panel. This is essentially a command line on Windows.
To start SSH Terminal to connect to the server, you need to go to the menu of the "Tools - Start SHH Session" program and then select an existing connection, or specify connection parameters for a new one.
picture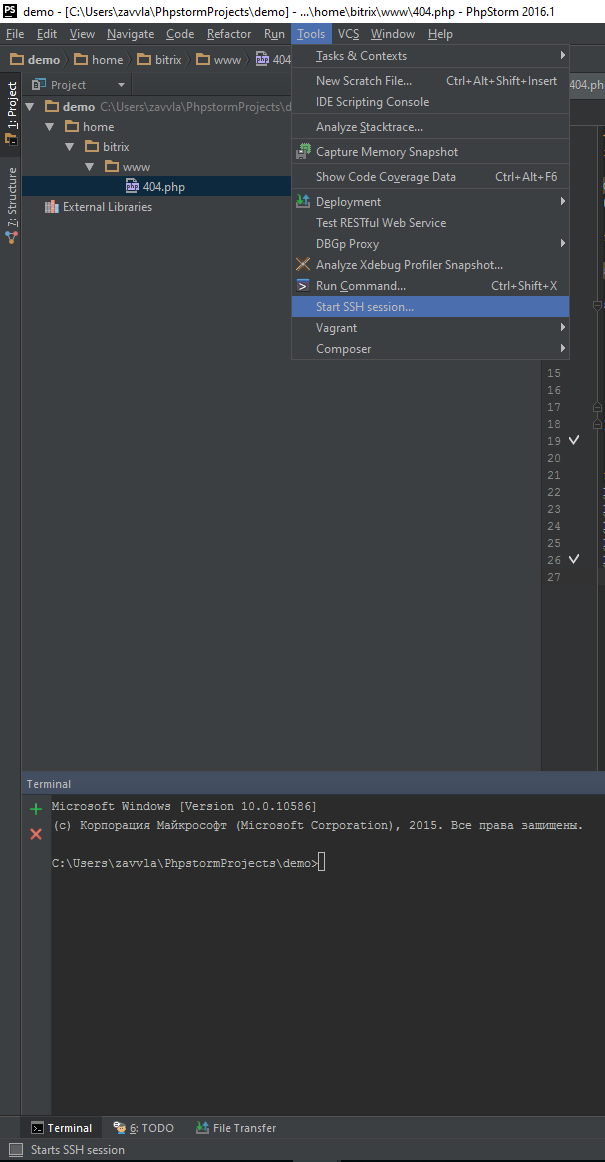
Notes and bookmarks
To add a note, you need to add an Html comment with the text todo. You can call up the panel with a note from the menu of the program "View - Tools Windows - TODO" or from the quick access panel. Using the filter, you can configure the display of notes. By double-clicking on the note, you will automatically open a file and the courses will be located on the note.
<!--todo Моя тестовая заметка-->picture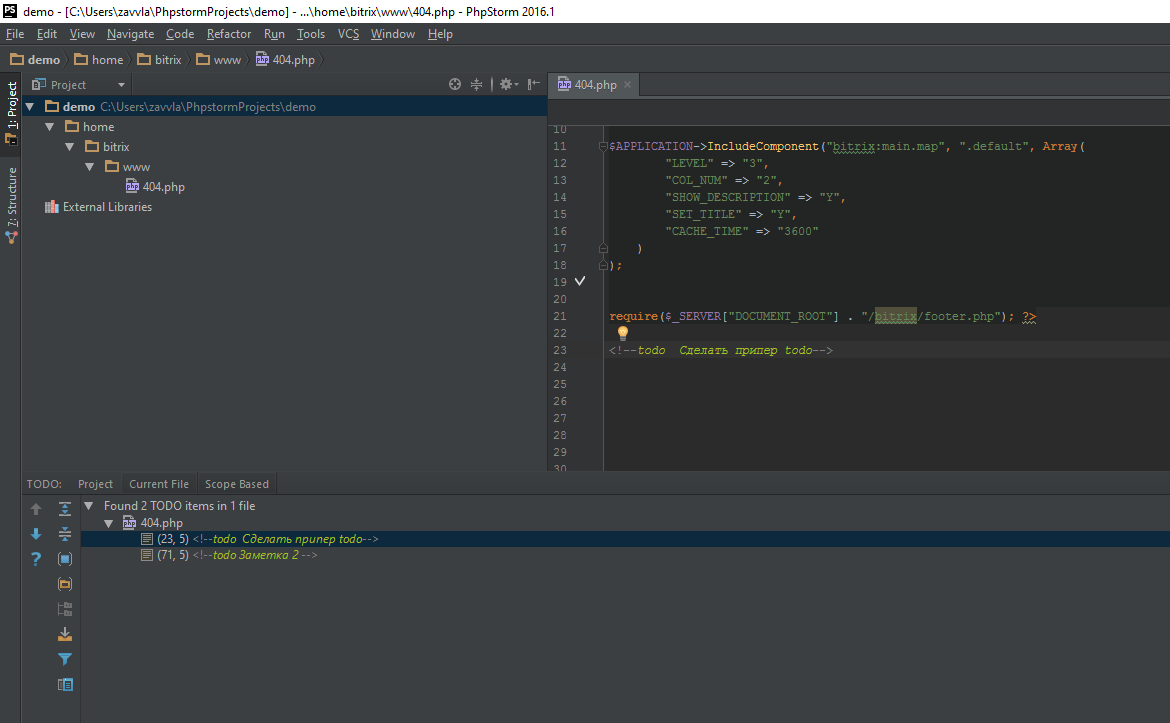
Bookmarks allow you to quickly view or display pieces of code. To add a bookmark, you must position the cursor at the beginning of the desired piece of code and use the hotkey (F11) or from the menu program "Navigate - Bookmark - Toggle Bookmark" to put a bookmark. The bookmark appears as a checkmark.
picture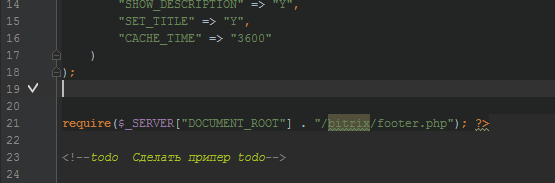
To quickly browse using the hotkey (Shift-F11) or from the program menu "Navigate - Bookmark - Show Bookmark" call the viewing window.
picture
LiveEdit (LivePreview) view changes without reloading the page on the PC
Install the LiveEdit plugin. To do this, open the program settings (Ctrl + Alt + S), then go to the "Plugins" section and click the "Browse repositories ..." button.
picture
In the window that opens, in the search bar, enter “Live Edit” and click the Install button. After installation, the program will ask you to restart it.
picture
Again, go to the program settings (Ctrl + Alt + S), then to “Build, Execution, Debbug - Live Edit” and put a checkmark on “Auto in (300 ms)”.
picture
Now you need to install the add-on for the browser in order to link our editor and browser. Please note that the add-on only works in Chrome, Yandex browsers. In the future, developers promise an add-on for Firefox, Safari browsers. You can read in more detail on the website of developers.
picture
We start Live Edit, for this we select an item in the Run - Debug program menu or click the bug icon on the quick access panel.
I draw your attention to the fact that the “Live Edit” mode works only for local projects, that is, only for those files that are on your PC and are not connected to a remote server.
picture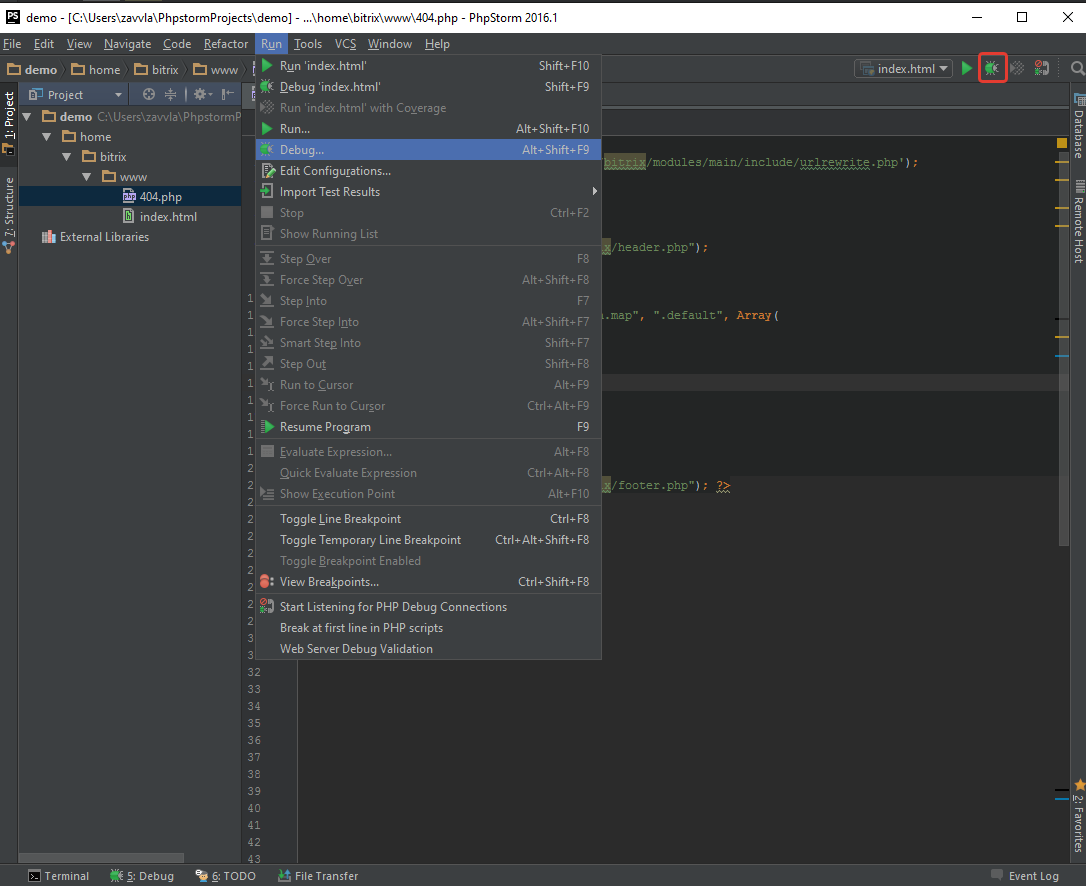
Stage 2 - installation and configuration of the style compiler (sass, scss)
To install the compiler on you will need to install:
Important! Installation should be performed on behalf of the administrator.
Nodejs installation
Download the installer for Windows from the official site . Standard installation, but at the component selection stage, make sure that the “Add to path” items are selected. It should be like in the image below.
picture
Install ruby
Download the installer for Windows from the official site . The standard installation, but at the component selection stage, make sure that the “Add Ruby Executables to PATH” checkbox is checked.
picture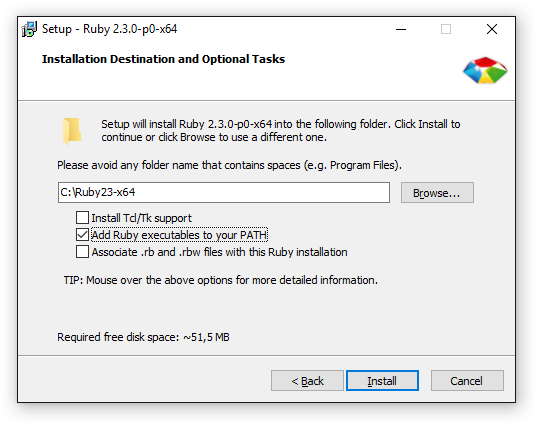
Restart Phpstorm by closing it or using the program menu "File - Invalidate Chache / Restart - Just Restart". Checking the version of nodejs and ruby. To do this, type in the terminal
node -v
and
gem -v
As a result:
picture
Sometimes you need to restart the computer for the terminal to work. It all depends on the version of Phpstorm.
Install gem sass, scss
To install packages, you must take turns in the terminal to enter the following commands:
gem install sass gem install scss picture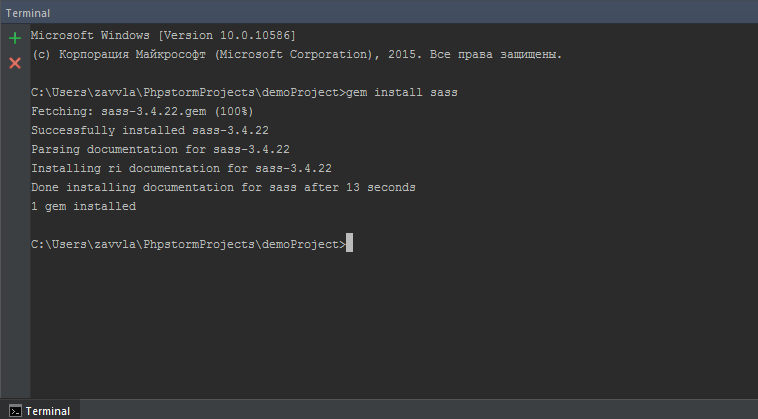
picture
Installation is complete, now we’ll configure it so that our files are automatically compiled from sass to css.
If we create a new .sass or .scss file, then when you open its program, it will automatically offer us to assign “File Watcher”.
picture
By clicking on the “Add watcher” link, a window with observer settings will automatically open. If everything was installed correctly, then in the programm field we will have the path to the sass.bat file.
picture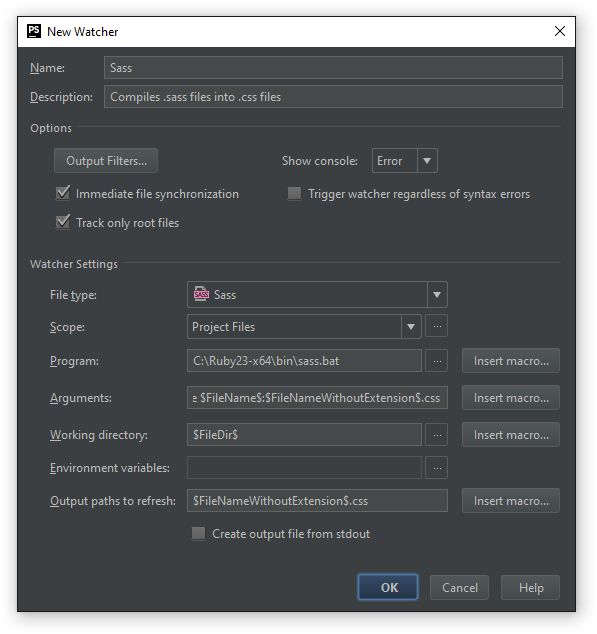
Click “OK” and this completes the quick setup. We check the compiler, for this we write any piece of code in a sass file. As a result, after pressing “Ctrl + S”, styles will be compiled.
picture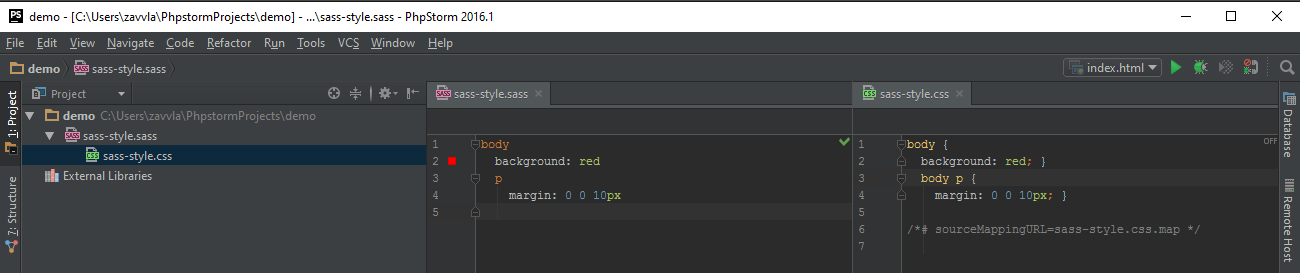
If an error is made in the file, the program will give us an error and the file will not be compiled.
picture
But it often happens that the .sass files (preprocessors) are in one folder, and the .css result needs to be placed in another folder. To do this, we just need to fix the way. Pressing the key combination (Ctrl + Alt + S) and go to the "Tools - File Watchers" section.
picture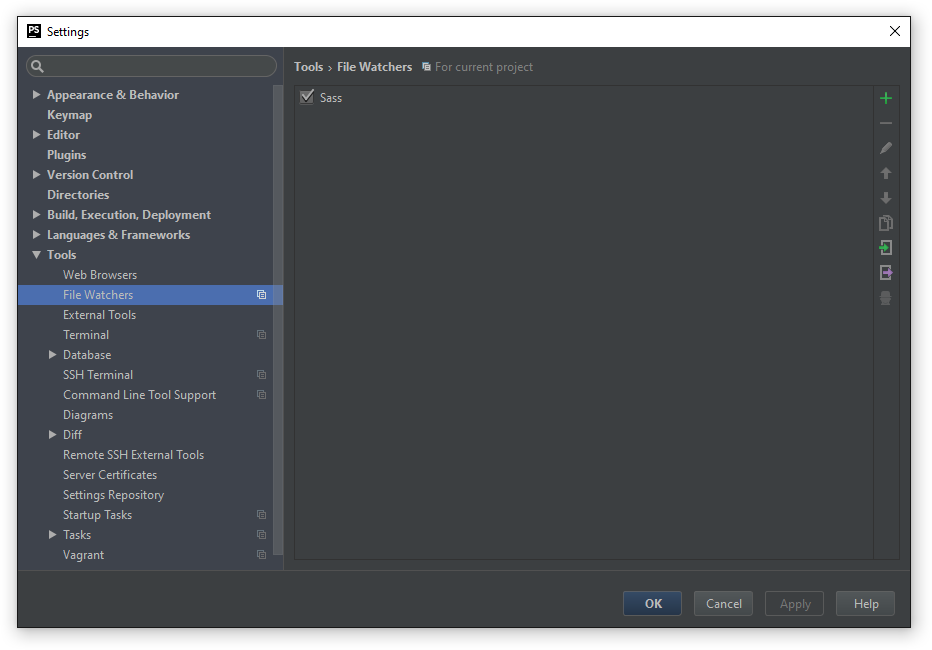
Next, click 2 times on the line Sass.
picture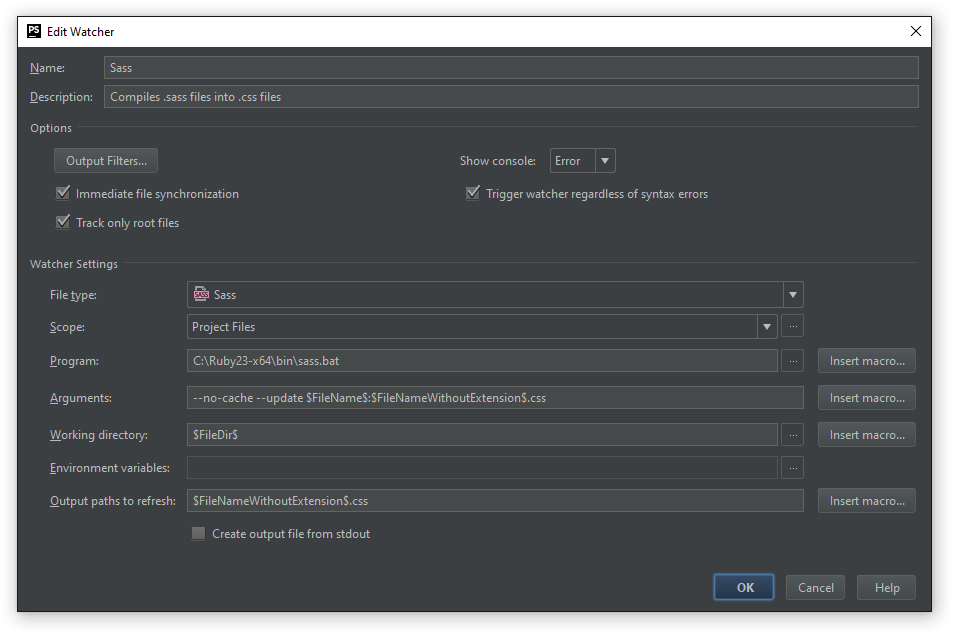
The field "Arguments" after the symbol ":" you need to specify the path to the css folder. Click on the "Inset macros" button and insert the "$ FileDir" variable. In this case, "$ FileDir" is a program variable that will automatically substitute the path to our project.
picture
The result should be
$FileDir$\css\$FileNameWithoutExtension$.css where the first variable is the path to the project, then the name of the folder where you want to store the .css files, and the name of the file variable. This piece $FileDir$\css\$FileNameWithoutExtension$.cssmust also be inserted into the "Output path to elements" field. I draw your attention to the fact that there are backslashes "\" in the path indication. As a result, we get, as in the image, and click the "OK" button.
picture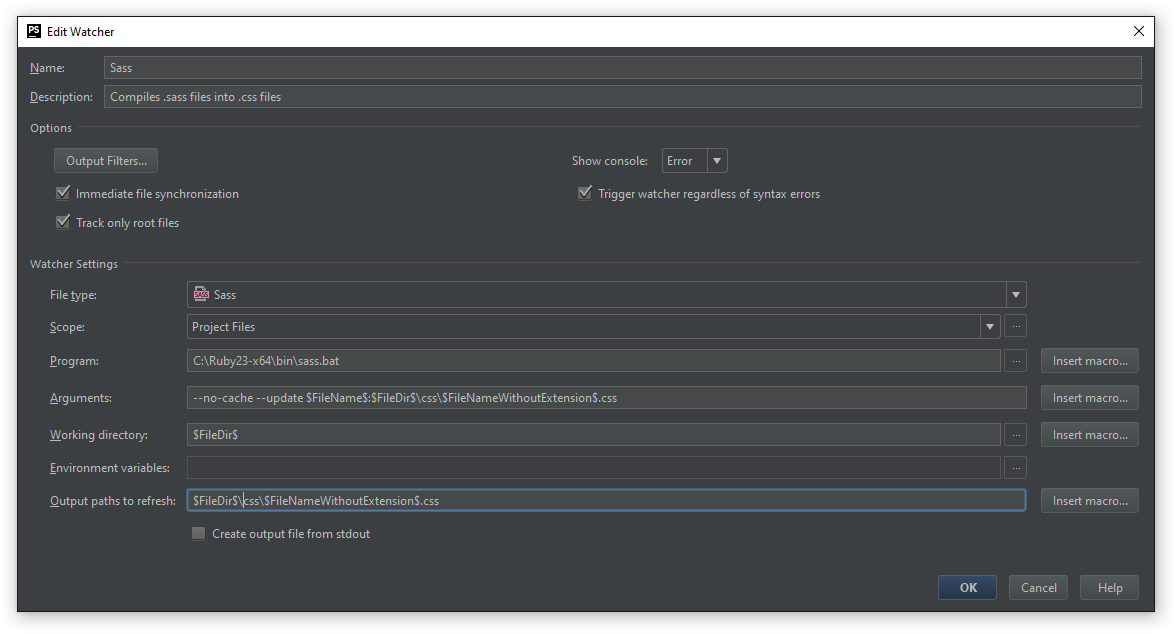
We check, for this you just need to make any change to the .sass file and press "Ctrl + S". The program will automatically create a folder called "css" and put the compiled files into it.
Old files can be deleted.
picture
For .scss files, the principle is the same. Only “File Watchers” will be SCSS and the program will substitute the path to the scss.bat file in the programm field.
picture
picture
Additional compilers settings can be viewed on the official website
Stage 3 - installation of the project collector, example setup (gulp)
Example installation and configuration from scratch
To create a configuration file, you need to type a command in the terminal
npm init, after which a series of questions will be asked where you can press the Enter button. Only enter the name of your file in the "entry points" field, in this case it will be "gulpfile.js"picture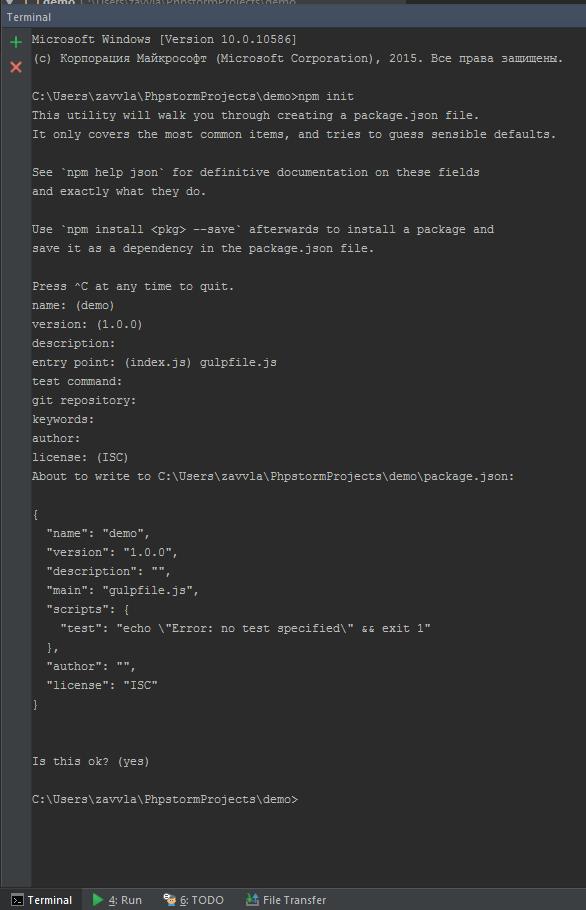
If you clicked something wrong, or decided to fix it, you can do this by going to the package.json file itself, which was created and located in the root of the project.
You can read more about the settings on the official website .
picture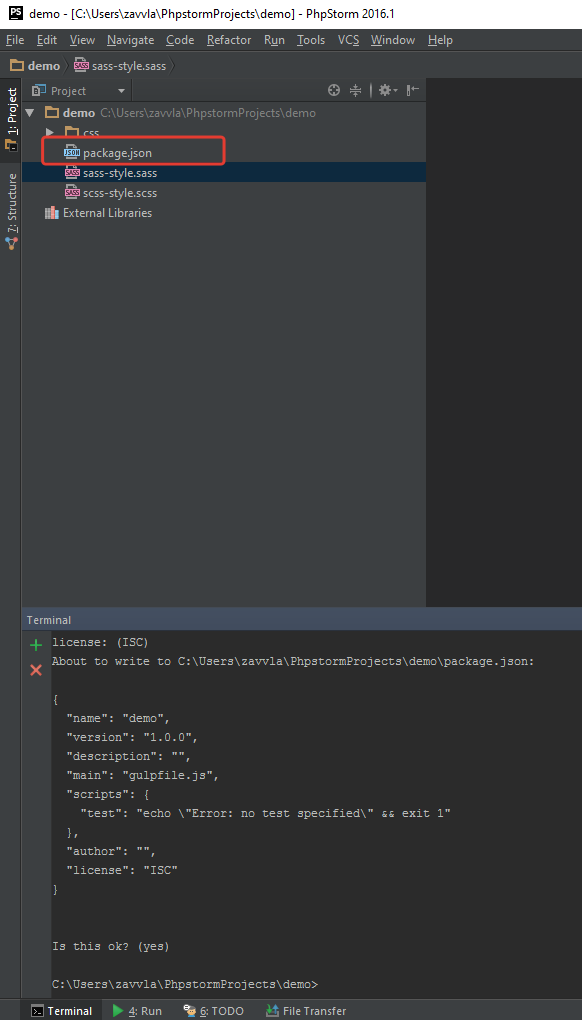
Now we need to install gulp itself, and some useful plugin, let it be autoprefixer. About PostCss and Autoprefixer you can read on the official website .
To install Gulp, you need to type a command in the terminal
npm install gulp --save-devand wait for the installation to complete. If everything went well, in the root we will create the node_modules folder in which the Gulp package manager will be installed. The key is --save-dev, needed to install packages locally, and then use it on other projects.picture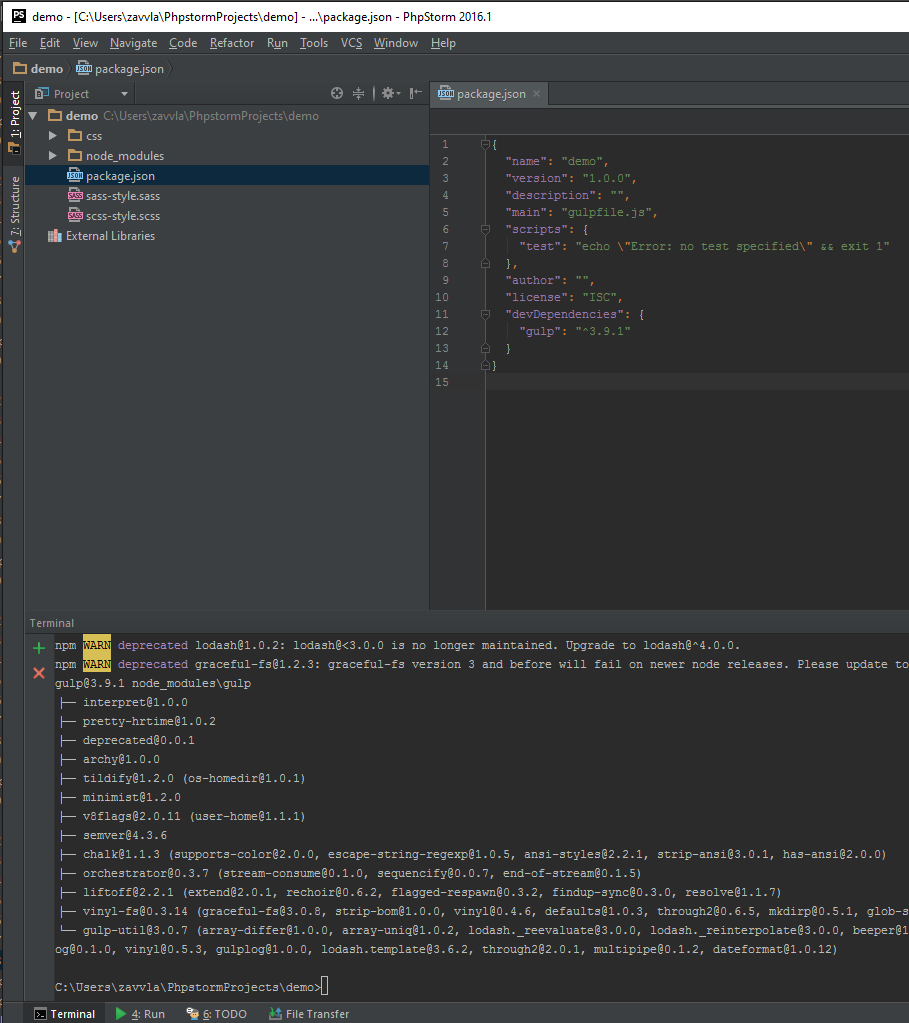
Now install autoprefixer , for this we type the command
npm install gulp-autoprefixer --save-dev and wait for the installation to complete. Please note that installing autoprefixer on the official website is different than installing on the npm website . This is due to the fact that on the official site, autoprefixer works through PostCss (post processor). In the future, it is better to use this plugin through PostCSS.
Now, if we open the package.json file, we will see that our add-ons are automatically registered in the “devDependencies” block.
Installation of plugins is completed, now they need to be configured.
To do this, create the “gulpfile.js” file in the root, and paste in the code that is listed on the npm website in the usage block and save it (Ctrl + S).
picture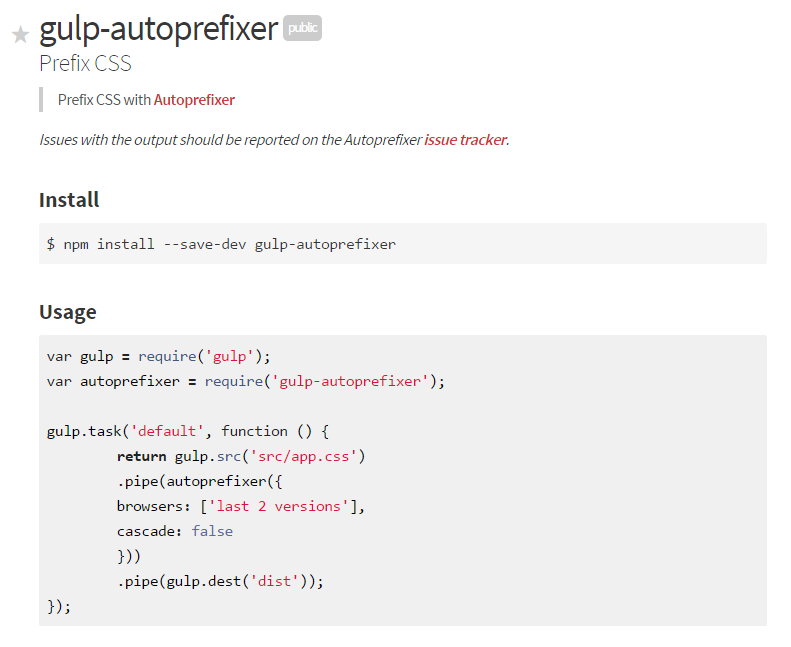
I made small changes to make it more clear.
picture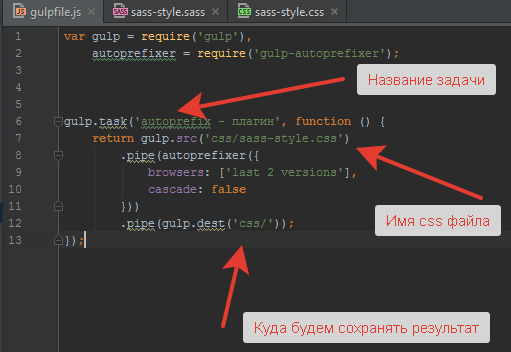
View code
var gulp = require('gulp'),
      autoprefixer = require('gulp-autoprefixer');
      gulp.task('autoprefix - плагин', function () {
         return gulp.src('css/sass-style.css')
            .pipe(autoprefixer({
               browsers: ['last 2 versions'],
               cascade: false
             }))
           .pipe(gulp.dest('css/'));
      });
Check the operation of the plugin. Add the display: flex property to the .sass file and save it. By default, it compiles the result into a .css file.
picture
In order to complete our task, open the gulp panel, you can do this by right-clicking on the file “gulpfile.js” and select “Show Gulp Tasks” or from the menu of the program “View - Tools WIndows - Gulp”. As a result, a panel with a list of tasks will open.
picture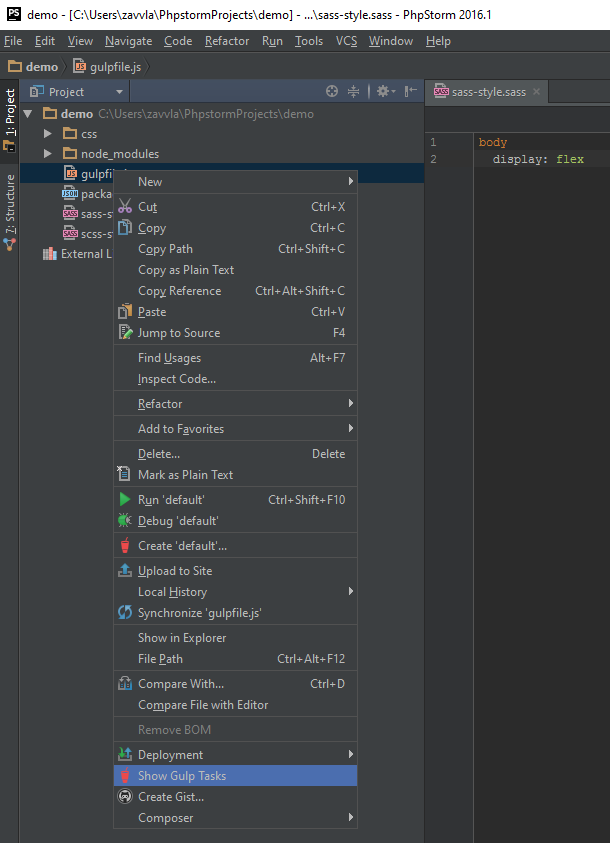
picture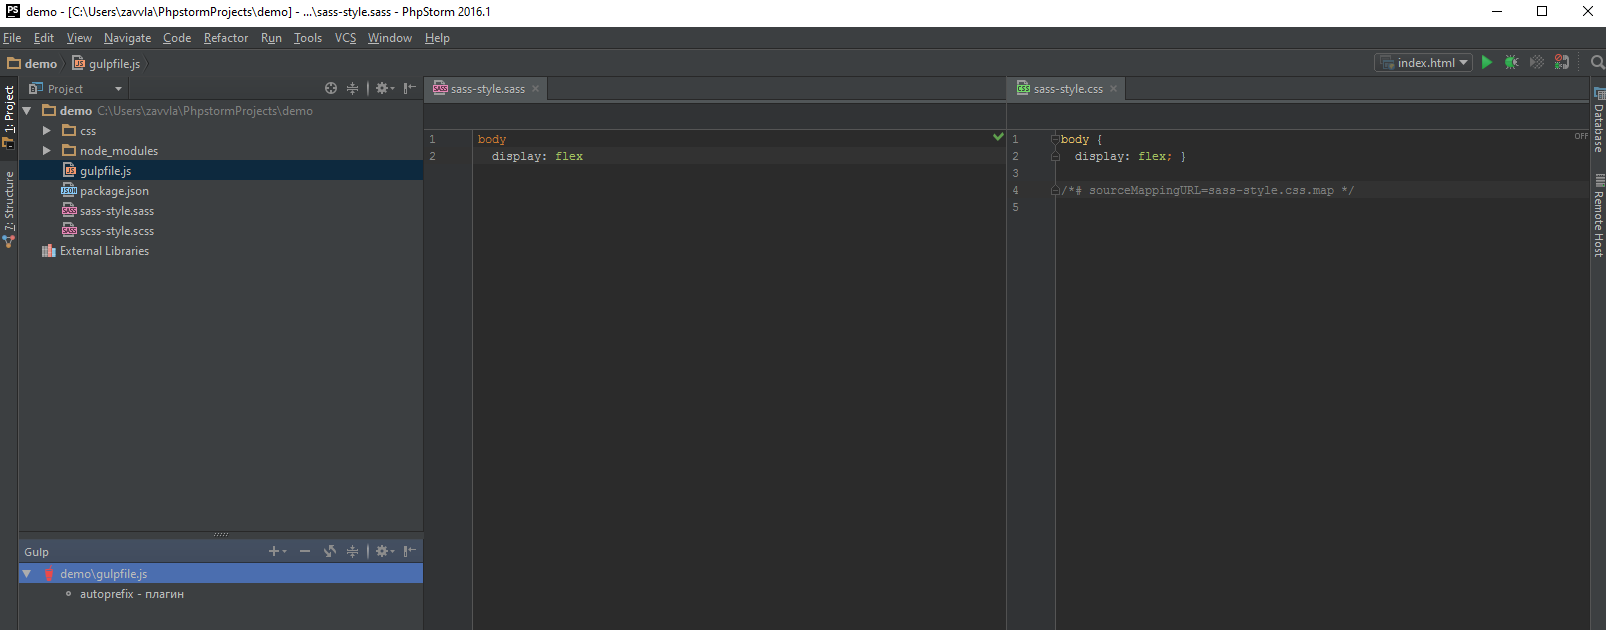
Attention! After any changes to the file "gulpfile.js", you need to update the task.
picture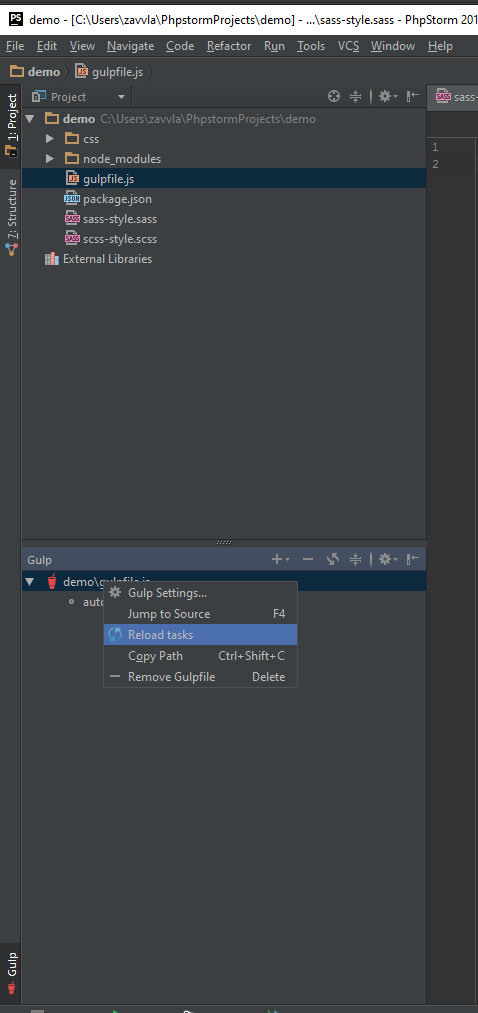
We click 2 times on the assignment, and wait for the end of its execution. If everything went well, the terminal will notify you of this. As you can see, we have added prefixes in the .css file.
picture
For example, add another plugin that will minify the code.
We execute the following command in the terminal
npm install gulp-cssnano --save-devand wait for the installation to complete. Now you need to update "gulpfile.js", according to the documentation specified on the site and do not forget to update the tasks in the gulp tab.
View code
var gulp = require('gulp'),
         autoprefixer = require('gulp-autoprefixer'),
         cssnano = require('gulp-cssnano');
         gulp.task('autoprefix - плагин', function () {
              return gulp.src('css/sass-style.css')
                 .pipe(autoprefixer({
                        browsers: ['last 2 versions'],
                        cascade: false
                  }))
                  .pipe(gulp.dest('css/'));
                });
                gulp.task('nano ', function() {
                    return gulp.src('css/sass-style.css')
                    .pipe(cssnano())
                    .pipe(gulp.dest('css/'));
                });
As a result, we should have another task.
picture
We click 2 times on the task of "nano" and get a minified file, without extra spaces, indents, hyphenation, etc.
picture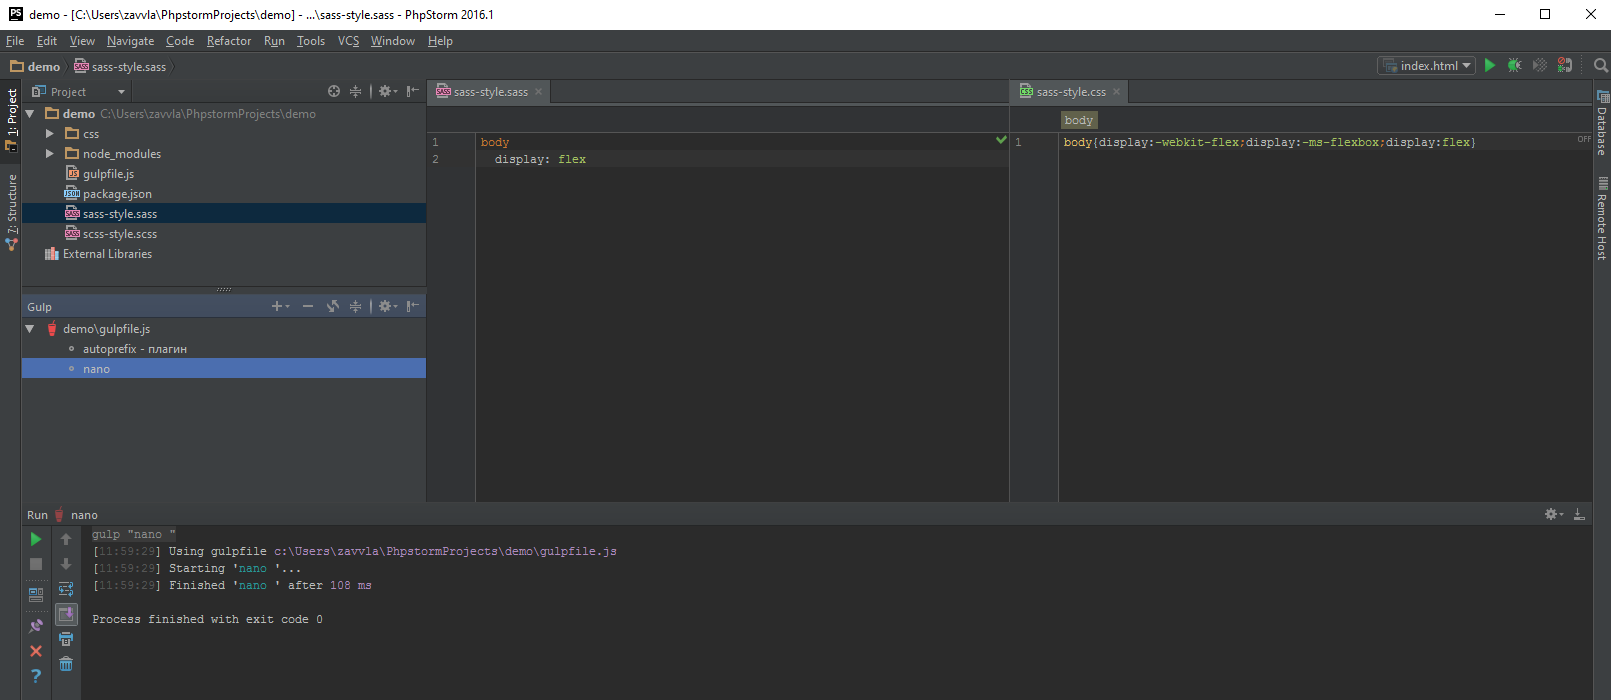
As you can see, there is nothing complicated. You can find more useful plugins here , I also recommend subscribing to the VKontakte group , in which you can follow the development of the project
Next, you most likely will have a logical question: “Will I have to install all the plugins for other projects
each time ?” In order not to put all the plugins and settings manually each time, I recommend saving my “package.json” files and "Gulpfile.js". In the future, you will only need to copy these two files into a new project and execute the command
npm installand all add-ons (autoprefixer, nano ...) will be automatically installed. It is very important to always adhere to a single file storage structure. Then you do not have to edit the file paths. How to organize the file structure, you can search the Internet. This completes the setup. In general, the time to read and configure will take no more than one hour. I hope the article will be useful to you.
The plans add a review of version control systems (git, mercurial).