Checkpoint Firewall Log Collection (OPSEC LEA)
OPSEC LEA (Log Export API) - an interface that allows you to receive logs from the management server (Checkpoint SmartCenter).
OPSEC LEA is based on a client-server architecture. The server is Checkpoint SmartCenter, which listens for incoming connections to port 18184 TCP (by default). The OPSEC LEA Client connects to the Server on the above port and receives logs.
Fw1-loggrabber is software that supports OPSEC LEA and is designed to receive logs from management servers (Checkpoint SmartCenter - hereinafter SC). Fw1-loggrabber can display the received logs on the screen, redirect it to a file or to syslog.
There are versions of this software for both Linux and Windows (for windows, syslog output is not supported).
Given:
get logs from SC and send them via syslog to an external syslog server.
To solve this problem, we will use the communication technology fw1-loggrabber and SC called "sslca", which requires authentication. It is also possible to use other mechanisms, including without authentication, which are described in the fw1-loggrabber MAN. We will use sslca firstly because it provides a more secure connection (due to the availability of authentication), and Checkpoint itself also promises to continue its support in future products.
The layout of the stand is shown in the figure below.

Figure 1 - Scheme of the stand FW1-loggrabber
To solve the problem, you will need to perform:
To install, you need to download the loggrabber software itself (https://sourceforge.net/projects/fw1-loggrabber/), unzip the archive and run the INSTALL.sh file from under the root account in the unpacked folder:
The installation script will copy the loggrabber files to / usr / local / fw1-loggrabber. This completes the installation. We pass to setup.
Having connected to the sc.local server management console using the SmartConsole graphical client, create a Syslogclient object (see Figure 2).
In the "host" field, specify the object, which is the loggraber.local host, in the "Client Entities" table, select "LEA". Click the Communicate button to set the SIC to establish the connection. The passphrase used when creating the SIC must be remembered, it will be needed later. We copy and save the DN of the object to the text file - CN = Syslogclient, O = cpmgmt.hemltd.ru.ukwt9b, because he will be needed in the next step.
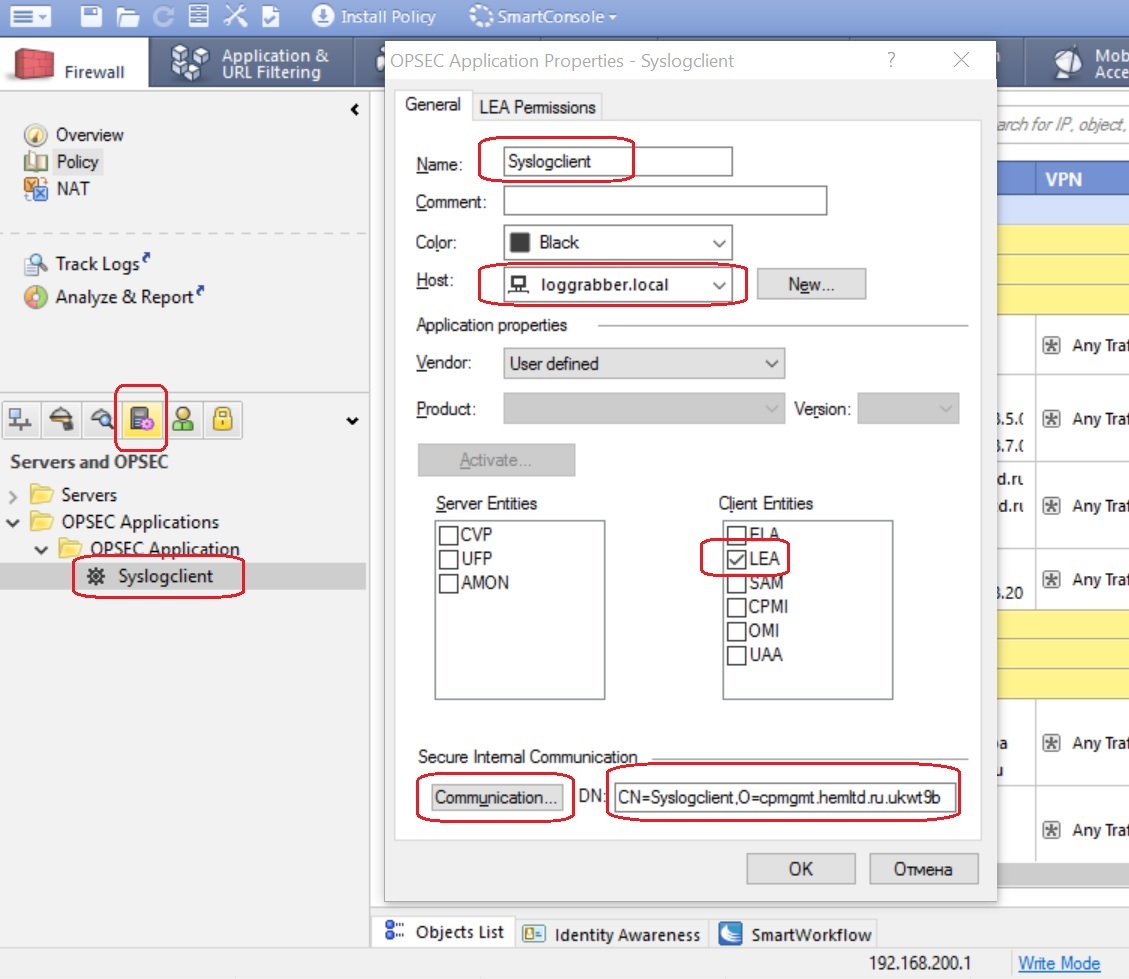
Figure 2 - Configuring the OPSEC object in Checkpoint
We also record the DN of the Checkpoint management server (sc.local), which can be found by clicking on the “Test SIC status” button in the “General” menu of the object corresponding to the Checkpoint management server in the graphical console interface (see Figure 3). In this example, this is: cn = cp_mgmt, o = cpmgmt.hemltd.ru.ukwt9b
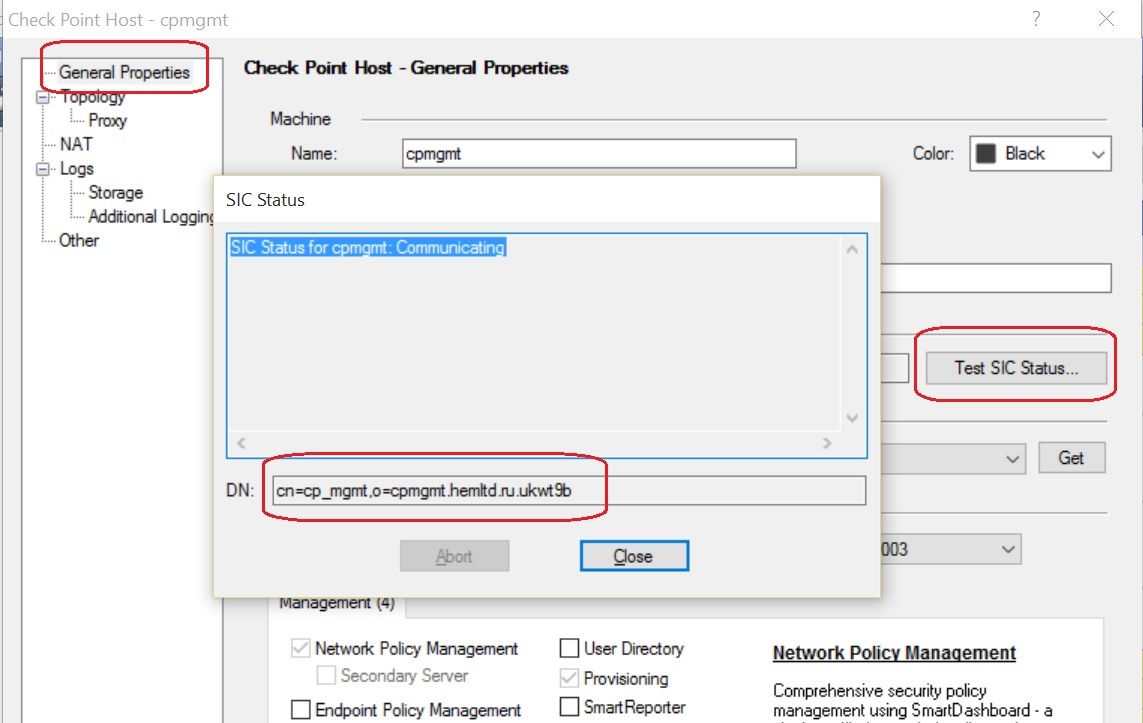
Figure 3 - Checkpoint management server DN (sc.local)
We connect to the Checkpoint management server (sc.local) via ssh, switch to expert mode and add (or modify) the following lines to the $ FWDIR / conf / fwopsec.conf file:
Then we restart the Checkpoint services:
Using the Checkpoint graphical management console, we create firewall rules that allow traffic on the tcp 18184 and tcp 18210 ports (the tcp 18210 port receives a certificate from the Checkpoint server by the loggrabber.local server) in the direction from the loggrabber.local server to sc.local.
Install the policy.
On the loggrabber.local server, install the opsec_pull utility from the opsec-tools package or from the OPSEC SDK. This utility is needed to establish a SIC connection between fw1-loggrabber and the Checkpoint management server.
We get the certificate from the Checkpoint management server by the command:
The resulting file is placed in the folder fw1-loggraber: / usr / local / fw1-loggrabber
Modify the file /usr/local/fw1-loggrabber/etc/lea.conf as follows:
For lea_server ip, specify the IP address of the sc.local server. For opsec_sic_name, specify the DN of the OPSEC LEA object created in step 2. As lea_server opsec_entity_sic_name, specify the Checkpoint server DN obtained in step 2. opsec_sslca_file should indicate the full path to the certificate file received from the Checkpoint server (described at the beginning of this step).
We modify the file /usr/local/fw1-loggrabber/etc/fw1-loggrabber.conf as follows:
Run fw1-loggrabber:
In the rsyslog configuration file, add:
And restart rsyslog:
Thus, the logs received by fw1-loggrabber on the loggrabber.local server (192.168.0.2) from the Checkpoint sc.local server (192.168.0.1) are redirected to the LOCAL1 rsyslog facilitation, which sends them over the network to the syslog.local server ( 192.168.0.3), as shown in Figure 1.
OPSEC LEA is based on a client-server architecture. The server is Checkpoint SmartCenter, which listens for incoming connections to port 18184 TCP (by default). The OPSEC LEA Client connects to the Server on the above port and receives logs.
Fw1-loggrabber is software that supports OPSEC LEA and is designed to receive logs from management servers (Checkpoint SmartCenter - hereinafter SC). Fw1-loggrabber can display the received logs on the screen, redirect it to a file or to syslog.
There are versions of this software for both Linux and Windows (for windows, syslog output is not supported).
Given:
- Checkpoint Management Server. Checkpoint software version - R77.30 (sc.local);
- Server with CentOS 6.6 (loggraber.local);
- Syslog server (syslog.local).
Task:
get logs from SC and send them via syslog to an external syslog server.
Decision:
To solve this problem, we will use the communication technology fw1-loggrabber and SC called "sslca", which requires authentication. It is also possible to use other mechanisms, including without authentication, which are described in the fw1-loggrabber MAN. We will use sslca firstly because it provides a more secure connection (due to the availability of authentication), and Checkpoint itself also promises to continue its support in future products.
The layout of the stand is shown in the figure below.
Figure 1 - Scheme of the stand FW1-loggrabber
To solve the problem, you will need to perform:
- Installing fw1-loggrabber on the loggrabber.local server;
- Creation of an OPSEC LEA object on the side of Checkpoint SC;
- Configure the Checkpoint Management Server;
- Configure fw1-loggrabber.
1. Installing fw1-loggrabber
To install, you need to download the loggrabber software itself (https://sourceforge.net/projects/fw1-loggrabber/), unzip the archive and run the INSTALL.sh file from under the root account in the unpacked folder:
# gzip –d fw1-loggrabber-1.11.1-linux.tar.gz
# tar xvf fw1-loggrabber-1.11.1-linux.tar
# cd fw1-loggrabber-1.11.1-linux
# ./INSTALL.sh
The installation script will copy the loggrabber files to / usr / local / fw1-loggrabber. This completes the installation. We pass to setup.
2. Creating an OPSEC LEA Object
Having connected to the sc.local server management console using the SmartConsole graphical client, create a Syslogclient object (see Figure 2).
In the "host" field, specify the object, which is the loggraber.local host, in the "Client Entities" table, select "LEA". Click the Communicate button to set the SIC to establish the connection. The passphrase used when creating the SIC must be remembered, it will be needed later. We copy and save the DN of the object to the text file - CN = Syslogclient, O = cpmgmt.hemltd.ru.ukwt9b, because he will be needed in the next step.
Figure 2 - Configuring the OPSEC object in Checkpoint
We also record the DN of the Checkpoint management server (sc.local), which can be found by clicking on the “Test SIC status” button in the “General” menu of the object corresponding to the Checkpoint management server in the graphical console interface (see Figure 3). In this example, this is: cn = cp_mgmt, o = cpmgmt.hemltd.ru.ukwt9b
Figure 3 - Checkpoint management server DN (sc.local)
3. Configure Checkpoint Management Server
We connect to the Checkpoint management server (sc.local) via ssh, switch to expert mode and add (or modify) the following lines to the $ FWDIR / conf / fwopsec.conf file:
lea_server port 0
lea server auth_port 18184
lea server auth_type sslca
Then we restart the Checkpoint services:
# cpstop
# cpstart
Using the Checkpoint graphical management console, we create firewall rules that allow traffic on the tcp 18184 and tcp 18210 ports (the tcp 18210 port receives a certificate from the Checkpoint server by the loggrabber.local server) in the direction from the loggrabber.local server to sc.local.
Install the policy.
4. Configuring FW1-loggrabber
On the loggrabber.local server, install the opsec_pull utility from the opsec-tools package or from the OPSEC SDK. This utility is needed to establish a SIC connection between fw1-loggrabber and the Checkpoint management server.
We get the certificate from the Checkpoint management server by the command:
# opsec_pull_cert -h 192.168.0.1 -n Syslogclient -p <парольная фраза, использованная при создании SIC на шаге 2>The resulting file is placed in the folder fw1-loggraber: / usr / local / fw1-loggrabber
Modify the file /usr/local/fw1-loggrabber/etc/lea.conf as follows:
lea_server auth_type sslca
lea_server ip 192.168.0.1
lea server port 0
lea_server auth_port 18184
opsec_sic_name "CN=Syslogclient,O=cpmgmt.hemltd.ru.ukwt9b"
opsec_sslca_file /usr/local/fw1-loggrabber/opsec.p12
lea_server opsec_entity_sic_name "cn=cp_mgmt,o=cpmgmt.hemltd.ru.ukwt9b"
For lea_server ip, specify the IP address of the sc.local server. For opsec_sic_name, specify the DN of the OPSEC LEA object created in step 2. As lea_server opsec_entity_sic_name, specify the Checkpoint server DN obtained in step 2. opsec_sslca_file should indicate the full path to the certificate file received from the Checkpoint server (described at the beginning of this step).
We modify the file /usr/local/fw1-loggrabber/etc/fw1-loggrabber.conf as follows:
DEBUG_LEVEL="0"  # выключен debug, для отладки можно поставить 3
FW1_LOGFILE="fw.log"  # имя файла лога на стороне сервера Checkpoint
FW1_OUTPUT="logs" # параметр говорит о том, что loggrabber будет получать логи с сервера Checkpoint. Если указать files, то при запуске loggrabber выведет список доступных файлов логов
FW1_TYPE="ng" # для старых версий Checkpoint (Checkpoint FW-1 4.1) указать в данном поле 2000
FW1_MODE="normal" # audit – логи аудита, normal – логи безопасности
ONLINE_MODE="yes" # работа в режиме реального времени. No – тогда loggrabber считывает весь лог и останавливается
RESOLVE_MODE="no" # отключено разрешение DNS имен
SHOW_FIELDNAMES="yes" # включать имена полей в лог
RECORD_SEPARATOR="|"  # разделитель полей
DATEFORMAT="std" # формат временной метки
LOGGING_CONFIGURATION=syslog # loggrabber передает логи в syslog, можно в file
OUTPUT_FILE_PREFIX="fw1-loggrabber" # префикс лог файла (в случае записи лога в файл)
OUTPUT_FILE_ROTATESIZE=104857600 # максимальный размер файла
SYSLOG_FACILITY="LOCAL1" # syslog facility
Run fw1-loggrabber:
/usr/local/fw1-loggrabber/bin/fw1-loggrabberIn the rsyslog configuration file, add:
LOCAL1.* @192.168.0.3And restart rsyslog:
/etc/init.d/rsyslog restartThus, the logs received by fw1-loggrabber on the loggrabber.local server (192.168.0.2) from the Checkpoint sc.local server (192.168.0.1) are redirected to the LOCAL1 rsyslog facilitation, which sends them over the network to the syslog.local server ( 192.168.0.3), as shown in Figure 1.