“What's New in Swift 2?” By Example
- Tutorial

Swift 2 focused on improving the language itself, interacting with Objective-C, and improving the performance of compiled applications. New features of Swift 2 are presented in 6 different areas:
- fundamental language constructs such as enum, scoping (scope), argument syntax, etc.
- pattern matching ( pattern matching )
- check availability ( availability Available checking )
- extension ( extensions ) protocol
- error control ( error handling )
- interaction with Objective-C
I will review the new features of Swift 2, accompanying them with examples whose code is on Github .
1. Fundamental language constructions
No more println ()
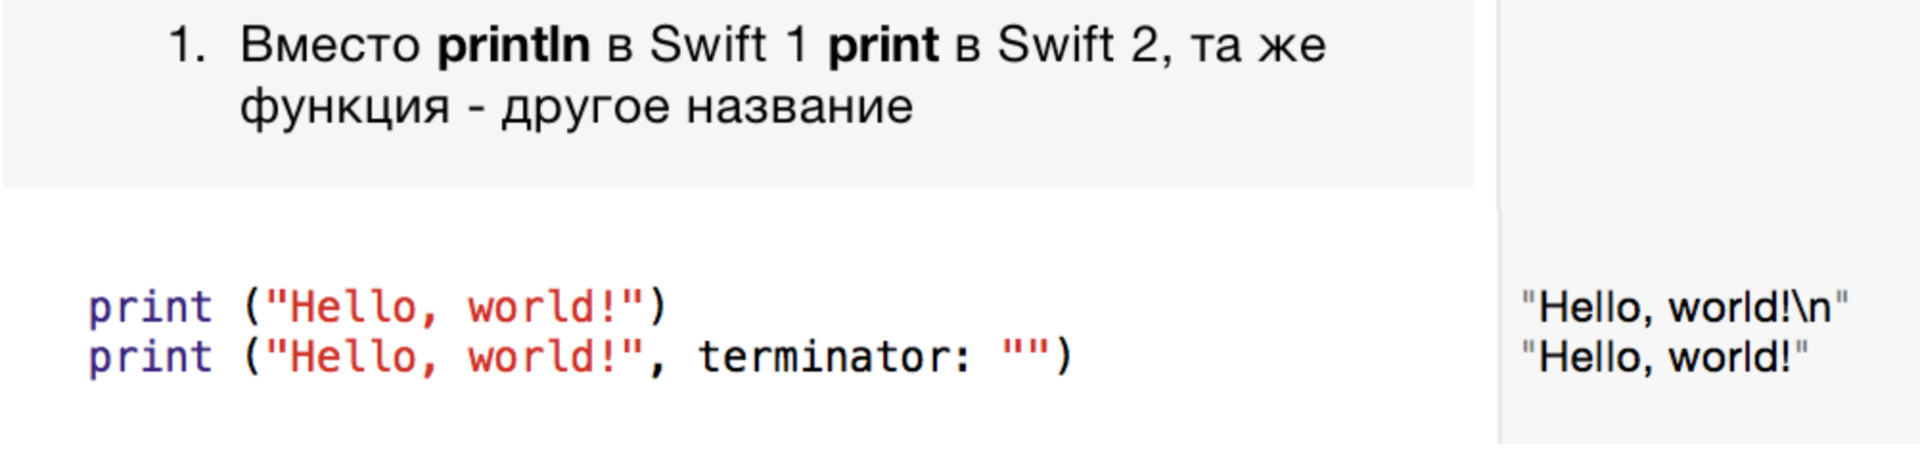
Usually we used the println () function to print a message to the console. In Swift 2, we will only use print (). Apple combined both println () and print () into one. The print () function, by default, prints your message with the "\ n" newline character. If you want, you can print a line without a newline:
map, filter and company
Defining these handy functions and methods through collections in Swift 1.2 was not entirely consistent. In Swift 1.2, there was no default implementation of the map method for the CollectionType protocol, since a default implementation in the protocol was not possible and extensions were made only for classes. Partly therefore, map was defined as a method in the Array class (which implements the CollectionType protocol), and not defined in the Set class (which implements the CollectionType protocol). In addition to this, the global map function was declared, which took an instance of CollectionType as the first parameter. This created complete confusion.
// Swift 1.2
     let a: [Int] = [1,2,3]
// здесь мы используем map как метод Array
     let b = a.map{ $0 + 1 }
// здесь мы вызываем глобально определенную map функцию
     map([1,2,3]) { $0 + 1 }
let set = Set([1,2,3])
// не работает, так как нет map метода для Set
     set.map{ $0 + 1 }
// глобальная функция map работает на Set
     map(set) { $0 + 1 }
It turned out that, depending on the type of collection, either the global map function or the map method of this collection is used. It looks inconsistent and poorly readable if a transformation chain is used using the map, filter, and reduce methods and functions.
Now in Swift 2 protocol extensions are allowed, therefore map, filter & co are implemented at the protocol level for CollectionType, as protocol extensions. Therefore, the same methods will operate on Array, Set or any other collection that implements the CollectionType protocol.
// Swift 2
let a: [Int] = [1,2,3]
let b = a.map{ $0 + 1 }
let set = Set([1,2,3])
let anotherSet = set.map{ $0 + 1 }
let sum = (1...100)
    .filter { $0 % 2 != 0 }
    .map    { $0 * 2 }
    .reduce(0) { $0 + $1 }
print(sum)
// prints out 5000
We see in the above example that filter now works on Range. In the previous version, this did not work, because although Range confirmed the CollectionType protocol, the filter method was not implemented. Now everywhere we have a much more understandable syntax of these methods for any collection.
Enum Enums
In Swift 2, enum has enough reflection information to make printing possible.

The print (an) sentence will now print Dragon correctly, although in the previous version of Swift, the output was completely not informative (Enum Value).
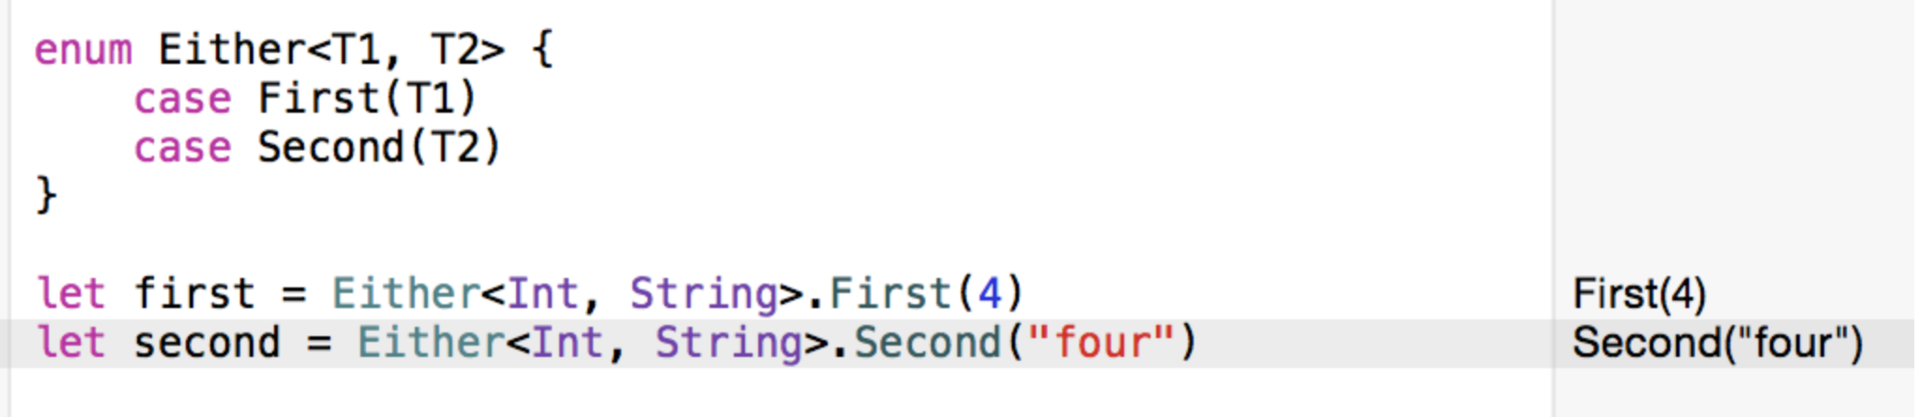
Another improvement regarding enum is that Swift now allows the representation of associated values of various types in enum. As an example, you can now legitimately imagine the type of Either:
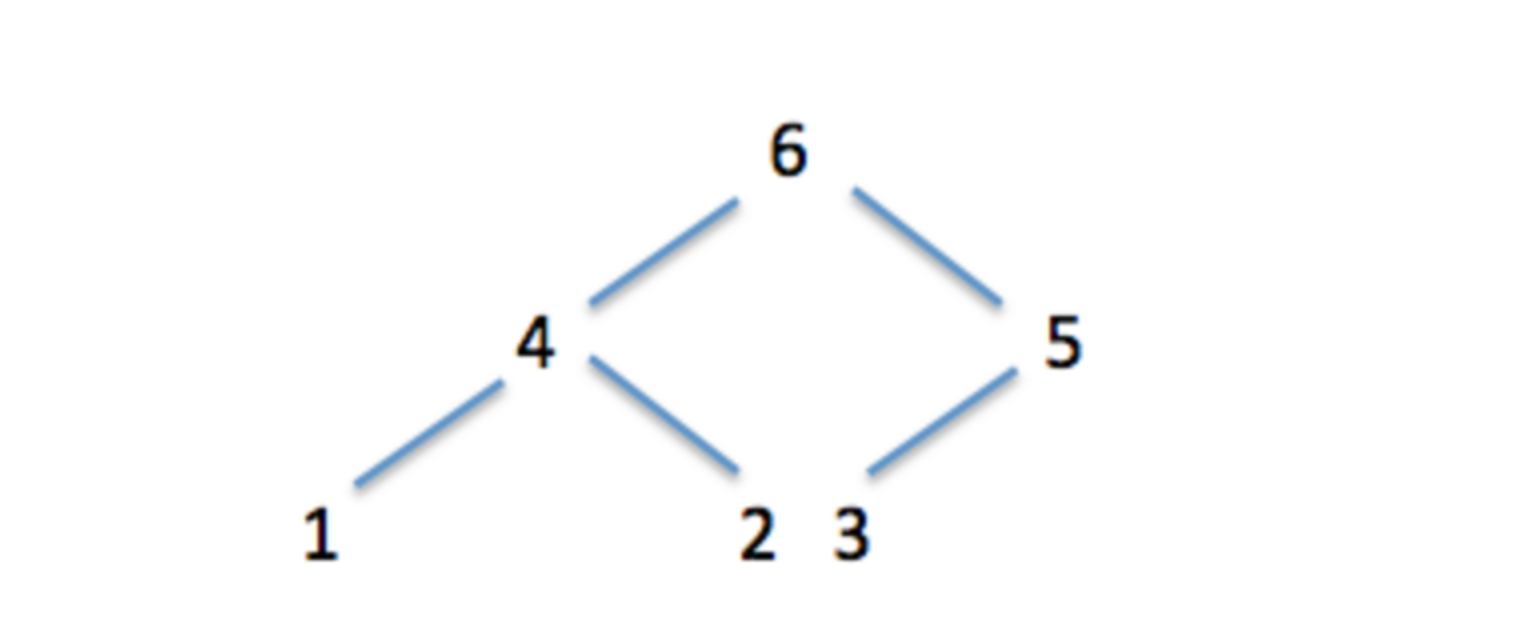
Now enum can be recursive, that is, we can build a tree using enum. Let's look at this example:

We must use the indirect keyword in front of the case Node. And this allowed us to create a tree:

Here is what it looks like:
Now we can create a function that recursively traverses the whole tree and adds the numbers:
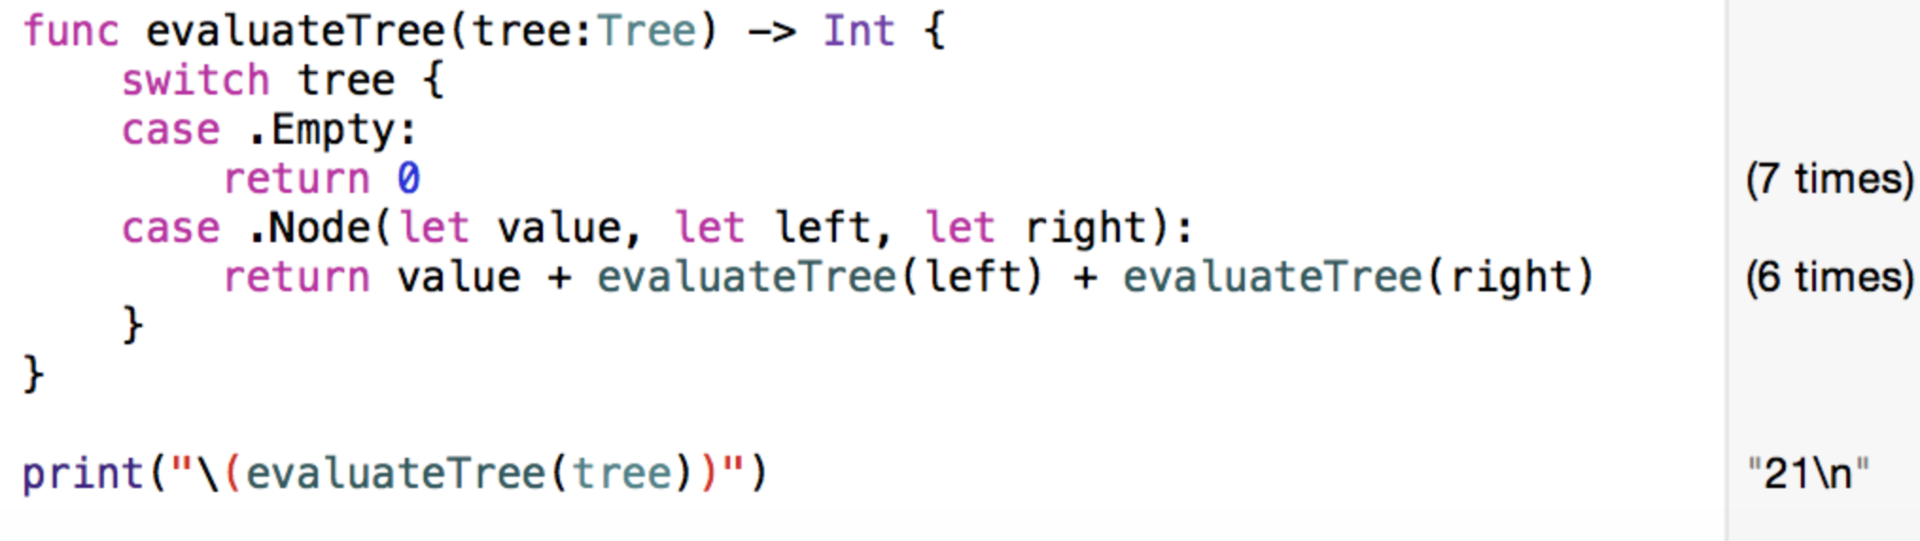
A result equal to 21 should be printed.
Diagnostics.
In addition to this, Swift 2 brought a huge number of improvements in error diagnostics and assumptions for correcting them, such as the correct definition of a developer’s attempt to change var using the immutable struct method, or when the var property never changes after initialization, or when the result of calling the function etc.
One of the simplest changes makes the code more readable. As you know, Swift developers prefer to declare many things as constants using let, rather than as variables using var. But what if you accidentally used the var keyword? Or did you think that you need to change it, but did not do it? Both Xcode 7 and Swift 2 will give you a warning that you don’t change this variable anywhere in your code - Xcode literally explores all ways to use the variable and knows for sure whether you changed it or not.
Set of options
Lots of options is a way to represent a lot of Boolean values, and in Swift 1.x it looked like this:
viewAnimationOptions = nil
viewAnimationOptions = .Repeat | .CurveEaseIn | .TransitionCurlUp
if viewAnimationOptions & .TransitionCurlUp != nil { ...
This type of syntax was widely used in Cocoa, but in reality, it is only a “relic” of the C language. So in Swift 2 it is removed and presents its own type for many options, this is OptionSetType protocol:
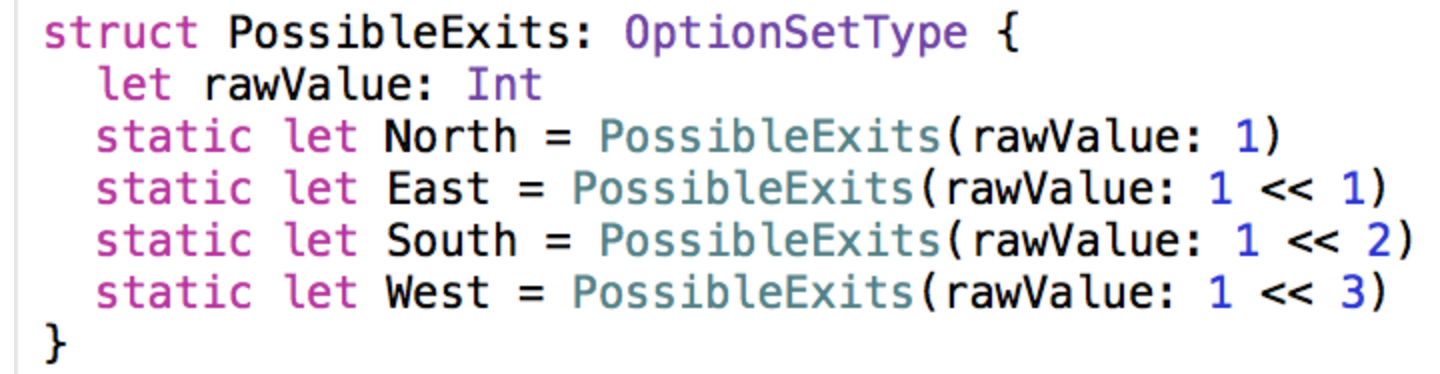
So now many options can be any type of Set or struct confirming OptionSetType protocol. This leads to a more understandable syntax when using multiple options:
The syntax does not rely on "bit" operations, as in previous versions, and does not use nil to represent an empty set of options.
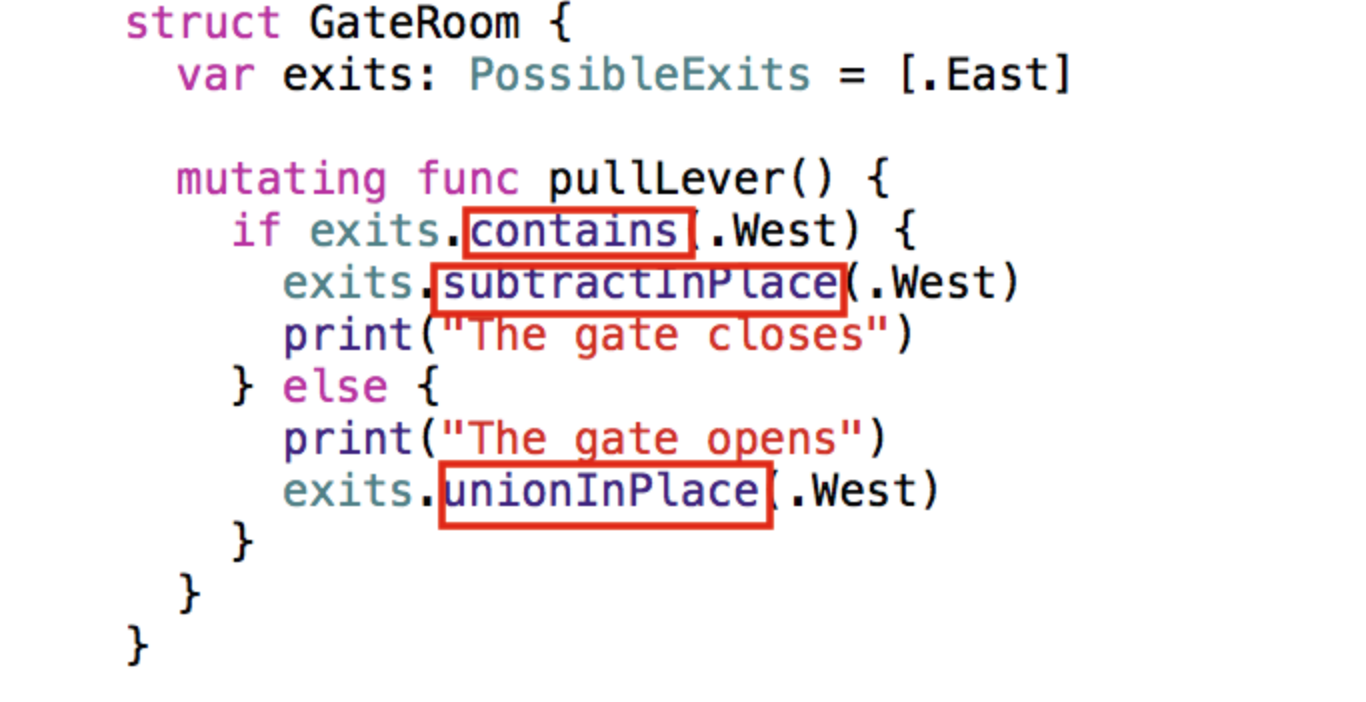
It should be noted that many OptionSetType options now rely on another feature in Swift 2 called the default implementations for protocol extensions, so just confirming the OptionSetType protocol, you get the default implementation, for example, for the contains method, subtractInPlace, unionInPlace and other set operations. We will look at protocol extensions later.
Functions and Methods
The Swift 1.x syntax for declaring functions and methods was inherited from two different conventions, deriving respectively from C, where the function arguments have no labels, and Objective-C, which labels the method arguments. So you had such declarations:
func save(name: String, encrypt: Bool) { ... }
class Widget {
  func save(name: String, encrypt: Bool) { ... }
save("thing", false)
widget.save("thing", encrypt: false)
In Swift 2, the above code would look like this:
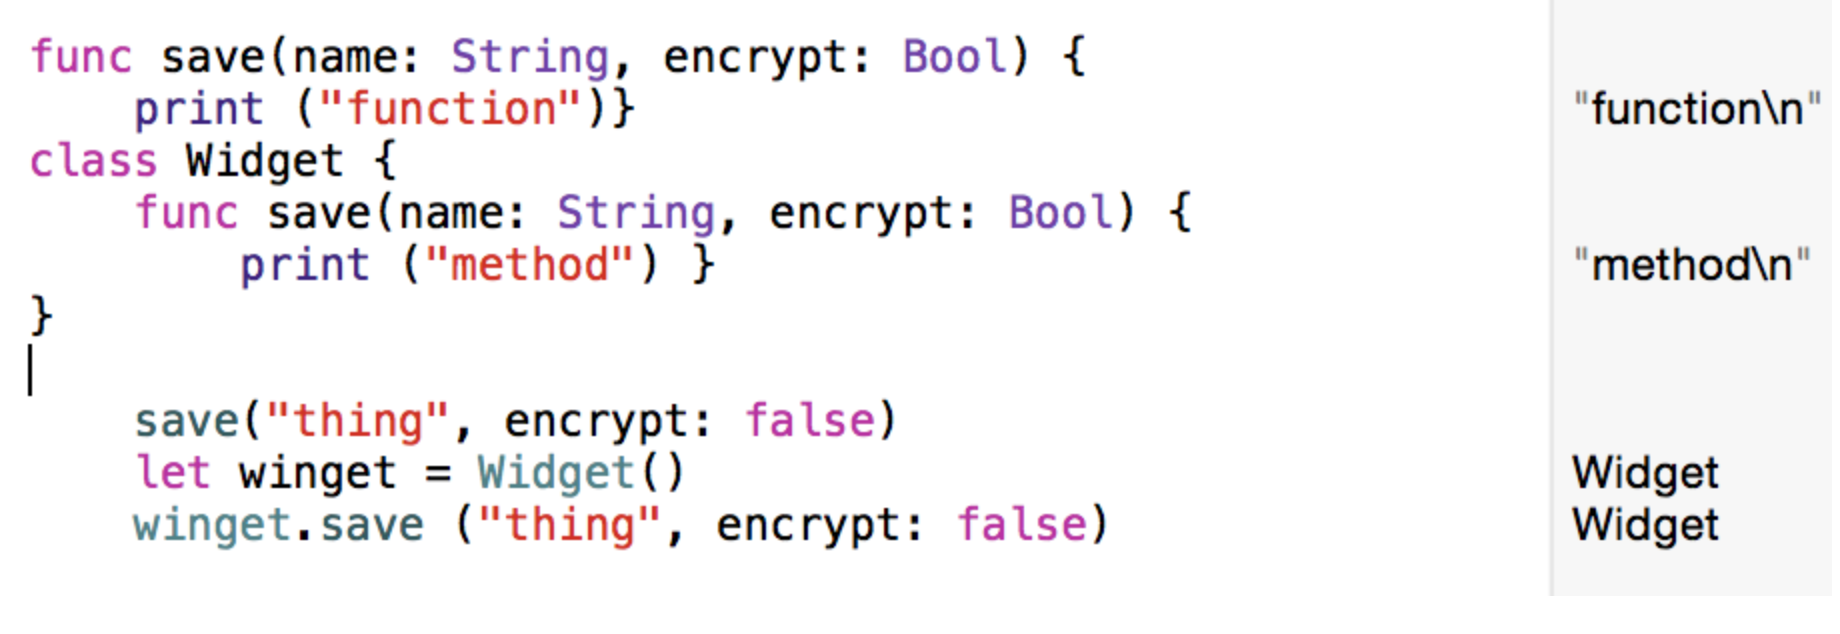
So the functions got the same convention as the methods:
- the name of the first argument is implied in the function name;
- subsequent arguments are labeled.
However, these changes do not apply to functions imported from the C and Objective-C APIs.
Additionally, the model for declaring parameter labels has become more convenient, since the #option option, which was used in Swift 1.x to designate a parameter with the same internal and external names, has been removed.
Scoping Operators
The new do clause allows developers to explicitly define the scope of variables and constants. This can be useful for reusing already declared names or for the early release of some resources. The do clause looks like this:

In order to avoid ambiguity with the do ... while clause, which was introduced in earlier versions of Swift 1.x, in Swift 2 the latter was renamed to repeat ... while.
UNIT testing
The problem with unit testing code on Swift 1.x is that Swift 1.x made you tag public with everything you want unit testing to see. As a result, public marks remain where they should not be. All this is due to the fact that Test Target is different from Application Target , and files from your application that are internal are not available for Test Target .
Swift 2 has achieved significant relief in unit testing. Xcode 7 automatically compiles Swift 2 code in a special “test” mode
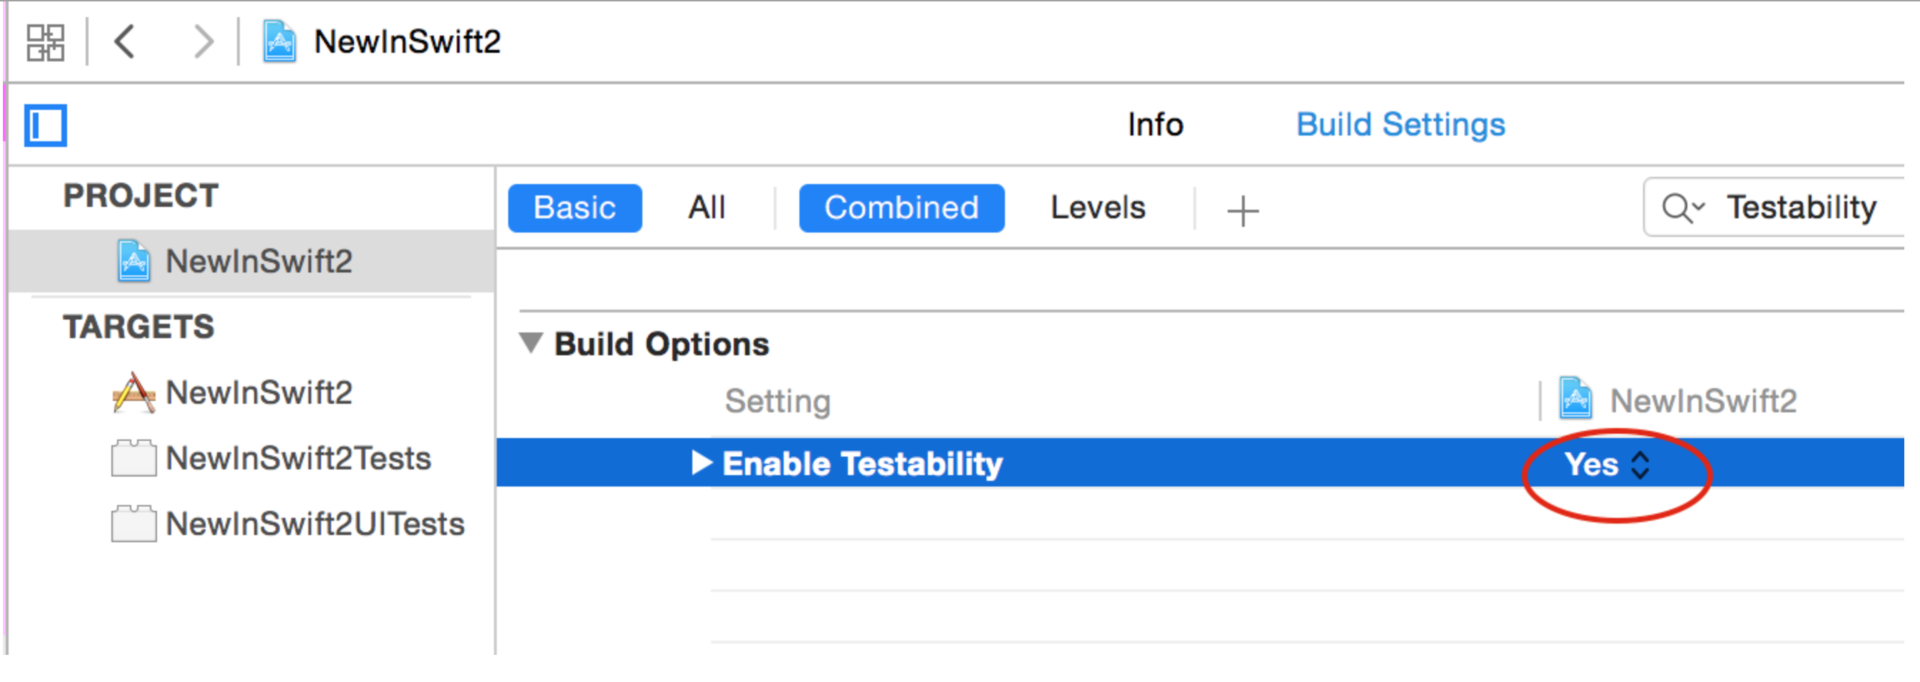
to access all internal definitions as if they were defined as public. This is done using the @testable attribute when importing our module.
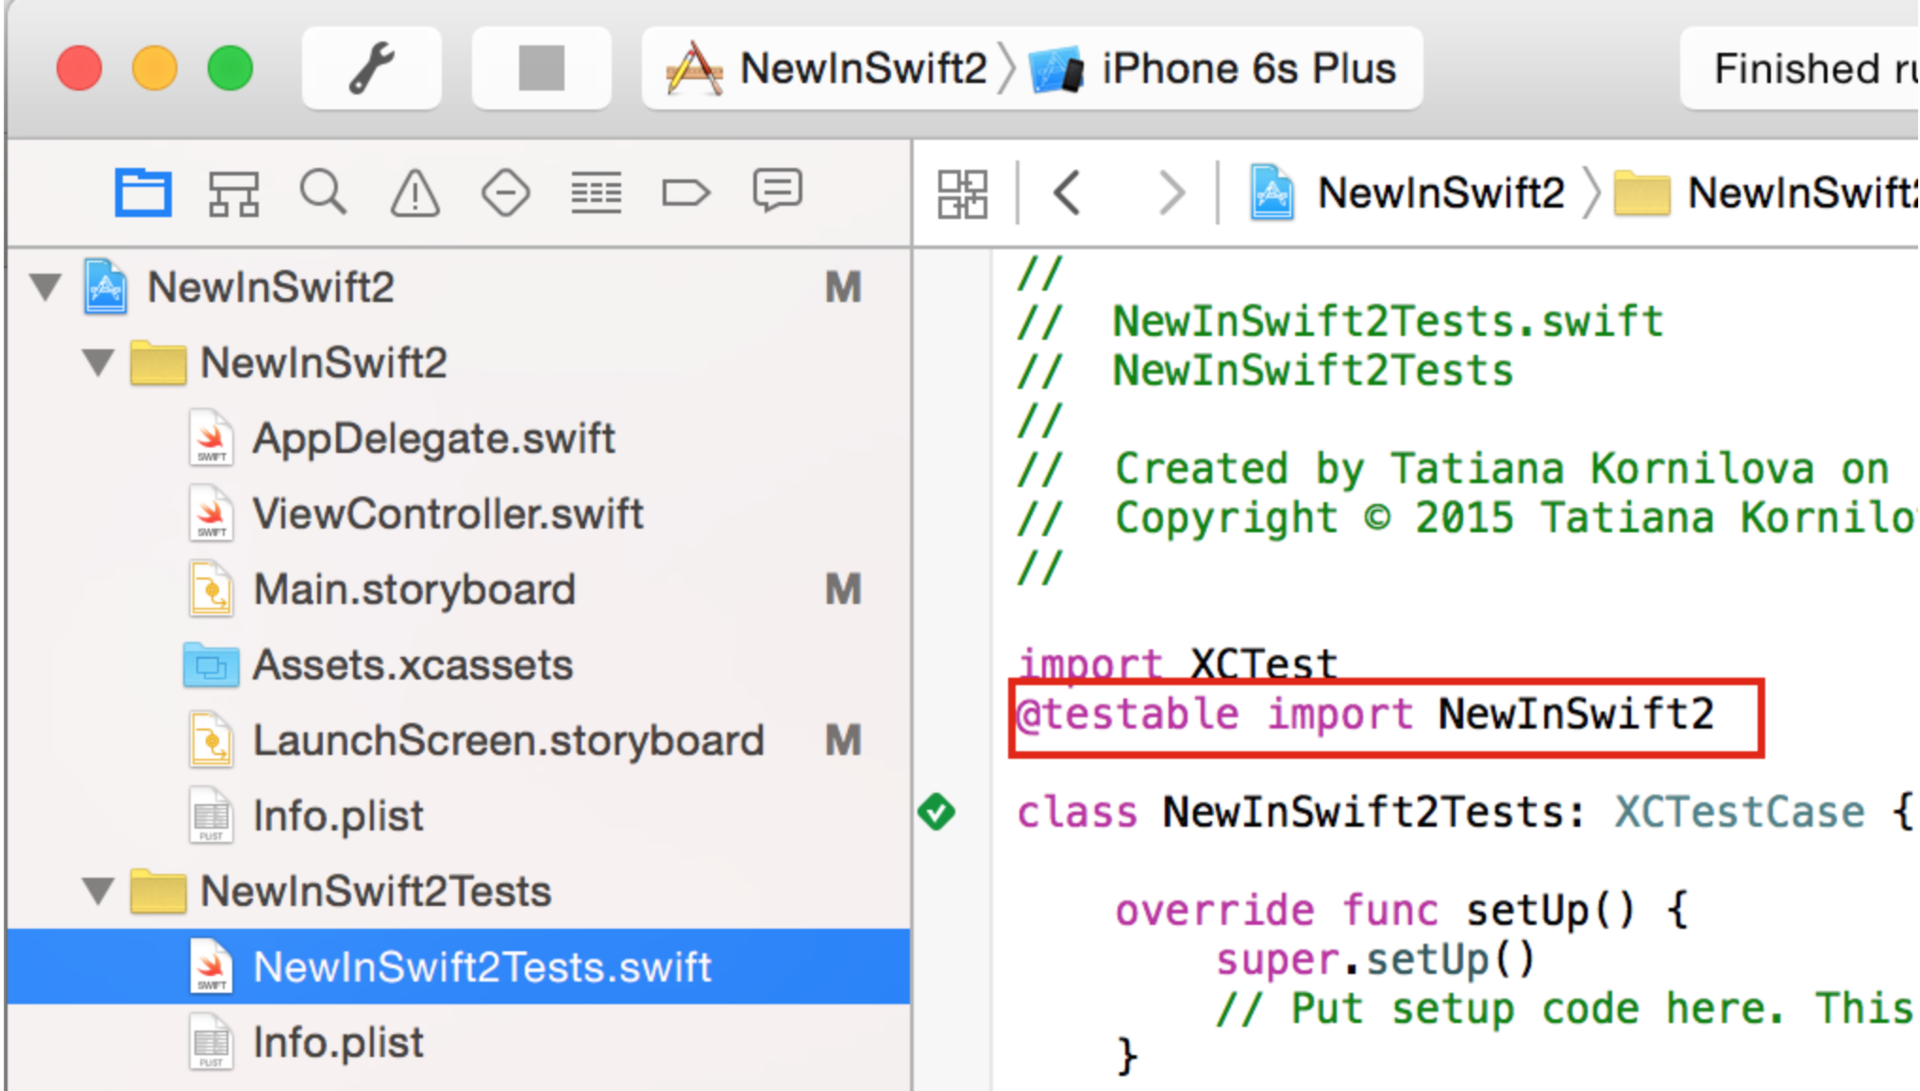
That’s all it takes, and you don’t need to label anything with the word public.
Moreover, these changes do not affect the main release of your application, while maintaining the correct behavior both in terms of performance and in terms of access control.
2. Management of the order of calculations
Swift 2 introduces new concepts for managing the order of computation, as well as improving existing designs.
Guard offer
The guard clause, like the if clause, executes code depending on the Boolean value of the conditional expression. You use the guard clause so that if the Boolean value is true, continue executing the code following the guard clause.
The guard clause is essentially an inverse of the if clause. For if we write:
if condition {
       // true ветка
   } else {
       // false ветка
   }
For guard, true branch rises to a higher level than false branch:
guard condition else {
        // false ветка
    }
    // true ветка
Note that a false branch should end execution in a closed context, returning a value or throwing an error. You guarantee that the code in the true branch will be executed only if the condition is met.
This makes the guard a natural way to test non-fatal preconditions without using a “symmetry pyramid” formed by nested if sentences and without inverting the conditions.
Let's see what a typical code execution path looks like when using the traditional if clause.
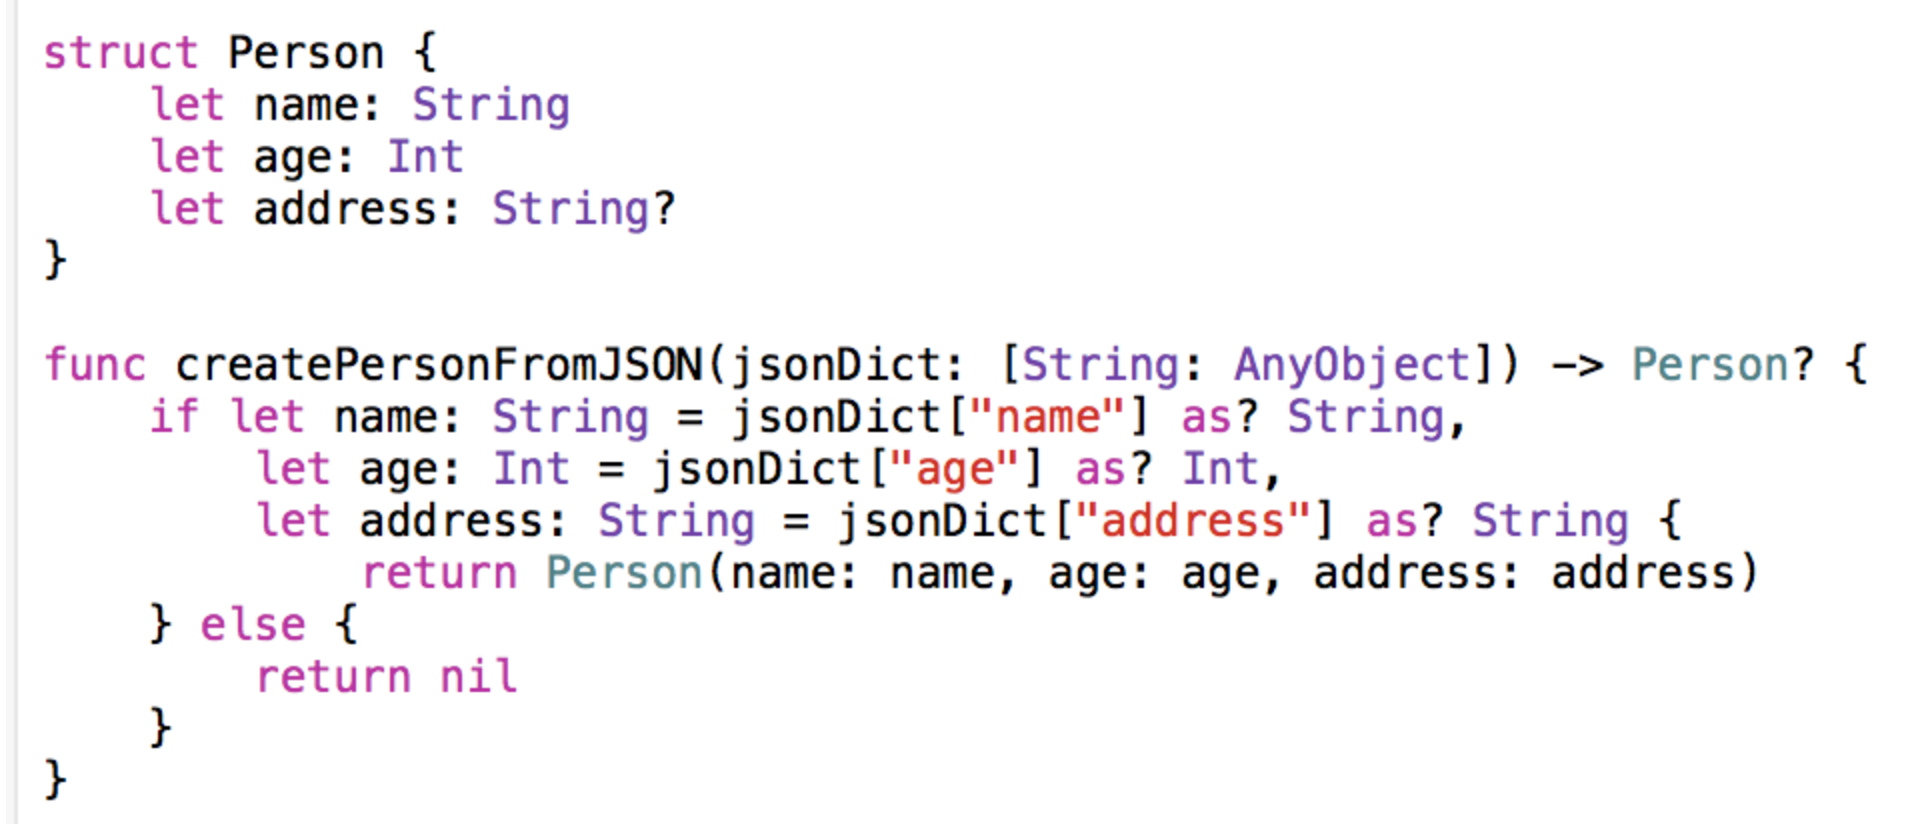
The jsonDict dictionary is supplied to the createPersonFromJSON function input, and the correct instance of the Person structure is created at the output, if the relevant information is presented in the dictionary, otherwise nil is returned. The function is written as it would look in Swift 1.2 - using the if let construct. There are a couple of pain points in this code. Firstly, “turning off” the direction of correct calculations from the main code, that is, the “successful” (from the point of view of the condition) direction of calculations turned out to be “embedded” in the if let clause. Secondly, the createPersonFromJSON function does not always return an instance of Person when we need it. The Person structure contains 3 properties, one of which is Optional, but the function returns the correct instance of Person only if we get non-nil values from the dictionary for all 3 keys. Let's rewrite this function like this: so that we can return an instance of Person if the address is missing, that is, if the address key returns nil.
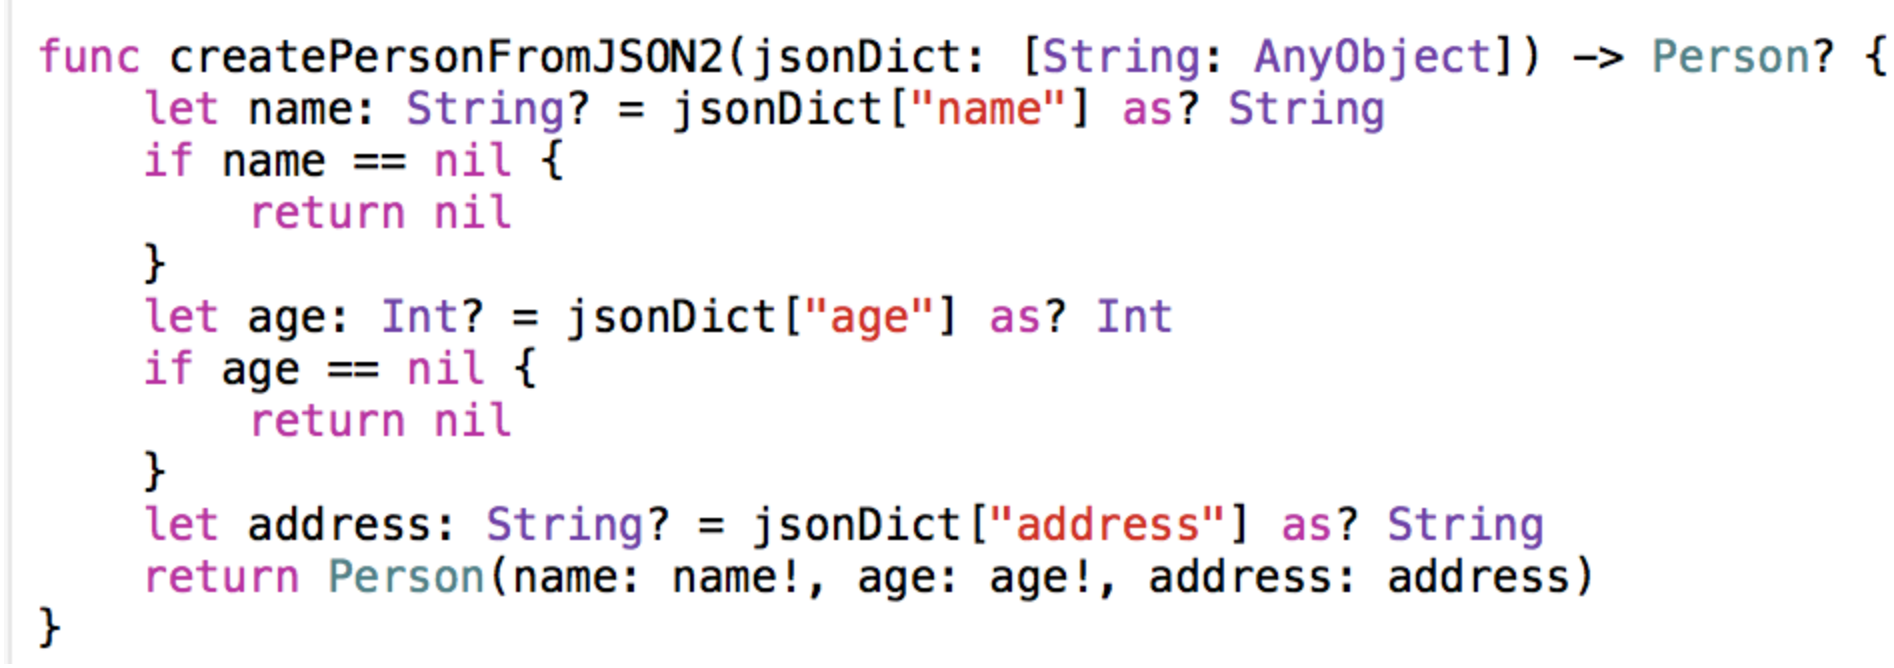
We have made a slight improvement in functionality. This version of the createPersonFromJSON2 function can now create an instance of Person even if the address is nil. This better reflects the structure of Person, but now we have many if clauses, as well as the need to expand the final values assigned to name and age. Let's see how this can be improved with the new guard offer.
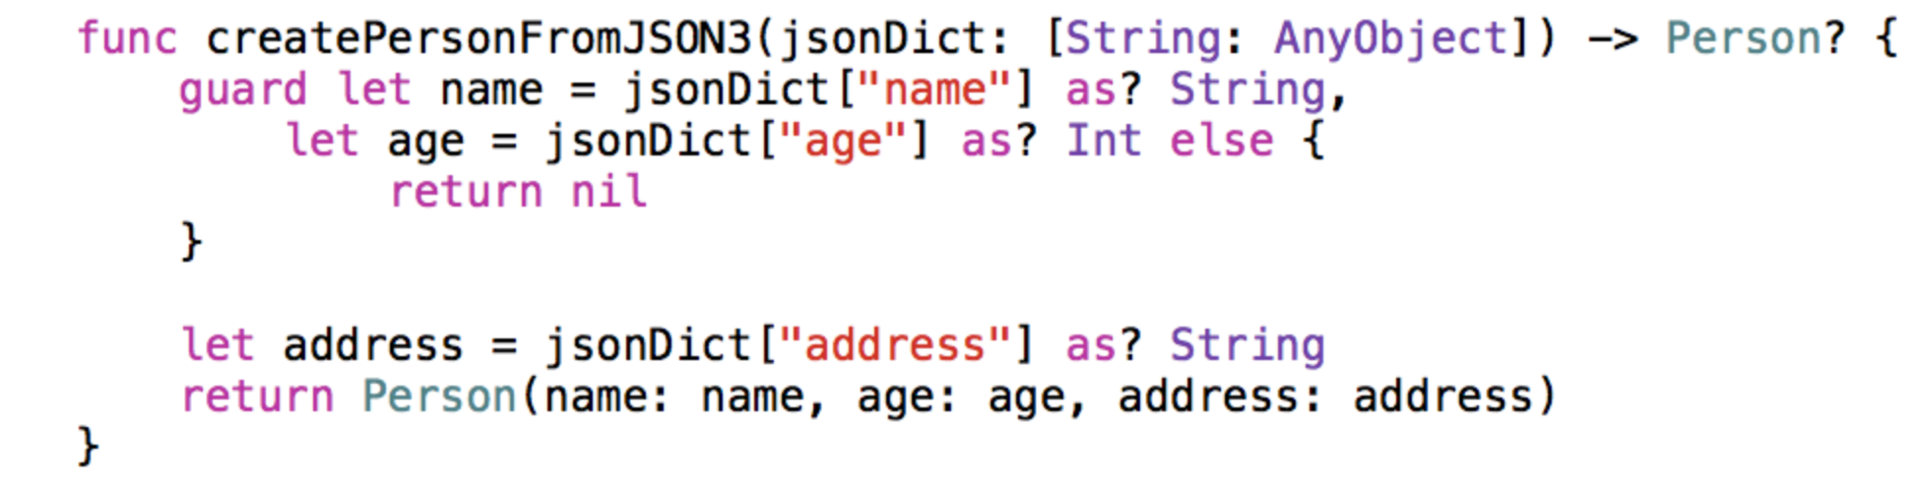
In the case of guard clauses, as well as with if let clauses, we can check for the presence of values, “expand” them and assign them to constants. However, with the guard let construct, code execution continues after curly braces {} if the conditional expression evaluates to true . This means that we can create an instance of Person inside the normal scope of the function without using additional branching code to expand the values. If any of the values of name or age is nil, then the code will jump to the else clause and return nil early.
Let's take a quick look at guard.
- If the guard clause of the clause is satisfied, code execution continues after closing the curly braces of the guard clause;
- If this condition is not met, then the code is executed in the else "branch"; unlike if, guard always has a> else block;
- The else clause must pass control outside the normal scope of the function using return, break, continue> or by calling another function or method
Defer clause
The defer clause resembles finally in other programming languages, except that it is not tied to the try clause, and you can use it anywhere. You write defer {...} and somewhere in the code, and this block will be executed when the calculation control leaves this enclosing scope, and it doesn’t matter if the code gets to the end or receives a return or “throws” "Mistake. The defer statement works well with guard and error handling (discussed later).
guard let file1 = Open(...) else {
        // обрабатываем ошибки file1
        return
    }
    defer { file1.close() }
    guard let file2 = Open(...) else {
        // обрабатываем ошибки file2
        return
    }
    defer { file2.close() }
    // используем file1 и file2
    . . . . . . .
    // нет необходимости закрывать файлы в конце, все уже сделано
Note that defer works for file1 both in the normal course of the computational process and in the event of an error with file2. This removes numerous repetitions from the code and helps you not to forget to “clear” something in any branch of calculations. Error handling faces the same problem and the defer clause is best suited for this purpose.
Repeat - while
Swift 2.0 made syntactic changes to the do-while clause that was used before. Instead of do-while, now we get repeat-while.
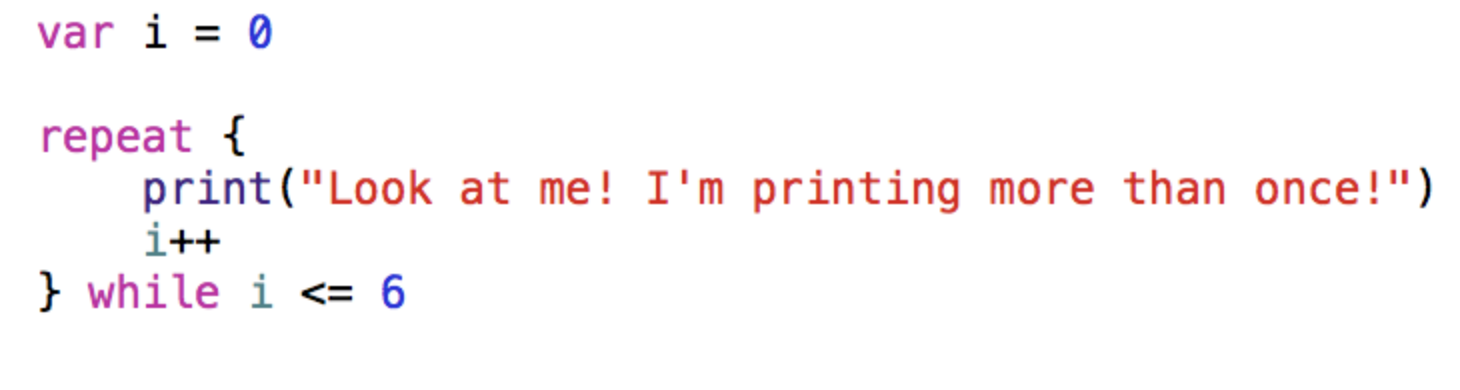
There are two reasons for such changes:
When you use the do - while loop, it is immediately unclear that this is a construction for repetition. This is especially true if the code block inside the sentence do is large and the while condition is off the screen. To mitigate this, the do keyword has been replaced with repeat, which makes it clear to the user that this is a repeating block of code.
The do keyword has a new purpose in Swift 2 in the new error handling model, which we will investigate later.
Pattern matching
Swift has always had powerful pattern matching capabilities , but only in the switch construct. The switch construct examined the value value and compared it with several possible patterns. One of the drawbacks of the switch clause is that we must provide all possible options for the value, that is, the switch statement must be exhaustive, and this causes inconvenience to use. Therefore, Swift 2 ported the pattern matching capabilities that only switch / case previously had to other suggestions that control the flow of computations. if case is one of them, and it allows you to rewrite code with switch more briefly. Other suggestions are for case and while case.
Pattern matching if case
New in Swift 2 is pattern matching support inside if (and guard) clauses. Let's first define the simplest enumeration Number, and then show how to use it.

1. Checking a specific case
We use case: we want to check whether the value matches a specific case. This works regardless of whether this case has an associated value or not, but the value is not restored (if it exists).

The sample begins with case .IntegerValue, and the value that should match this sample, the variable myNumber, comes after the equal sign. This may seem counterintuitive, but we see the same thing when “expanding” Optional values of a1 in the if let a = a1 construct: the value of a1, which is checked, comes after the equal sign.
Here is the equivalent Swift 1.2 version using switch:

2. Getting the associated value
We use case: we want to check whether the value matches a specific case, and also extract the associated value (or values).

The "pattern" has now turned into case let .IntegerValue (theInt). The value that should match the “pattern” is the same as in the previous example.
The following is an example reflecting the same concept, but with reference to guard. The predicate semantics for guard and if are identical, so pattern matching works the same way.

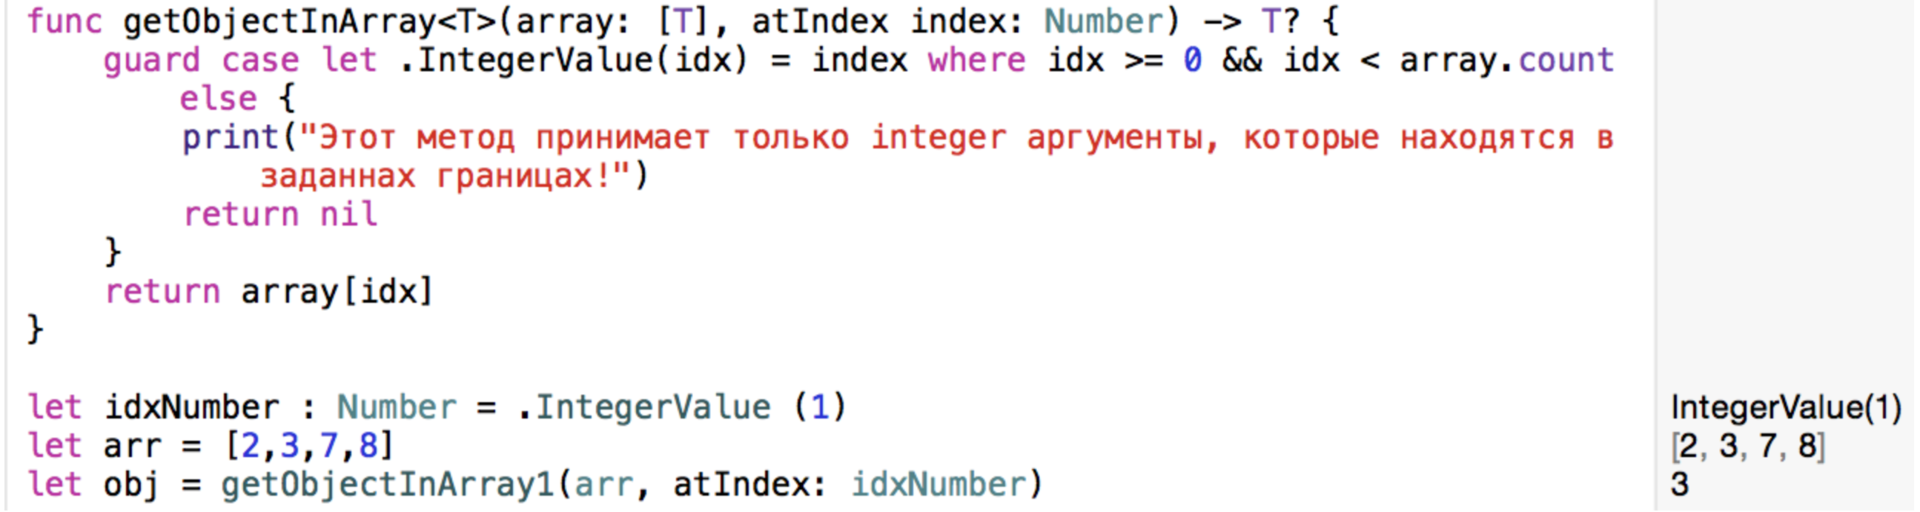
3. Selection with the where clause
To any case in the guard clause, a (optional) where clause can be added to provide additional restrictions. Let's modify the getObjectInArray: atIndex: function from the previous example:
4. Matching range

5. Use the tuple tuple
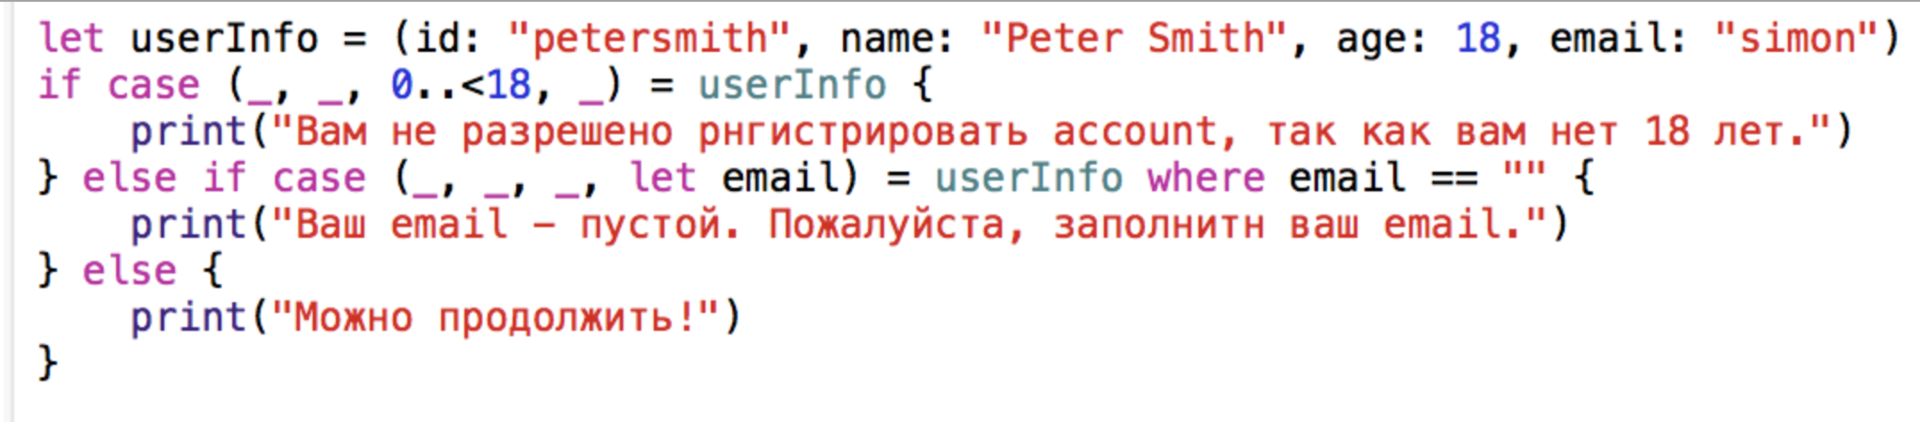
6. Complex if predicates
The if clause in Swift 2 was surprisingly capable. It can have many predicates, separated by commas. Predicates fall into one of three categories:
- The simplest logical tests (for example, foo == 10 || bar> baz). There can be only one such predicate and it should be placed first.
- Optional deployment (e.g. let foo = maybeFoo where foo> 10). If the Optional expansion predicate immediately follows another Optional expansion predicate , then let can be skipped. You can add with the where qualifier.
- Pattern matching (e.g. case let .Bar (something) = theValue), is what we examined above. You can add with the where qualifier.
Predicates are evaluated in the order in which they are defined, and after not executing a predicate, the rest are not evaluated.
Pattern matching for case
Pattern matching can be used in conjunction with the for -in loop. In this case, our intentions are to go through the elements of the sequence, but only those that correspond to the given “pattern”. Here is an example:

Note that just like the “patterns” in the switch clause, you can extract many associated values and use _ if you are not interested in this associated value. If necessary, you can also add additional restrictions using the where clause.
Pattern matching while
Pattern matching can also be used with a while loop. In this case, we will repeat the body of the loop until a certain value in the predicate corresponds to the “pattern”. Here is an example:
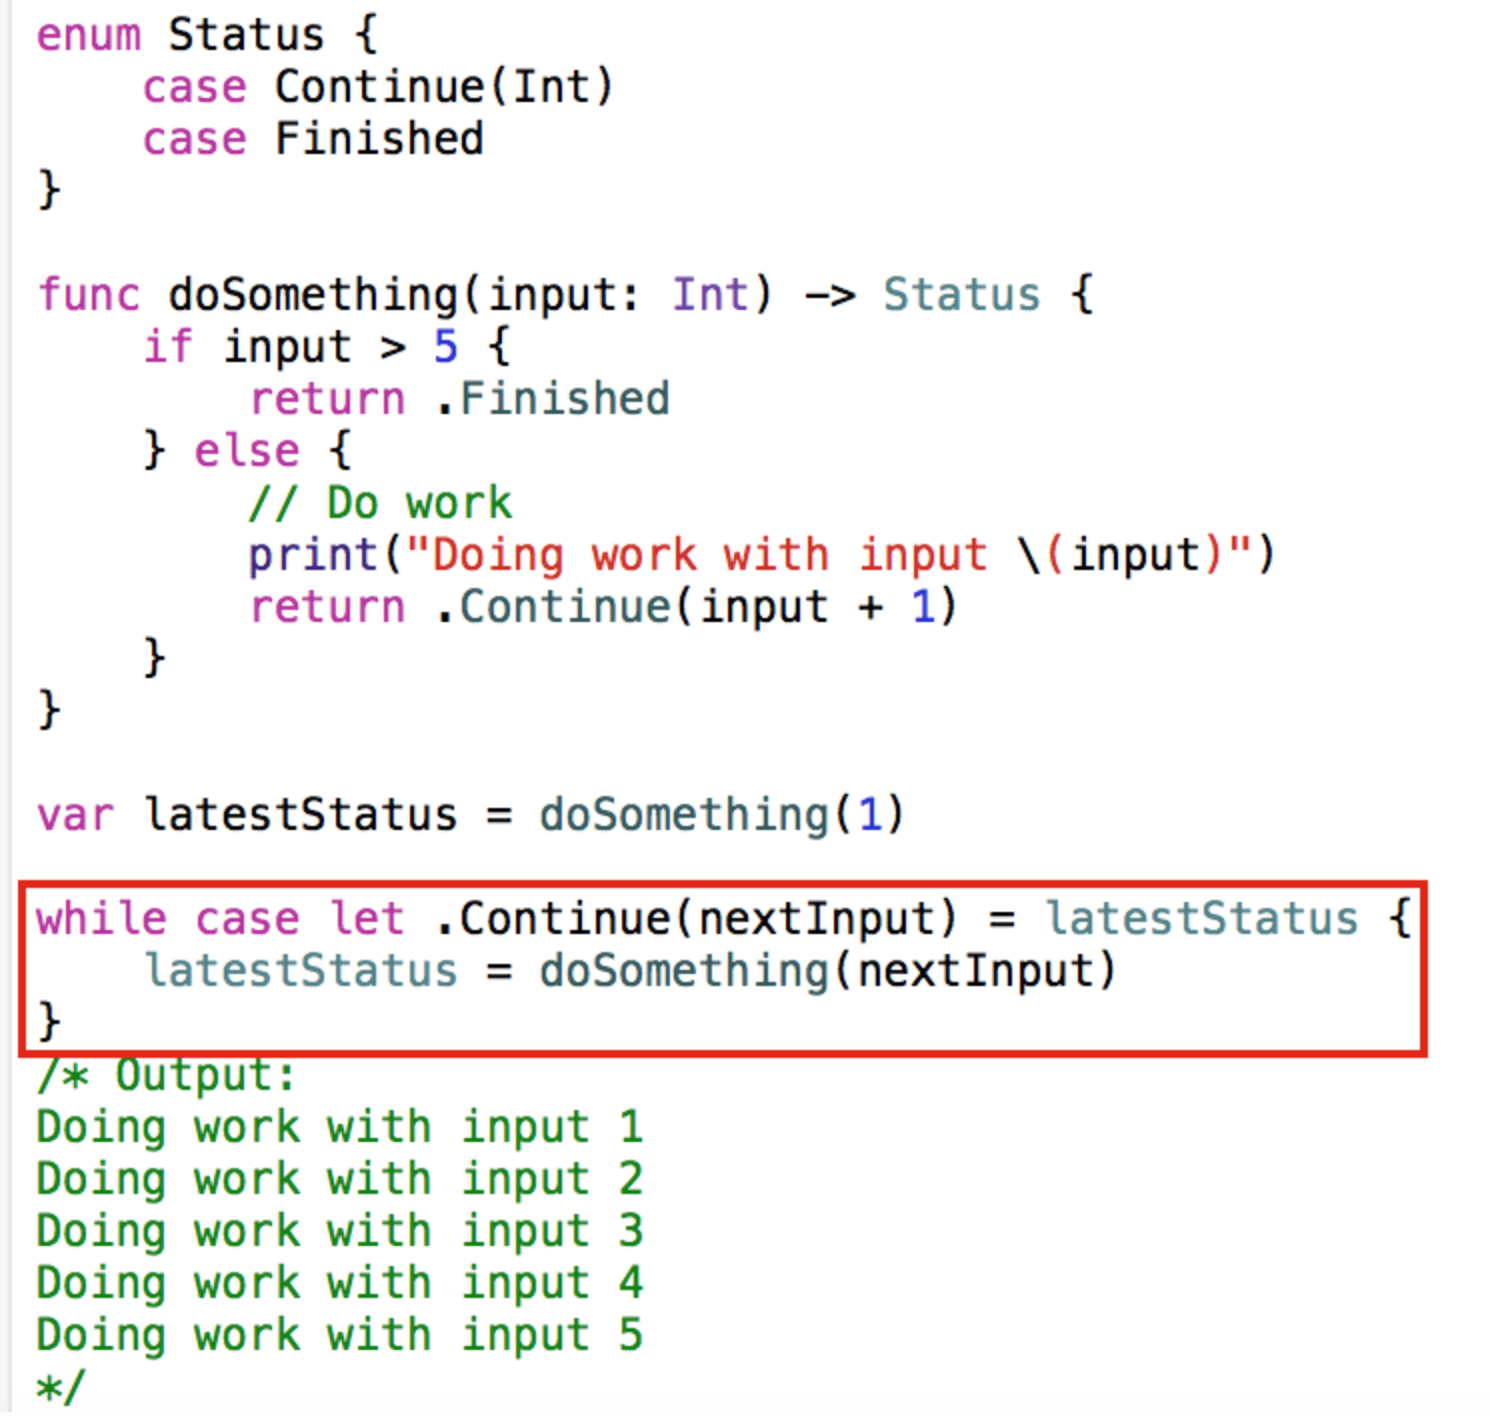
Note that the complex predicates described in the section “6. Complex if "predicates are also supported by the while loop, including the use of where.
Pattern for unwrapping multiple Optional
In Swift 1.2, we had a nice, compact syntax for “deploying” multiple Optionals in one simple if let clause:
var optional1: String?
var optional2: String?
if let optional1 = optional1, let optional2 = optional2 {
    print("Success")
} else {
    print("Failure")
}
Wow!
However, you are still faced with a situation where you really need to manage various combinations of existing / missing Optional teachings. One such example is the form for filling in the username and password fields, and the user did not fill out one of them, and clicked the “Submit” button. In this case, you will want to show a special error to notify the user what is specifically skipped. To do this, we can use pattern swapping in Swift 1.x !
var username: String?
var password: String?
switch (username, password) {
case let (.Some(username), .Some(password)):
    print("Success!")
case let (.Some(username), .None):
    print("Password is missing")
case let (.None, .Some(password)):
    print("Username is missing")
case (.None, .None):
    print("Both username and password are missing")
}
It's a little awkward, but we used it from the start.
In Swift 2, the syntax looks clearer:

At first glance, the use of the question mark is confusing? in order to show that the value is present (especially if it is associated with the idea of Optionals , when the value may or may not exist), but we must admit that this example is very understandable in contrast to the clumsy .Some (username) syntax .
Error processing
To understand the new features of Swift related to error handling, it will be useful to recall that there are 3 ways when a function can end abnormally (hereinafter, for brevity, we will switch to jargon and say “fall”):
- многие функции могут «падать» по одной достаточно простой «врожденной» причине, например, когда вы пытаетесь преобразовать String в Int; такие случаи достаточно хорошо обрабатываются с помощью возвращения Optional значения;
- на другом конце спектра находятся логические ошибки программирования, которые вызывают выход индекса массива за границы, непреемлемые условия и т.д., с ними очень тяжело иметь дело и мы не знаем, как можно ими управлять.
- третий случай — это ошибки детализации, поправимые ошибки, например, такие, как не найден файл, или ошибка сети или пользователь уничтожил операцию (ситуационные ошибки).
Handling errors of the third type related to the situation is what Swift 2 is trying to improve.
If we look at a typical scheme for managing such errors in Swift 1.x and Objective-C, do we find a scheme when a function receives an inout NSError argument? and returns a Bool to represent the successful or erroneous completion of the operation:
//Локальная переменная error запоминает ошибку, если она возвращается
var error: NSError?
// success это Bool:
let success = someString.writeToURL(someURL,
                                    atomically: true,
                                    encoding: NSUTF8StringEncoding,
                                    error: &error)
if !success {
    // Выводится информация об ошибке error:
    println("Error writing to URL: \(error!)")
}
This approach has many “dark” sides that make it less clear what the method itself does, but more importantly, it requires manual implementation of the conventions as to what is behind the returned Bool. If the method returns an object and receives an error, then it returns nil; if it is a Boolean value, false is returned, and so on. You need to know which method you are dealing with, what to check if the result is nil or false, or something else when the method contains an NSError error object ?. Very confusing syntax. All these difficulties are related to the fact that Objective-C could not return many values from a function or method, and if we needed to notify the user about an error, then we suggested such an ingrained way to handle it.
Swift 2 got a new bug management. It uses do-try-catch syntax, which replaces NSError. Let's see how you can use this new syntax. I will consider a very simple example of handling such errors, with which the returned Optional values can quite cope , and for which the new syntax is generally not intended. But the simplicity of this example will allow me to focus your attention precisely on the mechanism of “throwing out” and “catching” errors, and not on the complexity of their semantic content. In the end I will give a real example of processing data coming from the network.
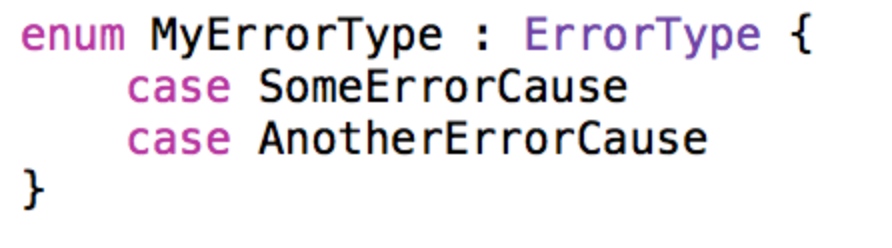
Before an error can be thrown or caught, it must be determined. You can define it in Swift 2 using enum, which implements the new ErrorType protocol:
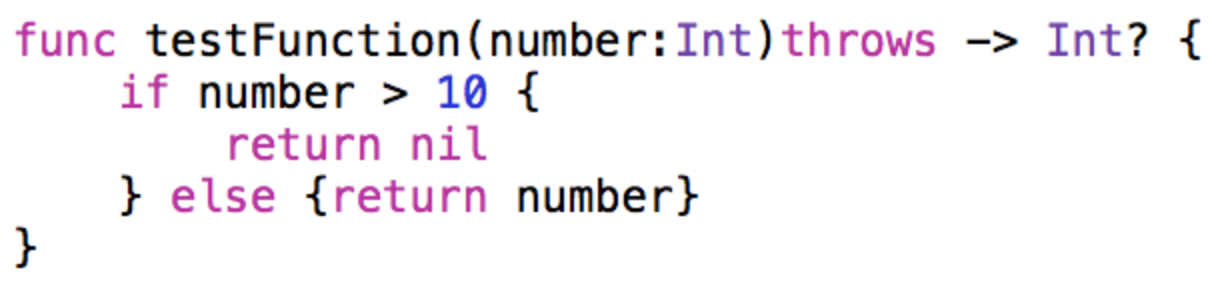
In order for the function
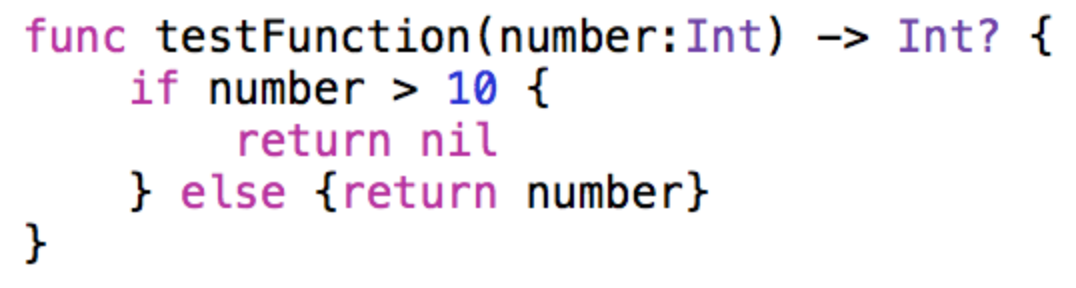
to “throw” an error, the throws keyword must be declared in the function header:
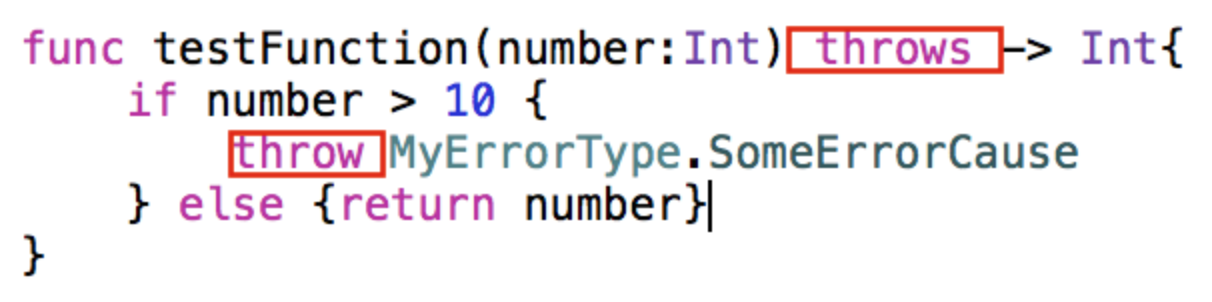
Now this function can throw an error using the throw keyword and a link to a specific type of error:
If you try to call this function, the compiler will produce an error: “The called function throws errors, and access to it is not marked with the try keyword and there is no error handling.”

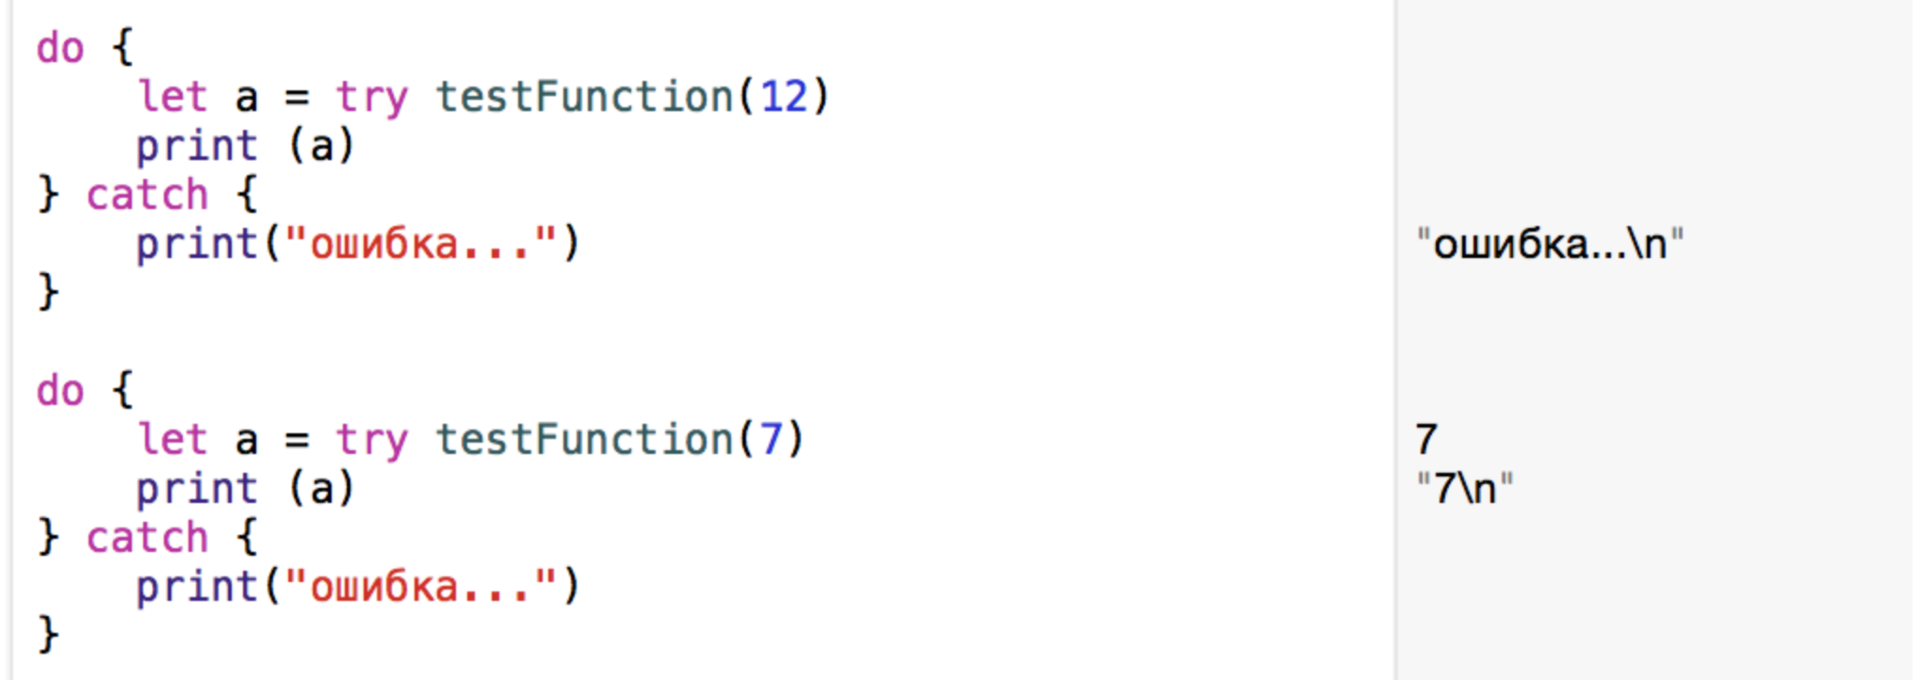
Because the function declared that it is capable of throwing errors, and you should “catch” potential errors. Let's try using the try keyword:
This was not enough, the compiler tells us that error handling is required using the do-try-catch syntax:
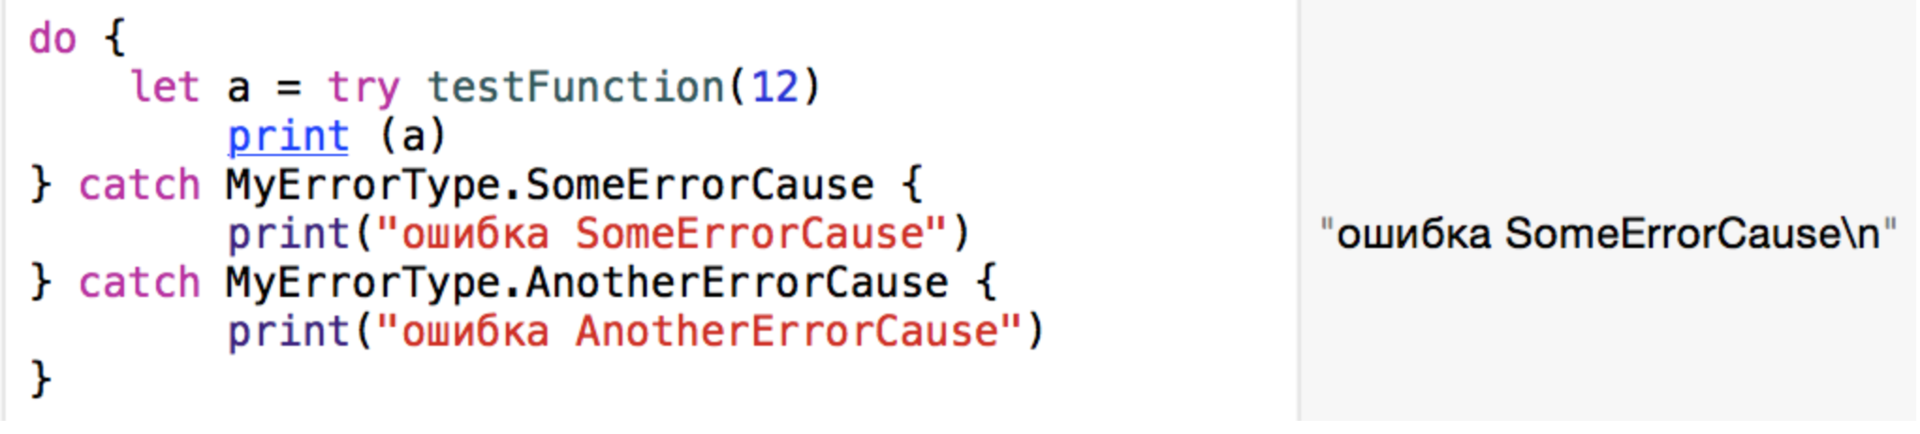
Moreover, in the do-try-catch block you have the opportunity to "catch" a few errors:
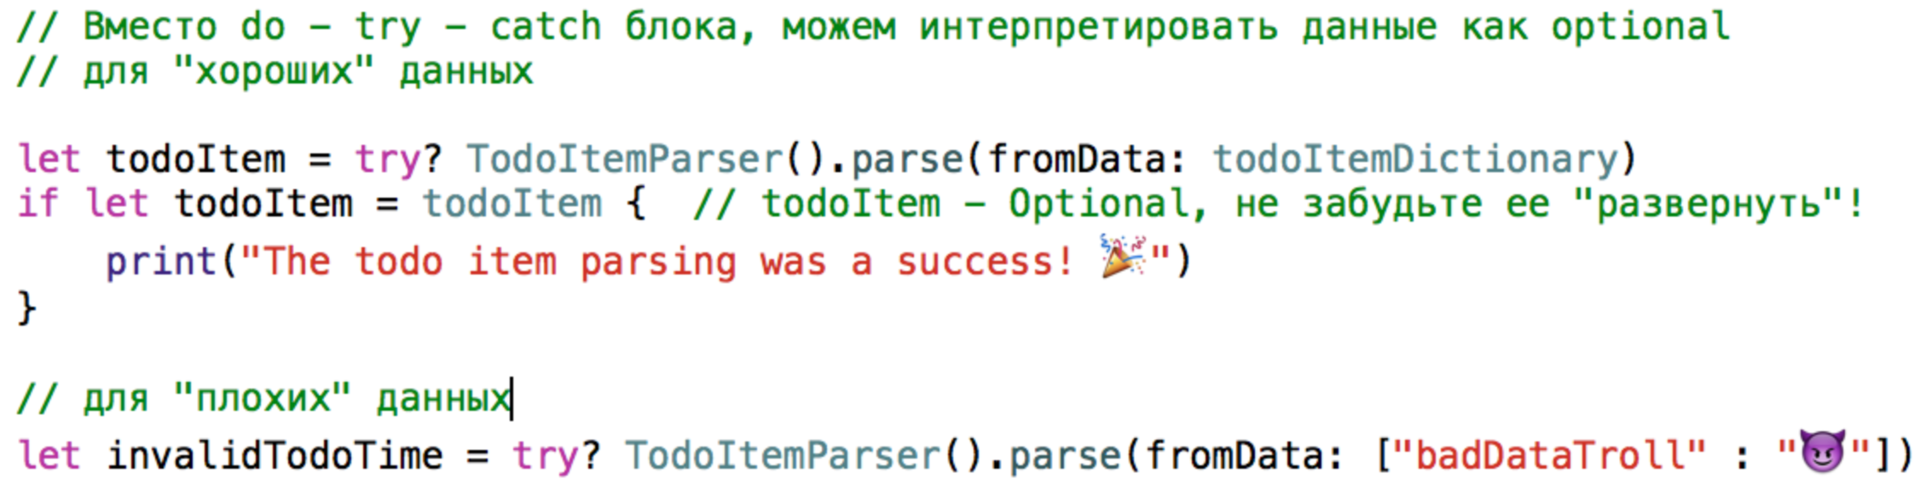
If the semantic part of the errors does not interest you, then instead of using the do-try-catch constructs, you can treat the values of interest to us as with Optional :

aTry and aTrySuccess are Optional , so don't forget to “expand” them before using!
Sometimes there is a method that can “fall” only in certain circumstances, and you know for sure that it will not “fall” with your method of use. Then you can use try !.
If the function "throws" an error, then it returns immediately. But sometimes you need to take some action, for example, to free up resources or close files, before the function returns. In this situation, the already familiar keyword defer works fine. With the defer keyword, you can define a block of code that is always executed if the function returns, and it does not matter whether it returns normally or because of errors.
We can define a defer block anywhere in our function. Moreover, it is possible to define more than one defer block. In this case, they will be executed in the reverse order. Let's look at an example:

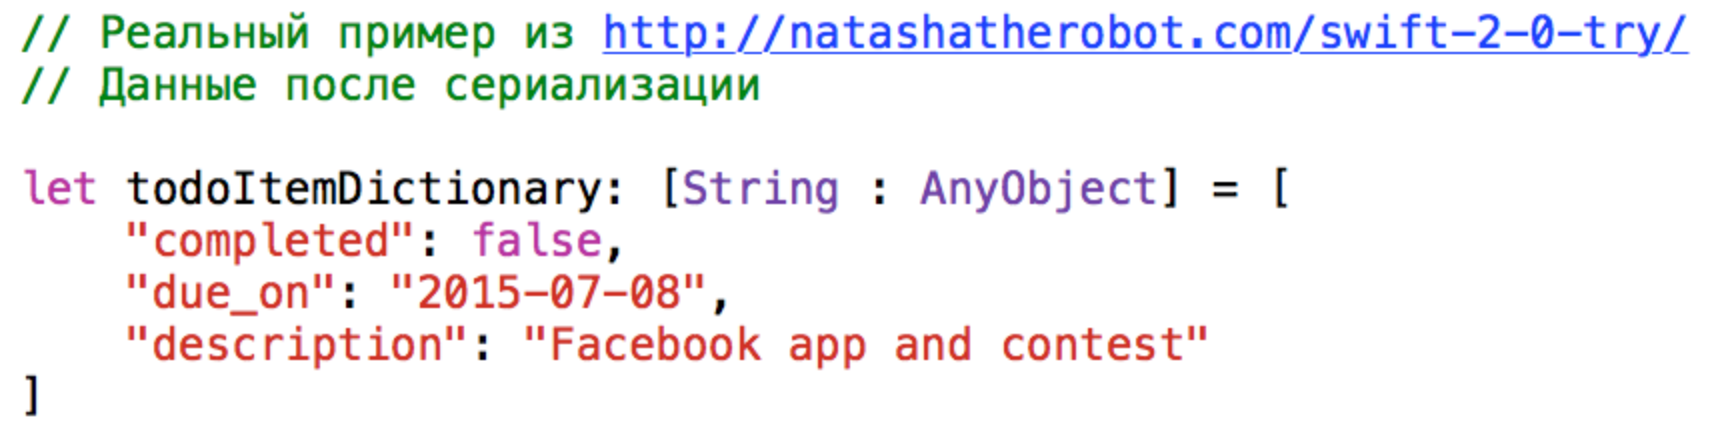
Let's move on to a real example presented in an article by Natasha Murashev. Swift 2.0: Let's try?. Consider the data that comes from some API (after deserialization):
This data needs to be converted to a Model for later use in the application:

The TodoItemParser parser deals with mixed data coming from some API, converts it into an understandable Model for later safe use in the application and It throws errors if it detects them:

Now we will parse the “good” data into the Model using the do-try-catch construct . We will
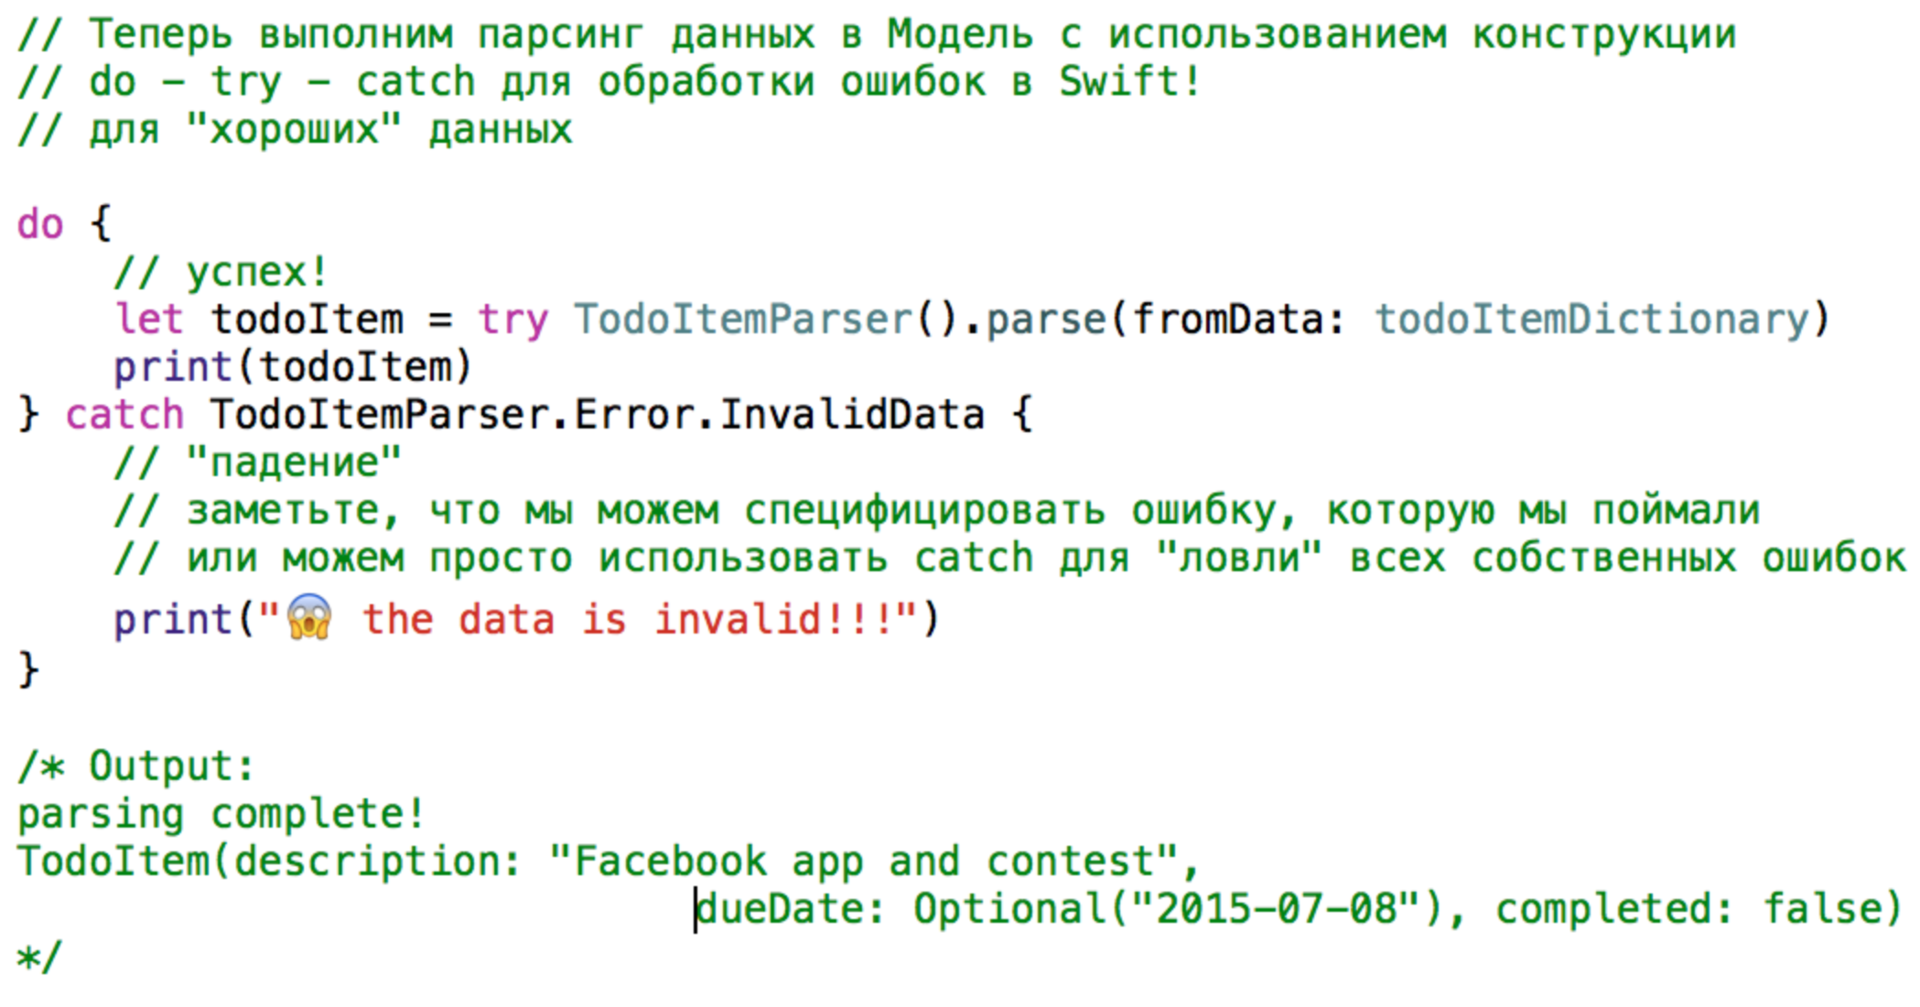
parse the “bad” data.

Instead of using the do-try-catch construct, you can treat the values of interest to us as Optional using the try operator ?:
In the first part, we examined only part of the new features of Swift 2:
— фундаментальные конструкции языка, такие, как
enum, scoping (область действия), синтаксис аргументов и т.д.— сопоставление с образцом (pattern matching)
— управление ошибками (error handling)
Во второй части мы рассмотрим оставшиеся:
— проверка доступности (availability checking)
— расширения (extensions) протокола
— взаимодействие с Objective-C
Ссылки на используемые статьи:
New features in Swift 2
What I Like in Swift 2
A Beginner’s guide to Swift 2
Error Handling in Swift 2.0
Swift 2.0: Let’s try?
Video Tutorial: What's New in Swift 2 Part 4: Pattern Matching
Throw What Don't Throw
The Best of What's New in Swift