Work with Veeam Endpoint Backup FREE: file-level backup, BitLocker support, use of paid connections
- Tutorial
In a post about backing up physical machines , various backup modes implemented in Veeam Endpoint Backup FREE were discussed. Continuing the topic today, I’ll talk a little more about the choice of folders and files for backup in the File level backup method, as well as about BitLocker support and how to configure the use of a paid connection. For all this, welcome to Cat.
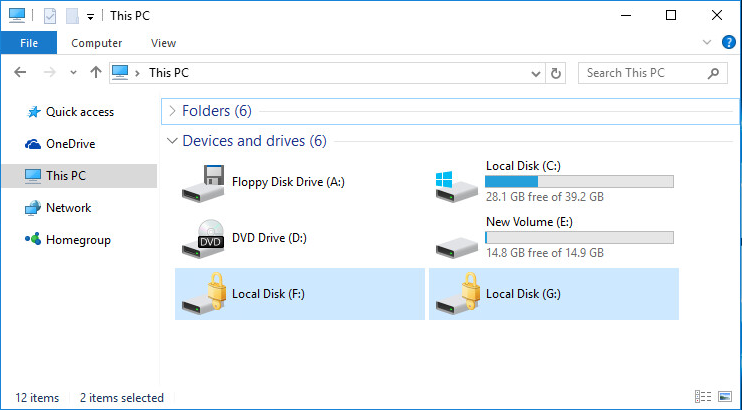
After you have selected the File level backup mode when setting up the backup , the wizard will offer you to specify exactly which files you want to backup:
You can select a volume, folder, or any combination thereof.
Note: If you select the entire volume and then remove the daws from folders that do not need to be backed up under it, backing up with these settings will go faster than if you select many folders (because copying will be used at the volume level with exceptions).
Note that the default exclusion list includes folders with temporary files, Recycle Bin, the Microsoft Windows pagefile system file, hibernation file, and also VSS snapshot files from the System Volume Information folder.
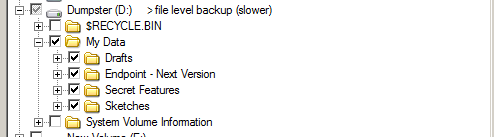
The picture shows an example of selecting a specific folder that you want to backup ( My Data folder ). Let's say that from the Drafts subfolder we want to backup draft documents only for future versions of Veeam Endpoint Backup.
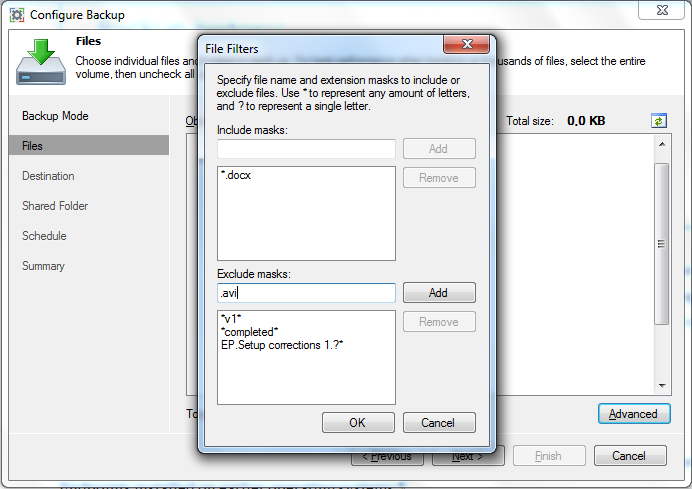
Since this backup will go at the file level, you can apply filters to files that should be included in \ exclude from backup. Their capabilities are quite flexible: you can specify the file name (in whole or in part, using the * ), the extension, as well as the name containing ? (replaces any character in the name) - or combine these filters.
Important! The exclusive filter takes precedence over the inclusive one.
Go to the Files stepbackup setup wizard, click the Advanced button there and set the necessary masks:
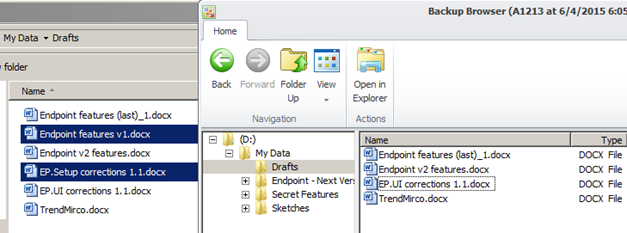
After backing up with these settings, files matching the mask of the inclusion filter should be backed up (unless they fall under the exclusion filter), and all exceptions should remain on the disk:
Modern devices are increasingly supporting data encryption with BitLocker as the default setting (for example, the Microsoft Surface tablet thus protects the system volume). The team of engineers working on Veeam Endpoint Backup did not stand aside and implemented support for volumes protected with BitLocker.
In most cases, you won’t even notice that BitLocker is enabled on the volume, and Veeam Endpoint Backup will not let you feel it. However, there may be situations where BitLocker is enabled on both the source and target volumes. What to do in this case, how to back up?
The first thing that comes to mind is to manually unlock the source and target volumes with the Unlock command by entering a password. But you can use the built-in auto-unlock function:
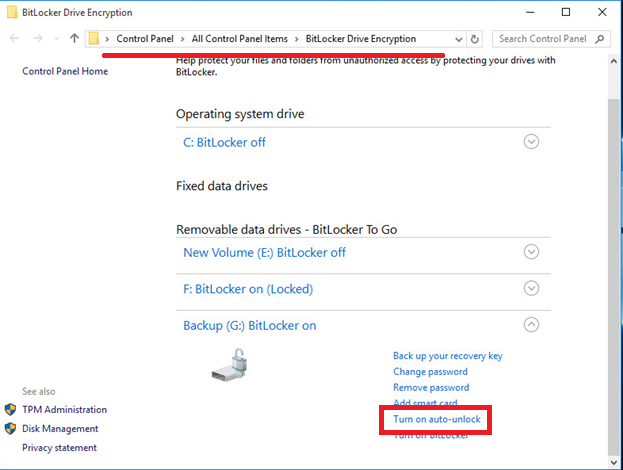
If you set up backup of source volumes protected by BitLocker, Veeam Endpoint Backup will display a message asking if you want to unlock the volume right now:
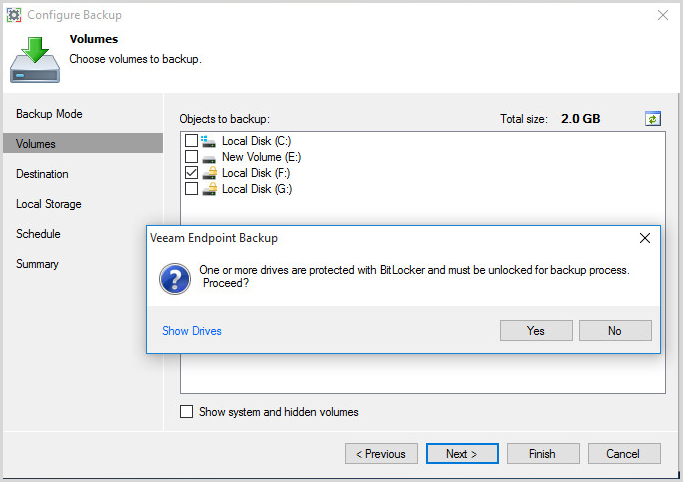
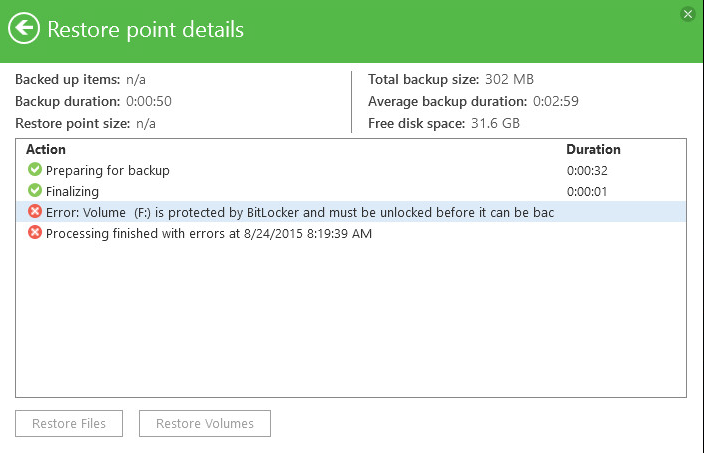
Note: If you decide to postpone the unlock “for later” and safely forget to do it, then during the execution an error message will be issued for the backup task: “Volume X is protected by BitLocker and must be unlocked ...”
Similar actions must be performed when restoring data at the file level or at the volume level:
But what about the restoration of "bare metal"? It is clear that if the volume is protected with BitLocker, then it is so easy to access the backup files or use such a volume as the recovery location will not work. Moreover, it will not be possible to unlock the volume using the Windows utility. In such a situation, a similar auto-unlock function, available on Veeam Recovery Media, will help you. Here's what you can do:
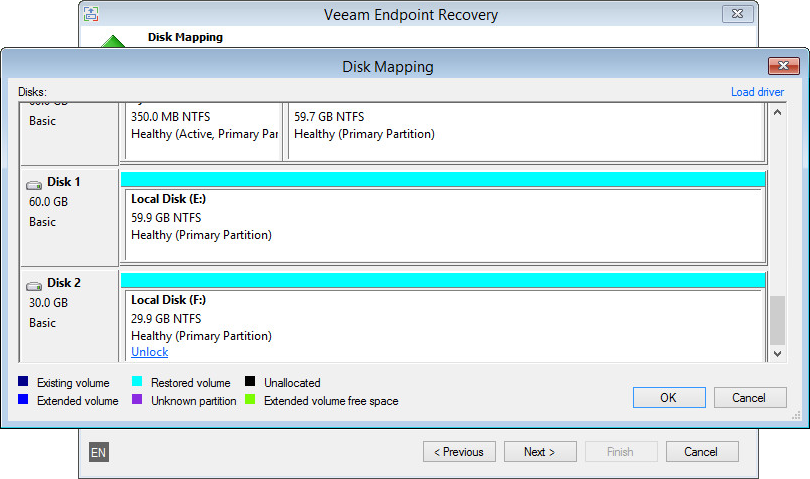
If you want to leave BitLocker encryption in effect, click Cancel and then proceed to manual recovery: click Customize disk mapping and click on Unlock for the volume that you want to overwrite.
Veeam Endpoint Backup has an option that allows you to automatically suspend backups (on demand or according to a schedule) if a paid network connection is used - this will help to avoid money expenses, for example, if you are in roaming. To do this, go to the Settings tab in the Veeam Endpoint Backup console and check the Disable backup over metered connection checkbox there .
Important! Since recognition of paid network connections is implemented starting with Windows 8, this option is available only for machines running Windows 8 and older.
Every time Microsoft Windows detects a connection to a cellular network, such a connection is marked as paid.
It should be remembered that if you use your smartphone as a portable access point, such connections will not be marked as paid. To change this manufacturer’s setting, select Network> Connections , and then right-click on the desired connection and select Set as metered connection .
For detailed information, contact the manufacturer: http://windows.microsoft.com/en-US/windows-8/metered-internet-connections-frequently-asked-questions .
Of course, even if you are connected to a paid network, this is not a reason to completely refuse to save a backup - and if you have a metered connection, you can always start a backup on demand: click Backup Now , confirm your decision and use a paid connection to transfer data during backup.
The other day, version 1.1.2 of the Veeam Endpoint Backup FREE solution was released, which implements support for working via the command line (see more details here ) - this gives, in particular, more flexible sheduling options and helps make life easier for those who use this backup solution servers.
You can download the latest version from this link: http://www.veeam.com/en/endpoint-backup-free-download.html I
also recommend viewing the previous series:
Select folders and files for backup
After you have selected the File level backup mode when setting up the backup , the wizard will offer you to specify exactly which files you want to backup:
- Operating System - the backup will include all data related to the OS: the system volume, personal files and the System Reserved section. The backup will be performed at the volume level.
- Personal Files - the backup will include folders from the OS user profile: user settings, downloads, documents, etc. (of course, if the correct paths lead to them). The backup will be performed at the file level.
You can select a volume, folder, or any combination thereof.
Note: If you select the entire volume and then remove the daws from folders that do not need to be backed up under it, backing up with these settings will go faster than if you select many folders (because copying will be used at the volume level with exceptions).
Note that the default exclusion list includes folders with temporary files, Recycle Bin, the Microsoft Windows pagefile system file, hibernation file, and also VSS snapshot files from the System Volume Information folder.
Example: reducing backup size using filters
The picture shows an example of selecting a specific folder that you want to backup ( My Data folder ). Let's say that from the Drafts subfolder we want to backup draft documents only for future versions of Veeam Endpoint Backup.
Since this backup will go at the file level, you can apply filters to files that should be included in \ exclude from backup. Their capabilities are quite flexible: you can specify the file name (in whole or in part, using the * ), the extension, as well as the name containing ? (replaces any character in the name) - or combine these filters.
Important! The exclusive filter takes precedence over the inclusive one.
Go to the Files stepbackup setup wizard, click the Advanced button there and set the necessary masks:
- First, select all Microsoft Word documents from the Drafts folder for backup .
- In this case, we do not need to backup documents for the release version - we exclude all files with names containing v1 and completed .
- We exclude from the backup the document with edits for the setup of the earlier version, whose number ends with some digit (I don’t remember it exactly, use the symbols ? And * ).
- Well, .avi format files are also excluded, so as not to burden our backup.
After backing up with these settings, files matching the mask of the inclusion filter should be backed up (unless they fall under the exclusion filter), and all exceptions should remain on the disk:
Working with BitLocker Protected Data
Modern devices are increasingly supporting data encryption with BitLocker as the default setting (for example, the Microsoft Surface tablet thus protects the system volume). The team of engineers working on Veeam Endpoint Backup did not stand aside and implemented support for volumes protected with BitLocker.
In most cases, you won’t even notice that BitLocker is enabled on the volume, and Veeam Endpoint Backup will not let you feel it. However, there may be situations where BitLocker is enabled on both the source and target volumes. What to do in this case, how to back up?
The first thing that comes to mind is to manually unlock the source and target volumes with the Unlock command by entering a password. But you can use the built-in auto-unlock function:
If you set up backup of source volumes protected by BitLocker, Veeam Endpoint Backup will display a message asking if you want to unlock the volume right now:
Note: If you decide to postpone the unlock “for later” and safely forget to do it, then during the execution an error message will be issued for the backup task: “Volume X is protected by BitLocker and must be unlocked ...”
Similar actions must be performed when restoring data at the file level or at the volume level:
- Unlock the repository where the backup is stored
- Unlock target folder
- If Windows asks for a password to unlock the target location, enter it by manually unlocking the volume (as mentioned above)
But what about the restoration of "bare metal"? It is clear that if the volume is protected with BitLocker, then it is so easy to access the backup files or use such a volume as the recovery location will not work. Moreover, it will not be possible to unlock the volume using the Windows utility. In such a situation, a similar auto-unlock function, available on Veeam Recovery Media, will help you. Here's what you can do:
- Decisively unlock the original volume protected by BitLocker - if any volume is under BitLocker protection, then when working with the recovery wizard, at the first step of the Backup Location, when you select this volume, you will see the Unlock drive link .
Click this link and in the window that opens, unlock the desired volume by selecting it and entering a password. If you do not know or forgot your password, refer to the manufacturer's tips: Microsoft BitLocker Frequently Asked Questions (FAQ) .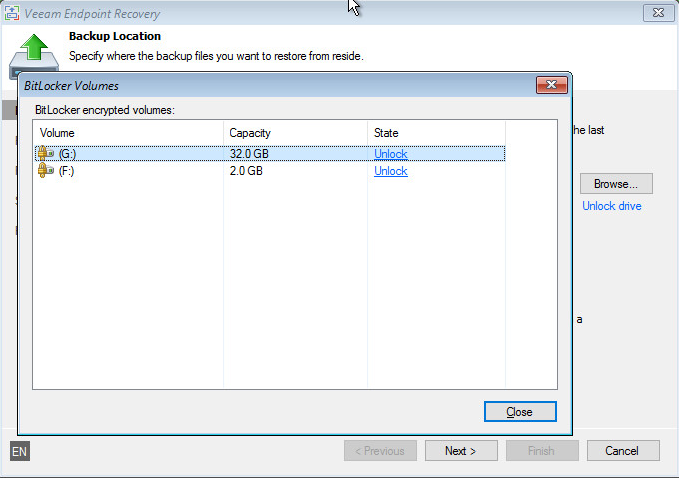
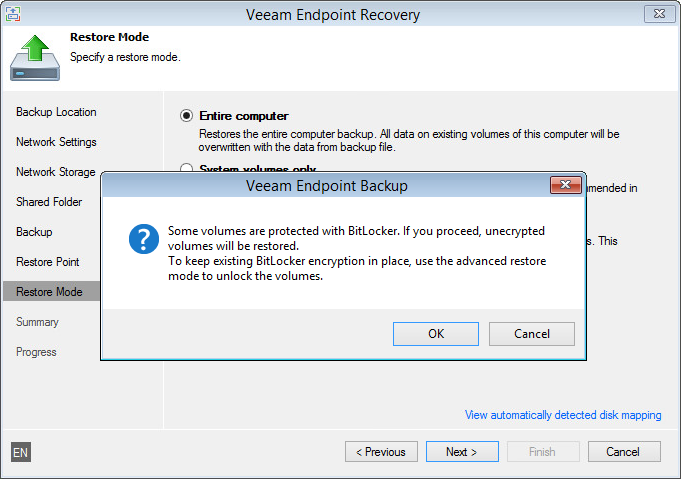
- Unlock or overwrite a BitLocker protected volume - at the step of choosing the recovery mode Restore Mode Veeam Endpoint Backup will tell you about two options: you can restore the volume from backup without encryption by removing the existing protection (click OK to do this ) or manually unlock the original volumes, and then overwrite them with volumes taken from the backup (click Cancel to do this ).
If you want to leave BitLocker encryption in effect, click Cancel and then proceed to manual recovery: click Customize disk mapping and click on Unlock for the volume that you want to overwrite.
Opt out of a paid network connection
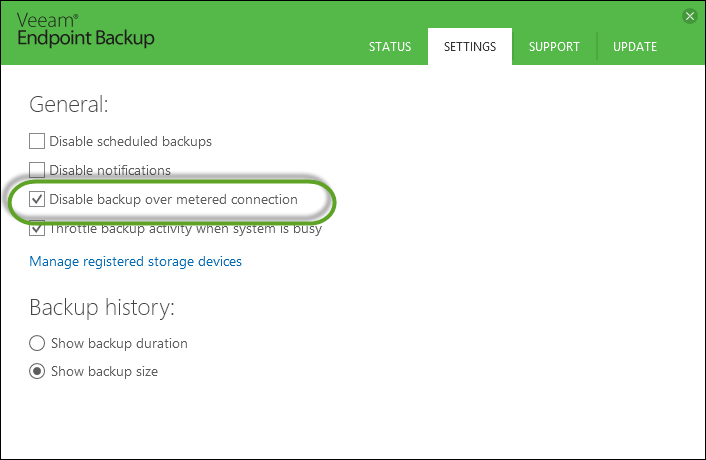
Veeam Endpoint Backup has an option that allows you to automatically suspend backups (on demand or according to a schedule) if a paid network connection is used - this will help to avoid money expenses, for example, if you are in roaming. To do this, go to the Settings tab in the Veeam Endpoint Backup console and check the Disable backup over metered connection checkbox there .
Important! Since recognition of paid network connections is implemented starting with Windows 8, this option is available only for machines running Windows 8 and older.
How does it work?
Every time Microsoft Windows detects a connection to a cellular network, such a connection is marked as paid.
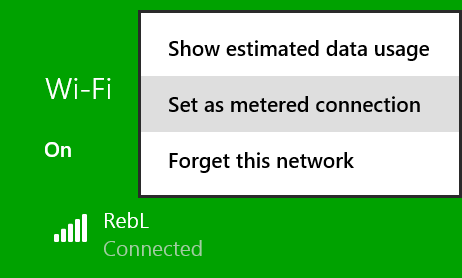
It should be remembered that if you use your smartphone as a portable access point, such connections will not be marked as paid. To change this manufacturer’s setting, select Network> Connections , and then right-click on the desired connection and select Set as metered connection .
For detailed information, contact the manufacturer: http://windows.microsoft.com/en-US/windows-8/metered-internet-connections-frequently-asked-questions .
Of course, even if you are connected to a paid network, this is not a reason to completely refuse to save a backup - and if you have a metered connection, you can always start a backup on demand: click Backup Now , confirm your decision and use a paid connection to transfer data during backup.
Finally
The other day, version 1.1.2 of the Veeam Endpoint Backup FREE solution was released, which implements support for working via the command line (see more details here ) - this gives, in particular, more flexible sheduling options and helps make life easier for those who use this backup solution servers.
You can download the latest version from this link: http://www.veeam.com/en/endpoint-backup-free-download.html I
also recommend viewing the previous series:
- Back up physical machines with the free Veeam Endpoint Backup FREE
- Recovery options for physical machines from backups using Veeam Endpoint Backup FREE
- Two reasons to install Veeam Endpoint Backup FREE now
- Overview of Veeam Endpoint Backup Free - a product for free backup of laptops and computers running Windows