Creating loadable Zabbix modules using the Modbus protocol as an example
Even in the Zabbix 2.2 version, loadable modules were added that allowed expanding the capabilities of the system at a new level. “Why do you need this?”, You ask, because you could always run external scripts and programs from Zabbix. Of course, this is primarily speed - the modules, like Zabbix itself, are written in C and, when properly applied, work as quickly as possible, unlike external programs that need to be run for each survey. Many may be frightened by the need to write code, but today I want to show you that everything is not so complicated.
For example, we’ll write a module that will allow Zabbix to collect information from devices operating under the world-wide industrial automation protocol - Modbus, and take temperature sensor readings with it, and also obtain electricity parameters from the Mercury 230 meter. At the end, place our module on share.zabbix.com portal , where users can share their experiences on Zabbix.
Modbus is a very common protocol used in industrial automation networks (factories, workshops, other industrial facilities, various engineering systems - everywhere it is possible to stumble on Modbus). The protocol was developed back in 1979 by Modicon, and over the next decades, thanks to its advantages, Modbus was implemented on a huge number of different devices:
Simplicity
Modbus is very simple. This allows you to run and implement it on the simplest and cheapest pieces of iron. And also does not discourage developers from using in their solutions.
Ethernet support
Modbus prepared in time for the widespread penetration of Ethernet networks, including industrial facilities, and now it works not only on serial lines RS-232, RS-485 (Modbus RTU / ASCII), but also via TCP / IP (Modbus TCP) .
Openness
All protocol specifications are open and accessible to all who wish to use it in their decisions, without any royalties to anyone.
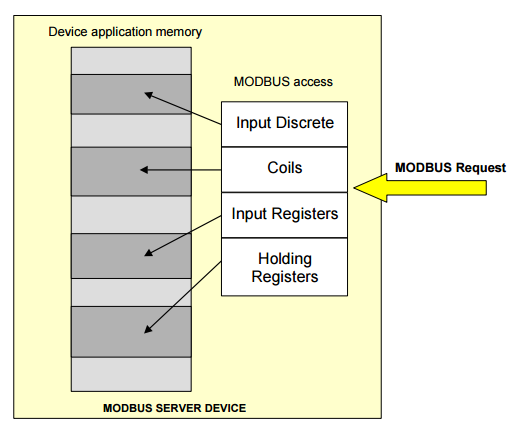
Now I’ll say a few words about how Modbus works. Access to data in the device’s memory is carried out through special logical tables: Discrete Input, Coils, Input Registers, Holding Registers . The first two data are presented in the form of single bits, in the last two - in the form of 16-bit words:
The first two tables can be used to work with simple discrete values: “open-closed”, “accident-not accident”, etc. And Input and Holding Registers can be used for everything else. Moreover, the problem when the data does not fit in 16 bits is easily solved by using two neighboring registers. So you can work with 32bit floats or longs.
Modbus data elements can be accessed through end-to-end addressing from 0 to 65535 across all tables.
Access to data may not overlap, and each table leads to a separate memory block:
So several tables can be used to access the same data:
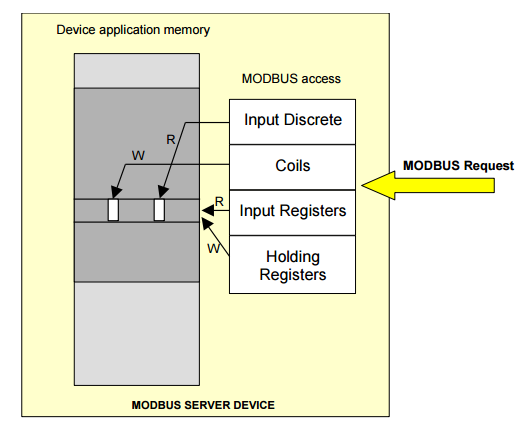
For example, if we have a controller with 16 dry contacts, and we want to know how it is now, open or closed? Then we can take the values of all 16 contacts at once through the Input Registers table , or read all the contacts in turn through the Input Discrete table .
If Modbus devices are on a serial line (RS-485), then each device in Modbus has its own unique address (slave id, from 1 to 247), the interrogating device is always one and is called a master. In the case of a Modbus TCP device, an IP address is sufficient.
Where will we host Zabbix with our future module here?
We can place it as a Modbus master by connecting to the RS-485 network with controllers via a converter, or working with devices that support Modbus TCP directly:
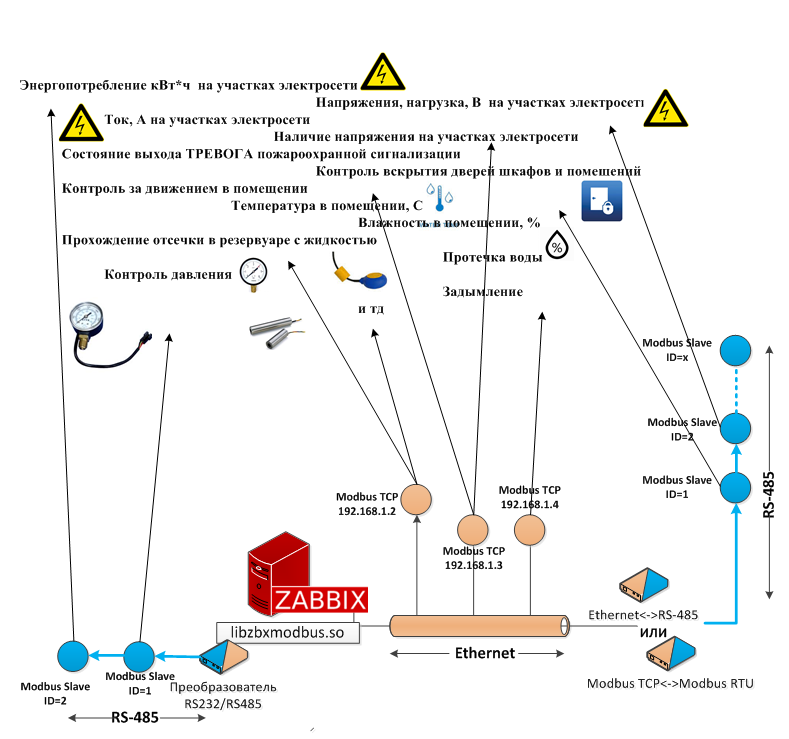
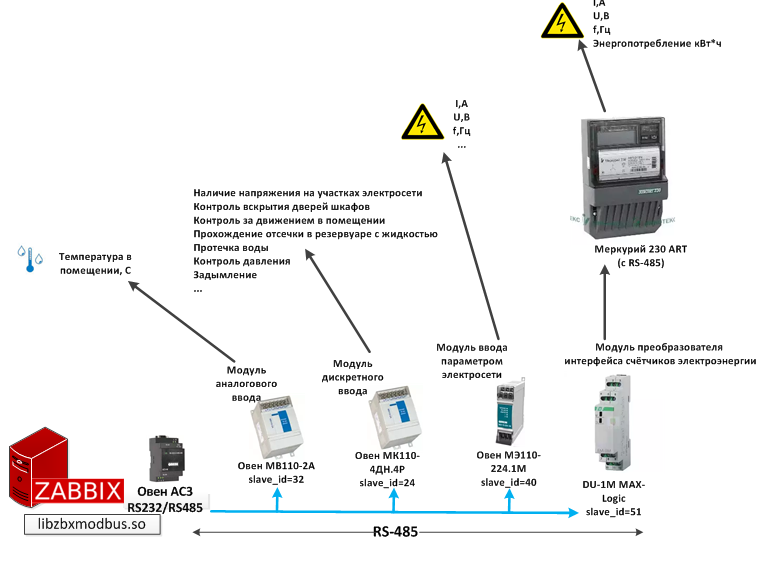
We’ll prepare a small test bench that will help us test our Modbus module in Zabbix. We will take the equipment from the domestic manufacturer Aries , whose input-output devices will allow us to control the temperature, various discrete sensors, and power supply parameters. As a bonus, we will take readings from the common three-phase Mercury 230R electric meter using the DU-1M MAX-Logic converter, which can turn the built-in Mercury protocol into Modbus. All these devices are connected to the RS-485 bus, to which Zabbix will gain access as a master through the RS232 / RS485 converter.
Configuring Aries modules for Modbus operation is described in the device documentation. In general, here is what you need to do:
Through the Aries configurator, connecting to all modules in turn through the RS232 / RS485 converter:
For DU-1M MAX-Logic (Mercury230), everything is a little more complicated: First, carefully follow the instructions on the DU-1M and connect to the Mercury 230 counter, then instead of a cozy graphical configurator, as in Aries, we will use the console utility modpoll , sending commands to the configuration registers to configure pairing with a counter (phew!).
Here’s what’s going to end up:
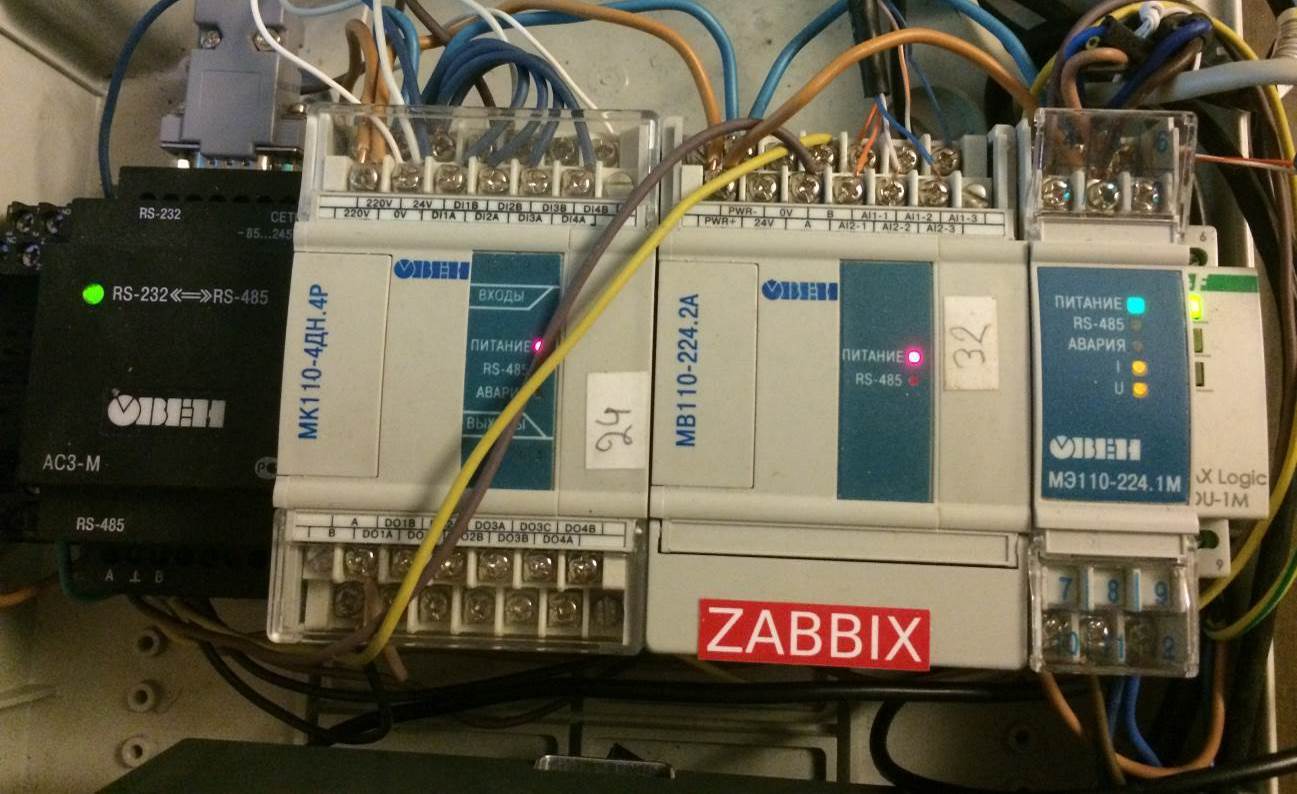
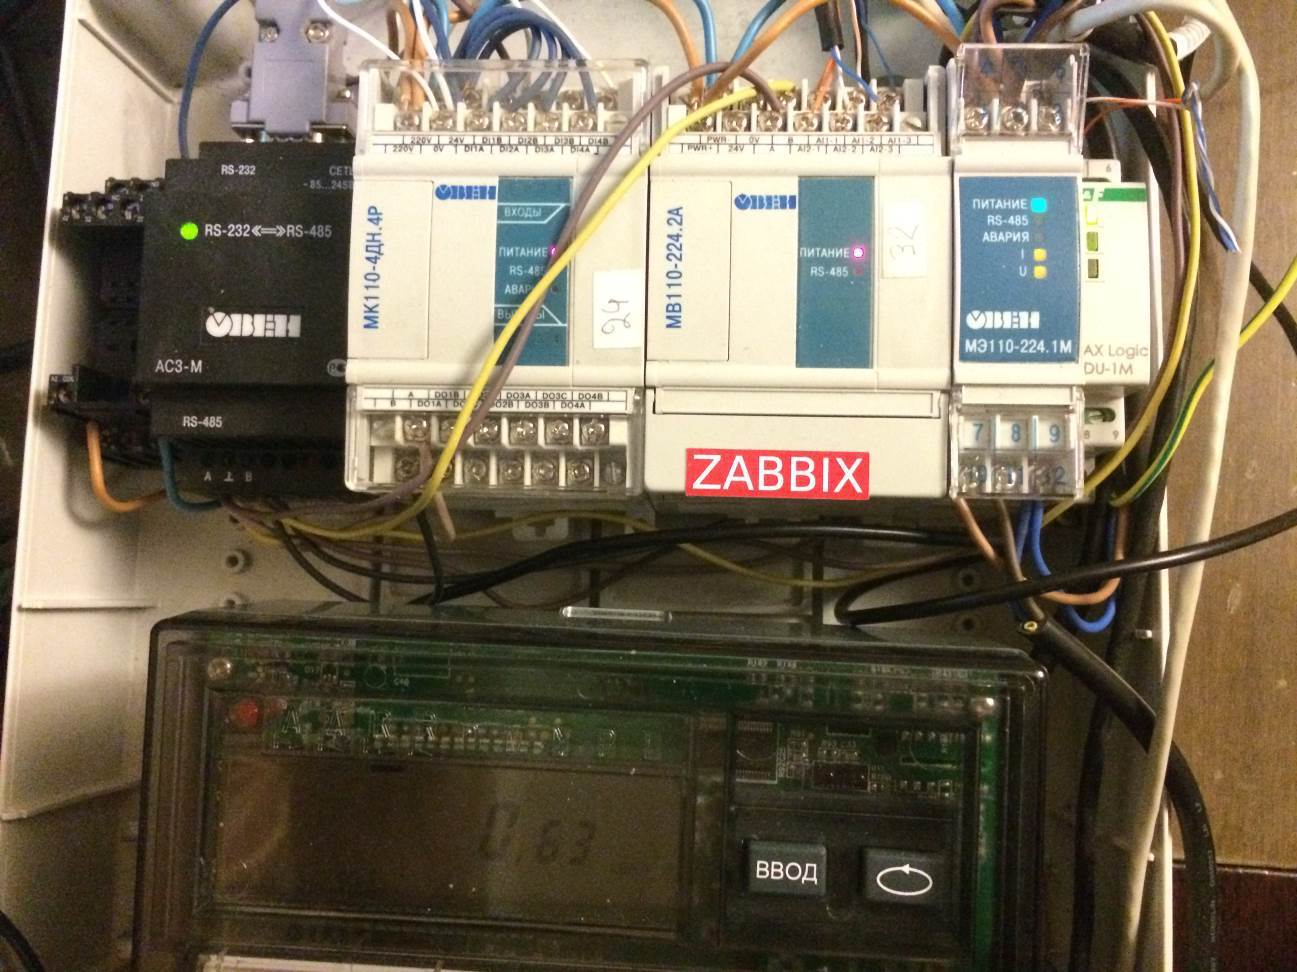
And here’s how it looks live:
Having assembled the stand, we test the performance using modpoll , for example, by connecting a temperature sensor to the MV110-2A, we will interrogate it through register 10, as the device documentation says:

Or we’ll remove the power consumption of the Mercury counter at tariff T1:
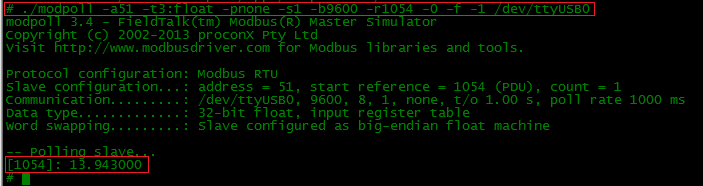
As we see, there is a connection, and data is being collected. It is time to deliver this data to Zabbix.
How to write a module for Zabbix?
As in the case of running scripts through UserParameter, you first need to think about how the data element key in Zabbix itself will look . Let's start from this, in our case it will be such a key:
Inside this key, we will pass four required and three optional parameters:
So, they came up with, fine, now let's go directly to the module. In fact, we need to write a function for collecting data from Modbus registers and add to it a special Zabbix interface of the following functions:
two required functions:
And also three optional:
But we completely copy them from the dummy.c example , which is kindly described in the Zabbix documentation. Excellent, saved time and energy, move on.
And then the question is how to write the collection function itself? By the way, let's call it like this:
And here the work is minimized, because in order not to spoil the implementation of the Modbus protocol and not to reinvent the wheel, we take the C library, which already does all this well: libmodbus .
Using the libmodbus interface, we only need to validate the incoming data from Zabbix, then run the polling functions from libmodbus , and then convert the received values to Zabbix data types and return them. Well, or return an error.
The rest of the details that I missed can be found here .
And once again I emphasize a couple of key points:
1) Upon successful execution of the function, the result is put in * result through macros:
For instance:
And the function itself should return SYSINFO_RET_OK.
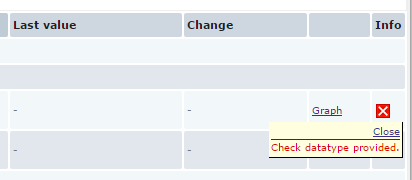
2) If something went wrong, then you need to return SYSINFO_RET_FAIL , and in * result put an error message that we can see in the Zabbix web interface:
3) It is very important not to forget to validate all incoming incoming parameters. Otherwise, a module crash will cause the Zabbix server or agent to crash.
4) Remember that Zabbix runs many polling processes in parallel. So if you are going to work with resources that do not tolerate simultaneous access (a file or a serial port in our case), then you need to implement control of this access on your own. I did this through semaphores, which somewhat complicated the task, but fortunately this is not always required.
5) Since the external libmodbus library is used, it must be installed on the system where the Zabbix module will be used, for this:
As a result, we got such a code for the module:
Compile it and add the resulting .so file to Zabbix Server or to Zabbix Agent. It is only important to remember that the module depends on some headers of Zabbix itself. Therefore, if you want to collect everything separately from Zabbix, then copy at least zbxtypes.h, module.h, sysinc.h from the Zabbix sources to yourself. Well, that's it.
For example, the compiled file libzbxmodbus.so will be uploaded to Zabbix Server, for this, in the Zabbix config file, add:
Add the user zabbix to the dialout group to access the serial port:
... and restart Zabbix:
If everything has successfully restarted, then go to Zabbix and create a template for our Modbus devices.
To begin, create data elements for MV110-224.2A read readings of temperature sensor:
Where is the key ( key ):
Подробнее как выбирать параметры тут. Кроме того необходимо указать:
Тип (type)
Simple check — если модуль подгружен на Zabbix Server и Zabbix Proxy,
Zabbix agent — если модуль подгружен на Zabbix Agent'е
Тип данных (Type of information):
в нашем случае это Numeric(float).
Create a host , define macros, as agreed:
And attach the template you just created:
We go to the Recent Data section and we can begin to observe the data that we managed to collect from the sensor:
And having created the templates for the remaining device registers, we get this picture:
Well, then we can create triggers , graphs , integrated screens in the templates at will.
Using downloadable modules, Zabbix developers gave us an interface for creating really fast and well-integrated extensions with Zabbix. Yes, the possibilities are so far limited by creating new types of data elements, and, for example, it will not work to add a new trigger function ( ZBXNEXT-2650 ), but wait and see.
To prevent modules from spreading around the Internet, an important second step was also taken towards organizing user solutions - share.zabbix.com - a single repository created for exchanging templates, modules and other extensions for Zabbix. Looking for a template for a tricky piece of iron? Or have you written a template for a tricky piece of iron and are ready to share it with others? Looking for a solution to monitor PostgreSQL ? Or Docker ?
Come and join! Well, our module is now there too .
For example, we’ll write a module that will allow Zabbix to collect information from devices operating under the world-wide industrial automation protocol - Modbus, and take temperature sensor readings with it, and also obtain electricity parameters from the Mercury 230 meter. At the end, place our module on share.zabbix.com portal , where users can share their experiences on Zabbix.
A few words about Modbus
Modbus is a very common protocol used in industrial automation networks (factories, workshops, other industrial facilities, various engineering systems - everywhere it is possible to stumble on Modbus). The protocol was developed back in 1979 by Modicon, and over the next decades, thanks to its advantages, Modbus was implemented on a huge number of different devices:
Simplicity
Modbus is very simple. This allows you to run and implement it on the simplest and cheapest pieces of iron. And also does not discourage developers from using in their solutions.
Ethernet support
Modbus prepared in time for the widespread penetration of Ethernet networks, including industrial facilities, and now it works not only on serial lines RS-232, RS-485 (Modbus RTU / ASCII), but also via TCP / IP (Modbus TCP) .
Openness
All protocol specifications are open and accessible to all who wish to use it in their decisions, without any royalties to anyone.
Now I’ll say a few words about how Modbus works. Access to data in the device’s memory is carried out through special logical tables: Discrete Input, Coils, Input Registers, Holding Registers . The first two data are presented in the form of single bits, in the last two - in the form of 16-bit words:
| Table | Data type | Access |
|---|---|---|
| Discrete input | 1 bit | only reading |
| Coils | 1 bit | read and write |
| Input registers | 16 bit | only reading |
| Holding registers | 16 bit | read and write |
The first two tables can be used to work with simple discrete values: “open-closed”, “accident-not accident”, etc. And Input and Holding Registers can be used for everything else. Moreover, the problem when the data does not fit in 16 bits is easily solved by using two neighboring registers. So you can work with 32bit floats or longs.
Modbus data elements can be accessed through end-to-end addressing from 0 to 65535 across all tables.
Access to data may not overlap, and each table leads to a separate memory block:
So several tables can be used to access the same data:
For example, if we have a controller with 16 dry contacts, and we want to know how it is now, open or closed? Then we can take the values of all 16 contacts at once through the Input Registers table , or read all the contacts in turn through the Input Discrete table .
If Modbus devices are on a serial line (RS-485), then each device in Modbus has its own unique address (slave id, from 1 to 247), the interrogating device is always one and is called a master. In the case of a Modbus TCP device, an IP address is sufficient.
Where will we host Zabbix with our future module here?
We can place it as a Modbus master by connecting to the RS-485 network with controllers via a converter, or working with devices that support Modbus TCP directly:
Environment setting
We’ll prepare a small test bench that will help us test our Modbus module in Zabbix. We will take the equipment from the domestic manufacturer Aries , whose input-output devices will allow us to control the temperature, various discrete sensors, and power supply parameters. As a bonus, we will take readings from the common three-phase Mercury 230R electric meter using the DU-1M MAX-Logic converter, which can turn the built-in Mercury protocol into Modbus. All these devices are connected to the RS-485 bus, to which Zabbix will gain access as a master through the RS232 / RS485 converter.
Configuring Aries modules for Modbus operation is described in the device documentation. In general, here is what you need to do:
Through the Aries configurator, connecting to all modules in turn through the RS232 / RS485 converter:
- Change slaveid addresses so that they are unique
- Set Modbus RTU exchange protocol
- For MK110.224.2A: select the type of connected temperature sensors
For DU-1M MAX-Logic (Mercury230), everything is a little more complicated: First, carefully follow the instructions on the DU-1M and connect to the Mercury 230 counter, then instead of a cozy graphical configurator, as in Aries, we will use the console utility modpoll , sending commands to the configuration registers to configure pairing with a counter (phew!).
Here’s what’s going to end up:
And here’s how it looks live:
Having assembled the stand, we test the performance using modpoll , for example, by connecting a temperature sensor to the MV110-2A, we will interrogate it through register 10, as the device documentation says:
Or we’ll remove the power consumption of the Mercury counter at tariff T1:
As we see, there is a connection, and data is being collected. It is time to deliver this data to Zabbix.
Module writing
How to write a module for Zabbix?
As in the case of running scripts through UserParameter, you first need to think about how the data element key in Zabbix itself will look . Let's start from this, in our case it will be such a key:
modbus_read_registers[
  ,
  ,
  ,
  ,
  [],[],[]
]
Inside this key, we will pass four required and three optional parameters:
- connection - IP address or serial port with connection parameters
- slave_id - Modbus device ID
- reg_to_read - treasured register with data
- modbus_function - one of the functions for reading Modbus tables, 1 - for reading COILS
- 2 - for DISCRETE INPUT , 3 - for HOLDING REGISTERS and 4 for INPUT REGISTERS
- datatype - type of returned data from the register. bit, 16bit int, 32bit int or 32bit float.
- endianness , first_reg - needed to correctly set the bit order for 32-bit values, as well as to indicate which addressing is used - the Modbus data model (table elements where the first element has address 1 and last n) or PDU addressing (addressing from 0 to 65535 )
So, they came up with, fine, now let's go directly to the module. In fact, we need to write a function for collecting data from Modbus registers and add to it a special Zabbix interface of the following functions:
two required functions:
int    zbx_module_api_version(void);
int    zbx_module_init(void);
And also three optional:
ZBX_METRIC    *zbx_module_item_list(void);
void    zbx_module_item_timeout(int timeout);
int    zbx_module_uninit(void);
But we completely copy them from the dummy.c example , which is kindly described in the Zabbix documentation. Excellent, saved time and energy, move on.
And then the question is how to write the collection function itself? By the way, let's call it like this:
int zbx_modbus_read_registers(AGENT_REQUEST *request, AGENT_RESULT *result)
And here the work is minimized, because in order not to spoil the implementation of the Modbus protocol and not to reinvent the wheel, we take the C library, which already does all this well: libmodbus .
Using the libmodbus interface, we only need to validate the incoming data from Zabbix, then run the polling functions from libmodbus , and then convert the received values to Zabbix data types and return them. Well, or return an error.
The rest of the details that I missed can be found here .
And once again I emphasize a couple of key points:
1) Upon successful execution of the function, the result is put in * result through macros:
- SET_UI64_RESULT - if the result is an integer
- SET_DBL_RESULT - if the result is a floating point number
- SET_STR_RESULT - if the result is Char
- SET_TEXT_RESULT - if the result is text
- SET_LOG_RESULT - if the result is a log
For instance:
SET_DBL_RESULT(result, modbus_get_float(temp_arr));
And the function itself should return SYSINFO_RET_OK.
2) If something went wrong, then you need to return SYSINFO_RET_FAIL , and in * result put an error message that we can see in the Zabbix web interface:
SET_MSG_RESULT(result, strdup("Check datatype provided."))
3) It is very important not to forget to validate all incoming incoming parameters. Otherwise, a module crash will cause the Zabbix server or agent to crash.
4) Remember that Zabbix runs many polling processes in parallel. So if you are going to work with resources that do not tolerate simultaneous access (a file or a serial port in our case), then you need to implement control of this access on your own. I did this through semaphores, which somewhat complicated the task, but fortunately this is not always required.
5) Since the external libmodbus library is used, it must be installed on the system where the Zabbix module will be used, for this:
wget http://libmodbus.org/releases/libmodbus-3.1.2.tar.gz
tar zxvpf libmodbus-3.1.2.tar.gz
cd libmodbus-3.1.2
./configure
make
make install
ldconfig
As a result, we got such a code for the module:
Compile it and add the resulting .so file to Zabbix Server or to Zabbix Agent. It is only important to remember that the module depends on some headers of Zabbix itself. Therefore, if you want to collect everything separately from Zabbix, then copy at least zbxtypes.h, module.h, sysinc.h from the Zabbix sources to yourself. Well, that's it.
Testing at the stand
For example, the compiled file libzbxmodbus.so will be uploaded to Zabbix Server, for this, in the Zabbix config file, add:
LoadModulePath = /usr/local/lib
LoadModule = libzbxmodbus.so
Add the user zabbix to the dialout group to access the serial port:
usermod -a -G dialout zabbix
... and restart Zabbix:
/etc/init.d/zabbix-server restart
If everything has successfully restarted, then go to Zabbix and create a template for our Modbus devices.
Create Template
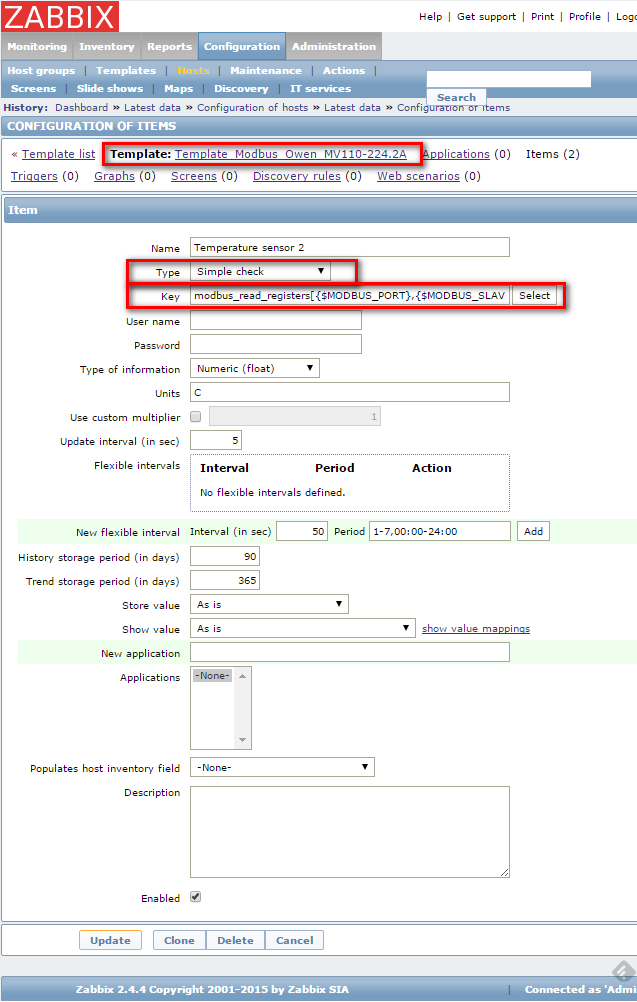
To begin, create data elements for MV110-224.2A read readings of temperature sensor:
Where is the key ( key ):
modbus_read_registers[{$MODBUS_PORT},{$MODBUS_SLAVE},10,3,f,1,0]
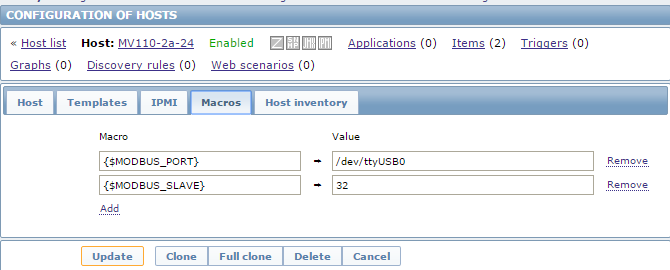
- {$ MODBUS_PORT} - A macro that will be overwritten by the connection parameters to our device. For example, at the host level, we define our {$ MODBUS_PORT} as / dev / ttyUSB0 9600 N 1
- {$ MODBUS_SLAVE} is another user macro that means slave_id and we will rewrite it as 32
- 10 - the register in which the temperature value lies
- 3 — функция Modbus, используемая для чтения, в данном случае 0x03 READ HOLDING REGISTERS
- f — тип данных, float
- 1 — так как контроллеры Овен используют Big endian для кодирования значений, которые не поместились в один регистр
- 0 — используется PDU адресация
Подробнее как выбирать параметры тут. Кроме того необходимо указать:
Тип (type)
Simple check — если модуль подгружен на Zabbix Server и Zabbix Proxy,
Zabbix agent — если модуль подгружен на Zabbix Agent'е
Тип данных (Type of information):
в нашем случае это Numeric(float).
Создание узла сети
Create a host , define macros, as agreed:
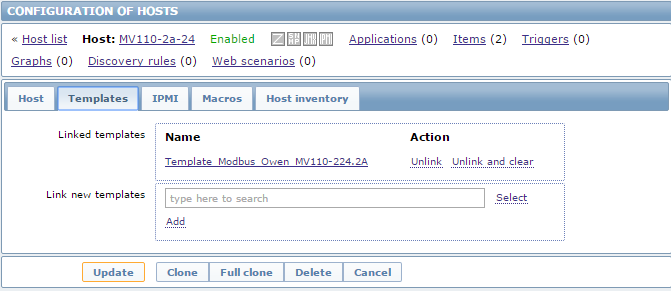
And attach the template you just created:
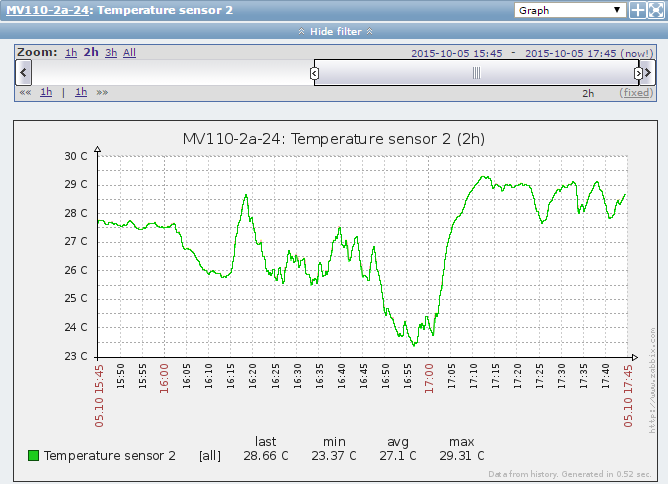
Data
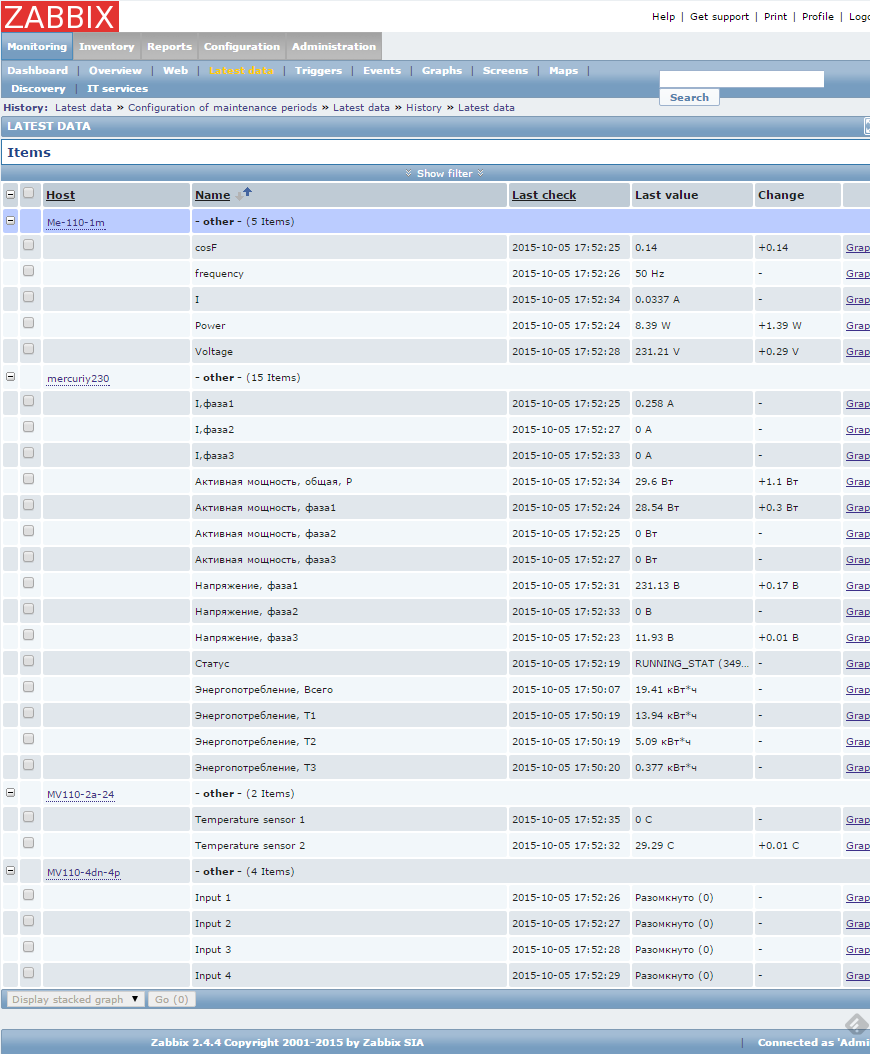
We go to the Recent Data section and we can begin to observe the data that we managed to collect from the sensor:
And having created the templates for the remaining device registers, we get this picture:
Well, then we can create triggers , graphs , integrated screens in the templates at will.
Conclusion
Using downloadable modules, Zabbix developers gave us an interface for creating really fast and well-integrated extensions with Zabbix. Yes, the possibilities are so far limited by creating new types of data elements, and, for example, it will not work to add a new trigger function ( ZBXNEXT-2650 ), but wait and see.
To prevent modules from spreading around the Internet, an important second step was also taken towards organizing user solutions - share.zabbix.com - a single repository created for exchanging templates, modules and other extensions for Zabbix. Looking for a template for a tricky piece of iron? Or have you written a template for a tricky piece of iron and are ready to share it with others? Looking for a solution to monitor PostgreSQL ? Or Docker ?
Come and join! Well, our module is now there too .