Vagrant, Python, Pycharm = (convenient, work, Windows)

Introduction
Django is a well-known and one of the most developed web development frameworks. Django is written in Python and, therefore, it requires an installed Python interpreter to work with it. This does not present any problems if we work in a Linux environment. However, events take a completely different turn if you have to do Python development for Windows.
For Windows, there are ready-made Python builds, among which it is worth noting Enthought Python , Anaconda Python , PythonXY .
There are simpler ways .
Their main drawback compared to the “standard” Python in Linux is the limited set of libraries available for installation. In particular, they are not Django, and to install it you have to perform some not quite obvious actions.
One of the possible solutions to the problem is to install a virtual machine with Linux on board. Working with a virtual machine, despite the ease of installation and configuration, introduces a number of inconveniences.
So, a virtual machine can be quite demanding on computer resources and sometimes work slowly, creating discomfort to the developer. This is especially annoying if braking starts at the most stressful moment of operation (and it is then that this most often happens!). In addition, even on very good hardware, an IDE such as PyCharm works in a mode far from what is considered to be comfortable.
You can improve performance by installing only the necessary packages, the lack of a window manager, and the like. That is, the virtual machine must be configured correctly. And in this matter Vagrant comes to the rescue- A utility for creating fully finished working environments based on virtual machines (VirtualBox, VmWare Player / Workstation). Vagrant not only installs a virtual machine, but also makes it easy to create new ones using the current user configuration.
The next section discusses installing and configuring the Vagrant desktop environment to use it as a remote Python interpreter for PyCharm projects.
Working with Vagrant on Windows
Install Vagrant and Download Environment
Installing Vagrant is very easy. All that is needed is to download the installer from the site and run it. In addition, Vagrant requires one of the VirtualBox or VMware virtual machines to be installed.
After Vagrant is installed, we move on to creating a working environment. The basis of its construction is the “box” of Vagrant (box). "Box" Vagrant is a file with the extension box. This file is nothing more than a tar archive, possibly compressed with gzip. The archive of the virtual machine and the files necessary for its correct launch are stored inside the archive.
The official Vagrant website has a significant number of ready-made “boxes” with various versions of Linux and installed software. Their list can be viewed on VagrantCloud .
Even more pre-built environments are available at www.vagrantbox.es .
For our purposes, the standard version of Ubuntu - hashicorp / precise64 with pre-installed Chef and Puppet (which we, by the way, will not need) from the official repository is quite suitable. Before setting up the environment, create a directory where the configuration file for it will be stored. Let's call her Vagrant. Go to this directory and execute in the console:
\Vagrant> vagrant init hashicorp/precise64
After that, the Vagrantfile file appears in the directory, which contains a description of the configuration of this environment. For example, the line config.vm.box = “hashicorp / precise64” defines the name of our environment. Now everything is ready to start launching the environment. We execute
\Vagrant> vagrant up
and we’ll see a message about loading the corresponding “box”. Since this is the first launch of this environment, before starting it must be downloaded from the repository to the local disk. It should be noted that in the above example, the argument to the init command - the environment name - matches that on the Vagrant site. This match is optional. So, one could configure this environment (its version without Chef and Puppet) and thus:
\Vagrant> vagrant init precise64
http://cloud-images.ubuntu.com/vagrant/precise/current/... .box
The second argument to init, as you can easily see, is the URL of the box. Note also that the environment names, for example, the ones used above hashicorp / precise64, precise64, are actually needed for convenient orientation among the installed environments, and Vagrant itself uses unique identifiers to launch the required environment (their value is stored in the action_set_name file). Work environment files are stored by default in the ~ / .vagrant.d} directory, where "~" in Windows is the C: \ Users \ your_login \ directory.
After we performed vagrant up and waited for the environment to load, it is ready to use, as you can verify by checking its status:
\Vagrant> vagrant status
To terminate the environment, use the command
\Vagrant> vagrant halt
All installed Vagrnat environments can be viewed using the vagrant box list or directly in VirtualBox (VMware).

Virtualbox with Vagrant virtual machines installed.
To conclude this section, we note that the Vagrant environment can be added using the vagrant box add command. You can read more about it and other Vagrant console commands on the official documentation page .
Connecting to the Vagrant Environment
When the environment starts (vagrant up) in the .vagrant.d folder, the insecure_private_key key is automatically created to connect to the environment using the ssh protocol. To use the ssh protocol on Windows, we need the PuTTY and PuTTYgen programs (to convert the key to a format that PuTTY understands). We start PuTTYgen , open insecure_private_key and we see the message that the key was successfully imported. Now you can save it in ppk format as a private key.
For convenience reasons, the key can be saved in the folder with the Vagrantfile file for this environment. Now we tell PuTTY which key to use, and connect via port 2222 (the port number is displayed when vagrant up is executed). By default, the login name is vagrant.
If the connection is successful, we will find ourselves in the console of our Vagrant environment, from where you can install Python libraries or system applications.
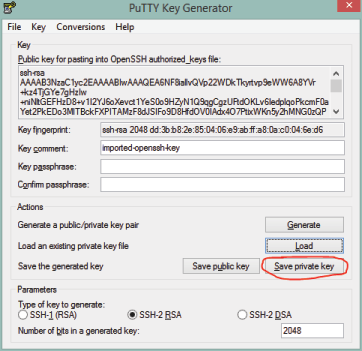
Saving a key in PuTTYgen.
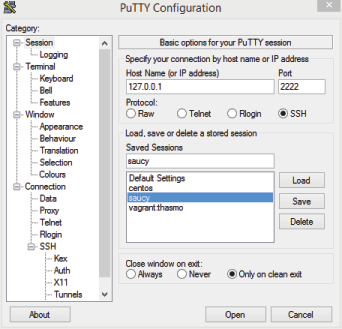

Configure PuTTY connection settings.
Now that the working environments have been downloaded and started, everything is ready to install Python and Django itself. Good practice is to use virtual environments to work with Python (and not only with it). In this case, the risk of conflicts with versions of the interpreter and other software already installed in the system is minimized and it becomes possible to work simultaneously with different versions of the Python interpreter, Django, or any other package.
To install the virtual environment, run the Vagrant console:
vagrant@vagrant sudo apt-get install python-virtualenv
After installation is complete, create a new virtual environment
vagrant@vagrant virtualenv venv
activate it
vagrant@vagrant source /home/vagrant/venv/bin/activate
Now it's time to install Django:
(venv)vagrant@vagrant pip install django
You can specify the version of the package that we want to install:
(venv)vagrant@vagrant pip install django==1.4
Django is installed, but one small task remains: to teach PyCharm to work with the Python interpreter installed in the Vagrant environment. How to do this is discussed in the next section.
Configure PyCharm
Launch PyCharm and create a new Django project. By default, it is created in the ~ / PycharmProjects / folder. Let it be a Test project. Next, in the home directory of the Vagrant working environment, create the PycharmProjects folder (the coincidence of names is random and was chosen for convenience).
Go to the project settings menu: File-> Settings-> Project Interpeter. Here we add a new interpreter: specify its address (127.0.0.1), port number (2222), username (vagrant), the path to the interpreter / home / vagrant / venv / bin / python and, finally, specify the path to the file with the key for ssh.
Now you need to configure the synchronization of the local folder with projects and a similar folder in the Vagrant environment. Open the Vagrant file for editing and uncomment the line with config.vm.synced_folder in it, correcting it to config.vm.synced_folder C: / Users / adolgikh / PycharmProjects, / home / vagrant / PycharmProjects. Now local files will be synchronized with the environment in which the interpreter is installed. Restart Vagrant
$ vagrant reload
and we see that our folder with the project Test was successfully added to the folder with the projects in the remote working environment.
In order for the current changes made during the work on the project to be immediately sent to the remote environment, you need to make additional settings in the Pycharm project. Go to the Run-> Edit Configuration menu and adjust Path Mapping as shown in the screenshot.
Mention is made of the ability to run an ssh console in Pycharm. It starts from the Tools menu and connects via ssh to the environment specified in the settings of the remote interpreter. Thus, we do not need to use PuTTY with a correctly configured project in Pycharm.

Configuring Path Mapping in Pycharm
Conclusion
Undoubtedly, Vagrant is good not only because it can significantly increase the convenience of Python-development in Windows. By installing Vagrant, we are able to create, configure, and save fully functional work environments. Moreover, we can create configurations where several Vagrant environments with different configurations work simultaneously.
Thus, it becomes possible to accurately model the intended working environment used in production. In a word, Vagrant is another valuable tool in the hands of the developer, in the future we will try to highlight other aspects of working with it.