Backup with Bareos and Relax-and-Recover
Bareos (Backup Archiving Recovery Open Sourced) is a centralized, client-server and cross-platform system for backup, archiving and data recovery.

He is a fork of Bacula and is actively developing. It has clients for Linux and Windows. Full list of supported features on Github .
The principles of operation and configuration are fully consistent with Bacula, so I will not dwell on the description of all parameters. There are articles about Bacula on Habré ( "Step-by-step modification of the predefined Bacula settings" , "Bacula: for those who need a quick and in pictures" , "Configuring and understanding Bacula" ,"Centralized backup of Windows and * nix server data using Bacula" ).
Hosts:
testbackup-bareos - the Bareos server running bconsole, bareos-director, file daemon, storage daemon. IP address - 10.11.0.150
testbackup-client-03 - the client that we backup. OS Rosa Cobalt 1.0. It runs file-daemon. IP address - 10.11.0.153
I chose Bareos 15.X, as socket work has been improved here. But this instruction is also suitable for the 14.X branch.
Install Bareos from the repository and configure PostgreSQL:
Client configuration is located in the /etc/bareos/bareos-dir.d directory:
There are 4 jobs created - 2 Job for backup / restore the entire system (/ and / boot) and 2 Job for backup / restore the MySQL Zabbix database using pipe (bpipe). In our example, a backup of the database is done only to demonstrate the operation of bpipe. The database dump is not stored locally at the client; it is immediately transmitted over the network.
Bpipe structure:
plugin - the name of the plugin without the prefix -fd.so;
filepath - a pseudo path in Volume to the backup file. This path and file name are only needed for logical representation in the directory tree during recovery;
readprogram - a program whose stdout reads bpipe and passes to the server;
writeprogram is a program in which stdin bpipe transfers data from the server.
Director configuration in the / etc / bareos directory:
The bconsole configuration in the / etc / bareos directory:
Storage Daemon configuration in / etc / bareos directory:
If the client name does not resolve, then we write in / etc / hosts:
echo "10.11.0.153 testbackup-client-03" >> / etc / hosts
Run Director, File Daemon and Storage:
This completes the setup of the Bareos server. We proceed to configure the client testbackup-client-03.
Install the bareos repository and install File Daemon:
File Daemon configuration in / etc / bareos directory:
This completes the client setup.
We go to the testbackup-bareos server and run the backup of the MySQL database and the full backup:
To restore the database, you need to run the corresponding task:
And follow the suggested items.
Or, if we know JobId (for example, 158), then immediately run:
REAR (Relax-and-Recover) is a Linux BMDR (Bare Metal Disaster Recovery) solution that restores a system to clean hardware.

Key features:
The remaining features are on the site .
In our example, we will consider creating a bootable ISO image and fully recovering the client system testbackup-client-03 using Bareos as a backend.
A bootable ISO image is created on the client and transferred via NFS to the server (in our case, the Bareos server) in the nfs folder: //10.11.0.150/backup
For this, you must first configure the server to access via NFS.
After we proceed to the client setup testbackup-client-03:
Install bconsole:
For our distribution of ROSA Cobalt, we connect the EPEL repository:
Comment out the mirrorlist and uncomment baseurl in /etc/yum.repos.d/epel.repo:
Connect the CentOS repository to /etc/yum.repos.d/CentOS-Base.repo:
And import the GPG key:
Install REAR and the necessary components:
In the ip_addresses and route files, add information about ip, interface and default gateway:
To avoid problems with defining Job names, Client recommends that the File Daemon name of the client matches its hostname exactly. Those. if the hostname of the server is testbackup-client-03, then in bareos-fd.conf in the FileDaemon section should read:
Name = testbackup-client-03-fd
Configure local.conf from the template:
I do not publish the full local.conf configuration as I changed only the following parameters compared to default.conf:
Since I use the ROSA Cobalt distribution (rhel-based version 6.6) and therefore I installed OS_VENDOR and OS_VERSION as for CentOS 6.6.
For clarity, I use my name template for Job, File Set, Client, so you need to edit the REAR recovery script, otherwise the script will not find all the necessary data.
We find the line:
And in the same place (in front of it, for example) we set a new variable:
Instead:
We write:
Making bootable ISO:
For information: the resulting ISO size is about 30-40 MB.
To restore, we boot from this image and select Recover testbackup-client-03.

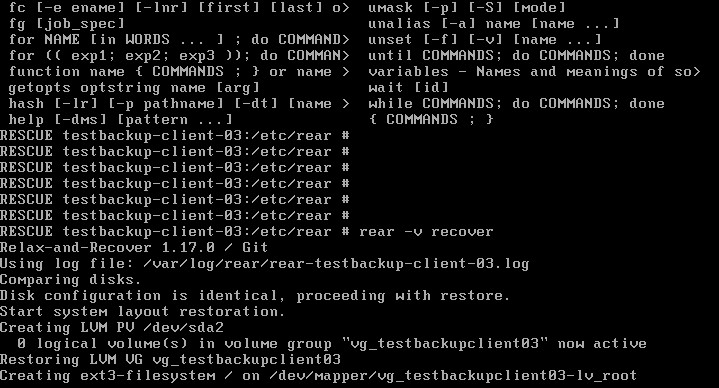
We start the recovery process:
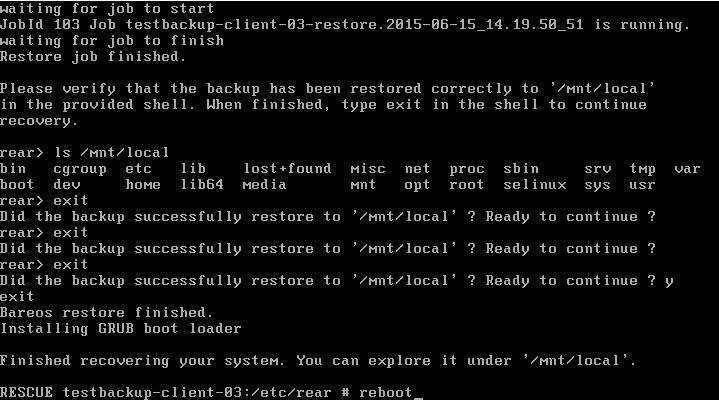
At the end of the recovery process, we check our system, which is mounted in / mnt / local.
We make sure that everything is in place and reboot:
The system is fully restored.
Before using a boot image for any OS, I recommend testing it beforehand.
He is a fork of Bacula and is actively developing. It has clients for Linux and Windows. Full list of supported features on Github .
The principles of operation and configuration are fully consistent with Bacula, so I will not dwell on the description of all parameters. There are articles about Bacula on Habré ( "Step-by-step modification of the predefined Bacula settings" , "Bacula: for those who need a quick and in pictures" , "Configuring and understanding Bacula" ,"Centralized backup of Windows and * nix server data using Bacula" ).
Hosts:
testbackup-bareos - the Bareos server running bconsole, bareos-director, file daemon, storage daemon. IP address - 10.11.0.150
testbackup-client-03 - the client that we backup. OS Rosa Cobalt 1.0. It runs file-daemon. IP address - 10.11.0.153
Bareos Server Setup
I chose Bareos 15.X, as socket work has been improved here. But this instruction is also suitable for the 14.X branch.
Install Bareos from the repository and configure PostgreSQL:
wget -O /etc/yum.repos.d/bareos.repo http://download.bareos.org/bareos/experimental/nightly/CentOS_6/bareos:master.repo
yum install bareos bareos-common bareos-database-postgresql bareos-client bareos-bconsole bareos-storage bareos-filedaemon bareos-director
su postgres -c /usr/lib/bareos/scripts/create_bareos_database
su postgres -c /usr/lib/bareos/scripts/make_bareos_tables
su postgres -c /usr/lib/bareos/scripts/grant_bareos_privileges
Client configuration is located in the /etc/bareos/bareos-dir.d directory:
testbackup-client-03.conf:
Job {
  Name = "testbackup-client-03-backup"
  Type = Backup
  Level = Incremental
  Client = testbackup-client-03-fd
  FileSet = "testbackup-client-03-fileset"
  Schedule = "WeeklyCycle"
  Storage = File
  Messages = Standard
  Pool = testbackup-client-03-pool-Incremental
  Priority = 10
  Write Bootstrap = "/var/lib/bareos/%c.bsr"
  Full Backup Pool = testbackup-client-03-pool-Full
  Differential Backup Pool = testbackup-client-03-pool-Differential
  Incremental Backup Pool = testbackup-client-03-pool-Incremental
}
Job {
  Name = "testbackup-client-03-restore"
  Type = Restore
  Client = testbackup-client-03-fd
  FileSet = "testbackup-client-03-fileset"
  Storage = File
  Pool = testbackup-client-03-pool-Incremental
  Messages = Standard
  Where = /
}
Job {
  Name = "testbackup-client-03-backup-mysql"
  Type = Backup
  Level = Incremental
  Client = testbackup-client-03-fd
  FileSet = "testbackup-client-03-fileset-mysql"
  Schedule = "WeeklyCycle"
  Storage = File
  Messages = Standard
  Pool = testbackup-client-03-pool-Incremental
  Priority = 10
  Write Bootstrap = "/var/lib/bareos/%c.bsr"
  Full Backup Pool = testbackup-client-03-pool-Full
  Differential Backup Pool = testbackup-client-03-pool-Differential
  Incremental Backup Pool = testbackup-client-03-pool-Incremental
}
Job {
  Name = "testbackup-client-03-restore-mysql"
  Type = Restore
  Client = testbackup-client-03-fd
  FileSet = "testbackup-client-03-fileset-mysql"
  Storage = File
  Pool = testbackup-client-03-pool-Incremental
  Messages = Standard
  Where = /
}
FileSet {
  Name = "testbackup-client-03-fileset"
  Include {
    Options {
        compression = GZIP
        Signature = MD5 # calculate md5 checksum per file
    }
    File = "/"
    File = "/boot"
  }
}
FileSet {
  Name = "testbackup-client-03-fileset-mysql"
  Include {
    Plugin = "bpipe:file=/MYSQL/dump.sql:reader=mysqldump -uzabbix -p12345 --single-transaction --add-drop-database -B zabbix:writer=mysql -uzabbix -p12345"
    Options {
        Signature = MD5 # calculate md5 checksum per file
        compression = GZIP
    }
  }
}
Client {
  Name = testbackup-client-03-fd
  Address = testbackup-client-03
  Password = "Msmn8GRO0CnMyUljLmB9u1wgrbYXoV1rI8MLugI6JJqc "
  File Retention = 30 days # 30 days
  Job Retention = 6 months # six months
  AutoPrune = no # Prune expired Jobs/Files
}
Pool {
  Name = testbackup-client-03-pool-Full
  Pool Type = Backup
  Recycle = yes # Bareos can automatically recycle Volumes
  AutoPrune = yes # Prune expired volumes
  Volume Retention = 365 days
  Maximum Volume Bytes = 30G
  Maximum Volumes = 100
  Label Format = "testbackup-client-03-pool-Full-"
}
Pool {
  Name = testbackup-client-03-pool-Differential
  Pool Type = Backup
  Recycle = yes # Bareos can automatically recycle Volumes
  AutoPrune = yes
  Volume Retention = 90 days
  Maximum Volume Bytes = 10G
  Maximum Volumes = 100
  Label Format = "testbackup-client-03-pool-Differential-"
}
Pool {
  Name = testbackup-client-03-pool-Incremental
  Pool Type = Backup
  Recycle = yes
  AutoPrune = yes
  Volume Retention = 30 days
  Maximum Volume Bytes = 1G
  Maximum Volumes = 100
  Label Format = "testbackup-client-03-pool-Incremental-"
}
There are 4 jobs created - 2 Job for backup / restore the entire system (/ and / boot) and 2 Job for backup / restore the MySQL Zabbix database using pipe (bpipe). In our example, a backup of the database is done only to demonstrate the operation of bpipe. The database dump is not stored locally at the client; it is immediately transmitted over the network.
Bpipe structure:
Plugin = ":file=:reader=:writer=" plugin - the name of the plugin without the prefix -fd.so;
filepath - a pseudo path in Volume to the backup file. This path and file name are only needed for logical representation in the directory tree during recovery;
readprogram - a program whose stdout reads bpipe and passes to the server;
writeprogram is a program in which stdin bpipe transfers data from the server.
Director configuration in the / etc / bareos directory:
bareos-dir.conf
@/etc/bareos/bareos-dir.d/testbackup-client-03.conf  #включаем конфигурацию клиента
Director {
  Name = testbackup-bareos-dir
  QueryFile = "/usr/lib/bareos/scripts/query.sql"
  Maximum Concurrent Jobs = 10
  Password = "lY/wVlXuC25qk18i15iw10MpOVxLwDLFgOUMtSMpFOC6"
  Messages = Daemon
  Auditing = yes
  Maximum Concurrent Jobs = 20
}
Schedule {
  Name = "WeeklyCycle"
  Run = Full 1st sat at 21:00
}
Storage {
  Name = File
  Address = testbackup-bareos
  Password = "k4dkFWMwJh3zBpnAOpa9+oule1z/OT0GIcE4wZYySgbU"
  Device = FileStorage
  Media Type = File
}
Catalog {
  Name = MyCatalog
  dbdriver = "postgresql"
  dbname = "bareos"
  dbuser = "bareos"
  dbpassword = ""
}
Messages {
  Name = Standard
  mailcommand = "/usr/bin/bsmtp -h localhost -f \"\(Bareos\) \<%r\>\" -s \"Bareos: %t %e of %c %l\" %r"
  mailcommand = "/etc/bareos/scripts/bareoszabbix.bash %i"
 operatorcommand = "/usr/bin/bsmtp -h localhost -f \"\(Bareos\) \<%r\>\" -s \"Bareos: Intervention needed for %j\" %r"
  mail = root@localhost = all, !skipped, !audit
  operator = root@localhost = mount
  console = all, !skipped, !saved, !audit
  append = "/var/log/bareos/bareos.log" = all, !skipped, !audit
  catalog = all, !audit
}
Messages {
  Name = Daemon
  mailcommand = "/usr/bin/bsmtp -h localhost -f \"\(Bareos\) \<%r\>\" -s \"Bareos daemon message\" %r"
  mail = root@localhost = all, !skipped, !audit
  console = all, !skipped, !saved, !audit
  append = "/var/log/bareos/bareos.log" = all, !skipped, !audit
  append = "/var/log/bareos/bareos-audit.log" = audit
}
The bconsole configuration in the / etc / bareos directory:
bconsole.conf
Director {
  Name = testbackup-bareos-dir
  DIRport = 9101
  address = testbackup-bareos
  Password = "lY/wVlXuC25qk18i15iw10MpOVxLwDLFgOUMtSMpFOC6"
}
Storage Daemon configuration in / etc / bareos directory:
bareos-sd.conf
Storage {
  Name = testbackup-bareos-sd
  Maximum Concurrent Jobs = 20
}
Director {
  Name = testbackup-bareos-dir
  Password = "k4dkFWMwJh3zBpnAOpa9+oule1z/OT0GIcE4wZYySgbU"
}
Device {
  Name = FileStorage
  Media Type = File
  Archive Device = /backup
  LabelMedia = yes;
  Random Access = yes;
  AutomaticMount = yes;
  RemovableMedia = no;
  AlwaysOpen = no;
}
Messages {
  Name = Standard
  director = testbackup-bareos-dir = all
}
If the client name does not resolve, then we write in / etc / hosts:
echo "10.11.0.153 testbackup-client-03" >> / etc / hosts
Run Director, File Daemon and Storage:
service bareos-dir start
service bareos-sd start
service bareos-fd start
This completes the setup of the Bareos server. We proceed to configure the client testbackup-client-03.
Configuring the Bareos client.
Install the bareos repository and install File Daemon:
yum -y install bareos-filedaemonFile Daemon configuration in / etc / bareos directory:
bareos-fd.conf
Director {
  Name =  testbackup-bareos-dir
  Password = "Msmn8GRO0CnMyUljLmB9u1wgrbYXoV1rI8MLugI6JJqc"
}
FileDaemon {
  Name = testbackup-client-03-fd
  Maximum Concurrent Jobs = 20
  Compatible = no #совместимость с Bacula отключена, чтобы использовать все фичи bareos-fd
}
Messages {
  Name = Standard
  director = testbackup-client-03-dir = all, !skipped, !restored
}
This completes the client setup.
Startup backup / restore
We go to the testbackup-bareos server and run the backup of the MySQL database and the full backup:
#bconsole
*run testbackup-client-03-backup-mysql
*run testbackup-client-03-backup
To restore the database, you need to run the corresponding task:
#bconsole
*restore
And follow the suggested items.
Or, if we know JobId (for example, 158), then immediately run:
*restore restorejob=testbackup-client-03-restore-mysql jobid=158Install and configure Relax-and-Recover
REAR (Relax-and-Recover) is a Linux BMDR (Bare Metal Disaster Recovery) solution that restores a system to clean hardware.
Key features:
- Pure hardware recovery: physical-to-virtual (P2V), virtual-to-physical (V2P), physical-to-physical (P2P) and virtual-to-virtual (V2V), KVM, Xen, VMware virtualization systems
- Types of boot devices: ISO, USB, eSATA, OBDR / bootable tape, PXE
- Protocols for data transfer: HTTP, HTTPS, FTP, SFTP, NFS, CIFS (SMB)
- Types of disk partitioning: HWRAID (HP SmartArray), SWRAID, LVM, multipathing, DRBD, iSCSI, LUKS (encrypted partitions and filesystems)
- Backends: CommVault Galaxy, EMC NetWorker (Legato), HP DataProtector, IBM Tivoli Storage Manager (TSM), SEP Sesam, Symantec NetBackup, Bacula, Bareos, duplicity / duply
The remaining features are on the site .
In our example, we will consider creating a bootable ISO image and fully recovering the client system testbackup-client-03 using Bareos as a backend.
A bootable ISO image is created on the client and transferred via NFS to the server (in our case, the Bareos server) in the nfs folder: //10.11.0.150/backup
For this, you must first configure the server to access via NFS.
After we proceed to the client setup testbackup-client-03:
Install bconsole:
yum -y install bareos-bconsole/etc/bareos/bconsole.conf
Director {
  Name = testbackup-bareos-dir
  DIRport = 9101
  address = testbackup-bareos
  Password = "lY/wVlXuC25qk18i15iw10MpOVxLwDLFgOUMtSMpFOC6"
}
For our distribution of ROSA Cobalt, we connect the EPEL repository:
rpm -ivh http://dl.fedoraproject.org/pub/epel/epel-release-latest-6.noarch.rpmComment out the mirrorlist and uncomment baseurl in /etc/yum.repos.d/epel.repo:
epel.repo
[epel]
name=Extra Packages for Enterprise Linux 6 - $basearch
baseurl=http://download.fedoraproject.org/pub/epel/6/$basearch
#mirrorlist=https://mirrors.fedoraproject.org/metalink?repo=epel-6&arch=$basearch
failovermethod=priority
enabled=0
gpgcheck=1
gpgkey=file:///etc/pki/rpm-gpg/RPM-GPG-KEY-EPEL-6
Connect the CentOS repository to /etc/yum.repos.d/CentOS-Base.repo:
CentOS-Base.repo
[base]
name=CentOS-$releasever - Base
baseurl=http://mirror.centos.org/centos/6.6/os/$basearch/
enabled=1
gpgcheck=1
gpgkey=file:///etc/pki/rpm-gpg/RPM-GPG-KEY-CentOS-6
And import the GPG key:
rpm --import http://mirror.centos.org/centos/6.6/os/x86_64/RPM-GPG-KEY-CentOS-6Install REAR and the necessary components:
yum -y install nfs-utils genisoimage syslinux rearIn the ip_addresses and route files, add information about ip, interface and default gateway:
mkdir /etc/rear/mappings
echo "eth0 10.11.0.153/24" > /etc/rear/mappings/ip_addresses
echo "default 10.11.0.1 eth0" > /etc/rear/mappings/route
To avoid problems with defining Job names, Client recommends that the File Daemon name of the client matches its hostname exactly. Those. if the hostname of the server is testbackup-client-03, then in bareos-fd.conf in the FileDaemon section should read:
Name = testbackup-client-03-fd
Configure local.conf from the template:
cp /usr/share/rear/conf/default.conf /etc/rear/local.confI do not publish the full local.conf configuration as I changed only the following parameters compared to default.conf:
local.conf
OS_VENDOR=CentOS
OS_VERSION=6.6
BACKUP=BAREOS
OUTPUT=ISO
BAREOS_CLIENT=$(grep $(hostname -s) /etc/bareos/bareos-fd.conf | awk '/-fd/ {print $3}' )
OUTPUT_URL=nfs://10.11.0.150/backup
USE_STATIC_NETWORKING=y
Since I use the ROSA Cobalt distribution (rhel-based version 6.6) and therefore I installed OS_VENDOR and OS_VERSION as for CentOS 6.6.
For clarity, I use my name template for Job, File Set, Client, so you need to edit the REAR recovery script, otherwise the script will not find all the necessary data.
vi /usr/share/rear/restore/BAREOS/default/40_restore_backup.shWe find the line:
BAREOS_CLIENT=$(grep $(hostname -s) /etc/bareos/bareos-fd.conf | awk '/-fd/ {print $3}' )And in the same place (in front of it, for example) we set a new variable:
BAREOS_CLIENT_1=$(grep "Name =.*-fd" /etc/bareos/bareos-fd.conf | awk '{print $3}' | sed -e 's/-fd//g' )Instead:
echo "restore client=$BAREOS_CLIENT where=/mnt/local select all doneWe write:
echo "restore client=$BAREOS_CLIENT_1-fd restorejob=$BAREOS_CLIENT_1-restore fileset=$BAREOS_CLIENT_1-fileset where=/mnt/local select all doneMaking bootable ISO:
rear -v -d mkrescueFor information: the resulting ISO size is about 30-40 MB.
To restore, we boot from this image and select Recover testbackup-client-03.
We start the recovery process:
rear -v recoverAt the end of the recovery process, we check our system, which is mounted in / mnt / local.
We make sure that everything is in place and reboot:
The system is fully restored.
Before using a boot image for any OS, I recommend testing it beforehand.