Integration of OTRS v4 with Active Directory. Configuring Single Sign On Authentication
- Tutorial
This guide is for when there is already a configured server with OTRS installed. A detailed guide on installing OTRS v4 in a Windows environment can be found in here .
Before integrating OTRS with Active Directory, you need to decide on the accounts and their role. We will need the following accounts:
As an analogue in Active Directory for the root @ localhost account, we will use the “Admin OTRS” account with the login “root”.
In the Active Directory Users and Computers snap-in, create a new user.

When creating an account, do not forget to uncheck "Require password change the next time you log in."
We assume that the accounts for the technical support specialist and for the user already exist. If not, we create them by analogy.
IMPORTANT : all users must have an email address. This is a prerequisite for all OTRS users.
In this example, all technical support specialists who will work in OTRS will be members of the OTRSagents group. This is an important point when delimiting access rights in the system.
Create the OTRSagents group in the Active Directory Users and Computers snap-in. The scope of the group is Global. Group Type - Security. We make the members of the group the previously created OTRS administrator account (with the root login) and the necessary technical support specialists.
It is also important to have a user account that OTRS will use to read Active Directory. For convenience, the password validity period for this account should be unlimited.

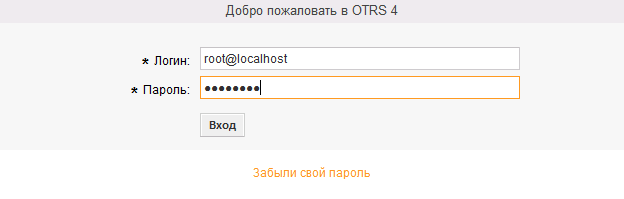
We follow the link http: //localhost/otrs/index.pl and log in as root @ localhost.
Next, go to the Administration, Agent Management, Agents tab.
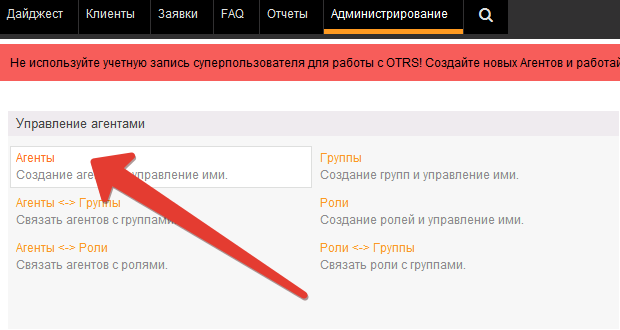
We select the root @ localhost account.

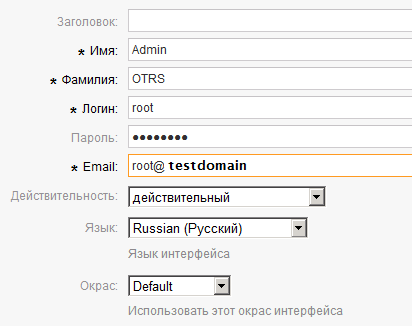
We are making changes. It is important to remember that the login and password for this account must match the login and password of the Admin OTRS account (root login) that we created in Active Directory.
Change the root @ localhost login to root, respectively change the password. Set the email address in the Email field (in this example, testdomain, among other things, acts as a mail server). Click the Submit button.
The final step is to edit the file c: \ otrs \ Kernel \ Config.pm.
In this example:
The following configuration is inserted after the line “insert your own config settings“ here ”.
We save the changes to the file, restart the Apache service. If there are problems, then the service will not start. We read the logs (c: \ otrs \ var \ log) and fix the errors.
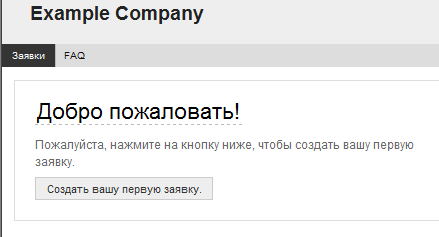
We follow the link http: //localhost/otrs/index.pl for the agent. Do not forget to check the root account. Also go to the link http: //localhost/otrs/customer.pl , go under the account of a simple user.
Everything works! Configuring OTRS integration with the active tree is complete.
For authentication, Apache needs the so-called keytab. To generate it, you need the protocol (HTTP), the fully qualified domain name of the OTRS server, and the domain name. The protocol name and domain name must be uppercase. A regular domain user is also required.
At the command prompt on the domain controller, do the following:
At the output, in the root of drive C, we get a file. Later I renamed the file from helpdesksrv.keytab to apache.keytab and put it in the c: \ Apache2 \ conf \ folder (the file name does not matter).
Download MIT Kerberos and install.
Installation is simple, without any features.
Create an empty file c: \ Program Files (x86) \ MIT \ Kerberos \ krb.ini and fill it in, we are case-sensitive as in the example. Here TESTDC1 is the name of the domain controller.
Download mod_auth_kerb.so for Apache 2.2. *, Copy it to the c: \ Apache2 \ modules folder.
Modify the file c: \ Apache2 \ conf \ httpd.conf. Add the following lines and reboot:
Edit the file c: \ otrs \ Kernel \ Config.pm, add the lines:
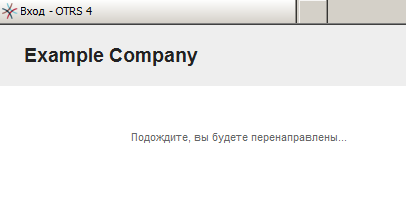
Restarting the Apache service. Checking out http: //helpdesksrv/otrs/customer.pl . We will be redirected, the line in the address bar of the browser will change to http: //helpdesksrv/otrs/customer.pl? Action = CustomerTicketOverview; Subaction = MyTickets .
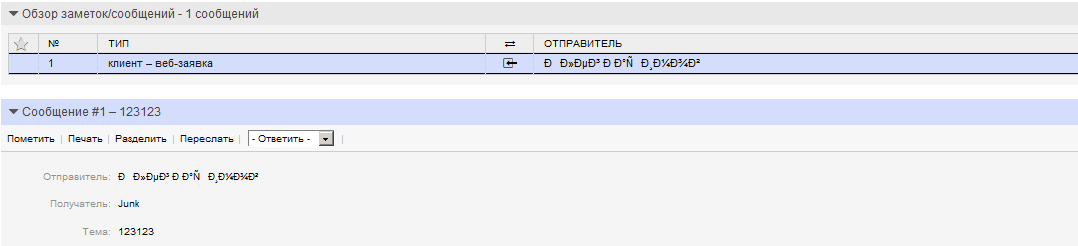
We create an application through the web interface by the user. We go into the agent interface and see that the username in the application is not displayed correctly.
Apparently, the insertion of the parameter
in the file c: \ otrs \ Kernel \ Config.pm does not work correctly.
Modify the file c: \ otrs \ Kernel \ cpan-lib \ Apache \ DBI.pm, add the lines:
Restarting the Apache service.

Now the username is displayed correctly.
That's all. I hope that my experience will be useful to you.
Part 1. Configuring LDAP authentication.
Before integrating OTRS with Active Directory, you need to decide on the accounts and their role. We will need the following accounts:
- agent - technical support specialist;
- root user (a very important point - the login and password of the root user account must match the login and password of the administrator account in OTRS);
- Actually, the OTRS user who will apply for technical support;
- account to read Active Directory.
As an analogue in Active Directory for the root @ localhost account, we will use the “Admin OTRS” account with the login “root”.
In the Active Directory Users and Computers snap-in, create a new user.
When creating an account, do not forget to uncheck "Require password change the next time you log in."
We assume that the accounts for the technical support specialist and for the user already exist. If not, we create them by analogy.
IMPORTANT : all users must have an email address. This is a prerequisite for all OTRS users.
In this example, all technical support specialists who will work in OTRS will be members of the OTRSagents group. This is an important point when delimiting access rights in the system.
Create the OTRSagents group in the Active Directory Users and Computers snap-in. The scope of the group is Global. Group Type - Security. We make the members of the group the previously created OTRS administrator account (with the root login) and the necessary technical support specialists.
It is also important to have a user account that OTRS will use to read Active Directory. For convenience, the password validity period for this account should be unlimited.
We follow the link http: //localhost/otrs/index.pl and log in as root @ localhost.
Next, go to the Administration, Agent Management, Agents tab.
We select the root @ localhost account.
We are making changes. It is important to remember that the login and password for this account must match the login and password of the Admin OTRS account (root login) that we created in Active Directory.
Change the root @ localhost login to root, respectively change the password. Set the email address in the Email field (in this example, testdomain, among other things, acts as a mail server). Click the Submit button.
The final step is to edit the file c: \ otrs \ Kernel \ Config.pm.
In this example:
- Domain test.testdomain.ru
- Domain Controller IP - 10.0.0.11
- The Active Directory read account is helpdesk@test.testdomain.ru with the password Qwerty123.
- The OTRS agent group is OTRSagents in the Users container.
The following configuration is inserted after the line “insert your own config settings“ here ”.
Config.pm
# insert your own config settings "here"               #
#
#-------------------LDAP-----------------#
$Self->{'DefaultCharset'} = 'utf-8';
# задействуем LDAP аутентификацию для бэкэнд агентов
$Self->{'AuthModule'} = 'Kernel::System::Auth::LDAP';
$Self->{'AuthModule::LDAP::Host'} = '10.0.0.11';
$Self->{'AuthModule::LDAP::BaseDN'} = 'dc=test, dc= testdomain,dc=ru';
$Self->{'AuthModule::LDAP::UID'} = 'sAMAccountName';
# проверка, присутствует ли пользователь в группе, если да, то доступ в OTRS разрешен
$Self->{'AuthModule::LDAP::GroupDN'} = 'cn=OTRSagents,cn=Users,dc=test,dc=testdomain,dc=ru';
$Self->{'AuthModule::LDAP::AccessAttr'} = 'member';
$Self->{'AuthModule::LDAP::UserAttr'} = 'DN';
$Self->{'AuthModule::LDAP::SearchUserDN'} = 'helpdesk@test.testdomain.ru';
$Self->{'AuthModule::LDAP::SearchUserPw'} = 'Qwerty123';
$Self->{'AuthModule::LDAP::Params'} = {
port => 389,
timeout => 120,
async => 0,
version => 3,
sscope => 'sub'
},
# Agent data sync against LDAP
$Self->{'AuthSyncModule'} = 'Kernel::System::Auth::Sync::LDAP';
$Self->{'AuthSyncModule::LDAP::Host'} = '10.0.0.11';
$Self->{'AuthSyncModule::LDAP::BaseDN'} = 'dc=test, dc=testdomain,dc=ru';
$Self->{'AuthSyncModule::LDAP::UID'} = 'sAMAccountName';
$Self->{'AuthSyncModule::LDAP::SearchUserDN'} = 'helpdesk@test.testdomain.ru';
$Self->{'AuthSyncModule::LDAP::SearchUserPw'} = 'Qwerty123';
$Self->{'AuthSyncModule::LDAP::UserSyncMap'} = {
	UserFirstname => 'givenName',
	UserLastname => 'sn',
	UserEmail => 'mail',
};
$Self->{'AuthSyncModule::LDAP::UserSyncInitialGroups'} = [
'users',
];
#
#
# Authenticate customer users against an LDAP backend  #
$Self->{'Customer::AuthModule'} = 'Kernel::System::CustomerAuth::LDAP'; #LDAP
$Self->{'Customer::AuthModule::LDAP::Host'} ='10.0.0.11';
$Self->{'Customer::AuthModule::LDAP::BaseDN'} = 'dc=test, dc=testdomain,dc=ru';
$Self->{'Customer::AuthModule::LDAP::UID'} = 'sAMAccountName';
$Self->{'Customer::AuthModule::LDAP::SearchUserDN'} = 'helpdesk@test.testdomain.ru';
$Self->{'Customer::AuthModule::LDAP::SearchUserPw'} = 'Qwerty123';
$Self->{CustomerUser} = {
	Module => 'Kernel::System::CustomerUser::LDAP',
	Params => {
	Host => '10.0.0.11',
	BaseDN => 'dc=test, dc=testdomain,dc=ru',
	SSCOPE => 'sub',
	UserDN => 'helpdesk@ test.testdomain.ru',
	UserPw => 'Qwerty123',
	AlwaysFilter => '(&(samAccountType=805306368)(!(userAccountControl:1.2.840.113556.1.4.803:=2)))',
	SourceCharset => 'utf-8',
	DestCharset => 'utf-8',
},
      ReadOnly => 1,
      CustomerKey => 'sAMAccountName',
      CustomerID => 'mail',
      CustomerUserListFields => ['givenname', 'sn', 'mail'],
      CustomerUserListFields => ['sAMAccountName', 'cn', 'mail'],
      CustomerUserSearchFields => ['displayName','sAMAccountName','givenName', 'sn', 'mail','description'],
      CustomerUserSearchFields => ['sAMAccountName', 'cn', 'mail'],
      CustomerUserSearchPrefix => '',
      CustomerUserSearchSuffix => '*',
      CustomerUserSearchListLimit => 10000,
      CustomerUserPostMasterSearchFields => ['displayName','sAMAccountName','givenName','sn','mail','description'],
      CustomerUserNameFields => ['givenname', 'sn'],
#     CustomerUserExcludePrimaryCustomerID => 0,
      CacheTTL => 120,
      Map => [
#         [ 'UserSalutation', 'Title', 'title', 1, 0, 'var' ],
         [ 'UserFirstname', 'Firstname', 'givenName', 1, 1, 'var' ],
         [ 'UserLastname', 'Lastname', 'sn', 1, 1, 'var' ],
         [ 'UserLogin', 'Login', 'sAMAccountName', 1, 1, 'var' ],
         [ 'UserEmail', 'Email', 'mail', 1, 1, 'var' ],
         [ 'UserCustomerID', 'CustomerID', 'mail', 0, 1, 'var' ],
         ],
};
#--------------------------------------------
We save the changes to the file, restart the Apache service. If there are problems, then the service will not start. We read the logs (c: \ otrs \ var \ log) and fix the errors.
We follow the link http: //localhost/otrs/index.pl for the agent. Do not forget to check the root account. Also go to the link http: //localhost/otrs/customer.pl , go under the account of a simple user.
Everything works! Configuring OTRS integration with the active tree is complete.
Part 2. Configuring end-to-end (Single Sign On) authentication.
Creating Kerberos token
For authentication, Apache needs the so-called keytab. To generate it, you need the protocol (HTTP), the fully qualified domain name of the OTRS server, and the domain name. The protocol name and domain name must be uppercase. A regular domain user is also required.
At the command prompt on the domain controller, do the following:
Ktpass -princ HTTP/helpdesksrv.test.testdomain.ru@TEST.TESTDOMAIN.RU -mapuser helpdesk@test.testdomain.ru -pass Qwerty123 -out C:\helpdesksrv.keytab
At the output, in the root of drive C, we get a file. Later I renamed the file from helpdesksrv.keytab to apache.keytab and put it in the c: \ Apache2 \ conf \ folder (the file name does not matter).
Installing MIT Kerberos for Windows 4.0.1
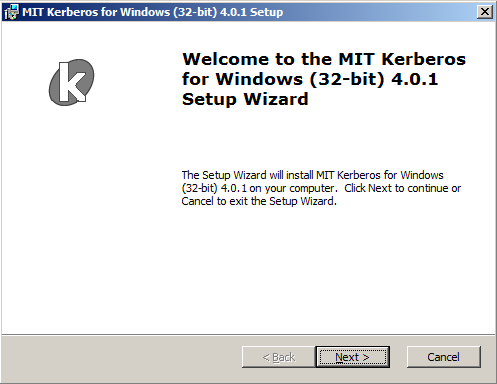
Download MIT Kerberos and install.
Installation is simple, without any features.
Configure MIT Kerberos
Create an empty file c: \ Program Files (x86) \ MIT \ Kerberos \ krb.ini and fill it in, we are case-sensitive as in the example. Here TESTDC1 is the name of the domain controller.
krb.ini
[logging]
 	default = c:/otrs/var/log/krb5libs.log
 	kdc = c:/otrs/var/log/krb5kdc.log
 	admin_server = c:/otrs/var/log/kadmind.log
[libdefaults]
debug=true
default_keytab_file = c:/Apache2/conf/apache.keytab
	default_realm = TEST.TESTDOMAIN.RU
dns_lookup_kdc = false
krb4_config = /etc/krb.conf
krb4_realms = /etc/krb.realms
kdc_timesync = 1
ccache_type = 4
forwardable = true
proxiable = true
[realms]
TEST.TESTDOMAIN.RU =   {
kdc = TESTDC1.test.testdomain.ru
admin_server = TESTDC1.test.testdomain.ru
default_domain = test.testdomain.ru
}
[domain_realm]
	.test.testdomain.ru = TEST.TESTDOMAIN.RU
	test.testdomain.ru = TEST.TESTDOMAIN.RU
[login]
krb4_convert = true
krb4_get_tickets = false
[appdefaults]
pam = {
debug = false
ticket_lifetime = 36000
renew_lifetime = 36000
forwardable = true
krb4_convert = false
 	}
Download mod_auth_kerb.so for Apache 2.2. *, Copy it to the c: \ Apache2 \ modules folder.
Configure Apache
Modify the file c: \ Apache2 \ conf \ httpd.conf. Add the following lines and reboot:
httpd.conf
# загружаем модуль керберос
LoadModule auth_kerb_module modules/mod_auth_kerb.so
  # в данном примере OTRS установлен в папку c:/otrs
   AllowOverride None
   AuthType Kerberos
   AuthName "OTRS Kerberos Authentification"
# указываем путь до keytab-файла
   Krb5Keytab c:/Apache2/conf/apache.keytab
   KrbAuthRealms TEST.TESTDOMAIN.RU
   KrbMethodNegotiate on
   KrbSaveCredentials  off
   Require valid-user
   Options +ExecCGI -Includes
   Order allow,deny
   Allow from all
Configure OTRS
Edit the file c: \ otrs \ Kernel \ Config.pm, add the lines:
Config.pm
# аутентификация + авторизация LDAP
#+ single sign on
# -------для агентов ---------
#	$Self->{'AuthModule'} = 'Kernel::System::Auth::HTTPBasicAuth';
#	$Self->{'AuthModule::HTTPBasicAuth::ReplaceRegExp'} = '@TEST.TESTDOMAIN.RU';
# ------для пользователей ---------
	$Self->{'Customer::AuthModule'} = 'Kernel::System::CustomerAuth::HTTPBasicAuth';
	$Self->{'Customer::AuthModule::HTTPBasicAuth::ReplaceRegExp'} ='@ EST.TESTDOMAIN.RU';
	$Self->{CustomerUser} = {
Module => 'Kernel::System::CustomerUser::LDAP',
Params => {
Host => '10.0.0.11',
BaseDN => 'dc=test, dc=testdomain,dc=ru',
SSCOPE => 'sub',
UserDN => 'helpdesk@test.testdomain.ru',
UserPw => 'Qwerty123',
		SourceCharset => 'utf-8',
		DestCharset => 'utf-8',
},
CustomerKey => 'sAMAccountName',
CustomerID => 'mail',
CustomerUserListFields => ['sAMAccountName', 'cn', 'mail'],
CustomerUserSearchFields => ['sAMAccountName', 'cn', 'mail'],
CustomerUserPostMasterSearchFields => ['mail'],
CustomerUserNameFields => ['givenname', 'sn'],
Map => [
# note: Login, Email and CustomerID needed!
# var, frontend, storage, shown, required, storage-type
[ 'UserSalutation', 'Title', 'title', 1, 0, 'var' ],
[ 'UserFirstname', 'Firstname', 'givenname', 1, 1, 'var' ],
[ 'UserLastname', 'Lastname', 'sn', 1, 1, 'var' ],
[ 'UserLogin', 'Login', 'sAMAccountName', 1, 1, 'var' ],
[ 'UserEmail', 'Email', 'mail', 1, 1, 'var' ],
[ 'UserCustomerID', 'CustomerID', 'mail', 0, 1, 'var' ],
],
};
Restarting the Apache service. Checking out http: //helpdesksrv/otrs/customer.pl . We will be redirected, the line in the address bar of the browser will change to http: //helpdesksrv/otrs/customer.pl? Action = CustomerTicketOverview; Subaction = MyTickets .
Eliminate krakozyabry
We create an application through the web interface by the user. We go into the agent interface and see that the username in the application is not displayed correctly.
Apparently, the insertion of the parameter
$Self->{'DefaultCharset'} = 'utf-8';
in the file c: \ otrs \ Kernel \ Config.pm does not work correctly.
Modify the file c: \ otrs \ Kernel \ cpan-lib \ Apache \ DBI.pm, add the lines:
$dbh->{'mysql_enable_utf8'} = 1;
$dbh->do('SET NAMES utf8');
Restarting the Apache service.
Now the username is displayed correctly.
That's all. I hope that my experience will be useful to you.