3D MC3 Master v1.1 or how I assembled my first 3D printer
It so happened that free time coincided with a great desire to do something with their own hands from scratch. Some acquaintance with Arduino controllers, process automation and completion of repairs in the house led to the idea of creating a robot vacuum cleaner. Everything could end with the purchase of some finished product, but I wanted to do everything myself and from the very beginning. Moreover, he even wanted to design and manufacture all the parts for himself.
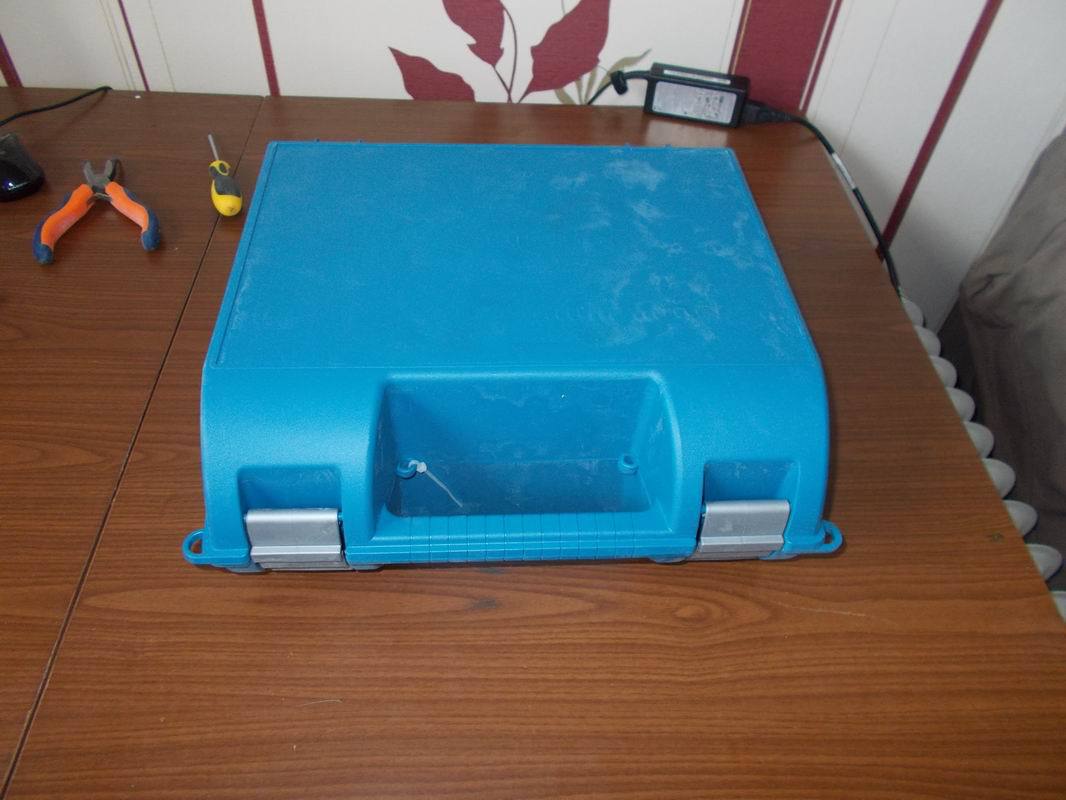
3D printers, for most, are a hobby or a toy, and for only a small percentage of people - a tool to achieve the ultimate goal. In my case, such a printer will become an instrument for the implementation of a very specific task: to make all the mechanics, fasteners and the body of the end device. Well, in order not to be bored - it was decided to assemble the printer from scratch, that is, from the KIT kit. The choice fell on the new printer of the company "Master Kit" 3D MC3 Master v1.1 . Having stopped by the manufacturer, I got a blue suitcase in my hands and went home to complete the first step on the way to the goal.
So, to get the details you need to assemble a 3d printer with your own hands. Everything is documented many times on the forums, but there is no step-by-step description of the assembly sequence, which can make the process last for days and weeks. The finished kit is pleased that there is a step-by-step instruction with photos and a simple description of this process. But we will start in order. The entire printer fits in a compact but heavy plastic case. It has a pair of latches, but is also secured with a tie to prevent accidental opening during transport. A trifle, but nice.
An autopsy showed that everything was neatly laid out in boxes and signed.


We spread everything on the table and consider it carefully.
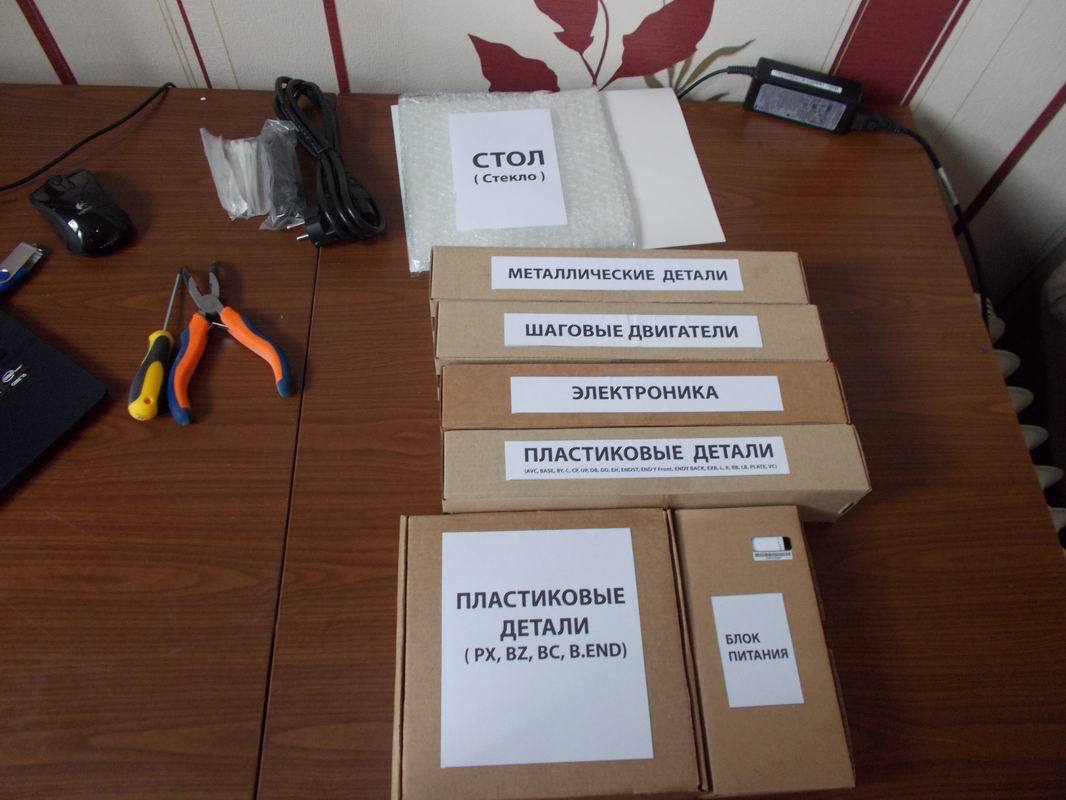
Allen wrenches for complete screws are included, but pliers and a Phillips screwdriver are also needed (to tighten only one screw).
Even while receiving the kit, I asked the engineers how much time it would take me to assemble the printer? The answer was “before 12 o’clock” - and this is only an assembly, not the beginning of printing. But the whole mono process can be divided into two large stages:
1. Physical connection of all parts and mechanics
2. Cable routing and electronics connection
It must be said that even with the instructions and the apparent simplicity of the process, both stages take approximately the same time, especially when you consider that when connecting, you should be extremely careful not to reverse the polarity, otherwise you can easily burn the controller.
The whole process from opening a suitcase to connecting to a computer took me about 5.5-6 hours, which is a good result, given the fact that I first assembled a 3D printer. It is worth paying tribute to the accompanying documentation: there are a lot of photographs, plastic parts are numbered, and bags with packaging are signed.
So, we begin fast assembly.
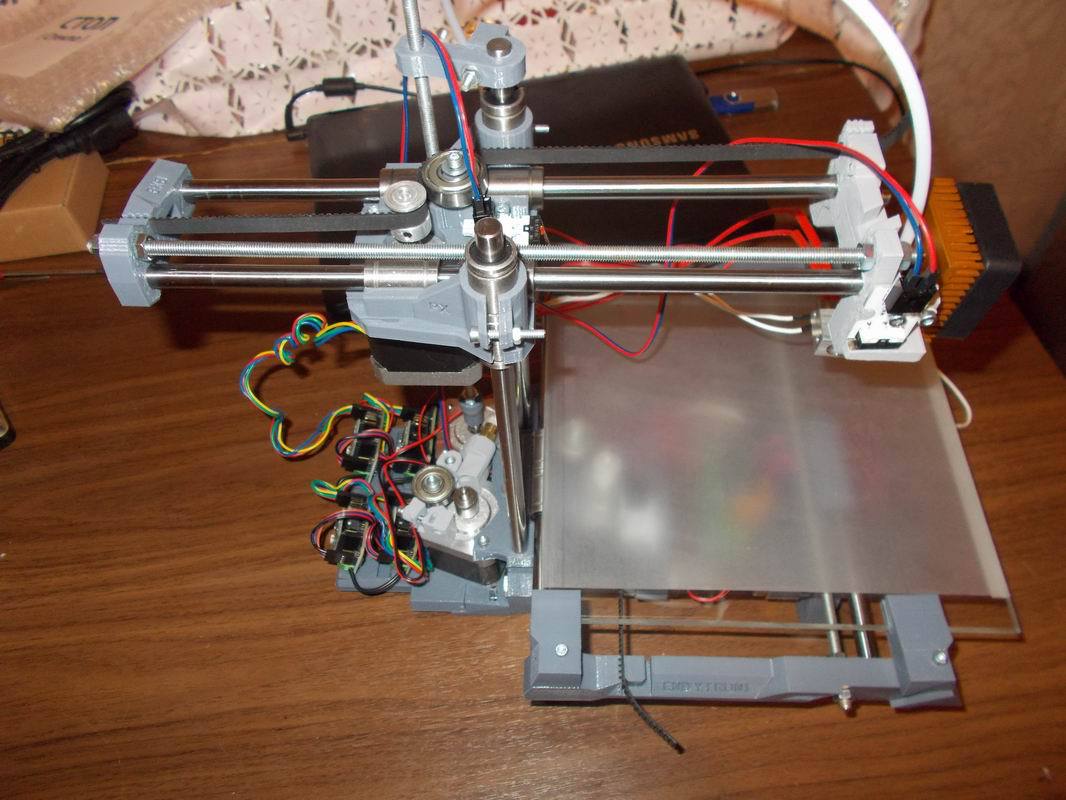
As a result of more than 5 hours of work, we managed to get such a printer.

It’s worth noting that the kit comes with ordinary glass, but to improve the adhesion of the plastic, I applied a frosted self-adhesive film Lomond to it. All wires first hang in the air and it is better to remove them before starting. The kit includes cable ties to help assemble all the wires into neat bundles. Before the final tightening of the screeds, it is worth moving all the moving elements several times to the extreme position to make sure that they move freely and that there are no hooks. If some shafts or bearings do not immediately fall into place, then the chamfers can be made with an ordinary clerical knife, since the details are printed in plastic.
It should turn out something like this (the cat is not included in the delivery):

What are the differencesThis 3D Printer MC3 Master v1.1 from MC3 Stealth .
What are the pros and cons of self-assembly 3D printer I learned from my experience?
Pros:
Minuses:
3D printers, for most, are a hobby or a toy, and for only a small percentage of people - a tool to achieve the ultimate goal. In my case, such a printer will become an instrument for the implementation of a very specific task: to make all the mechanics, fasteners and the body of the end device. Well, in order not to be bored - it was decided to assemble the printer from scratch, that is, from the KIT kit. The choice fell on the new printer of the company "Master Kit" 3D MC3 Master v1.1 . Having stopped by the manufacturer, I got a blue suitcase in my hands and went home to complete the first step on the way to the goal.
So, to get the details you need to assemble a 3d printer with your own hands. Everything is documented many times on the forums, but there is no step-by-step description of the assembly sequence, which can make the process last for days and weeks. The finished kit is pleased that there is a step-by-step instruction with photos and a simple description of this process. But we will start in order. The entire printer fits in a compact but heavy plastic case. It has a pair of latches, but is also secured with a tie to prevent accidental opening during transport. A trifle, but nice.
An autopsy showed that everything was neatly laid out in boxes and signed.
We spread everything on the table and consider it carefully.
Allen wrenches for complete screws are included, but pliers and a Phillips screwdriver are also needed (to tighten only one screw).
Even while receiving the kit, I asked the engineers how much time it would take me to assemble the printer? The answer was “before 12 o’clock” - and this is only an assembly, not the beginning of printing. But the whole mono process can be divided into two large stages:
1. Physical connection of all parts and mechanics
2. Cable routing and electronics connection
It must be said that even with the instructions and the apparent simplicity of the process, both stages take approximately the same time, especially when you consider that when connecting, you should be extremely careful not to reverse the polarity, otherwise you can easily burn the controller.
The whole process from opening a suitcase to connecting to a computer took me about 5.5-6 hours, which is a good result, given the fact that I first assembled a 3D printer. It is worth paying tribute to the accompanying documentation: there are a lot of photographs, plastic parts are numbered, and bags with packaging are signed.
So, we begin fast assembly.
As a result of more than 5 hours of work, we managed to get such a printer.
It’s worth noting that the kit comes with ordinary glass, but to improve the adhesion of the plastic, I applied a frosted self-adhesive film Lomond to it. All wires first hang in the air and it is better to remove them before starting. The kit includes cable ties to help assemble all the wires into neat bundles. Before the final tightening of the screeds, it is worth moving all the moving elements several times to the extreme position to make sure that they move freely and that there are no hooks. If some shafts or bearings do not immediately fall into place, then the chamfers can be made with an ordinary clerical knife, since the details are printed in plastic.
It should turn out something like this (the cat is not included in the delivery):
What are the differencesThis 3D Printer MC3 Master v1.1 from MC3 Stealth .
- Complete rejection of springing the table and springs in the bar feed system
- The Z-axis probe has now been moved to the extruder, so aligning the printer along this axis has become easier
- Before each print, the printer makes alignment along the axes, while on the Z axis it does this at three different points, thereby building for itself a clear picture of the plane. This solves the problem of not observing the horizontal table when mounting or installing the printer itself.
What are the pros and cons of self-assembly 3D printer I learned from my experience?
Pros:
- Self-assembly is significantly cheaper than the finished device
- Good instruction is the key to high-quality and quick assembly. In this kit, the instruction is very detailed
- The ready-made kit significantly saves time on the purchase of components and the calculation of the required parts
- No need to pick up a soldering iron. If you have the skill to use a screwdriver, that's enough
- If there are children, then the whole day will fly by quickly and excitingly
Minuses:
- Assembly kit requires a simple understanding of the mechanics
- To assemble a 3d printer, prepare a large table and free up at least 1 full day.
- Debugging the work of electricians will also take time, unlike the finished device