How to backup SQL Failover cluster
I do not like it when there are no simple step-by-step instructions on the network without clever words, showing how to do not the most obvious things. Therefore, without further ado today, I’ll tell you how to properly back up a failover (failover) SQL cluster. Yes, it is a cluster, not a standalone SQL server. Much has been written about them, but for some reason the cluster is avoided.
And without long prefaces, consider our lab:
- Windows cluster with Windows Server 2012 r2 under the hood and a certain number of nodes. For convenience, there are only two in my lab. A legitimate question arises: why put a cluster on a cluster? I will explain a little lower.
- Three disks are hooked to the iSCSI cluster: a quorum, a disk with a base (bases), a disk for logs. It is possible more, it is possible less, here as you like. Sometimes I like this: two local disks (one for the system, one for installing the SQL itself), a disk for quorum, a shared disk for root and system database, a disk for the database, a disk for logs, a disk for TempDB and a disk for Backups. System analysts say that is also correct. But I think that how many discs you have will be completely irrelevant. If it works for you, then you are right and well done.
- Each instance has a SQL instance installed, which understands that it is part of the SQL cluster, and the Windows cluster sees the role of SQL Server.
Now - before we get started - let's agree on two important things:
- Make a decision and stop doubting (I wanted to insert a joke about the bathhouse, cross and panties here, but
censored stabbeddecided to do without). One infrastructure object should be processed with only one solution. If for SQL backup you use solution A, and for cluster backup, solution B, then B should under no circumstances touch SQL. Or the solution A is better not to use at all, if B is able to make granular backups of machines at the application level. Why? Let's imagine that both applications are able to truncate SQL logs and successfully do it. Your SQL will work, of course, but in the next backup run you will receive a message about inconsistent server status at best, and at worst - you will not be able to recover from the transaction log. - I know that there are “miles and thousands” of backup software options, all of them are undoubtedly better because input_reason_here , but sorry, I will write only about one who can do it better than others, and perhaps even better.
Go!
So, as it is already clear, we will backup all the nodes. The first question immediately arises: why, if the Microsoft SQL cluster out of the box gives us a very, very decent level of fall protection? For example, you can always lead the SQL role and resources to another node.
This reasoning is true, but the option is missing that the nodes themselves are vulnerable. In short: the cluster at the OS level closes the risks associated with the operation of the OS of a particular machine, and the SQL cluster closes the risks associated specifically with databases. Yes, and backup this configuration is more interesting.
Let's imagine that a cryptographer will come to us and start putting the cluster nodes one by one. Here we will not be able to quickly restore only the database files. There are also unsuccessful OS updates, dying hardware, etc.
Therefore, I propose to assume that we have agreed on the need to backup the entire server, and now proceed to the toolkit. I will write how to achieve the goals and be delightful with Veeam Backup & Replication 9.5. Another version back Veeam could only backup virtual machines centrally, but now it has received full support for backup of physical servers, and it’s a sin not to figure it out.
Protection Groups
For backup, we will use the Protection Group . This is a simple logical entity, in essence - a container where the machines that need to be boiled are grouped. For example, in it you can group several objects from AD and not worry that new machines will not fall into backup. Protection Group automatically scans the changes and performs the remaining necessary actions on the specified schedule. In short, a very convenient thing, especially in large mixed infrastructures.
But let's move from words to deeds: launch Veeam Backup & Replication , go to the Inventory tab and launch the Protection Group creation wizard.

In the first step, you must specify the name of the group and some description as necessary, everything is clear.
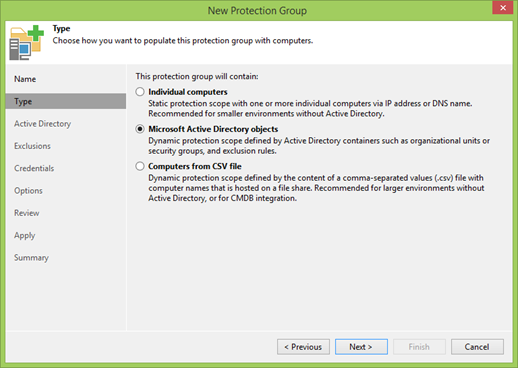
But in the next step you should already choose where the Protection Group will receive information about the protected machines. You can add them the old-fashioned way manually by DNS names or IP, you can provide the list as a CSV file, as real Jedi do, but we are simpler people and we will use Active Directory objects. In our case, it also means that all nodes of the cluster will be detected automatically, including new ones.
In the next step, you will first be asked to specify the address of the domain controller, port and user data to connect.
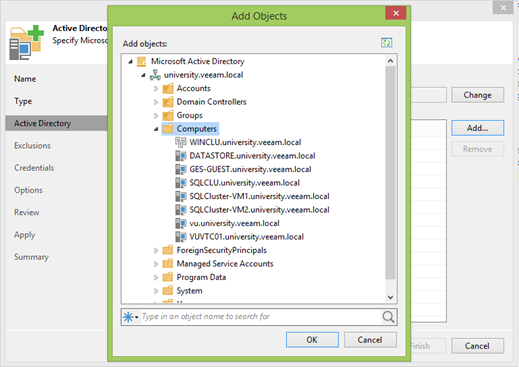
If all is well, click Add and select the required OUs.
The important point: you only need to add a cluster! Separate nodes should not be added.
My cluster is called WINCLU, and I will add it.
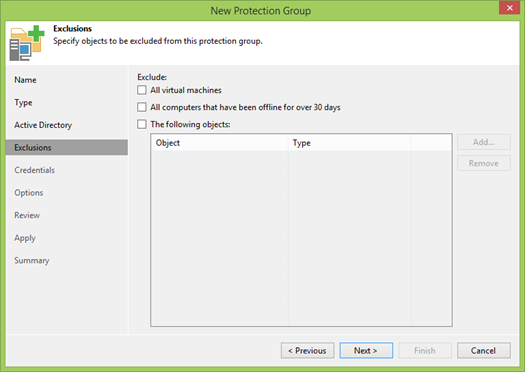
In the next step, rules are set up to exclude machines from scanning. In today's world, OUs often contain both virtual and physical machines, and in some cases they are backed up according to different scenarios. In fact, there are even mixed clusters where both physical and virtual machines are used. This is the third level of protection.
By default, the first two checkboxes are selected, and you may not need to remove them, but my lab is completely virtual, and we agreed at the beginning to look at the backup functionality of physical machines.
Now you need to specify which user we will use. In a certain ideal case, we have created a special user in AD, who has local administrator rights on all machines. But if this is not the case, then Veeam allows you to assign a separate user to each object.
Why do I need a local admin?
- First, to install Veeam Agent on each machine, which will manage the local backup process.
- Secondly, in order for Veeam Agent to make this backup, it needs local administrator rights to work with VSS. That's the way Windows is built, and there's nothing you can do about it.
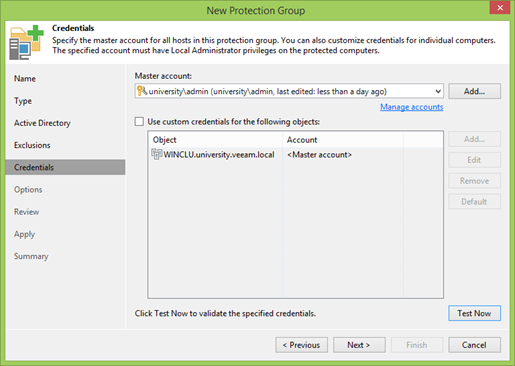
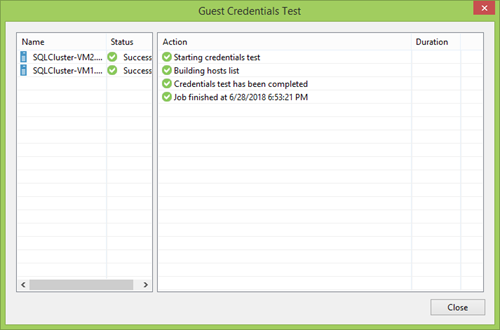
Separately, you need to focus your attention on the Test Now button . A great thing that allows you to quickly check that all accounts are entered correctly, and in the case of a cluster, be sure ahead of time that all nodes are visible and accessible.
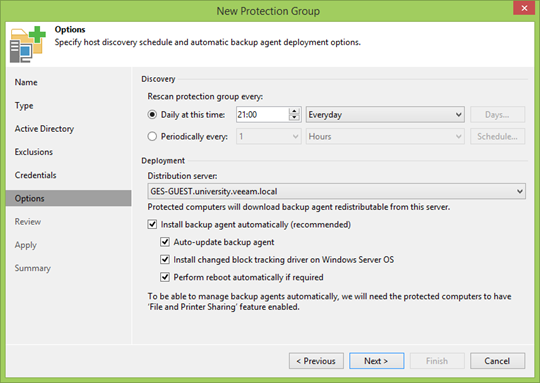
Then you need to set the interval and time for scanning PG members. You can at least once a week, but you can also configure a continuous update. This is up to you, but usually a great option is to repeat the backup frequency so that all new members can get to the nearest recovery point.
Below are the less obvious, but important options.
Distribution server is the machine with which Veeam Agents will be installed. In general, it is enough to use Veeam Backup server, but in geographically distributed infrastructures with poor connectivity, it makes sense to specify the option closer. In all other cases, it does not make sense to change.
Farther. I do not know the reasons why you should not install and not update agents automatically, but if you do not trust the automation, you can safely refuse. But keep in mind that because of the difference in versions you can be left without another backup point.
You can also agree to the installation of our CBT driver, which will track the change of disks at the file system level. This will allow only actually changed sectors to be backed up, which means that the recovery point is smaller, backup is faster, server load is less. But if you do not trust, the traffic is not important to you, you have large disks and the connection is excellent, then you can not install it.
There is a nuance with automatic reboot: it is applied not only during the first installation, but also during upgrades. So do not forget to uncheck if you can not afford such a luxury.
In the next step, we will be informed about the need to add components to the Distribution server. Even if they do not appear, in a minute they will be there by pressing the Apply button .
At the last step, we will be informed that the Protection Group (PG) was created successfully and will be offered to launch discovery, i.e. the group according to the specified conditions will compile a list of machines and, according to the settings, start the installation of the agents. While all the necessary operations will take place, you can go pour yourself a cup of coffee.
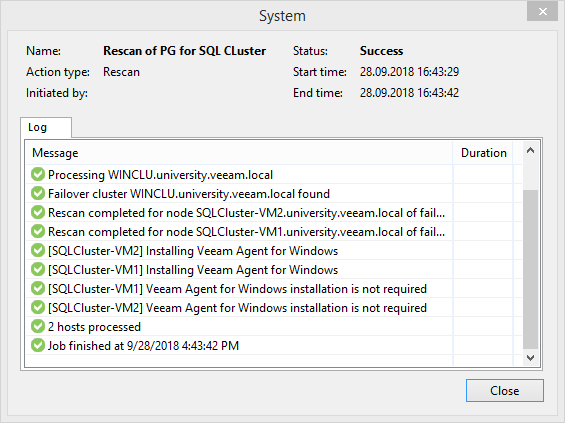
By emptying a cup of coffee, it can be found that an agent could not be installed on one of the nodes due to a network access error. If a similar grief happened to you, then simply disconnect the quorum disk from this node. Not often, but it happens. Or maybe this is a feature of my labs at all. So there was not enough assiduity to deal with this problem to the end.
Create backup
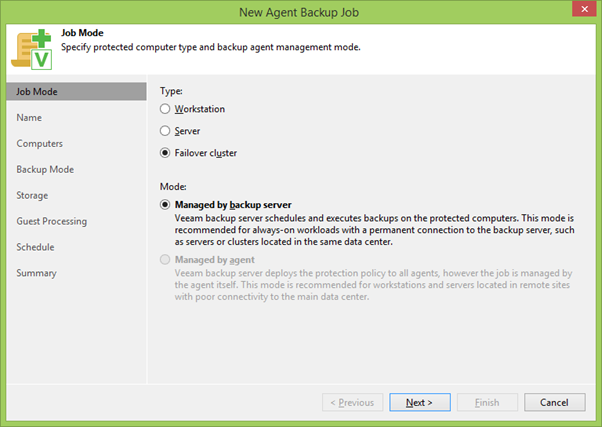
So, if at the previous stage everything ended successfully, then your Protection Group now has a cluster and a list of its nodes with successfully installed agents. Therefore, we proceed to the most interesting part: we create a backup in the Failover Cluster mode, so that all nodes and all attached disks get into it.
What is the main difference and why it is impossible to simply save them as separate cars? Technically, you can do this with all the nodes except for one - the current holder of the role of a cluster. If you start backing it straight in the forehead, the rest of the nodes can lose touch with it and begin to pull the blanket over themselves, which ultimately leads to the collapse and cessation of the entire cluster. This happens very often with busy systems.

Using the right mouse button (right click), click on the PG, start the backup creation wizard and immediately select the Failover Cluster mode . Such tasks can be created only on a central Backup Server, in contrast to local agent backups. But this is also logical: as you remember, we wanted to backup SQL at the same time, which means that the logs will be regularly truncated - for which, in any case, communication between the servers will be necessary.
Then choose the name of Joba and the list of backup participants. By default, there will be only the selected PG, but here you can also add something extra.
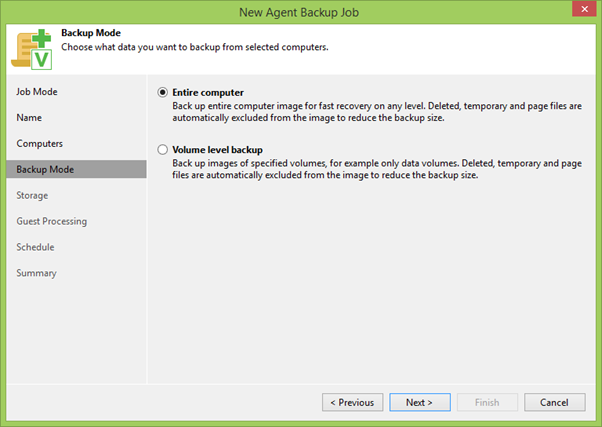
The next step is to choose between backup individual disks or the entire machine as a whole. In general, if you can backup the whole machine, then you need to backup the whole machine. In our case, this is true because we have to save all the cluster disks that may appear on any node of our cluster.
Then we select the repository for backups and indicate how many recovery points we will have. Using the Advanced button, you can bring up a tweaking menu, where you can choose which way to create a backup chain, include additional file integrity checks and much more, which we will not waste time now, because the most interesting is the Guest Processing section .

It depends on the settings on this tab whether we get the so-called application consistent backup (which sometimes translates as a complete backup or as a backup, taking into account the state of the applications, or don’t understand how and, most importantly, why). Therefore, go to Applications , select our PG and click Edit .

Make sure that Application-Aware Processing is enabled on the first tab . In this case, the VSS subsystem will be involved, the operation of which should go without errors. Rather, it can work with errors, but in this case, the backup will not be created and you will need to understand the reasons for the failure. Also here it is necessary to determine the fate of transactional logs: Veeam can ignore them, just copy to backup or cut.
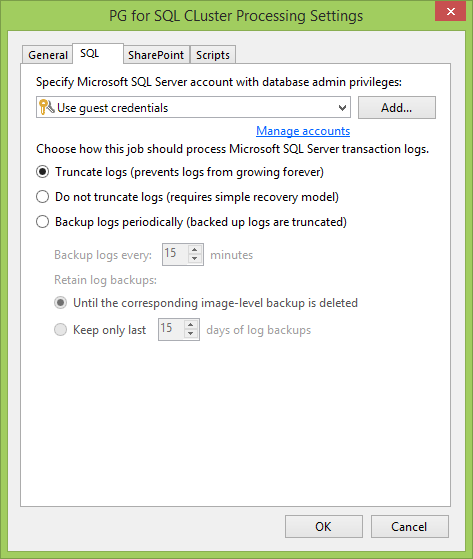
Now go to the SQL tab . The first thing to do is to set up a user account for interacting with the SQL server and its databases. In an ideal world, it coincides with the local administrator, which we specified when creating the PG. Otherwise, the main thing is that this user must have Databases Owner rights.
Then choose how we interact with the logs. For example, if you have a database in Full Recovery mode , it is very convenient to log logs. Or you can back up transaction logs on a separate schedule so that you can quickly roll back the database to the right time, and not lose everything that was between backups. Of course, you can not do anything with logs at all.

Go to the penultimate item Schedule , where we set the schedule according to your requirements. Someone enough once a day, someone once an hour, it's up to you to decide.
We finish the creation of the task by clicking Apply a couple of times , and enjoy the result.
In an ideal world, if you don’t have any tricks with installing agents that work as a link between the cluster and Veeam Server, or you suddenly forgot to load the necessary license for agents, the job will work fine and you will see something like the following picture.
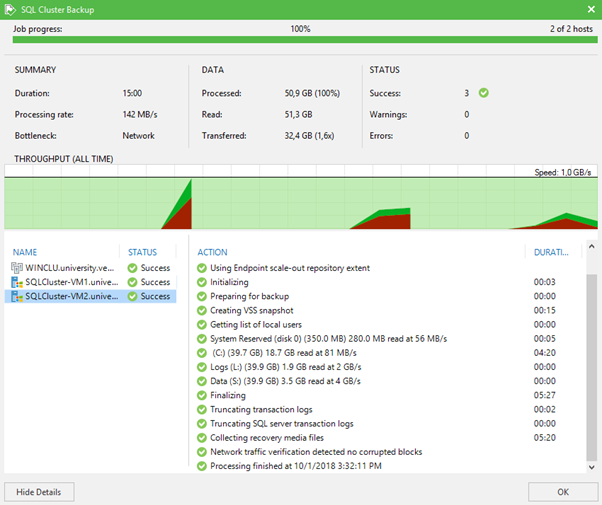
That's all. It turns out that backing up clusters is not so scary as it is customary to think about. Even if it is a cluster inside another cluster.
If you are interested in learning about another backup / restauran scenario, then write in the comments about it, and we will tell you everything in the best possible way.