OSSIM - deploying a comprehensive open source security management system
OSSIM (Open Source Security Information Management) - a system of management, control and information security.
OSSIM “out of the box” includes such functionality as:
- Event Collection, Analysis and Correlation - SIEM
- Host Intrusion Detection System (HIDS) - OSSEC
- Network Intrusion Detection System (NIDS) - Suricata
- Wireless Intrusion Detection System (WIDS) - Kismet
- Host Monitoring - Nagios
- Network Anomaly Analysis - P0f , PADS , FProbe , Arpwatch , etc.
- Vulnerability Scanner - OpenVAS
- The most powerful threat information exchange system between OSSIM users - OTX
- Over 200 plugins for parsing and correlation of logs from various external devices and services
Foreword
This article will focus primarily on the installation, initial configuration and configuration of OSSIM, all information about the features and functionality can be taken from the official website , or see this video:
It is worth noting that AlienVault has 2 products, free OSSIM and a more advanced version - USM, the differences can be found at this link .
As a bonus, the last chapter of articles posted information OSSIM integration with SIEM system of ArcSight .
Table of contents
Install OSSIM
Configuring OSSIM
- Setup wizard
- Set up email notifications
- HIDS setup
- Setting WIDS
- Configure system log collection
- ArcSight Integration
Used sources
Install OSSIM
Installing an open source SIEM system is done using a ready-made installation image that contains the Debian operating system and all the necessary pre-installed components and modules.
To install OSSIM, you must open the link , after which the download of the latest version of the OSSIM distribution will immediately begin.
We will install on VMware ESXi .
ESXi setup
First you need to configure ESXi itself, namely, to configure an interface that works in the “inaudible” mode (Promiscuous mode) . We need this mode to configure network monitoring. In OSSIM, Suricata plays this role .
To do this, open the host settings, and do everything, as in the animation below:
This completes the setup, now add a virtual machine. In the screenshots below, only those settings items that we change.

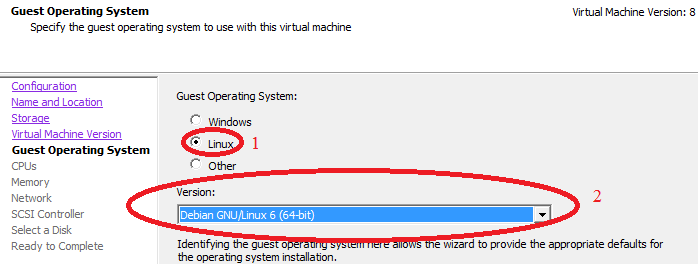
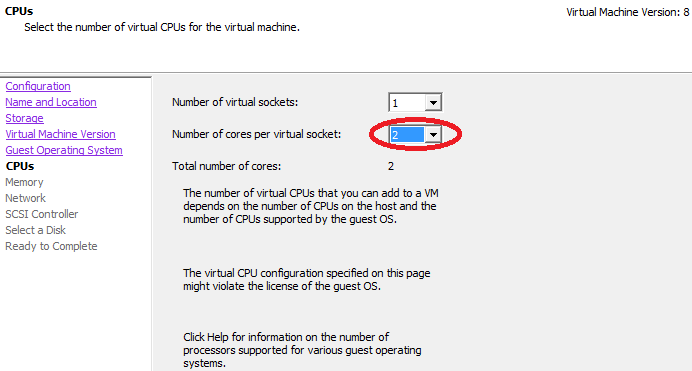
Many services in OSSIM can work in multi-threaded mode, so it is advisable to install several cores.

RAM, it is desirable to put more. The minimum size to which everything works more or less stably and without slowdowns is 3GB.
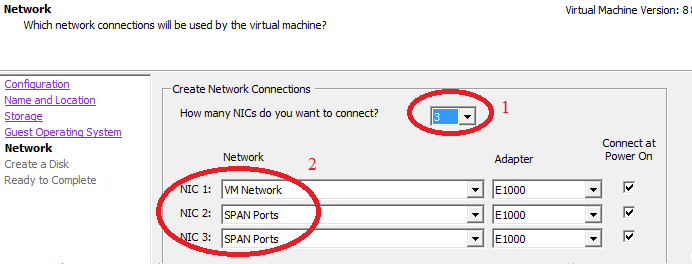
1 OSSIM management interface, 1 for Network IDS Suricata, one for OpenVAS (optional).

This completes the configuration of the virtual machine.
Installation
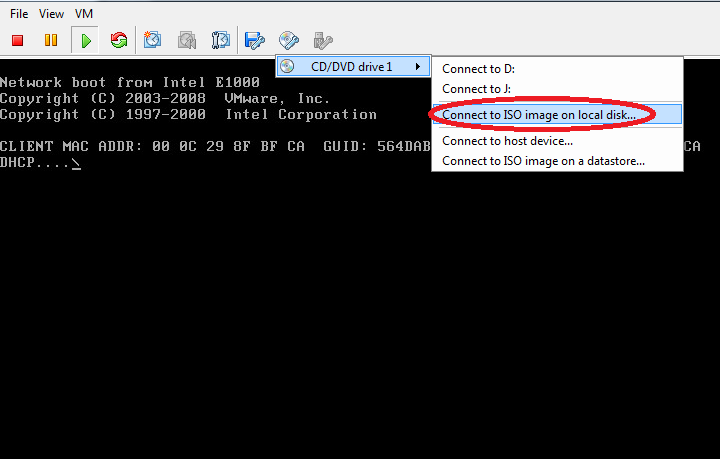
Turn on the virtual machine and connect to it, the previously downloaded OSSIM installation image.
Now install OSSIM. The installation is no different from installing Debian, only the points in the installation are much smaller.
The setup is very simple, so for brevity, some screenshots in the animation are omitted.
After entering all the settings, installation will begin.

At the “Launch cdsetup ...” step, the installation may freeze for a while, as it should be.
At the end, the console will appear:

We click on the link specified in the console and enter the credentials:

This completes the installation.
Configuring OSSIM
To configure OSSIM, 3 operating systems were configured: Windows server 2008 R2, Windows 7 SP1, Ubuntu 14.04 LTS, which we will directly connect to monitoring. In addition, we will set up a Kismet- based wireless IDS system using a host with Debian 6 pre-installed as a “sensor”.
Setup wizard
We enter the credentials specified in the previous setup item:

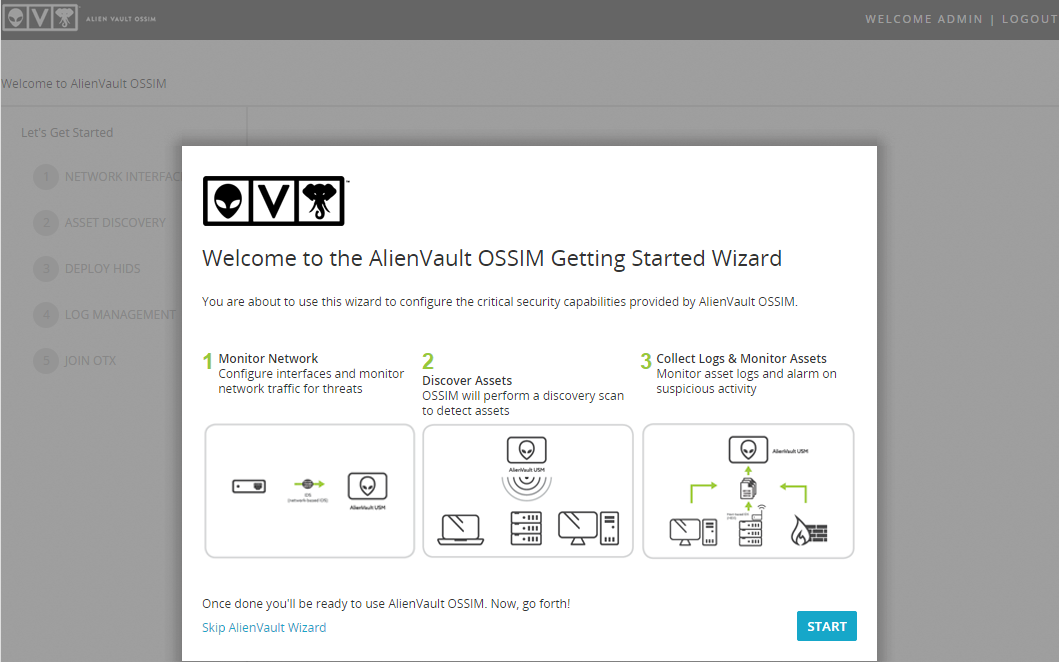
And we see the setup wizard window:
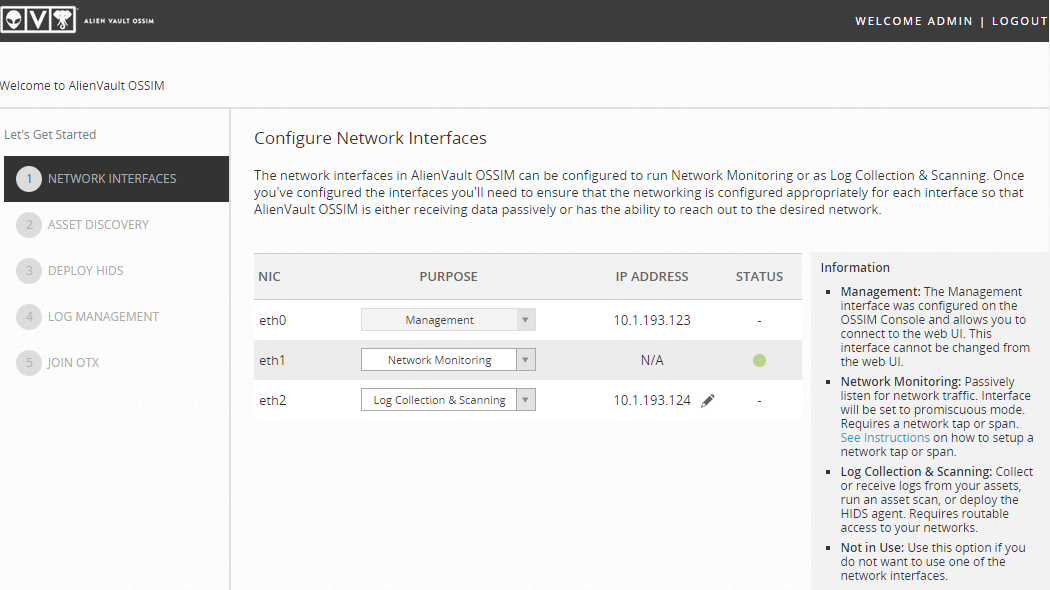
Configure the interfaces:
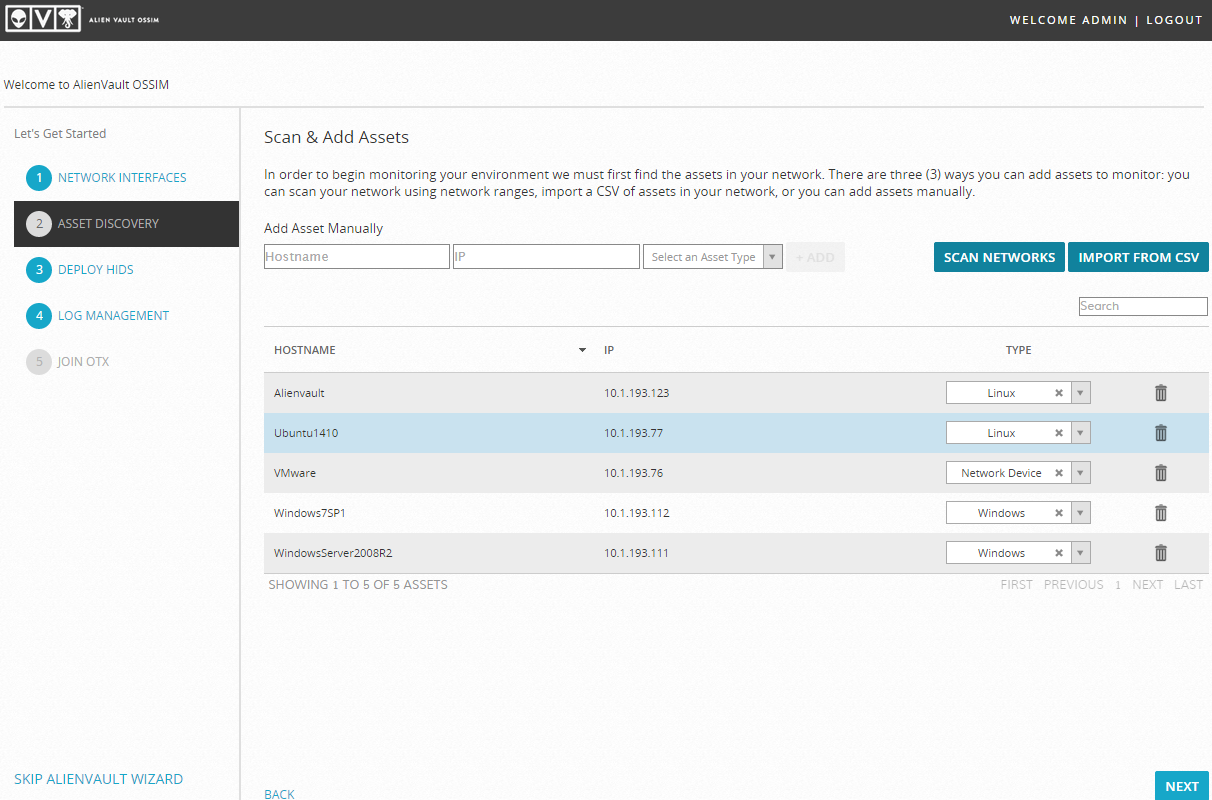
In the next paragraph, OSSIM will automatically scan the network and offer to indicate the type of nodes found, in our case, everything that does not belong to the test bench is deleted:
In the next In this step, you can automatically install the Intrusion Detection Host System (OSSEC). Let's try to install it for Windows Server. We enter the credentials and click "DEPLOY":
I do not recommend doing the same for Linux, because in this case, OSSEC will work without an agent ( Agentless ).
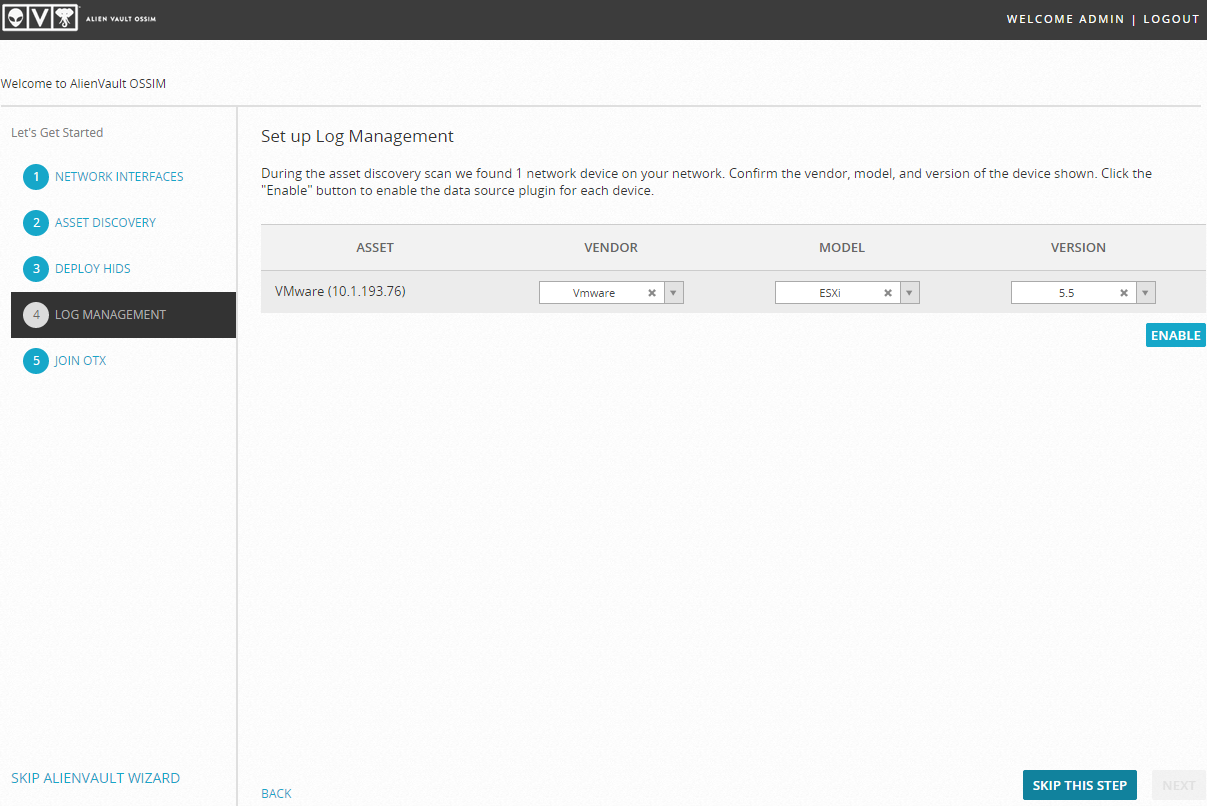
At the next stage, we are offered to configure log monitoring, we skip this item and return to it later, in the corresponding chapter:
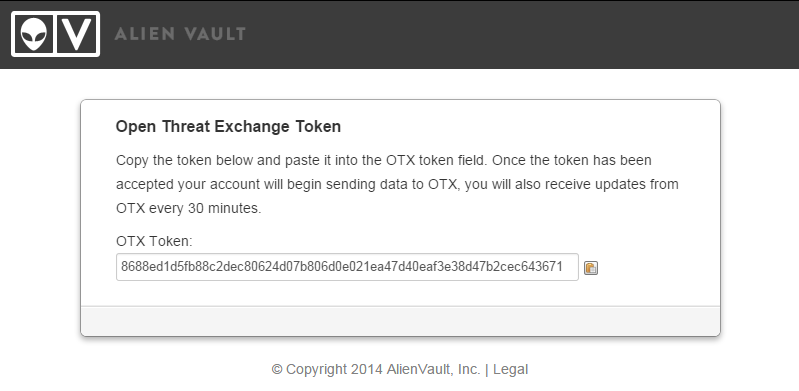
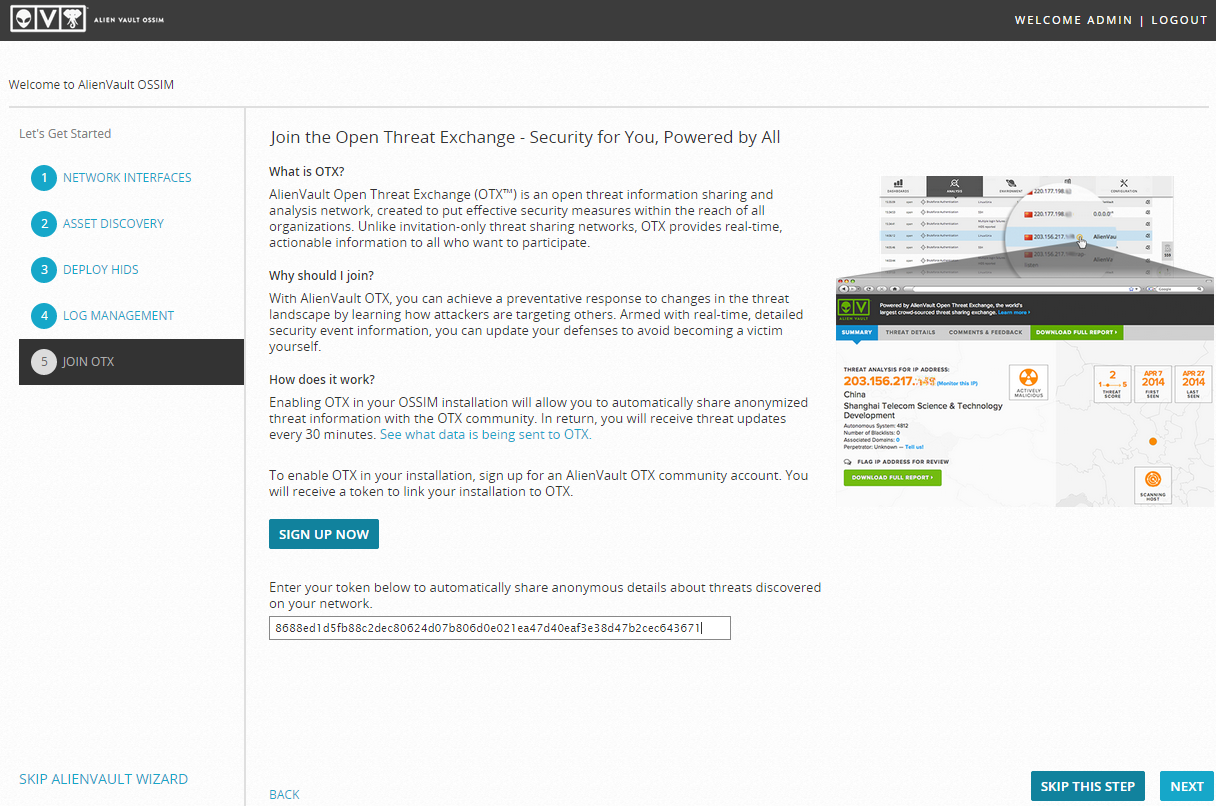
At the last point, we will be offered to join OTX, if you wish, register at www.alienvault.com/my-account/customer/signup and enter the token:
Next, we see a pop-up window with the following content:
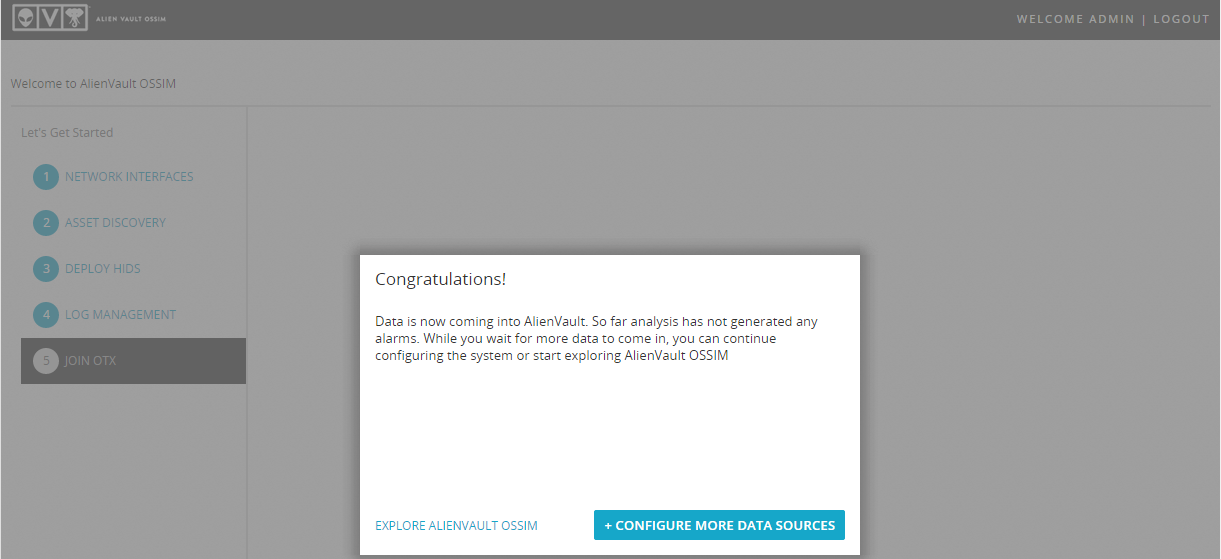
Click Explore Alienvault OSSIM and the setup manager works on it finished.
Set up email notifications
OSSIM has a “Alarm” section, which displays correlated security events, but you will not be able to receive notifications for such events. But in the system there is a section “Tickets”, in which for each event or events you can open a task.
Tickets can be created manually by a specialist or automatically when events from the Security Events (SIEM) logs enter Alarms; in case of a ticket opening automatically, OSSIM can automatically send notifications, which we will configure now.
Setting up email notifications takes place in 2 stages, first you need to configure postfix, and secondly, enable sending notifications.
Open SSH and connect to OSSIM:
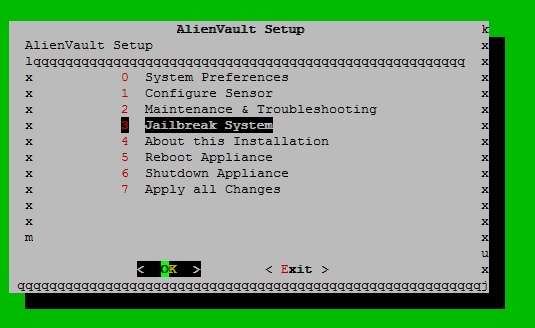
Select the Jailbreak System item and get to the console, enter:
sed -i -e "s@mailserver_relay=no@mailserver_relay=my.corporate.mail.server@" /etc/ossim/ossim_setup.conf
echo relayhost = my.corporate.mail.server:25 >> /etc/postfix/main.cf
service postfix restart
Note: instead of my.corporate.mail.server, specify your mail server, if necessary, configure any other postfix parameters (authorization, secure connection, etc.) - see the postfix documentation .
Now we open the settings and turn on the automatic sending of notifications in the administration section:
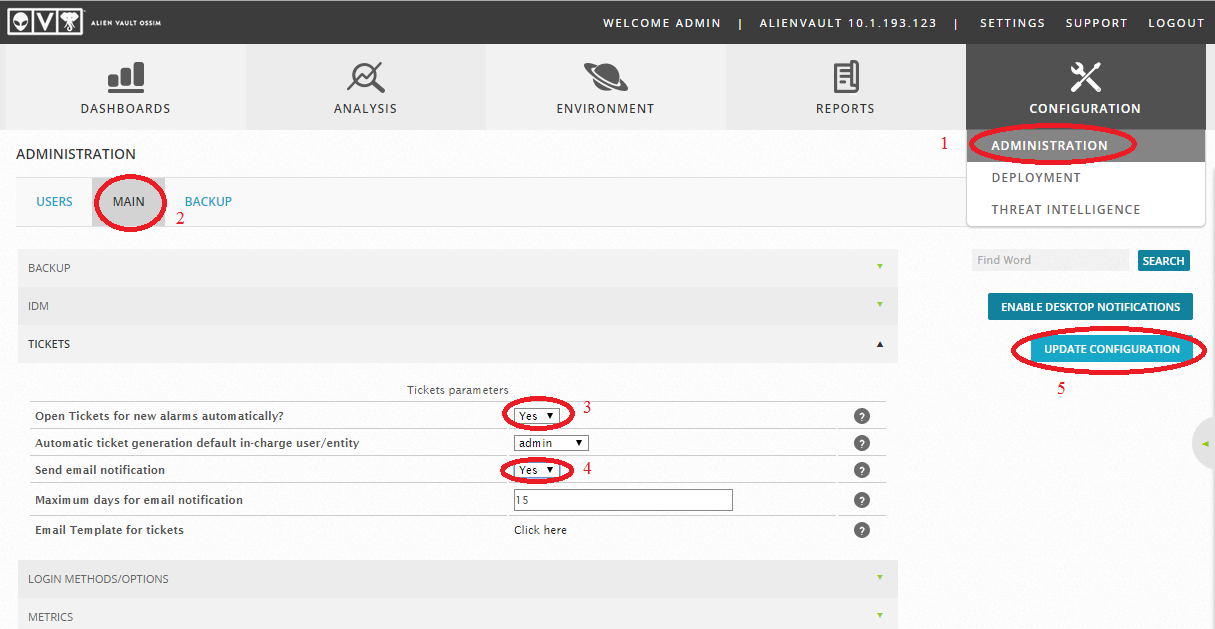
After this manipulation, any correlated event will automatically create a ticket and notify the administrator.
HIDS setup
The host system of intrusion prevention in OSSIM is not the unknown OSSEC , the configuration of which we will discuss further.
To configure HIDS, go to Environment -> Detection -> HIDS -> Agents and see 2 hosts, the first is AlienVault itself, the second is Windows Server, which we installed on the “Deploy HIDS” item in the “Setup Wizards” section. Go to the HIDS agents menu:

Add Windows 7 and Ubuntu:

Windows
To install HIDS, you can use the automatic installation mode
 or download the finished exe file
  .
. The installation in automatic mode is no different from what we already did:

When installing in manual mode, using an exe file, the OSSEC agent will be installed in “1 click”, without entering any additional parameters:

If successful, we will see:

Ubuntu
Now configure Ubuntu, connect via SSH, and install OSSEC:
sudo -s
apt-get install curl
curl --header 'Host: www.ossec.net' --header 'User-Agent: Mozilla/5.0 (X11; Ubuntu; Linux x86_64; rv:31.0) Gecko/20100101 Firefox/31.0' --header 'Accept: text/html,application/xhtml+xml,application/xml;q=0.9,*/*;q=0.8' --header 'Accept-Language: en-US,en;q=0.5' --header 'DNT: 1' --header 'Referer: http://www.ossec.net/?page_id=19' --header 'Connection: keep-alive' 'http://www.ossec.net/files/ossec-hids-2.8.tar.gz' -o 'ossec-hids-2.8.1.tar.gz' –L
Note: loading through wget does not work; on the server side ossec.net the User-Agent is checked.
tar xzf ossec-hids-2.8.1.tar.gz
cd ossec-hids-2.8/
/bin/bash ./install.sh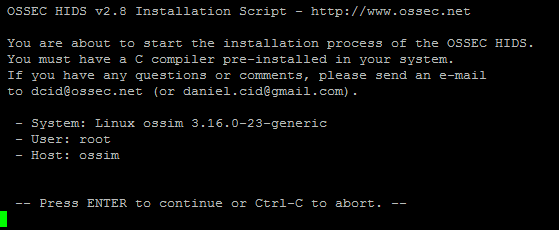
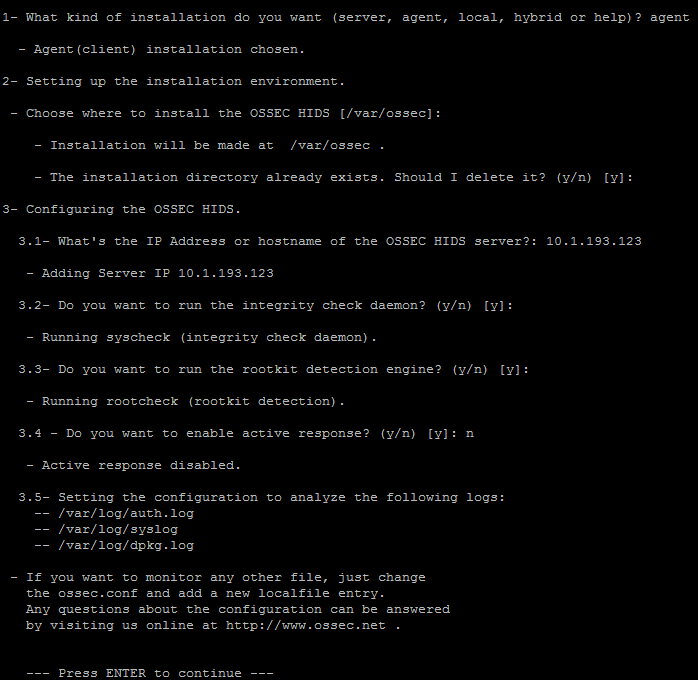
Note: clause 3.4, active protection mode (IPS instead of IDS), turn it on carefully, in this case we use only the detection mode, therefore it leaves “n” instead of “y”.
Now we get the key, for this we go back to the HIDS agents menu and click on
 :
: 
Run the configuration using the / var / ossec / bin / manage_agents utility, press I, enter the key and exit (Q):
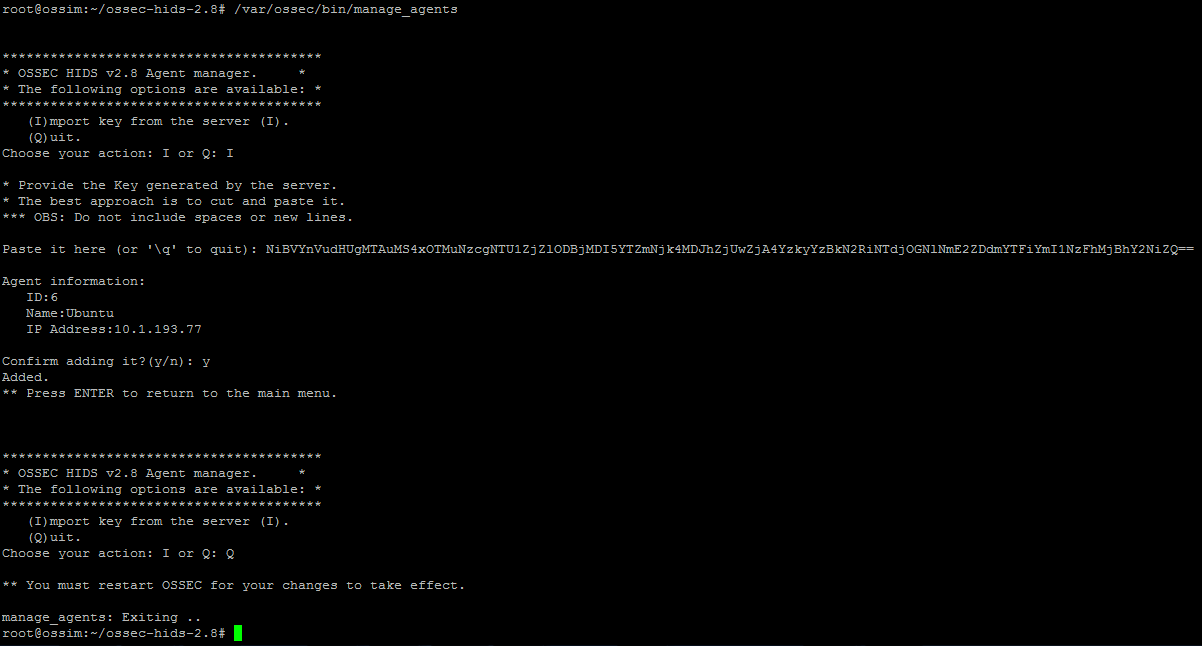
Restart OSSEC:
service ossec restart
If successful, we will see “Active” opposite the host:

If an agent does not appear as active in the list, you can restart OSSEC, for this we connect via SSH to OSSIM and perform the following actions:
This completes the installation of HIDS, now on the Environment tab -> Detection, you can see the OSSEC logs:

Setting WIDS
We will install WIDS as follows:
- Create a host with Debian 6
- Connect to it and set up a Wi-Fi card
- Install and configure kismet
- Set up OSSIM OpenVPN server
- Configure communication between OSSIM and Debian 6
- Set up sending and recording logs in rsyslog
- Enable the kismet plugin
- Let's configure import on the crown of logs in XML format from kismet
- Add a new sensor to OSSIM
- Verify the health of the solution
Virtual machine setup
To install the wireless IDS system, we need a host with preinstalled Debian 6.
Create a new virtual machine on ESXi and add a USB controller and a USB Wi-Fi card there:
In this example, the TOTOLink N500UD USB Wi-Fi card is used.
Install and configure Debian
Installing Debian 6 . All settings are at your discretion, the installation of Debian is standard, therefore it is omitted in this manual.
After installing the OS, connect to SSH and install the network card driver :
wget http://totolink.ru/files/soft/N500UD_Linux_V2.6.1.3.zip
apt-get install unzip
unzip N500UD_Linux_V2.6.1.3.zip
apt-get install build-essential
apt-get install linux-headers-$(uname -r)
make
make install
aptitude install wireless-tools
apt-get install ssh openvpn kismet ntp
reboot
After that, check for a new interface in iwconfig: Configure
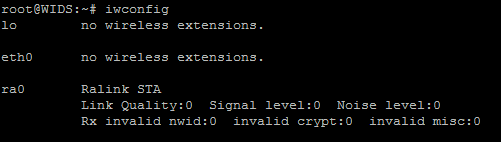
sending logs from Debian to OSSIM:
echo "*.* @10.67.68.1" > /etc/rsyslog.d/wids_alienvault.conf
Do not change the IP address, it should be like that. This is the IP address of the OpenVPN server, which will subsequently be raised in OSSIM.
Now create the script /etc/init.d/wids_alienvault.sh with the following contents:
#!/bin/sh
/usr/bin/kismet_server -l xml -t kismet -f /etc/kismet/kismet.conf 2>&1 | logger -t kismet -p local7.1
Give him the right to run:
chmod 755 /etc/init.d/wids_alienvault.sh
And write it to autoload in /etc/rc.local until exit 0:

Now configure kismet.
In the file /etc/kismet/kismet.conf
First, configure the adapter:
source=rt2500,ra0,ra0-wids
The name of the chipset can be viewed with the command:
lsmod | grep ^usbcore
Set the time for creating the XML report:
logexpiry=3600
Configure the name of the created logs so that OSSIM correctly determines which files to import and clean:
logdefault=10.67.68.10
logtemplate=/var/log/kismet/%n_%D-%i.%l
After reboot:
reboot
Configure OpenVPN
We connect to OSSIM via SSH, select the "Jailbreak system" item and enter the command:
alienvault-reconfig --add_vpnnode=WIDS-Sensor
Go back to Debian and copy the configured OpenVPN archive with the settings:
scp root@10.1.193.123:/etc/openvpn/nodes/WIDS-Sensor.tar.gz ~
Apply the config:
tar xzf WIDS-Sensor.tar.gz
rm -f WIDS-Sensor.tar.gz
mv * /etc/openvpn/
Check OpenVPN:
/etc/init.d/openvpn restart
Ifconfig tun0

Kismet Setup
Go back to OSSIM.
Set up rsyslog:
echo if \$programname contains \'ismet\' then /var/log/kismet.log >> /etc/rsyslog.d/kismet.conf
echo \& \~ >> /etc/rsyslog.d/kismet.conf
service rsyslog restart
Change the path to the file from which the plugin will pick up the logs:
sed –i –e "s@/var/log/syslog@/var/log/kismet.log@" /etc/ossim/agent/plugins/kismet.cfg
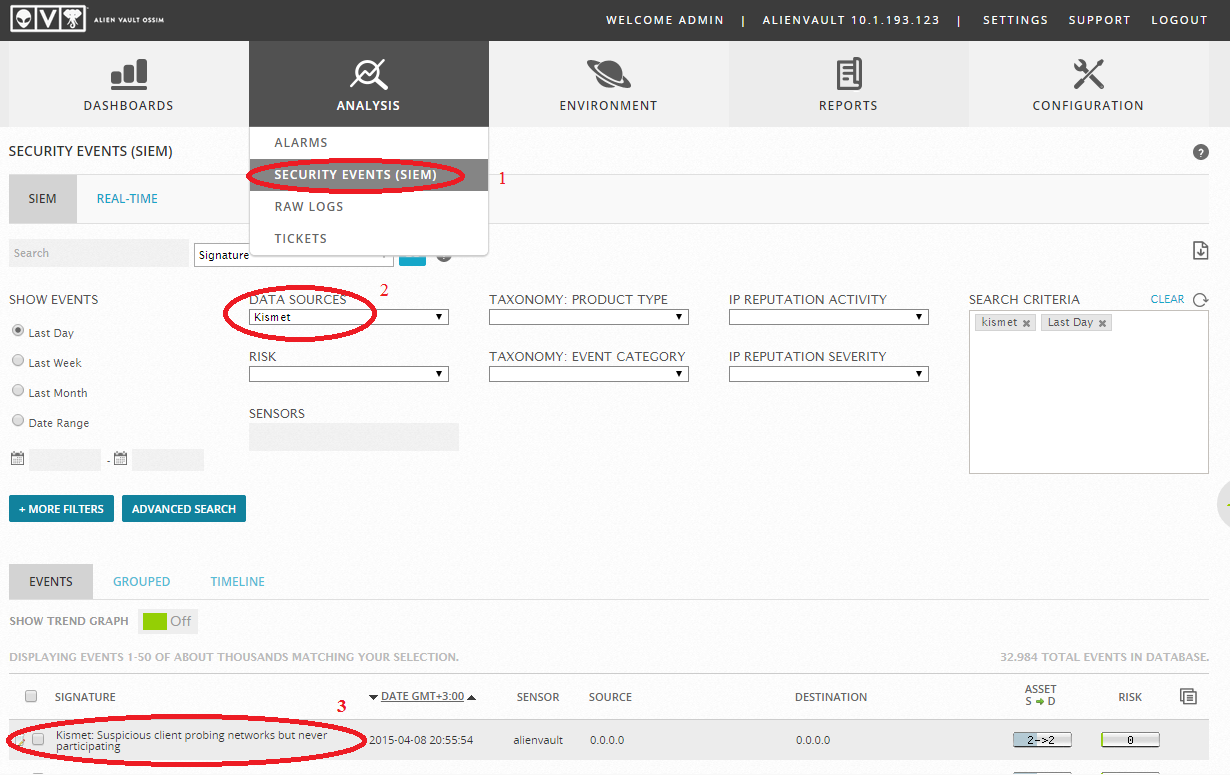
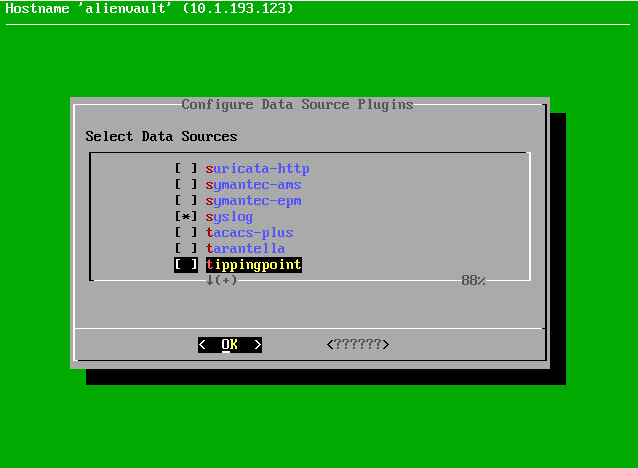
Now enable the plugin that will process the kismet logs. To do this, exit the OSSIM menu and turn on the plugin:
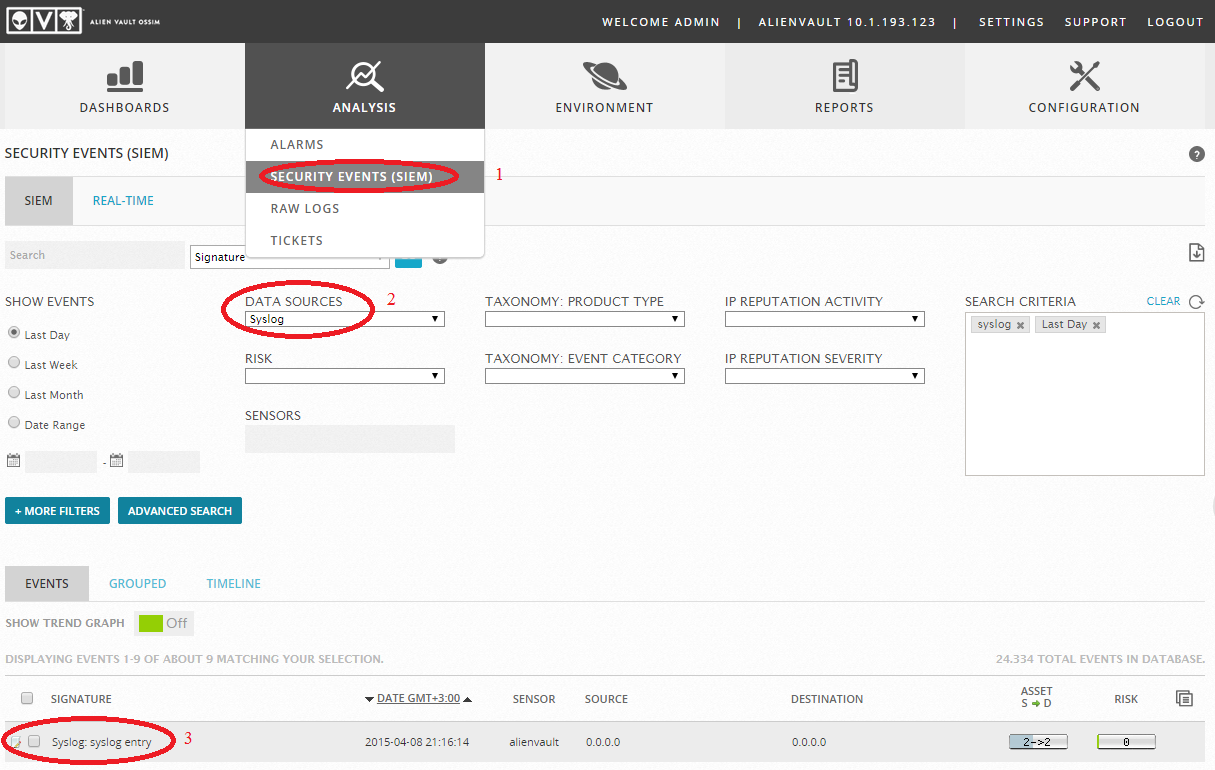
If everything is done correctly, we will see the logs in “Analysis -> Security Events (SIEM)”:
Setting up import of XML logs
Now it remains to configure the import of XML format logs from Debian.
This is necessary so that OSSIM can receive not only alerts, but all available data about Wi-Fi clients and networks by proximity, which will subsequently be reflected in Environment -> Detection -> Wireless IDS.
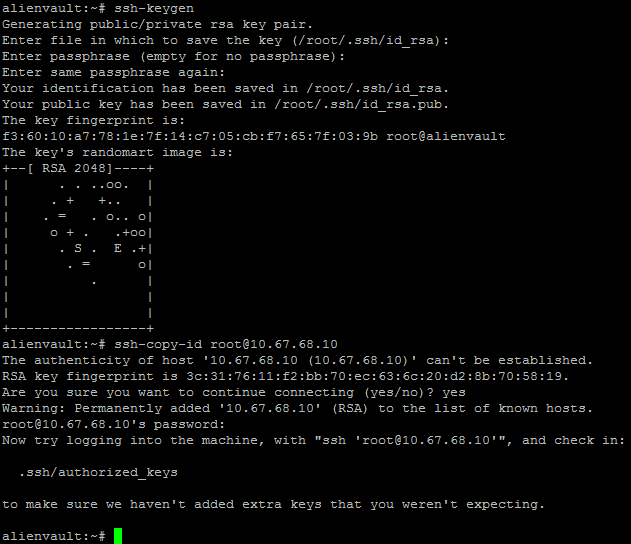
Configure SSH authorization without a password, so that the script receiving XML reports and cleaning them from the sensor works correctly.
In OSSIM, do:
ssh-keygen
ssh-copy-id root@10.67.68.10
Now create the file /etc/cron.hourly/kismet with the following contents:
#!/bin/bash
/usr/bin/perl /usr/share/ossim/www/wireless/fetch_kismet.pl
Copy the script itself:
cp /usr/share/ossim/www/wireless/kismet_sites.pl /var/ossim/kismet/kismet_sites.pl
And fix the address in it:
echo \$sites{\'10.67.68.10\'}=\'/var/log/kismet\'\; >> /var/ossim/kismet/kismet_sites.pl
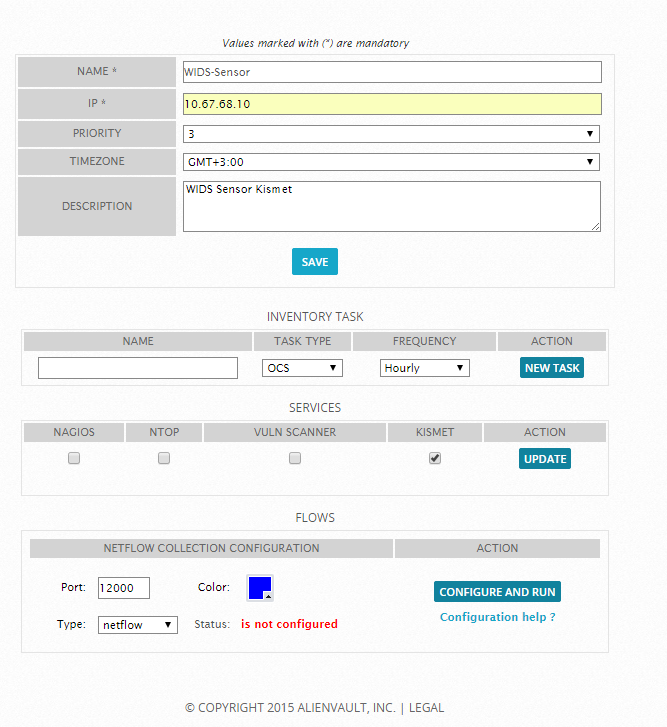
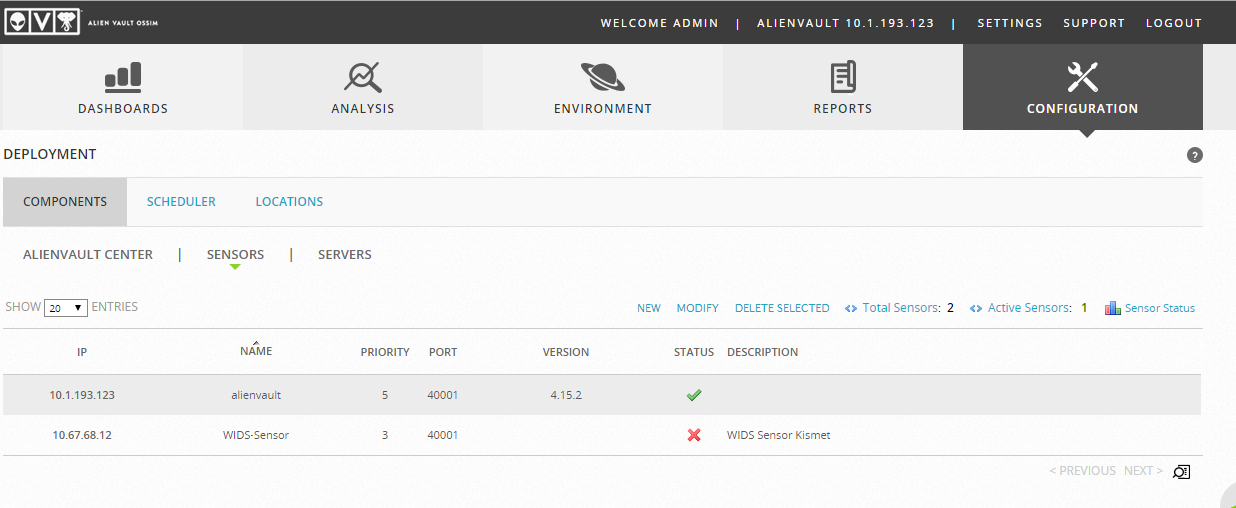
Sensor Setup
Now go to the web interface:
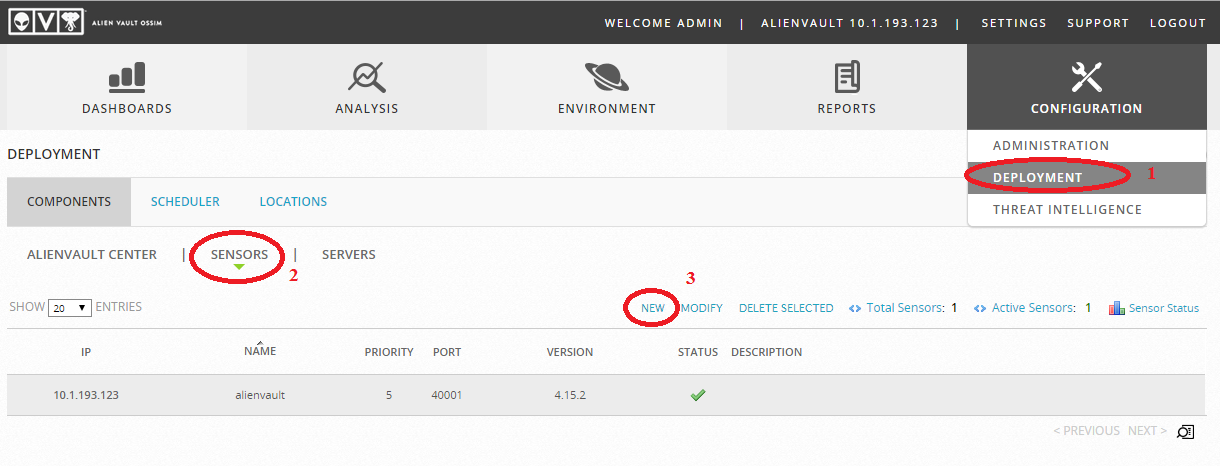
Add a new sensor:
The status of the sensor will be with a red X, it should be so:
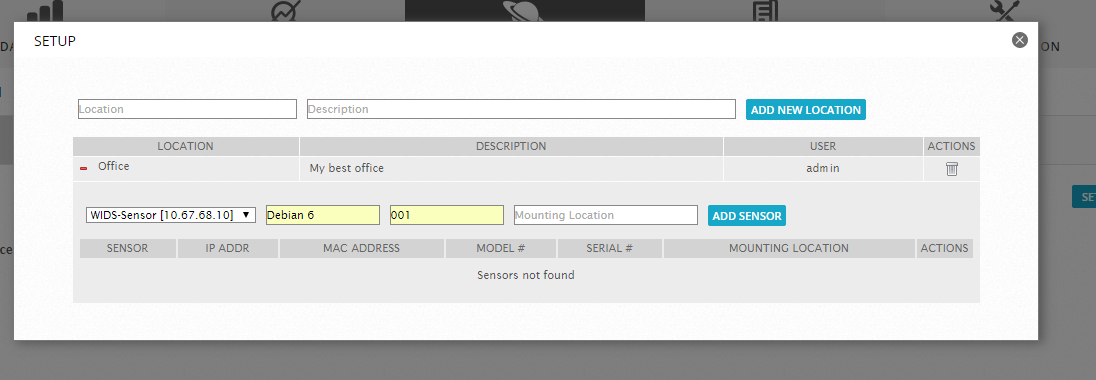
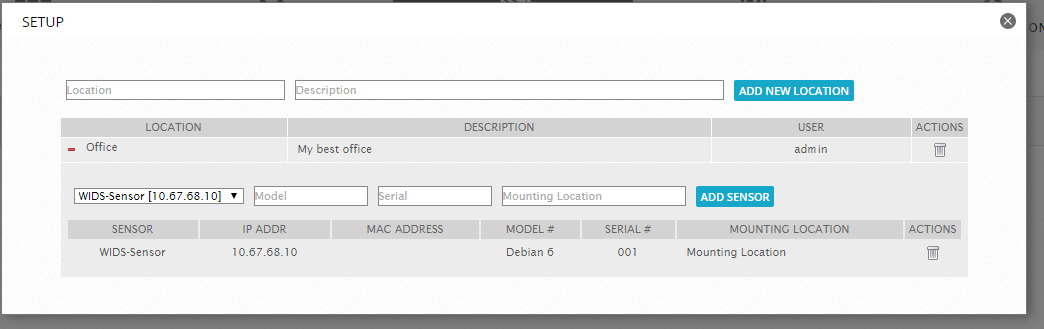
Now go to Environment -> Detection -> Wireless IDS and add the location and sensor:


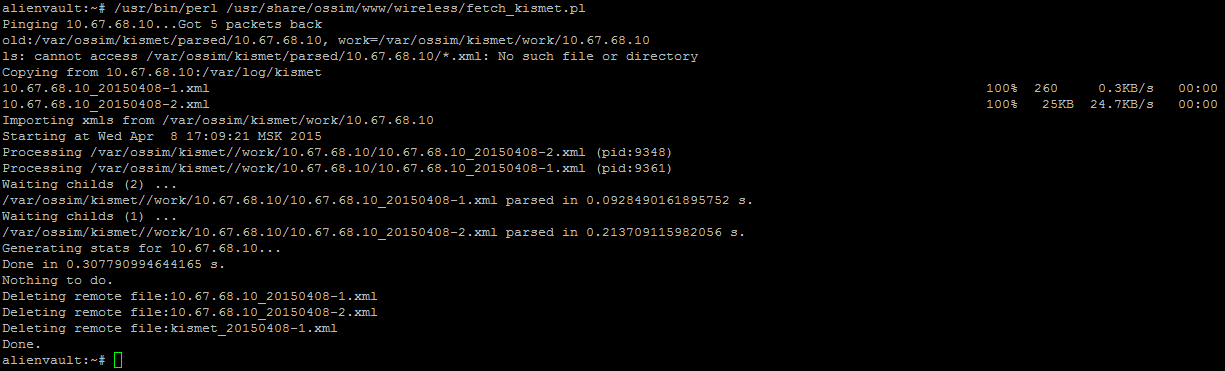
After we execute the command:
/usr/bin/perl /usr/share/ossim/www/wireless/fetch_kismet.pl
And if successful, we get:
And after this action, in the Environment -> Detection -> Wireless IDS item, the data appears:

Configure system log collection
Set up log collection with VMware ESXi, Windows server and Ubuntu.
To collect logs, we need to perform the following actions:
- Configure sending logs from hosts in OSSIM
- See from which file the OSSIM event processing plugin reads logs
- Configure logging from hosts to separate files through the rsyslog configuration
- Enable Plugin
- Check performance
VMware
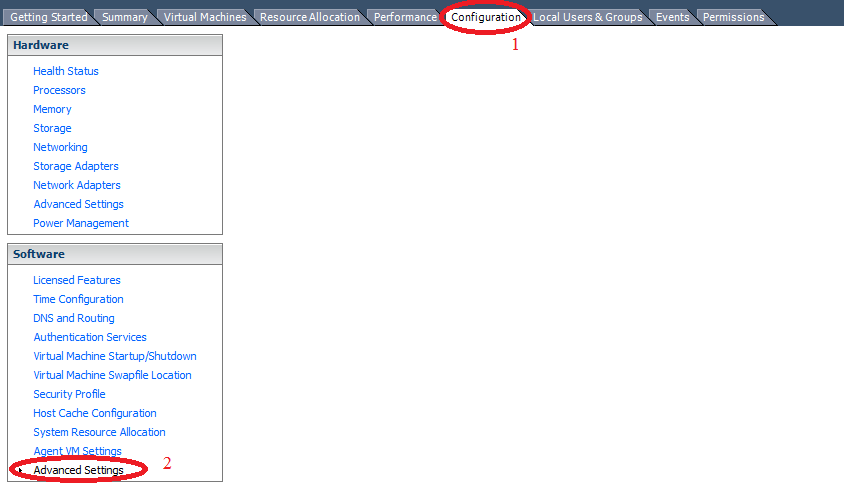
First, configure the sending of logs to ESXi, for this we open the advanced settings:
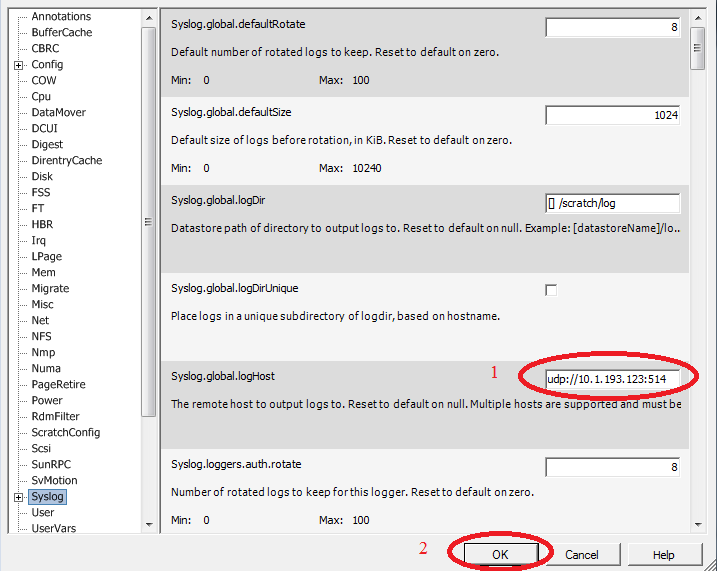
And turn on the sending of logs via UDP:
After we will see where the ESXi plugin will pick up the logs
cat /etc/ossim/agent/plugins/vmware-esxi.cfg | grep location

Set up rsyslog:
echo if \$fromhost-ip == \'10.1.193.76\' then -/var/log/vmware-esxi.log >> /etc/rsyslog.d/esxi.conf
service rsyslog restart
Now enable the plugin, connect via SSH to OSSIM:
Open Analysis -> Security Events (SIEM) and check:

Windows server
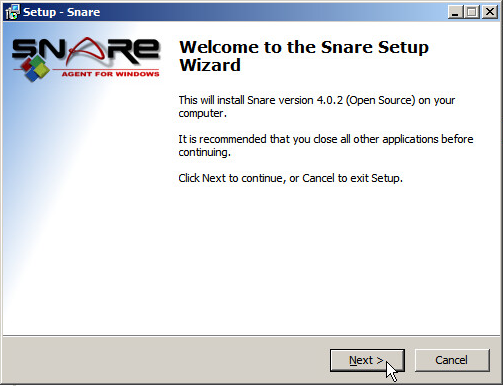
To send logs from Windows, we need the Snare program , which allows you to send system logs in syslog format.
Download and run:
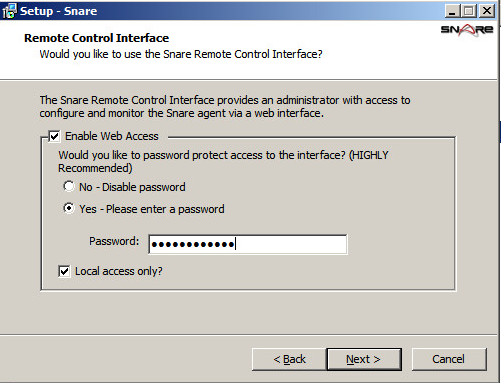
Turn on web access:
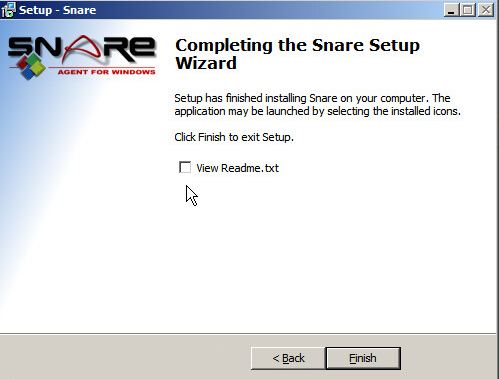
Finish installation:
Open the address in the browser: localhost : 6161
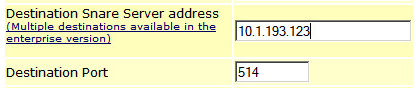
Enter the snare login, the password that was specified during installation, go to the “Network configuration” and indicate:
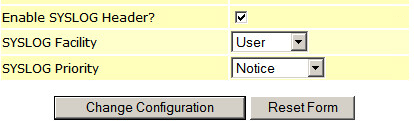
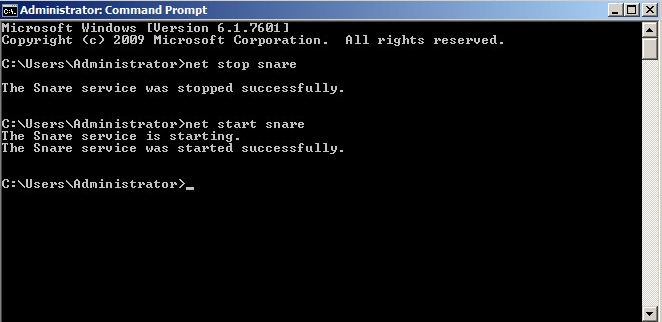
After saving the settings, open the console and restart snare :
net stop snare
net start snare
Check where the plugin gets the logs from:
cat /etc/ossim/agent/plugins/snare.cfg | grep location

Now configure rsyslog. In the rsyslog settings, there is already a predefined snare config (zzzzz_snare.conf), which we will fix a little now, guided by the OSSIM forum , replacing only 1 parameter:
sed -i -e "s@msg@rawmsg@" /etc/rsyslog.d/zzzzz_snare.conf
service rsyslog restart
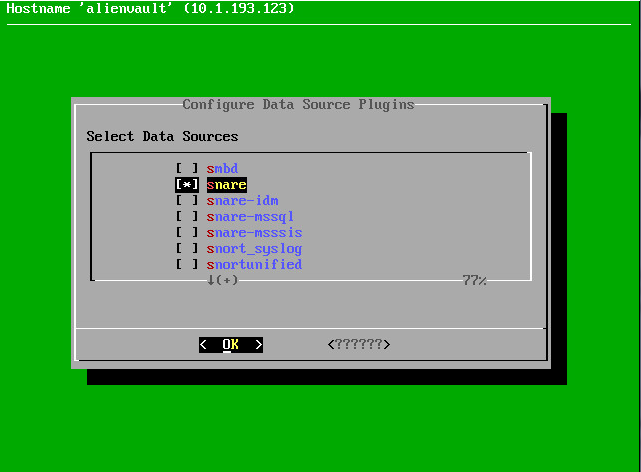
Now we’ll configure the plugin, by analogy with the VMware configuration , except for selecting the plugin itself:
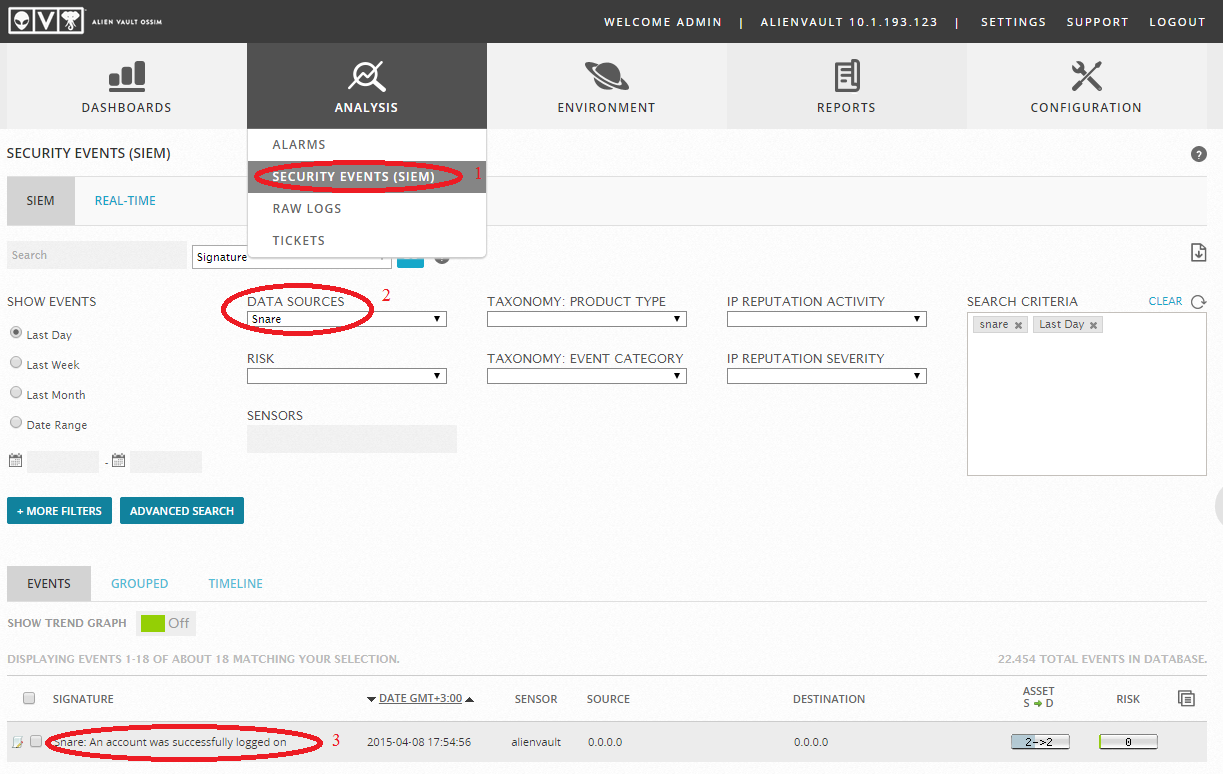
After restarting, check in Analysis -> Security Events (SIEM):
Ubuntu
To configure Ubuntu we will use rsyslog. We connect to Ubuntu via SSH and configure sending logs in OSSIM:
echo *.* @10.1.193.123 > /etc/rsyslog.d/alienvault.conf
service rsyslog restart
Check where the plugin gets the logs from:

cat /etc/ossim/agent/plugins/syslog.cfg
Change the path to the log file:
sed –i –e "s@/var/log/syslog@/var/log/ubuntusyslog.log@" /etc/ossim/agent/plugins/syslog.cfg
Now configure rsyslog in OSSIM:
echo if \$fromhost-ip == \'10.1.193.77\' then -/var/log/ubuntusyslog.log >> /etc/rsyslog.d/ubuntu.conf
service rsyslog restart
We turn on the plugin, by analogy with the previous paragraphs , only in the list of plugins we select the one you need:
Apply and check:
Note
If after selecting “Apply changes” you did not see the “AlienVault Reconfig” window
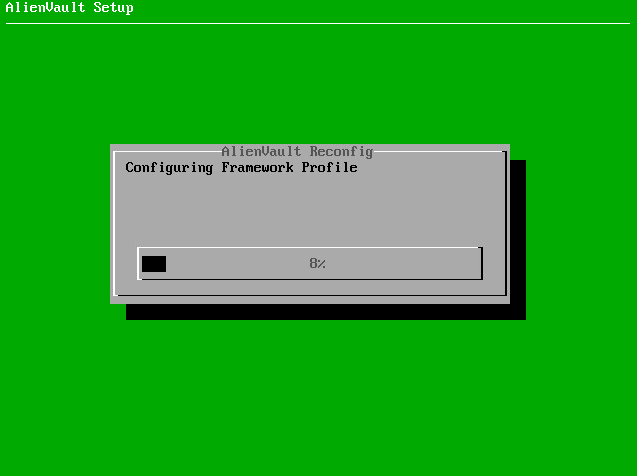
Reboot OSSIM (in the latest version 4.15.2 this bug appears periodically)
To solve problems with parsing logs encoded in cp1251 (Cyrillic), do the following:
In the / usr file /share/alienvault/ossim-agent/ParserDatabase.py to line 288 after:
                        if len(ret) > 0:
                            #We have to think about event order when processing
                            cVal = ret[len(ret) - 1][ref]
                            for e in ret:
Paste:
                                e=list(e)
                                x=[x.decode('cp1251').encode('utf8') if isinstance(x, basestring) else x for x in e] ## change for encoding cp1251
                                e=x
                                e=tuple(e)
In the file /usr/share/alienvault/ossim-agent/TailFollowBookmark.py on line 163 after:
    def _open_file(self, fromrotate=False):
        """
        Opens the file and seeks to the specified position based on
        the keyword arguments: offset and whence.  Furthermore, the
        _current_file attribute is set as a side-effect.
        fromrotate: Indicates if the file is opened when a
                    log rotation is detected
        """
Paste:
        if «alerts.log» in self.filename:
        self.encode='cp1251'
        else:
        self.encode='utf8'
Link to the forum where the discussion of the encoding problem was held.
Thank you very much for the information on resolving this bug. Dolph2005
ArcSight Integration
Now we will try to set up OSSIM integration with SIEM system of ArcSight .
Such a bundle can save tens of millions on ArcSight licenses if, in addition to the main office, the company has dozens of small branches that need to be protected and monitored.
The goal of this section is to send logs that are already correlated with OSSIM to ArcSight, and not correlate them on the ArcSight side, increasing the load.
To do this, install the connector (Syslog connector type), add the following FlexAgent:
# FlexAgent Regex Configuration File
do.unparsed.events=true
regex=\\D+ AV-FREE-FEED (\\D+) DST_IP -- SRC_IP: (\\d{1,3}\\.\\d{1,3}\\.\\d{1,3}\\.\\d{1,3}) , DST_IP: (\\d{1,3}\\.\\d{1,3}\\.\\d{1,3}\\.\\d{1,3}), Alarm: directive_event: AV-FREE-FEED \\D+ (\\d) (.*)
token.count=5
token[0].name=Event_Name
token[0].type=String
token[1].name=SRC_IP
token[1].type=IPAddress
token[2].name=DST_IP
token[2].type=IPAddress
token[3].name=Dev_Severity
token[3].type=String
token[4].name=Event_Message
token[4].type=String
event.name=Event_Name
event.sourceAddress=SRC_IP
event.destinationAddress=DST_IP
event.deviceSeverity=Dev_Severity
event.message=Event_Message
event.deviceVendor=__getVendor(AlienVault)
event.deviceProduct=__stringConstant(OSSIM)
To the connector folder and further to " user \ agent \ flexagent \ syslog ". Make the file name “ ossim.sdkrfilereader.properties ”
In the agent.properties file change the line agents [0] .customsubagentlist to add “ossim”, for example:
agents [0] .customsubagentlist = ossim | ciscopix_syslog | netscreen_syslog | ...
and the line agents [ 0] .usecustomsubagentlist set to true.
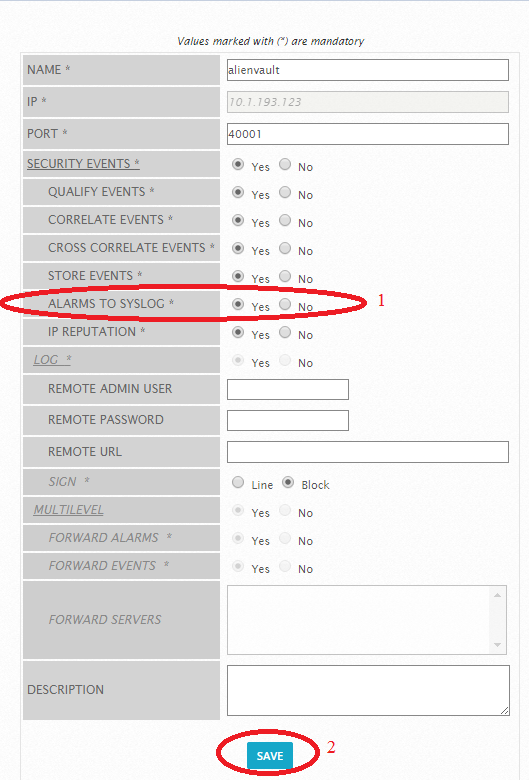
Next, go to the OSSIM settings:
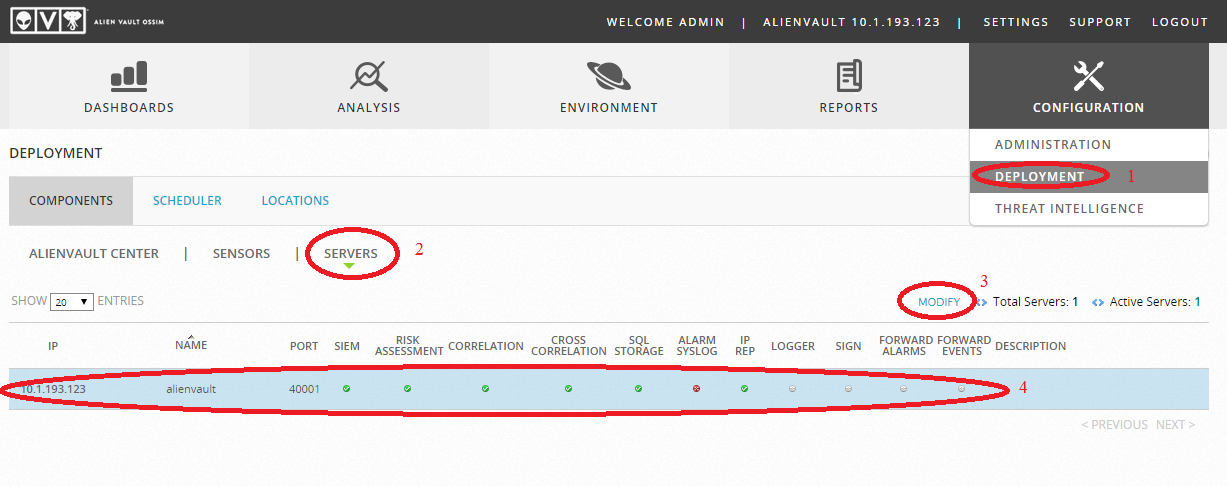
And enable sending alarm in syslog:
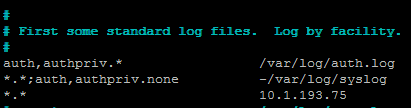
After setting up sending logs to rsyslog OSSIM.
In the /etc/rsyslog.conf file add the line:
*. * Ip.your.Flex.agent
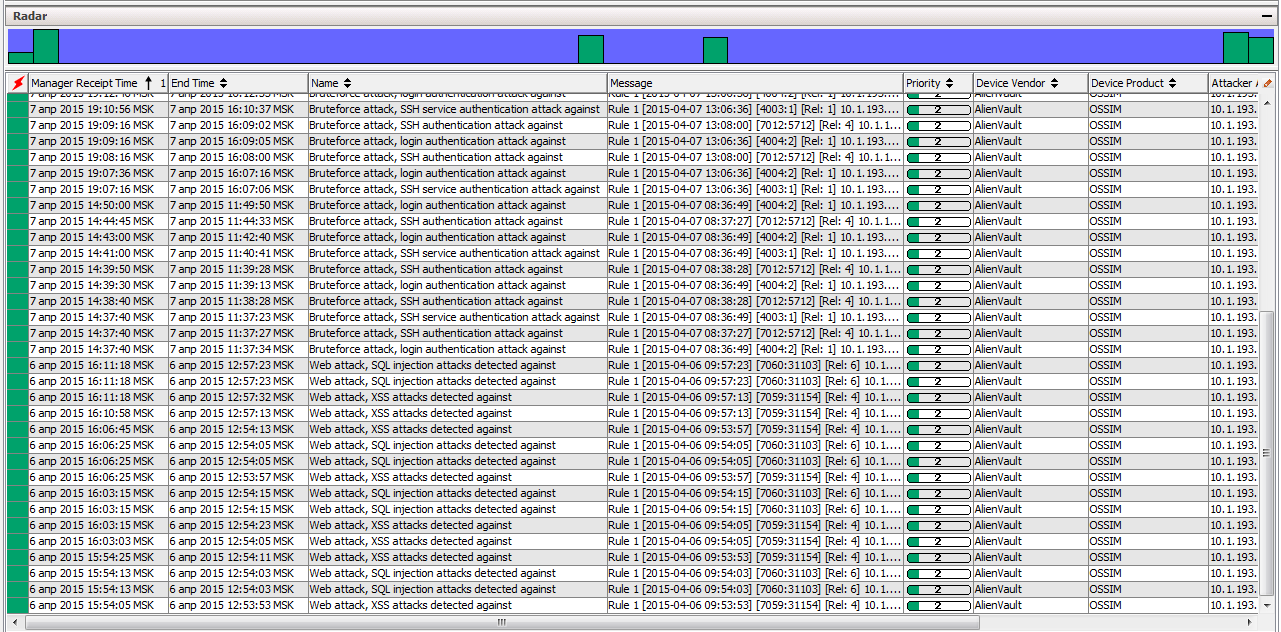
After that, already parsed, correlated logs will appear in the ArcSight connector: