Set up your room Service Bus for Windows Server

Quite often there is a need to link together several heterogeneous systems, or to ensure their synchronization. Of course, cases are different and unique, however, writing your own decision is usually quite expensive, both in time and in resources.
Among the serious companies, perhaps, cloud solutions from Amazon (SQS) and Microsoft (Service Bus) can be distinguished. However, despite the rapid development of Public Cloud, such solutions are not always applicable, which is called On-Premises. In other words, there is a need for such solutions, but in our own closed areas. In this regard, Microsoft made a competent step by making Service Bus available in the Private Cloud, or at least on one machine with Windows 7 and higher. In Service Bus 1.0, management through PowerShell was available, and with the release 1.1, it became possible to integrate into the Azure Pack console.
In this article I will try to describe the process of configuring Service Bus for Windows Server as detailed as possible, in pictures. Since it is better to see the process once once than to read it in parts in different sources several times.
Caution traffic! Under the cut a lot of pictures.
So, Azure Service Bus is a cloud-based universal messaging system.
In order to understand what functionality it has, we will recall several patterns from the category Messaging .
One of the best books on this subject, in my subjective opinion, is Enterprise Integration Patterns: Designing, Building, and Deploying Messaging Solutions (translation: Enterprise Application Integration Patterns) Adapts the following patterns:
Channel "point to point" (Point-to-Point Channel)
Channel "point to point" ensures that each individual message is consumed by only one recipient. A channel can have many recipients processing messages at the same time, but only one of them can successfully receive a specific message. If several recipients try to consume some message at the same time, the channel will take care that only one of them succeeds. The recipient does not have to coordinate their actions.
If the point-to-point channel has only one recipient, then the message will be consumed only once. If the channel is listened to by several recipients, they becomecompeting users ( Competing Consumers ). Channel and guarantees that the message will be received only by one of them. This pattern of message consumption and processing scales perfectly, because the workload per channel can be distributed among several consumers running within several applications on several computers.
If the message should not be received by one, but by all recipients who listen to the channel, use the publish-subscribe channel .

Channel "publish-subscribe» (Publish-Subscribe Channel)
The publication-subscription channel operates as follows: it has one input channel, which is divided into several output channels, one for each subscriber. When a message is published on a channel, the publish-subscribe channel delivers a copy of the message to each of the output channels. There is only one subscriber on each channel “output”, who is allowed to consume the message only once. Due to this, each subscriber will receive the message only once, after which the consumed copies of the message will disappear from the corresponding output channels.

Channel invalid messages (Invalid Message Channel)
Messages that have the wrong format, or that do not contain fields required for this channel, cannot be processed correctly, however, formally, they are delivered. In this case, the recipient can move these messages to the channel of invalid messages for the subsequent diagnosis of the problem.
If there are no means of working with invalid messages:

If there is a channel of invalid messages :

Many messaging systems implement a similar concept called the channel of dead messages . Unlike an invalid message channel that contains messages that were successfully delivered and received but not processed, the dead letter channelDesigned for messages that could not be delivered by the messaging system.
Channel undelivered messages (Dead Letter Channel)
Once the messaging system determines that it can not deliver a message, it must decide what to do with it. You can either delete the message or redirect it to the dead letter channel .
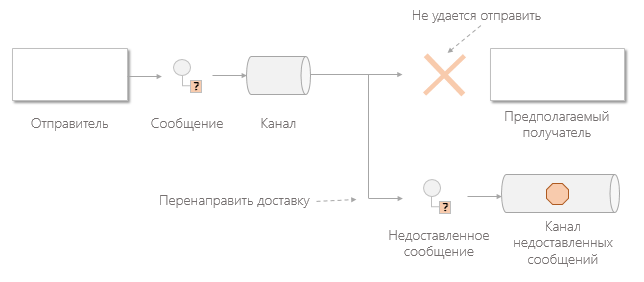
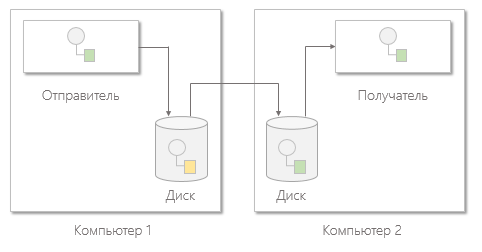
Guaranteed Delivery (Guaranteed Delivery)
Under guaranteed delivery is understood the ability to send a message to the recipient in asynchronous mode with a guarantee of either only successful receipt or the correct notification of the impossibility of delivery.
Bus messages (Message Bus)
A message bus is a combination of a canonical data model, a standard set of commands, and a messaging infrastructure that allows different systems to communicate with each other through a common set of interfaces.

Azure Service Bus implements all of the above patterns:
Now we understand what we are talking about. The logical question is "can I do the same, but

Yes, you can, and absolutely free. In order to start the Service Bus you only need Windows 7+ and MS SQL Server 2012 Express +.
If you want to manage Service Bus through the easy-to-use graphical interface of Azure Pack, you will need Windows Server 2012+.
You can download Service Bus for Windows Server 1.1 through the Microsoft Web Platform Installer .
You can download Azure Pack from here (Install Windows Azure Pack: Portal and API Express), or by direct link .
How it works?
Service Bus in its work uses a database to store infrastructure data and message containers (messages are distributed evenly between them). The database server and Service Bus can be located on different machines.
You can use Azure Pack to manage the Service Bus through the web interface. Azure Pack may be located on another machine, but for work it also needs a database where it will store user data, etc.
In my example, I will deploy three virtual machines that will hang on the Internet:
- On the first, I will deploy a database where the Service Bus will store messages.
- On the second Service Bus.
- On the third Azure Pack and a DB for it.
All the same can be deployed on one machine.
I will create virtual machines in Microsoft Azure using the updated management portal.
Before you start reading about the settings for Service Bus and Azure Pack, I strongly recommend that you familiarize yourself with the terminology on official resources.
Setting up a virtual machine with a database
Setting up a virtual machine with a database
We will specify the host name and administrator account information.
We will set the

time and automatic updates.

Create a virtual network: hello-habr-db.
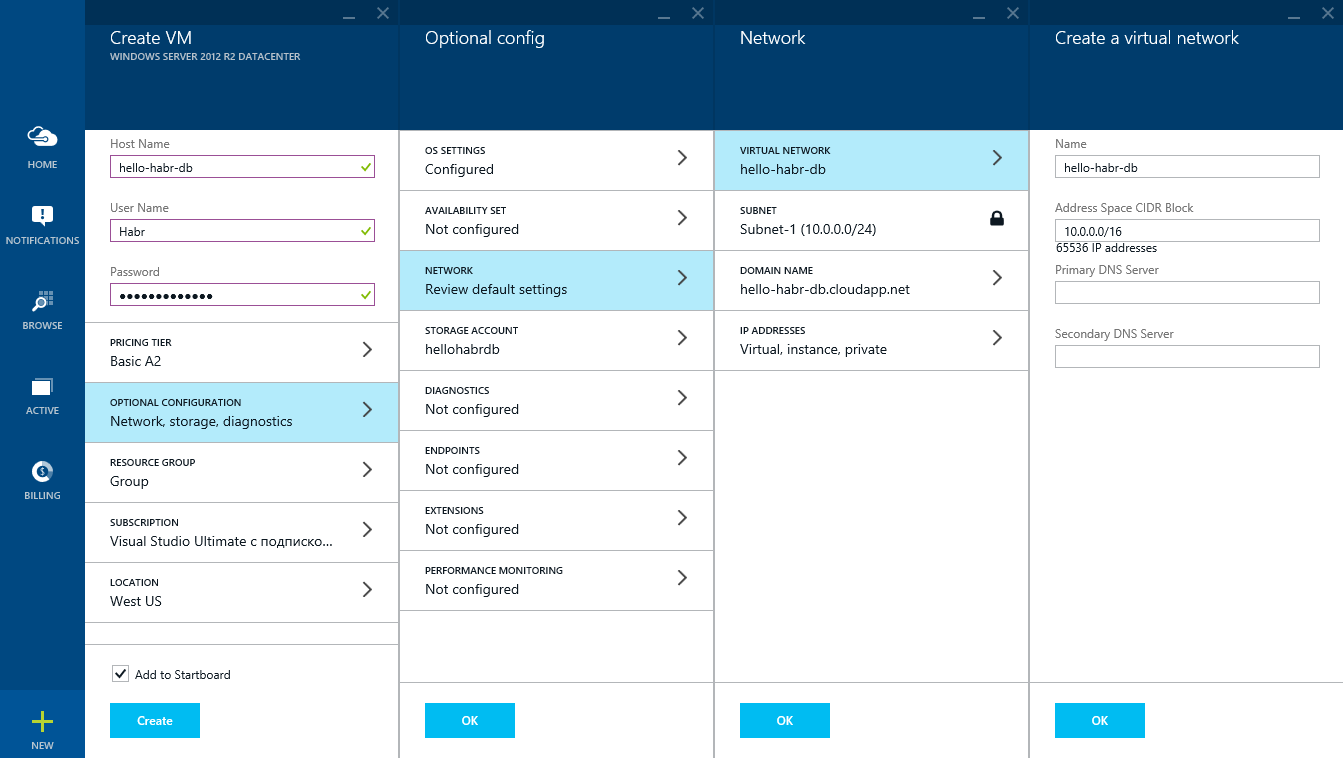
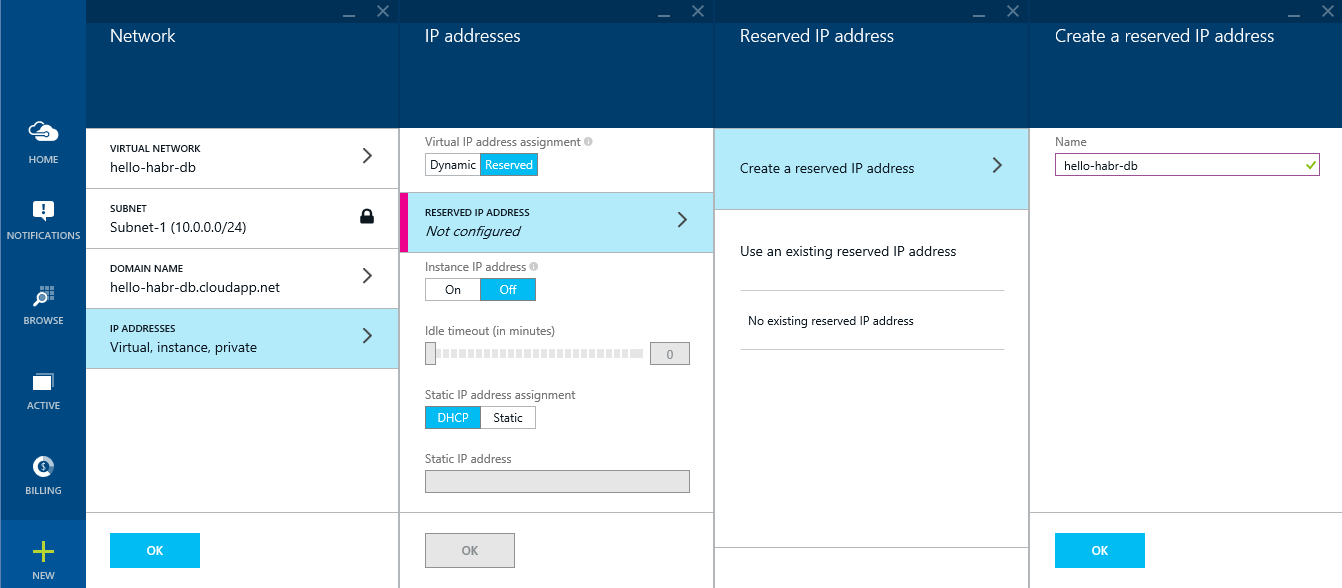
Reserve the external IP address: hello-habr-db.
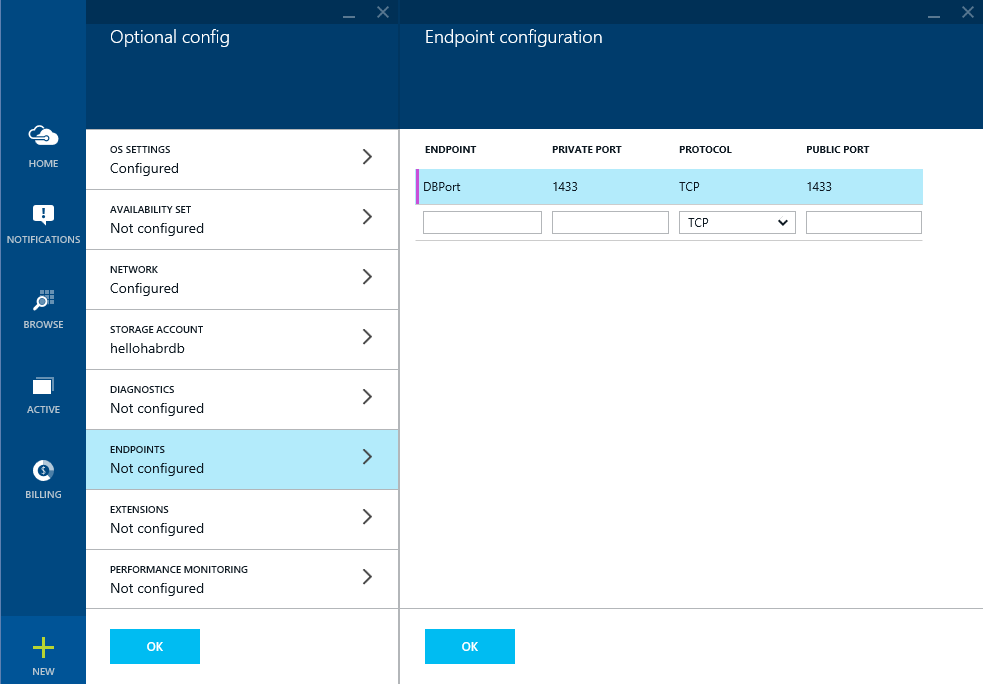
Open the ports for the database to work in.
We will indicate the geographical location closer to Russia

. while Azure will create the virtual machine. Then we will receive detailed information about it.

Now you can start installing the necessary software:
1) Microsoft SQL Server 2014 Express English (!) (Which, by the way, already provides 10 GB)
2) Management Studio 2014
Before you do this, do the following:
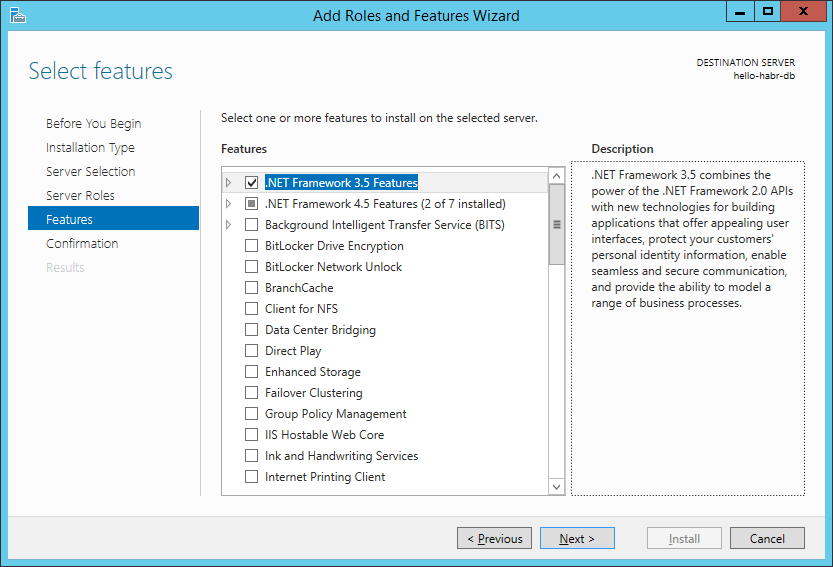
1) Install the .NET Framework 3.5
2) Turn off the firewall (do not repeat it yourself for completeness of the experiment)

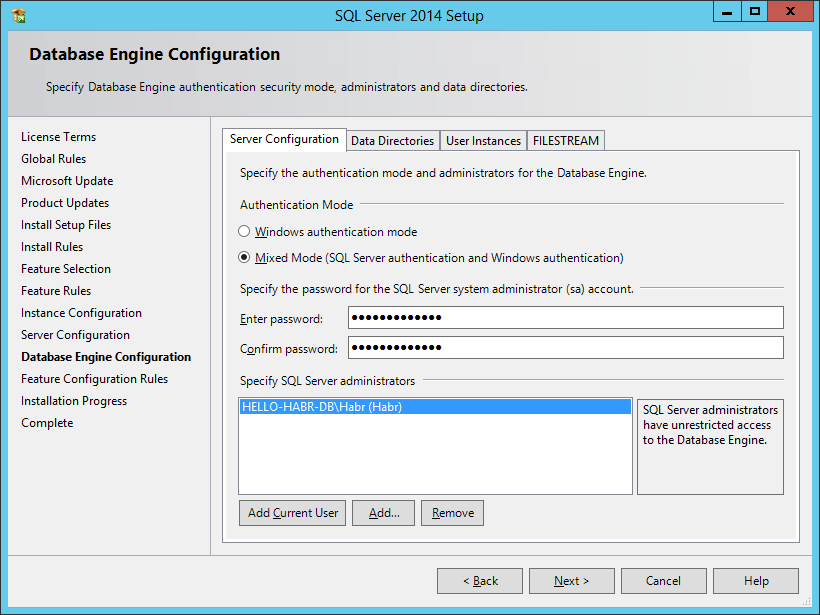
When installing MS SQL Server, you need to select a mixed authentication mode (this is important)
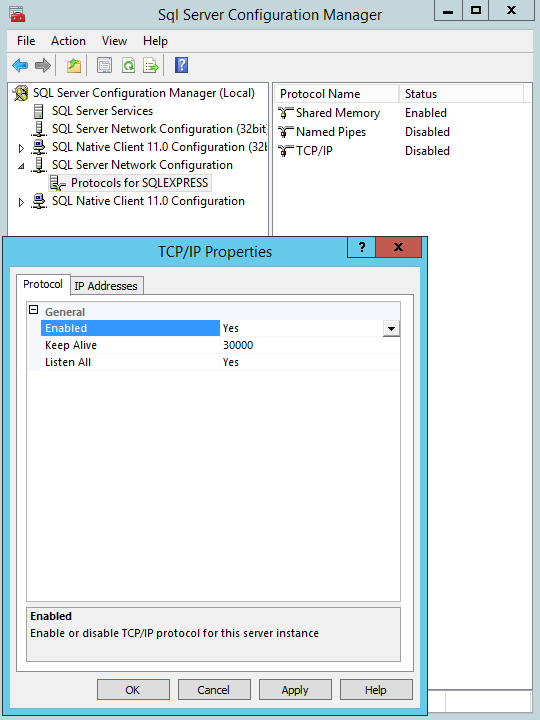
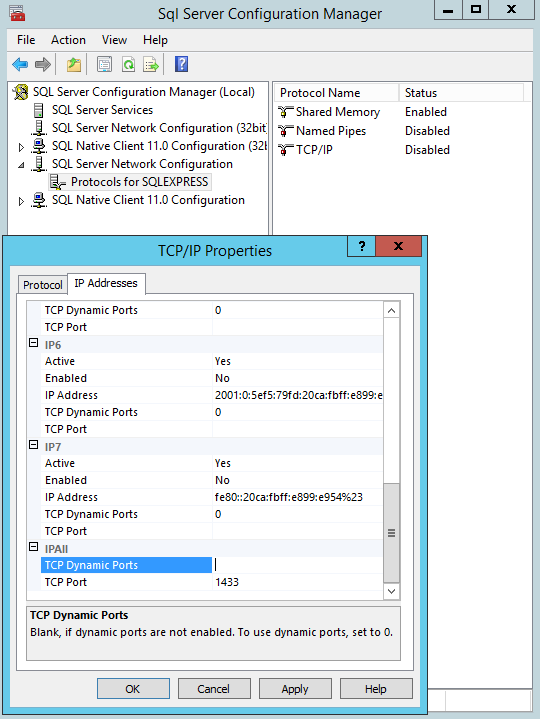
After installation, we will configure MS SQL Server to work on the front end.
This virtual machine is ready. Do not forget to restart.
time and automatic updates.
Create a virtual network: hello-habr-db.
Reserve the external IP address: hello-habr-db.
Open the ports for the database to work in.
We will indicate the geographical location closer to Russia
. while Azure will create the virtual machine. Then we will receive detailed information about it.
Now you can start installing the necessary software:
1) Microsoft SQL Server 2014 Express English (!) (Which, by the way, already provides 10 GB)
2) Management Studio 2014
Before you do this, do the following:
1) Install the .NET Framework 3.5
2) Turn off the firewall (
When installing MS SQL Server, you need to select a mixed authentication mode (this is important)
After installation, we will configure MS SQL Server to work on the front end.
This virtual machine is ready. Do not forget to restart.
Configure a virtual machine with Service Bus for Windows Server
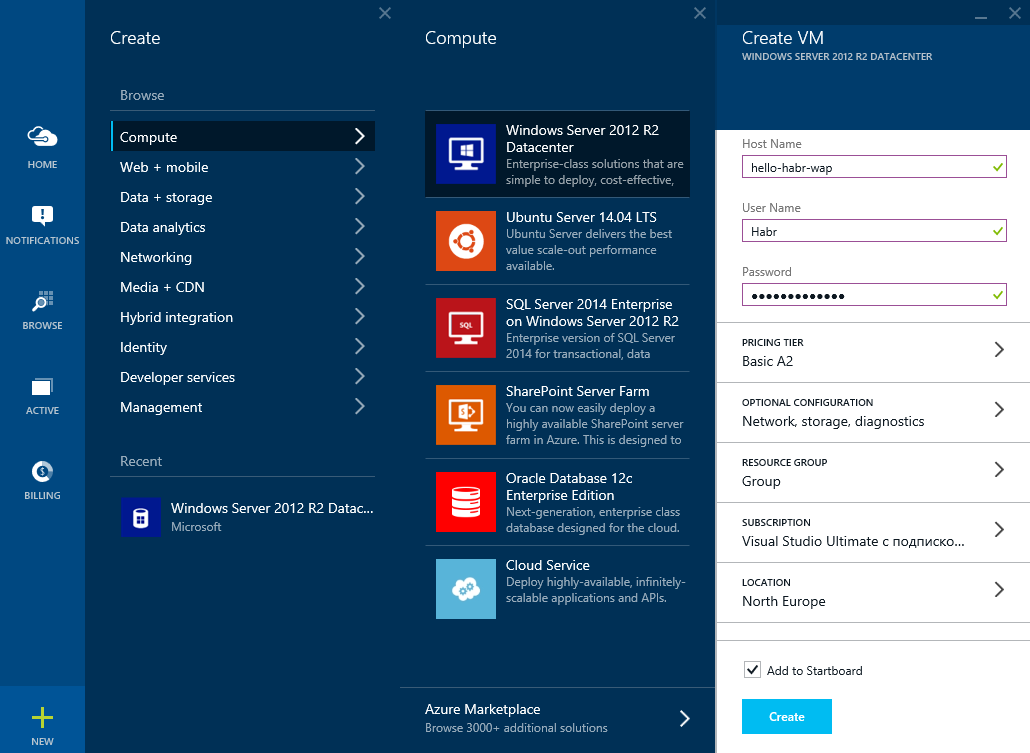
Configure a virtual machine with Service Bus for Windows Server
Specify the host name and administrator account data

Create a virtual network: hello-habr- s b

Reserve an external IP address: hello-habr- s b

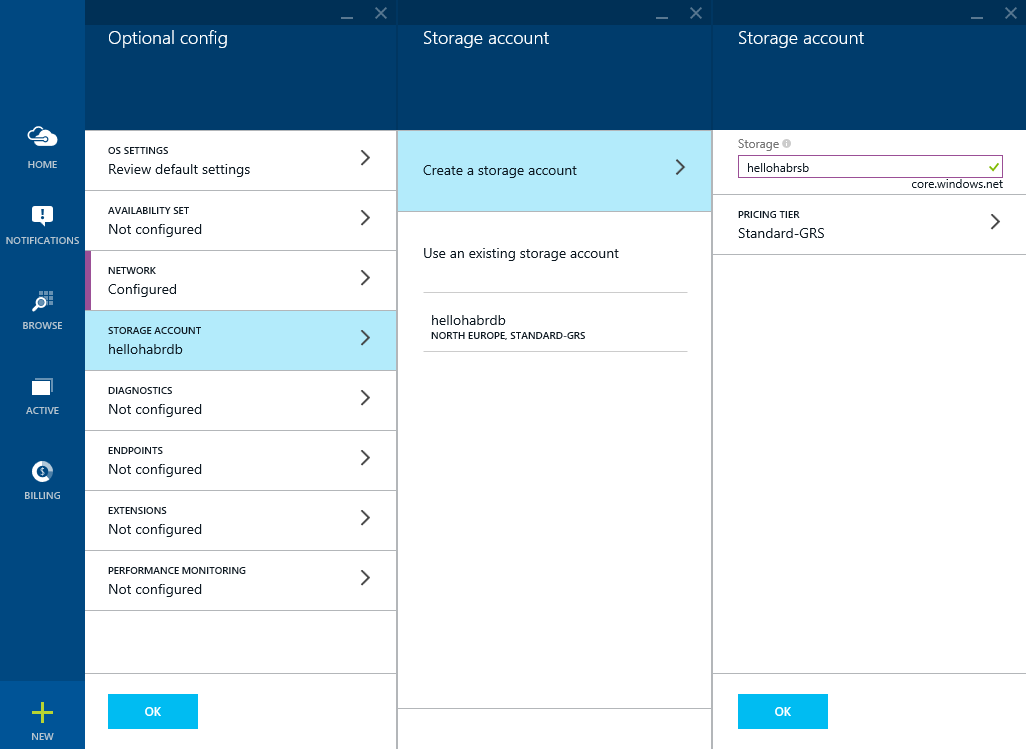
Create another Storage account (although this is not critical): hellohabr s b
Open an impressive list of ports for the Service to function Bus, and to access it, Azure Pack

Get a virtual machine

Turn off the firewall (do not repeat it yourself to complete the experiment)
Run the installer for Microsoft web platforms and find Service Bus 1.1 through the search,
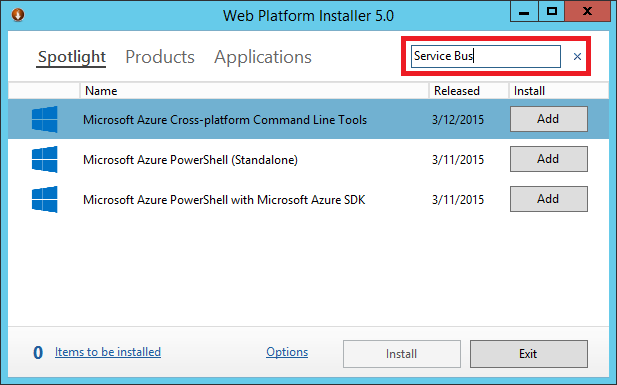
select two items and click install

Next, we will generate a certificate of access to Service Bus for Windows Server (from the client on another machine on the Internet) using the makecert.exe utility via the command line. In Windows 8.1, it usually lies in the directory:
C: \ Program Files (x86) \ Microsoft SDKs \ Windows \ v7.1A \ Bin
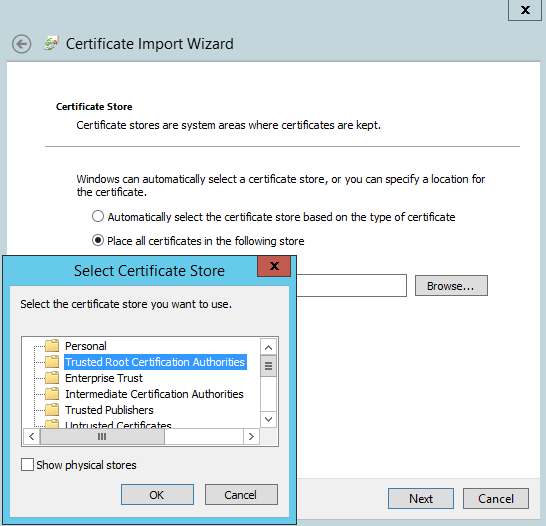
We get the file hello-habr-sb.cloudapp.net.cer . Install it in Certificates - Local Computer (Trusted Root CA) on the server and clients to Service Bus.

Great, now you are ready to configure the Service Bus. Launch Service Bus Configuration .
We are interested in Custom Settings.

We will indicate the DNS name of our virtual machine with the database: hello-habr-db.cloudapp.net . Check the connection.
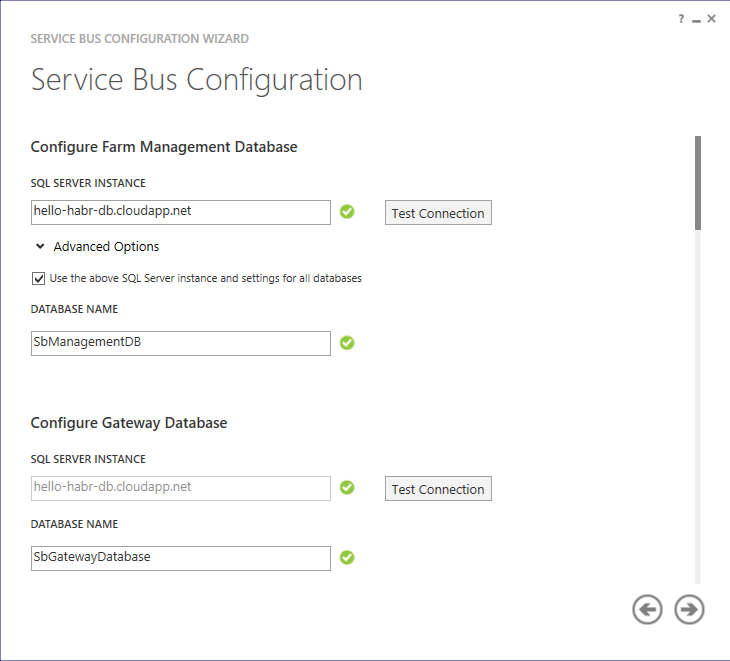
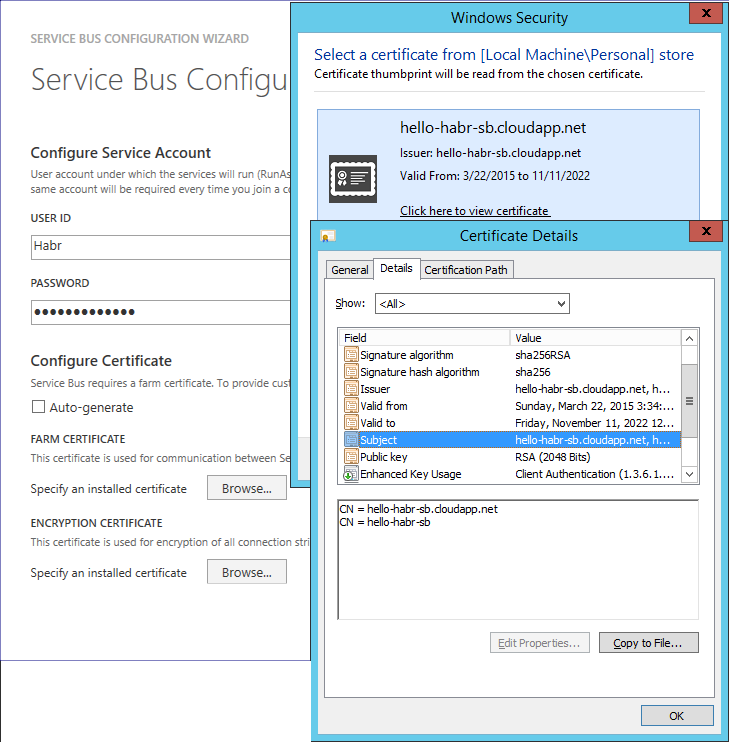
We set the number of containers for processing messages and enter the password.

As a certificate, we select the previously generated hello-habr-sb.cloudapp.net.cer
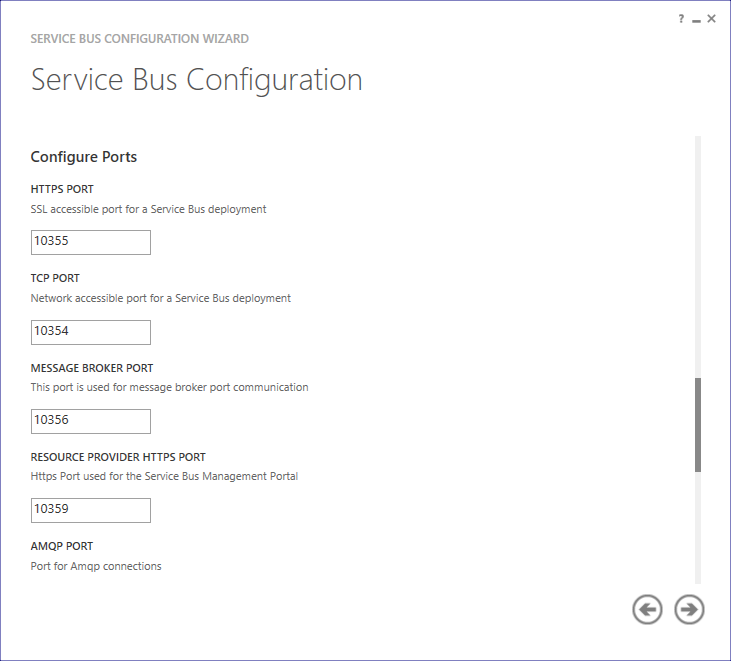
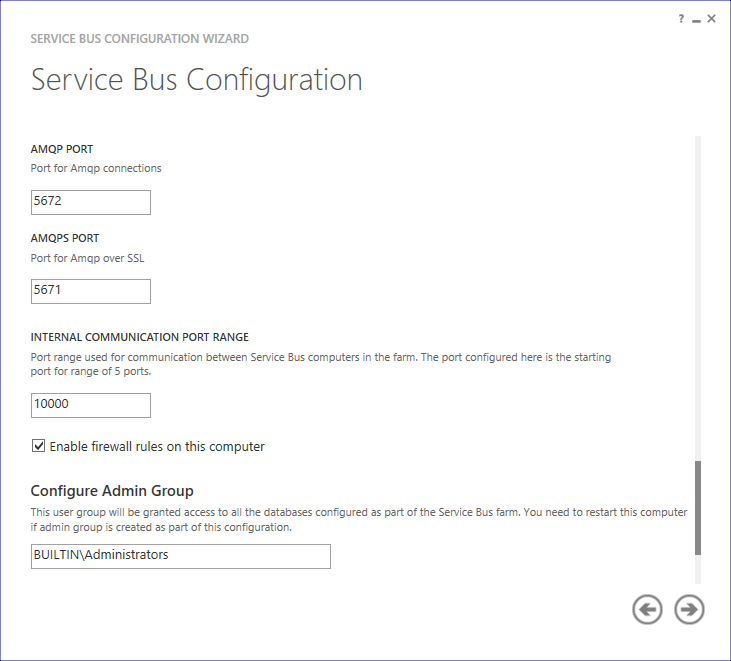
Change the ports from 9000 to 10000
Check the box that we want to manage this farm through the Azure Pack portal. We will specify the passwords for the admin- and tenant- portals.

If all the actions have been done correctly, we will be told that everything is fine.
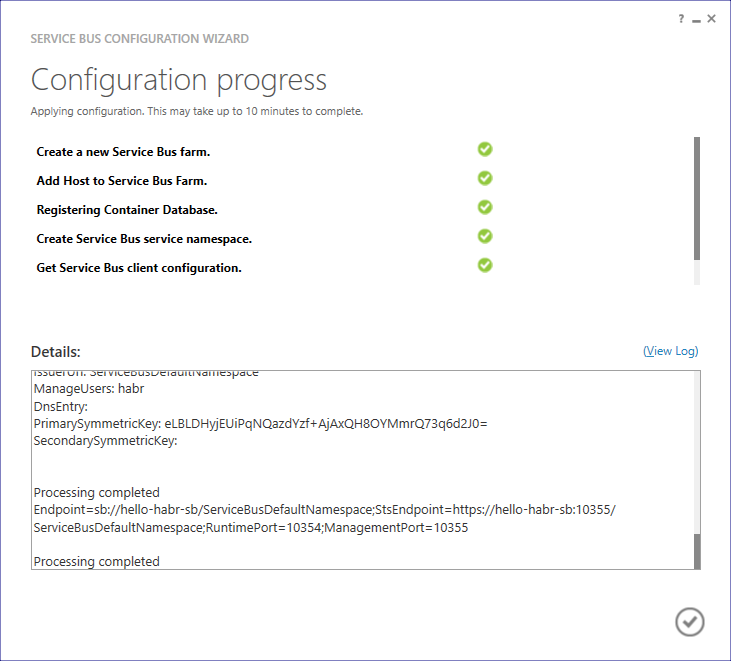
Now we need to change the DNS name Service Bus Farm (SBFarm) (this is necessary so that the client can access the Internet from another machine) . This can be done using Service Bus PowerShell (with administrator privileges). We execute the sequence of commands:
( Start-SBFarm takes a very long time, this is normal)
For the subsequent health check via the .NET client, we will assign a SAS key for the previously created ServiceBusDefaultNamespace:
In response, we get:
Last action on this machine: add an entry to the hosts file
(C: \ Windows \ System32 \ drivers \ etc)
Ok, let's move on to setting up Azure Pack on a third machine.
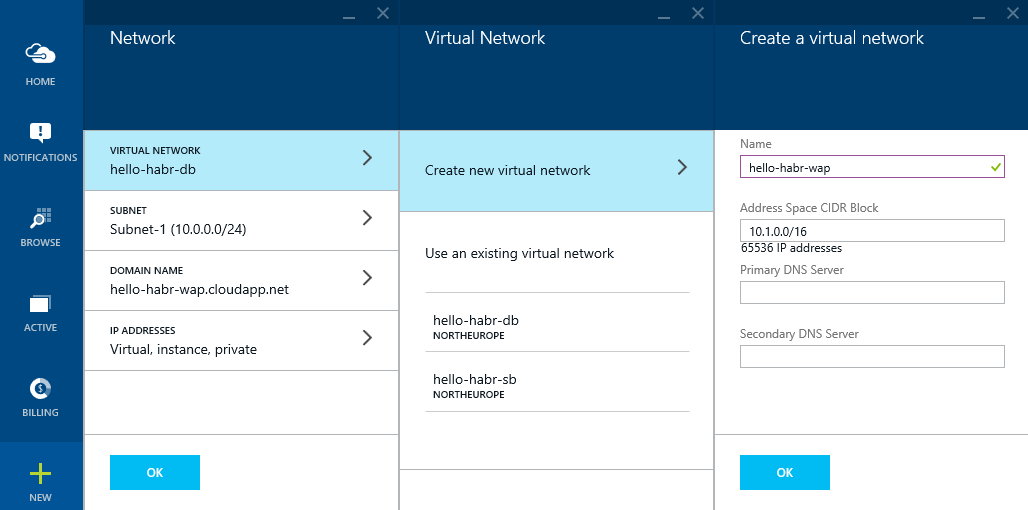
Create a virtual network: hello-habr- s b
Reserve an external IP address: hello-habr- s b
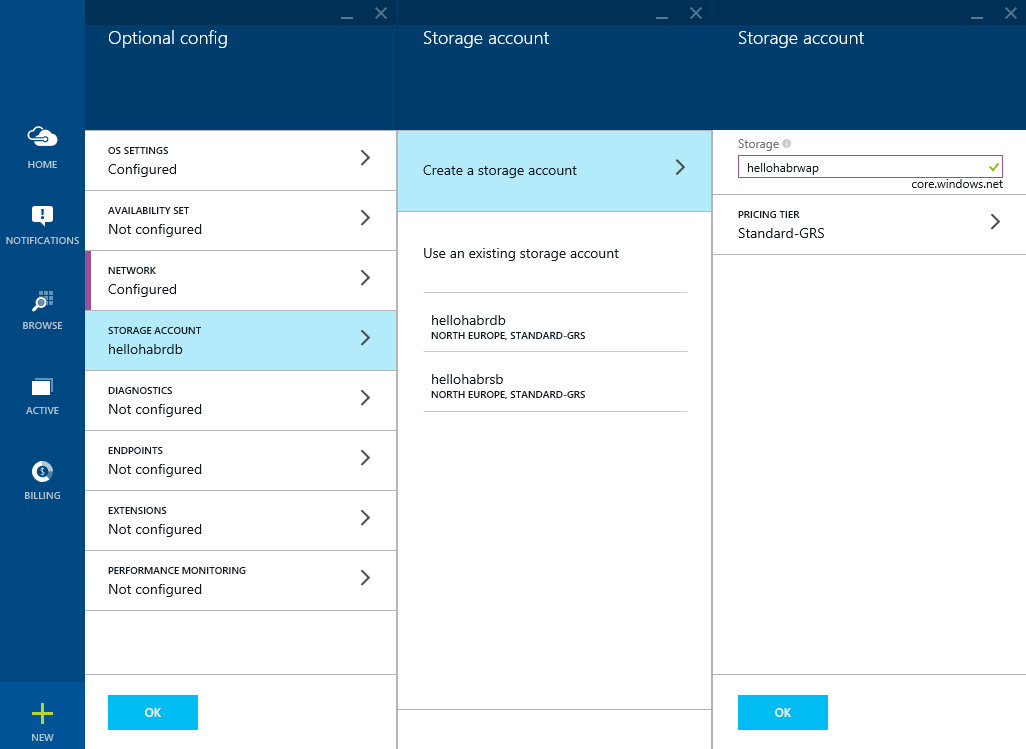
Create another Storage account (although this is not critical): hellohabr s b
Open an impressive list of ports for the Service to function Bus, and to access it, Azure Pack
Get a virtual machine
Turn off the firewall (
Run the installer for Microsoft web platforms and find Service Bus 1.1 through the search,
select two items and click install
Next, we will generate a certificate of access to Service Bus for Windows Server (from the client on another machine on the Internet) using the makecert.exe utility via the command line. In Windows 8.1, it usually lies in the directory:
C: \ Program Files (x86) \ Microsoft SDKs \ Windows \ v7.1A \ Bin
makecert.exe -r -pe -n "CN=hello-habr-sb.cloudapp.net, CN=hello-habr-sb" -e 11/11/2022 -eku 1.3.6.1.5.5.7.3.2 -ss My -sr "LocalMachine" -sky Exchange -a sha256 -sy 24 -len 2048 "hello-habr-sb.cloudapp.net.cer"
We get the file hello-habr-sb.cloudapp.net.cer . Install it in Certificates - Local Computer (Trusted Root CA) on the server and clients to Service Bus.
Great, now you are ready to configure the Service Bus. Launch Service Bus Configuration .
We are interested in Custom Settings.
We will indicate the DNS name of our virtual machine with the database: hello-habr-db.cloudapp.net . Check the connection.
We set the number of containers for processing messages and enter the password.
As a certificate, we select the previously generated hello-habr-sb.cloudapp.net.cer
Change the ports from 9000 to 10000
Check the box that we want to manage this farm through the Azure Pack portal. We will specify the passwords for the admin- and tenant- portals.
If all the actions have been done correctly, we will be told that everything is fine.
Now we need to change the DNS name Service Bus Farm (SBFarm) (this is necessary so that the client can access the Internet from another machine) . This can be done using Service Bus PowerShell (with administrator privileges). We execute the sequence of commands:
Get-SBFarm
Stop-SBFarm –Verbose
Set-SBFarm -FarmDns 'hello-habr-sb.cloudapp.net'
Update-SBHost –Verbose
Start-SBFarm –Verbose
( Start-SBFarm takes a very long time, this is normal)
For the subsequent health check via the .NET client, we will assign a SAS key for the previously created ServiceBusDefaultNamespace:
New-SBAuthorizationRule -NamespaceName ServiceBusDefaultNamespace -Name MainRule -Rights Manage, Send, Listen
In response, we get:
KeyName             : MainRule
PrimaryKey          : ylF6GWmH6rlZg1ekQMQrLQnht4kwVFWHAfyB8HkrZvM=
SecondaryKey        : ZYBpdiCYgZNfwOC37x6DEDLxhv+qan6CJZT0vG3GvTk=
Rights              : {Manage, Send, Listen}
CreatedTime         : 3/22/2015 12:53:23 AM
ModifiedTime        : 3/22/2015 12:53:23 AM
ConnectionString    : Endpoint=sb://hello-habr-sb.cloudapp.net/ServiceBusDefaultNamespace;
                      StsEndpoint=https://hello-habr-sb.cloudapp.net:10355/ServiceBusDefaultNamespace;
                      RuntimePort=10354;
                      ManagementPort=10355;
                      SharedAccessKeyName=MainRule;
                      SharedAccessKey=ylF6GWmH6rlZg1ekQMQrLQnht4kwVFWHAfyB8HkrZvM=
Last action on this machine: add an entry to the hosts file
(C: \ Windows \ System32 \ drivers \ etc)
127.0.0.1 hello-habr-sb.cloudapp.net
Ok, let's move on to setting up Azure Pack on a third machine.
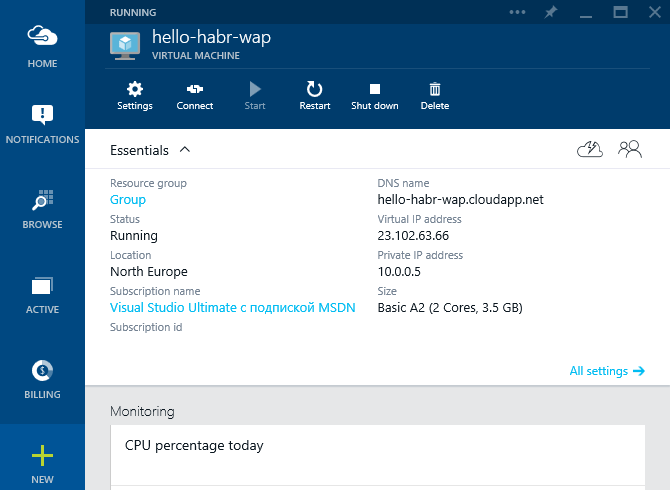
Configure a virtual machine with Azure Pack
Configure a virtual machine with Azure Pack
Укажем имя хоста и данные учетной записи администратора
Создадим виртуальную сеть: hello-habr-wap
Зарезервируем внешний IP адрес: hello-habr-wap

Создадим другой Storage account (хотя это не критично): hellohabrwap
Откроем порты для доступа к порталам управления Azure Pack

Получим виртуальную машину
Azure Pack также хранит свои данные в БД, и для того чтобы отделить его логику от логики Service Bus поднимем еще один сервер БД, но уже на этой машине. Для этого нам снова понадобится:
1) Microsoft SQL Server 2014 Express English(!)
2) Management Studio 2014
Перед тем как начать установку выполним следующие действия:
1) Установим .NET Framework 3.5
2) Выключим брандмауэр (не повторяйте это самостоятельно для полноты эксперимента)
При установке MS SQL Server нужно выбрать смешанный режим аутентификации (это важно)

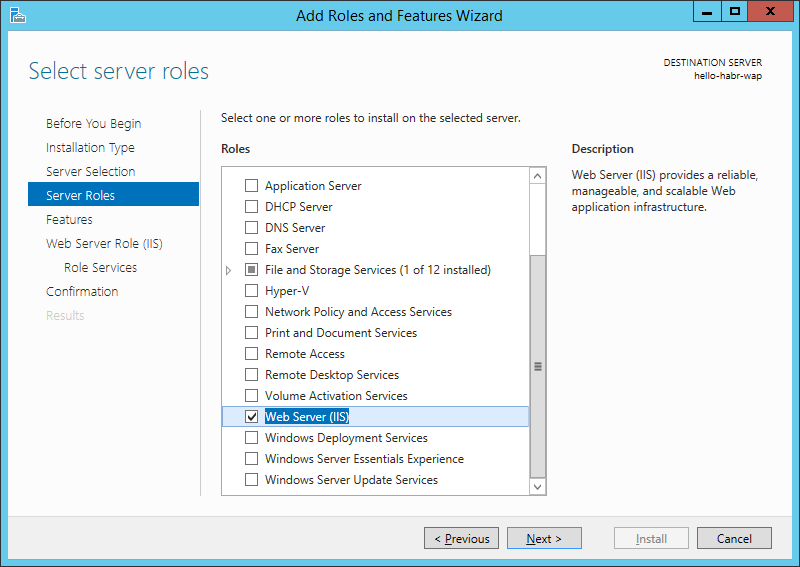
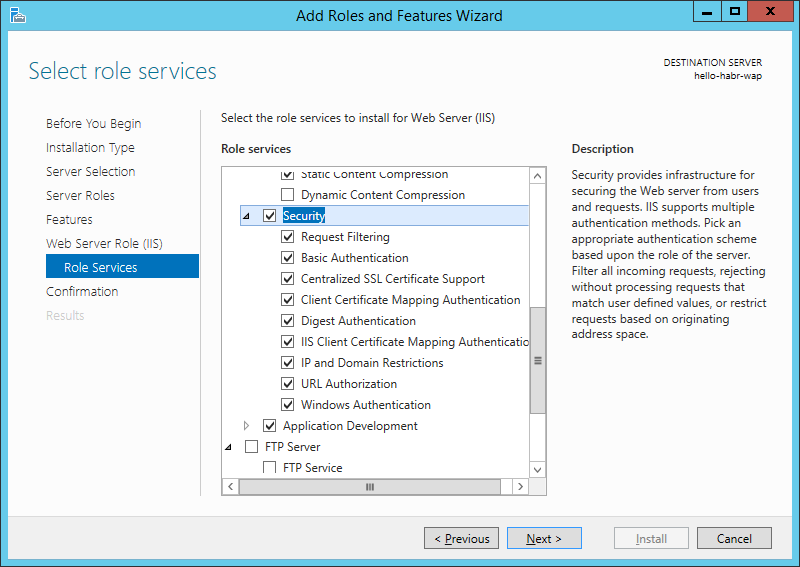
После этого нужно поднять IIS для работы порталов управления Azure Pack
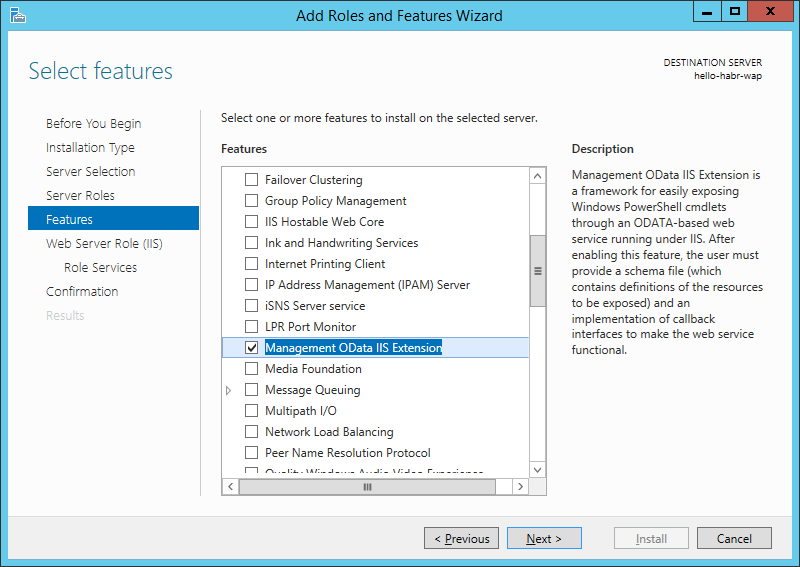
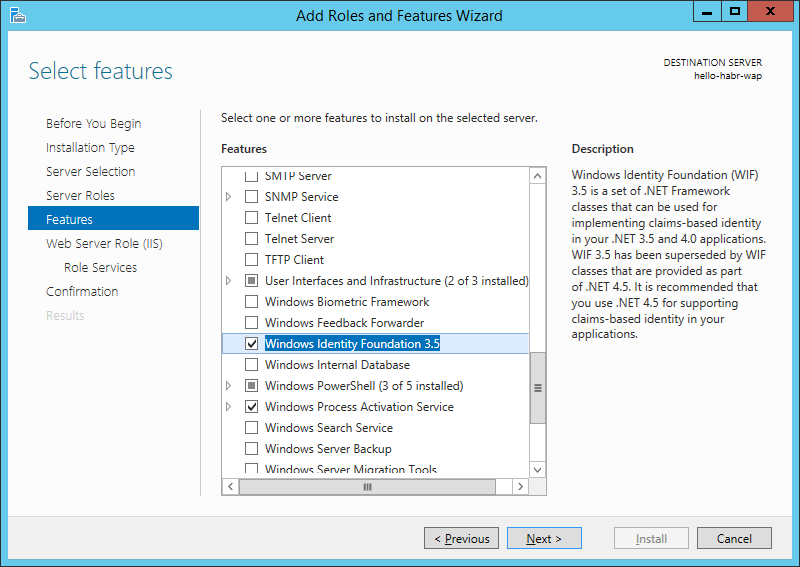
Также я установлю несколько компонентов, связанных с управлением IIS и безопасностью


Теперь установим Azure Pack с параметрами по умолчанию.
Сразу после установки откроется портал конфигурирования:
Нажмем продолжить.
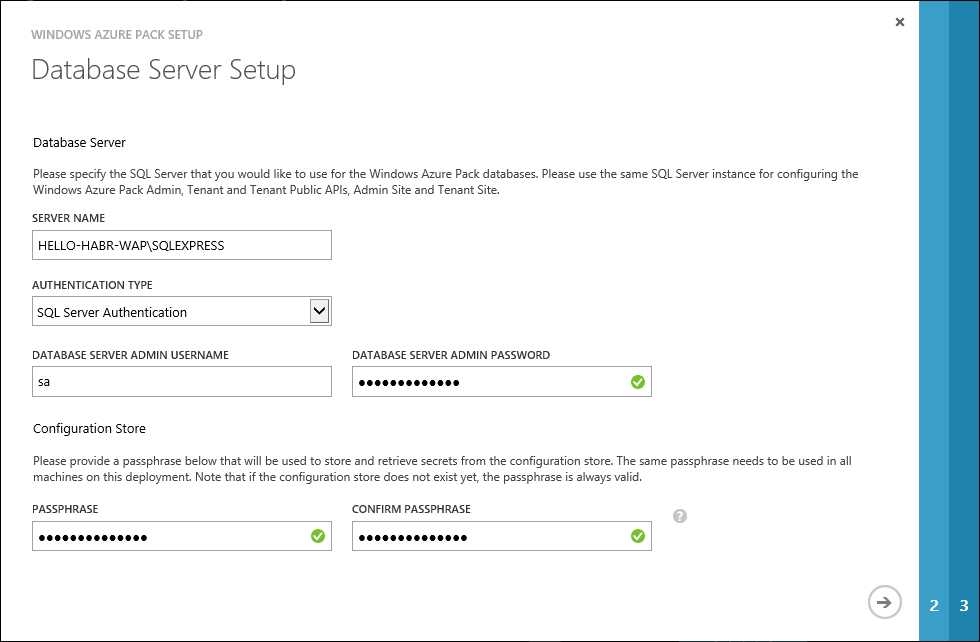
Укажем БД в которой будут хранится данные Azure Pack
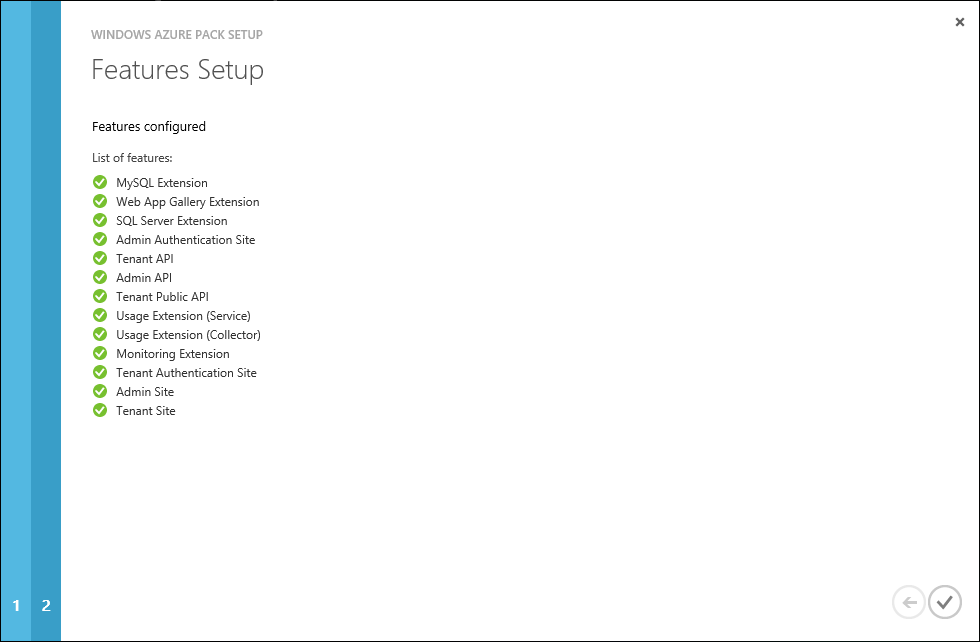
Если с IIS и БД все хорошо, нас проинформируют о успешном выполнении
Теперь нам нужно сгенерировать сертификат доступа к сайтам Azure Pack (чтобы доступ к сайтам имели только те, кто имеют сертификат) при помощи уже знакомых утилит makecert.exe и pvk2pfx.exe.
C:\Program Files (x86)\Microsoft SDKs\Windows\v7.1A\Bin
Для сервера:
Для клиента:
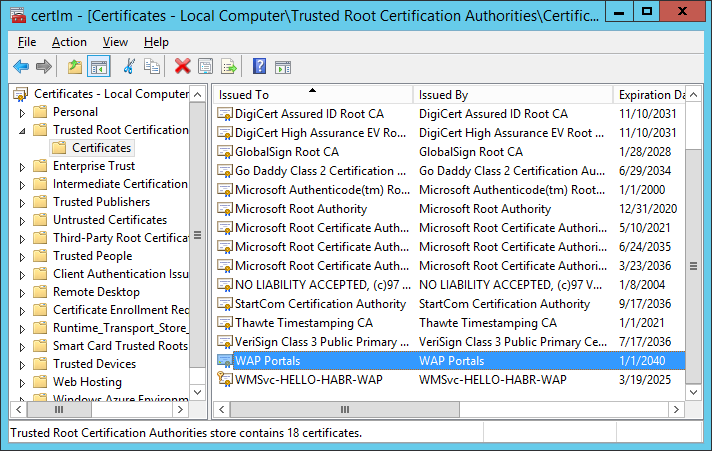
Импортируем WAPPortals.cer в Certificates – Local Computer (Trusted Root CA) на сервере.
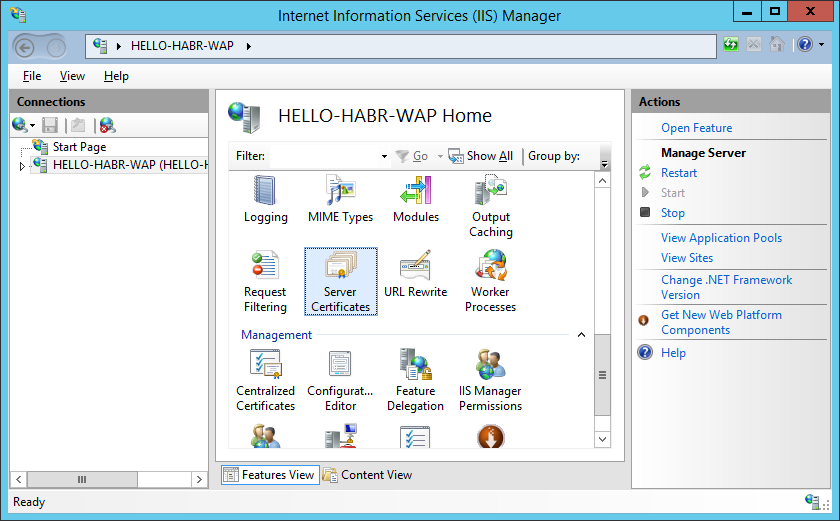
Импортируем WAPLocalServer.pfx в IIS на сервере.
В моем случае — я пароль не задавал.

Установим WAPClient.pfx на сервере и на клиентах в Certificates – Local Computer и Current User (Personal).
Добавим запись в файл hosts
(C:\Windows\System32\drivers\etc)
Теперь мы можем изменить FQDN имя для сайтов управления Azure Pack (это нужно для доступа к сайтам из сети интернет) при помощи PowerShell (с правами администратора)
Для TenantSite
Для AdminSite
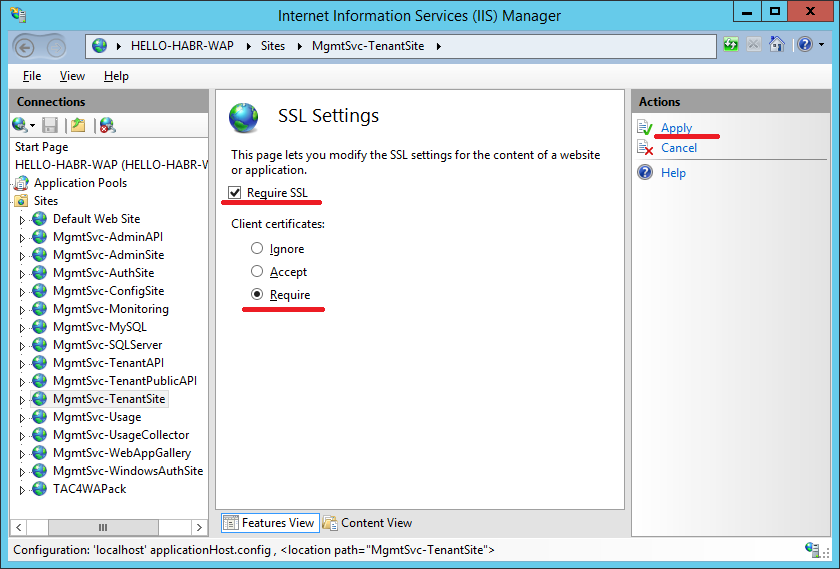
В настройках сайтов Azure Pack в IIS изменим Bindings

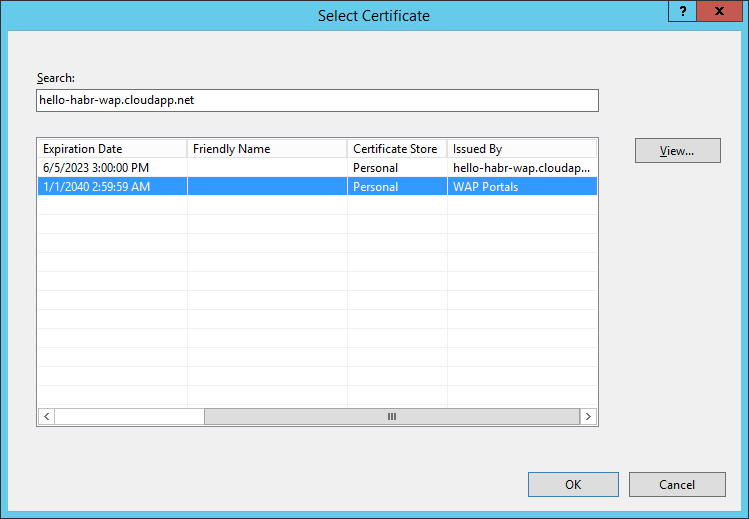
В качестве сертификата выбрать hello-habr-wap.cloudapp.net — WAP Portals

В настройках SSL для сайта — установим Require SSL

Данную процедуру повторить для сайтов:
— TenantSite
— AuthSite
— AdminSite
— WindowsAuthSite
Для создания user-friendly DNS-имен можно использовать способы, описанные в статьях: раз, два и три.
Отлично, мы вышли на финишную прямую. Теперь нужно настроить доступ к Service Bus, которая находится на hello-habr-sb.cloudapp.net

Зайдем на AdminSite:
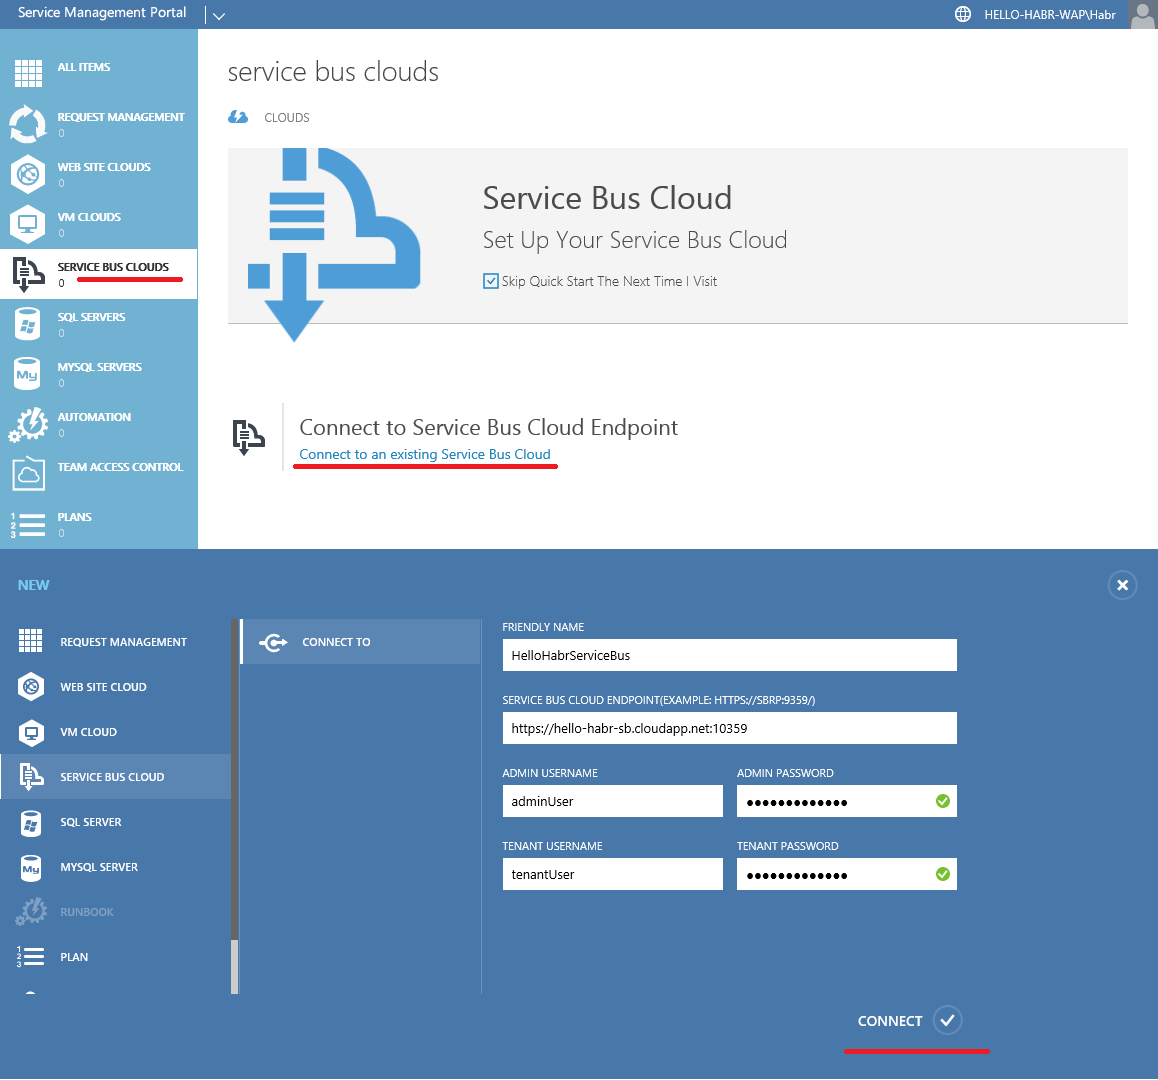
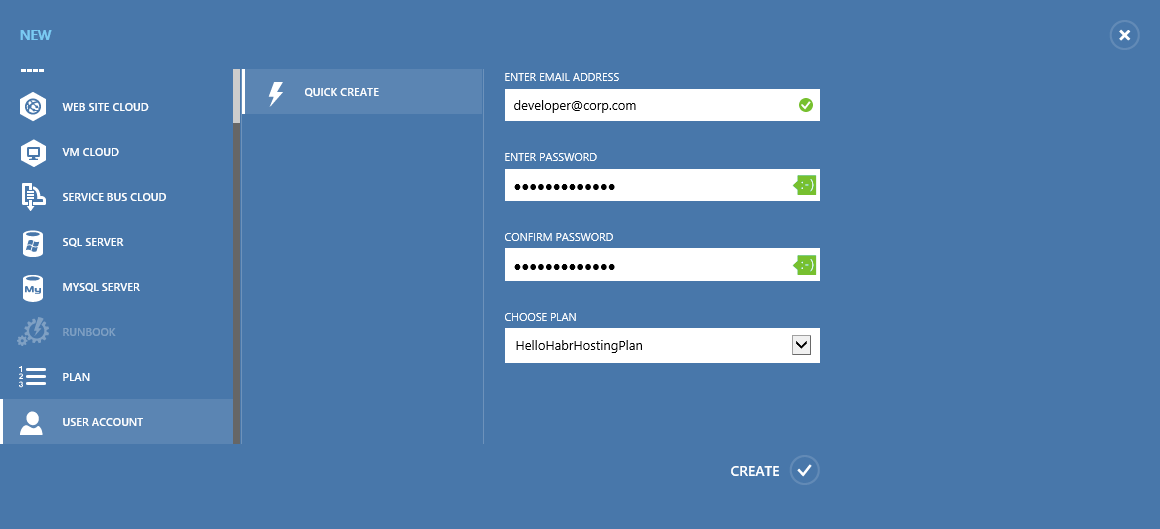
Connect to a virtual machine with Service Bus.
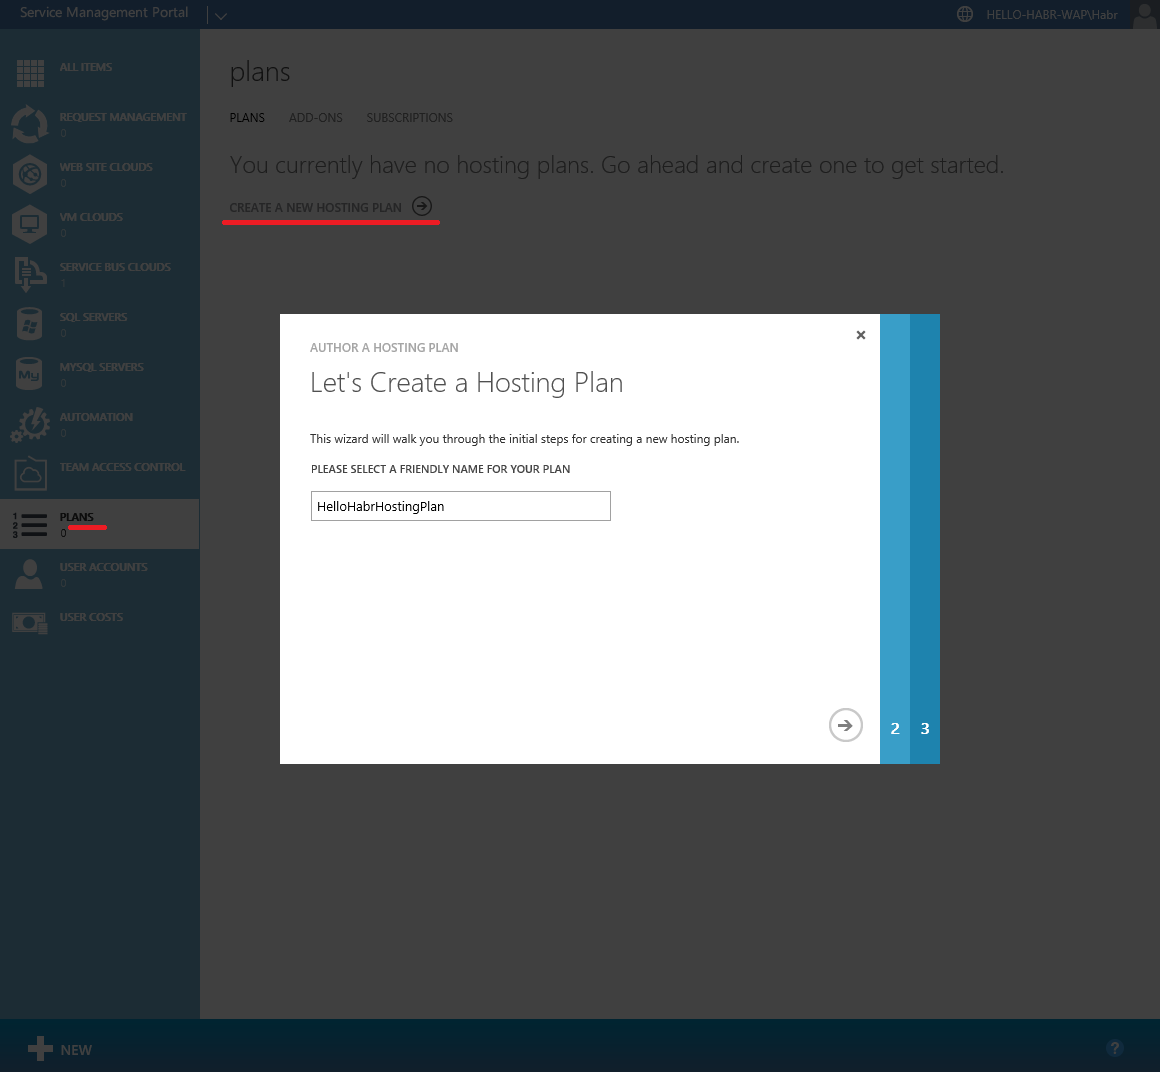
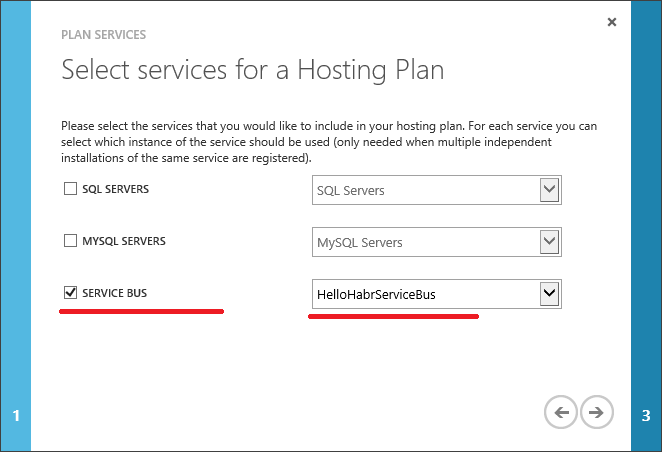
Create a Plan.

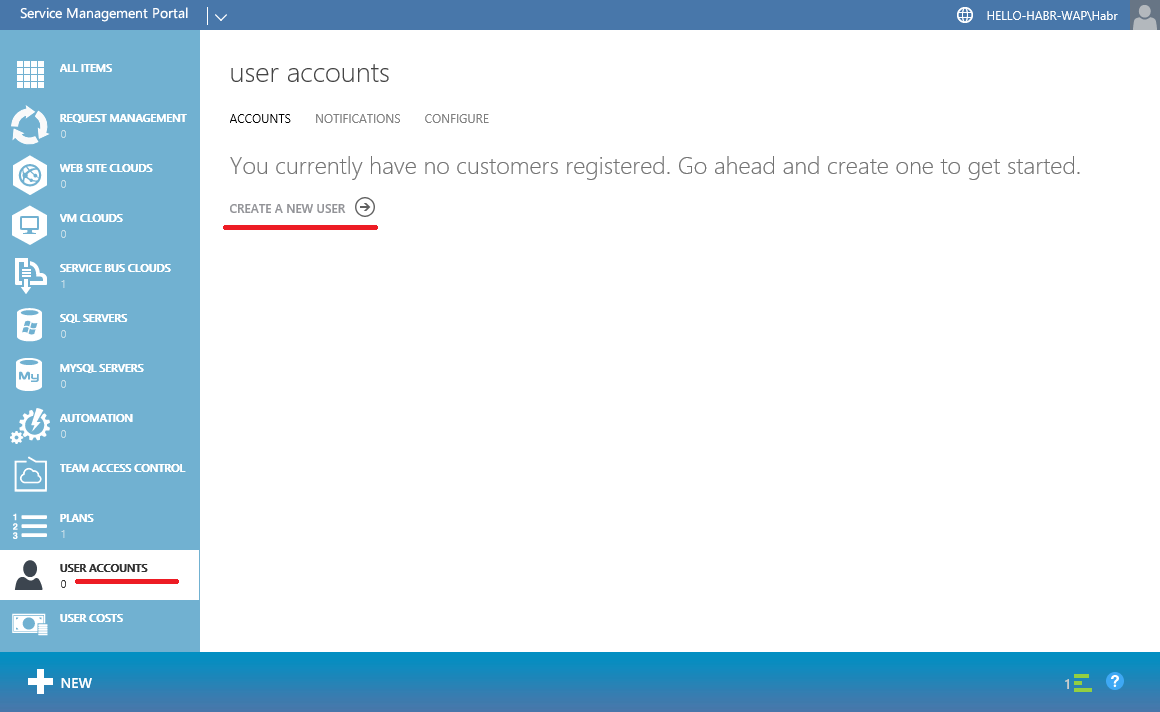
And finally, create a user.
Создадим виртуальную сеть: hello-habr-wap
Зарезервируем внешний IP адрес: hello-habr-wap
Создадим другой Storage account (хотя это не критично): hellohabrwap
Откроем порты для доступа к порталам управления Azure Pack
Получим виртуальную машину
Azure Pack также хранит свои данные в БД, и для того чтобы отделить его логику от логики Service Bus поднимем еще один сервер БД, но уже на этой машине. Для этого нам снова понадобится:
1) Microsoft SQL Server 2014 Express English(!)
2) Management Studio 2014
Перед тем как начать установку выполним следующие действия:
1) Установим .NET Framework 3.5
2) Выключим брандмауэр (
При установке MS SQL Server нужно выбрать смешанный режим аутентификации (это важно)
После этого нужно поднять IIS для работы порталов управления Azure Pack
Также я установлю несколько компонентов, связанных с управлением IIS и безопасностью
Теперь установим Azure Pack с параметрами по умолчанию.
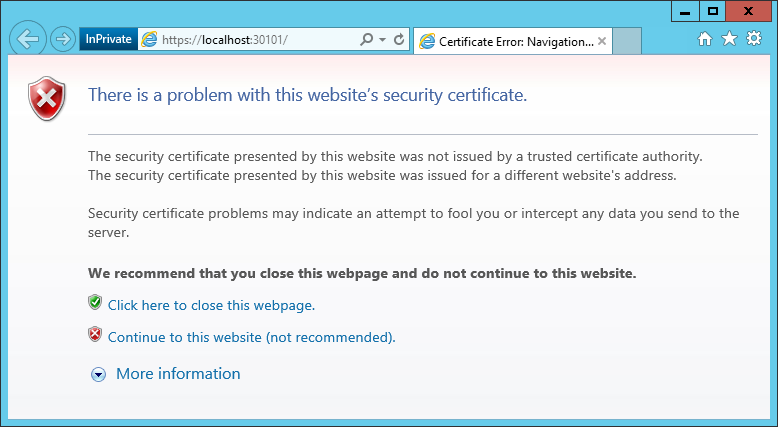
Сразу после установки откроется портал конфигурирования:
https://localhost:30101/
Нажмем продолжить.
Укажем БД в которой будут хранится данные Azure Pack
Если с IIS и БД все хорошо, нас проинформируют о успешном выполнении
Теперь нам нужно сгенерировать сертификат доступа к сайтам Azure Pack (чтобы доступ к сайтам имели только те, кто имеют сертификат) при помощи уже знакомых утилит makecert.exe и pvk2pfx.exe.
C:\Program Files (x86)\Microsoft SDKs\Windows\v7.1A\Bin
Для сервера:
makecert -r -pe -n "CN=WAP Portals" -ss CA -a sha1 -sky signature -cy authority -sv WAPPortals.pvk WAPPortals.cer
makecert -pe -n "CN=hello-habr-wap.cloudapp.net" -a sha1 -sky exchange -eku 1.3.6.1.5.5.7.3.1 -ic WAPPortals.cer -iv WAPPortals.pvk -sp "Microsoft RSA SChannel Cryptographic Provider"  -sy 12 -sv WAPLocalServer.pvk WAPLocalServer.cer
pvk2pfx -pvk WAPLocalServer.pvk -spc WAPLocalServer.cer -pfx WAPLocalServer.pfx
Для клиента:
makecert -pe -n "CN=WAPMainDeveloper" -a sha1 -sky exchange -eku 1.3.6.1.5.5.7.3.2 -ic WAPPortals.cer -iv WAPPortals.pvk -sv WAPClient.pvk WAPClient.cer
pvk2pfx -pvk WAPClient.pvk -spc WAPClient.cer -pfx WAPClient.pfx -po HelloHabr2015
Импортируем WAPPortals.cer в Certificates – Local Computer (Trusted Root CA) на сервере.
Импортируем WAPLocalServer.pfx в IIS на сервере.
В моем случае — я пароль не задавал.
Установим WAPClient.pfx на сервере и на клиентах в Certificates – Local Computer и Current User (Personal).
Добавим запись в файл hosts
(C:\Windows\System32\drivers\etc)
127.0.0.1 hello-habr-wap.cloudapp.net
Теперь мы можем изменить FQDN имя для сайтов управления Azure Pack (это нужно для доступа к сайтам из сети интернет) при помощи PowerShell (с правами администратора)
Для TenantSite
Import-Module -Name MgmtSvcConfig
Set-MgmtSvcFqdn -Namespace "TenantSite" -FullyQualifiedDomainName "hello-habr-wap.cloudapp.net" -Port 30081 -Server "hello-habr-wap\SQLEXPRESS"
Set-MgmtSvcFqdn -Namespace "AuthSite" -FullyQualifiedDomainName "hello-habr-wap.cloudapp.net" -Port 30071 -Server "hello-habr-wap\SQLEXPRESS"
Set-MgmtSvcRelyingPartySettings -Target Tenant -MetadataEndpoint "https://hello-habr-wap.cloudapp.net:30071/FederationMetadata/2007-06/FederationMetadata.xml" -ConnectionString "Data Source=hello-habr-wap\SQLEXPRESS;User ID=sa;Password=HelloHabr2015" –DisableCertificateValidation
Set-MgmtSvcIdentityProviderSettings -Target Membership -MetadataEndpoint "https://hello-habr-wap.cloudapp.net:30081/FederationMetadata/2007-06/FederationMetadata.xml" -ConnectionString "Data Source=hello-habr-wap\SQLEXPRESS;User ID=sa;Password=HelloHabr2015" –DisableCertificateValidation
Для AdminSite
Import-Module -Name MgmtSvcConfig
Set-MgmtSvcFqdn -Namespace "AdminSite" -FullyQualifiedDomainName "hello-habr-wap.cloudapp.net" -Port 30091 -Server "hello-habr-wap\SQLEXPRESS"
Set-MgmtSvcFqdn -Namespace "WindowsAuthSite" -FullyQualifiedDomainName "hello-habr-wap.cloudapp.net" -Port 30072 -Server "hello-habr-wap\SQLEXPRESS"
Set-MgmtSvcRelyingPartySettings -Target Admin -MetadataEndpoint "https://hello-habr-wap.cloudapp.net:30072/FederationMetadata/2007-06/FederationMetadata.xml" -ConnectionString "Data Source=hello-habr-wap\SQLEXPRESS;User ID=sa;Password=HelloHabr2015" –DisableCertificateValidation
Set-MgmtSvcIdentityProviderSettings -Target Windows -MetadataEndpoint "https://hello-habr-wap.cloudapp.net:30091/FederationMetadata/2007-06/FederationMetadata.xml" -ConnectionString "Data Source=hello-habr-wap\SQLEXPRESS;User ID=sa;Password=HelloHabr2015" –DisableCertificateValidation
В настройках сайтов Azure Pack в IIS изменим Bindings
В качестве сертификата выбрать hello-habr-wap.cloudapp.net — WAP Portals
В настройках SSL для сайта — установим Require SSL
Данную процедуру повторить для сайтов:
— TenantSite
— AuthSite
— AdminSite
— WindowsAuthSite
Для создания user-friendly DNS-имен можно использовать способы, описанные в статьях: раз, два и три.
Отлично, мы вышли на финишную прямую. Теперь нужно настроить доступ к Service Bus, которая находится на hello-habr-sb.cloudapp.net
Зайдем на AdminSite:
https://hello-habr-wap.cloudapp.net:30091
Connect to a virtual machine with Service Bus.
Create a Plan.
And finally, create a user.
Check Service Bus
Check Service Bus
Go to TenantSite and enter the credentials of the created user

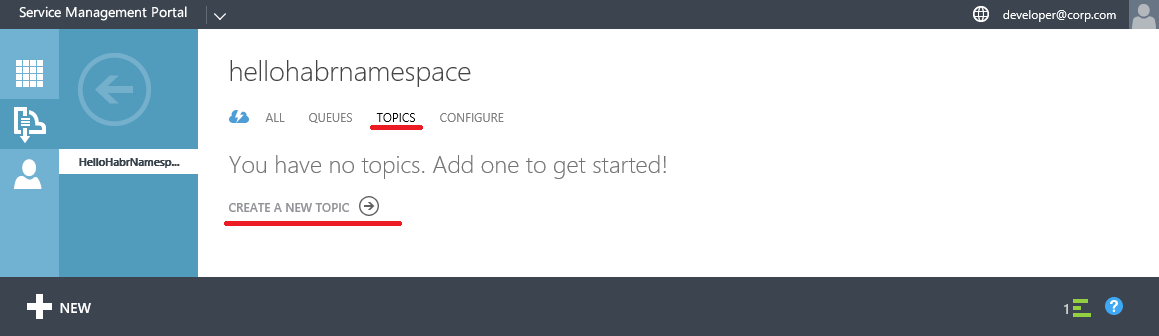
Create a Namespace

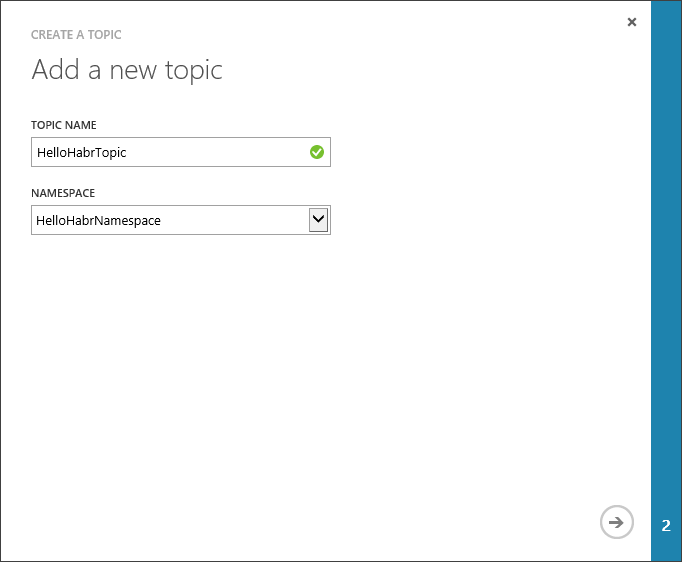
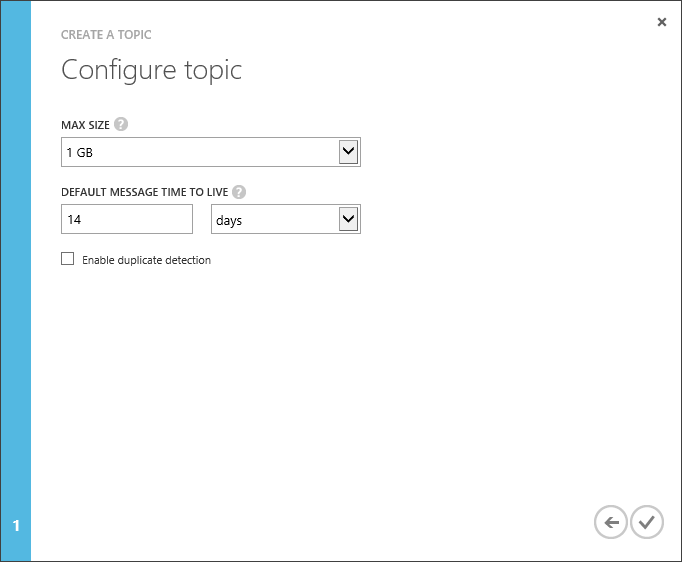
Create a Topic

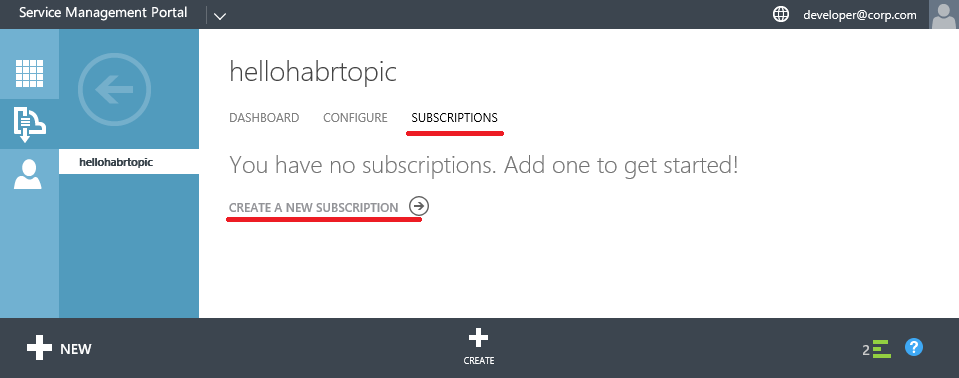
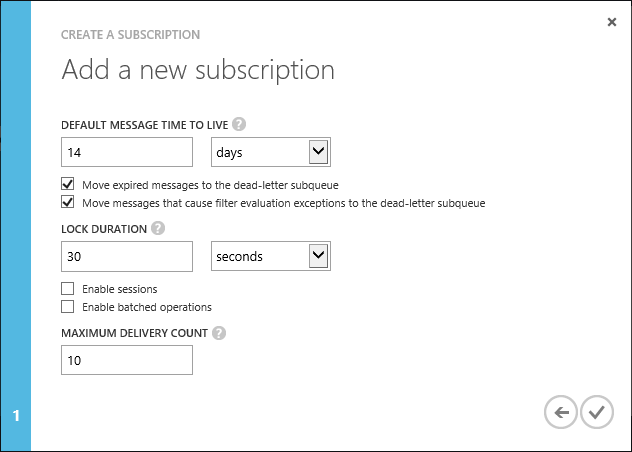
Create a Subscription

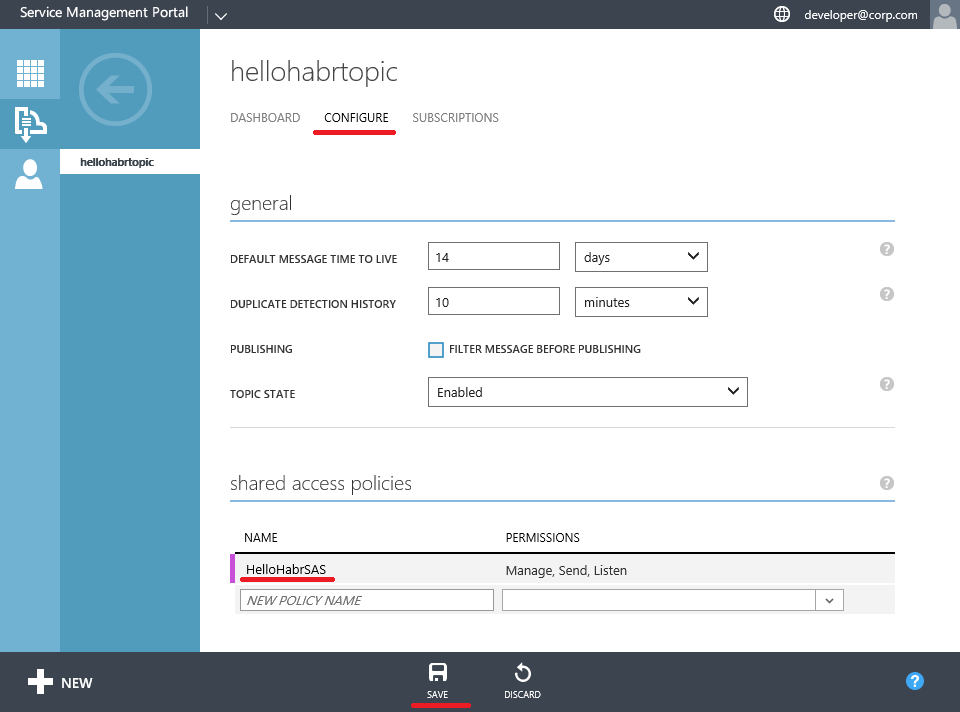
Create a Shared Access Policies for Topic
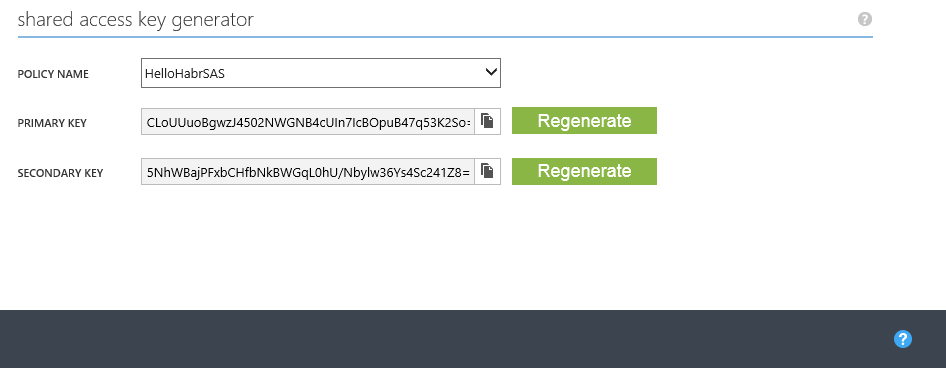
Get the keys for access
Now everything is ready for verification
Let's create a simple console application. I use Visual Studio 2013 for this.

Add the necessary References using the NuGet package manager console
And write a little verification code
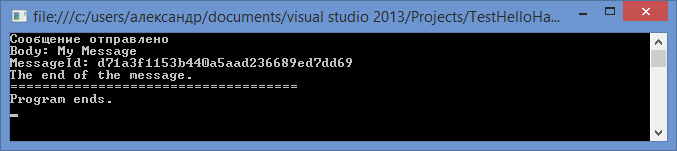
Run and make sure that messages are sent and delivered.
https://hello-habr-wap.cloudapp.nethaps0081/
Create a Namespace
Create a Topic
Create a Subscription
Create a Shared Access Policies for Topic
Get the keys for access
Now everything is ready for verification
Let's create a simple console application. I use Visual Studio 2013 for this.
Add the necessary References using the NuGet package manager console
Install-Package ServiceBus.v1_1
And write a little verification code
using Microsoft.ServiceBus;
using System;
using System.Collections.Generic;
using System.Linq;
using System.Text;
using System.Threading.Tasks;
using Microsoft.ServiceBus.Messaging;
namespace TestHelloHabrServiceBus
{
    class Program
    {
        static string ServerFQDN;
        static int HttpPort = 10355;
        static int TcpPort = 10354;
        static string ServiceNamespace = "HelloHabrNamespace";
        static void Main(string[] args)
        {
            ServerFQDN = "hello-habr-sb.cloudapp.net";
            ServiceBusConnectionStringBuilder connBuilder = new ServiceBusConnectionStringBuilder();
            connBuilder.ManagementPort = HttpPort;
            connBuilder.RuntimePort = TcpPort;
            connBuilder.Endpoints.Add(new UriBuilder() { Scheme = "sb", Host = ServerFQDN, Path = ServiceNamespace }.Uri);
            connBuilder.StsEndpoints.Add(new UriBuilder() { Scheme = "https", Host = ServerFQDN, Port = HttpPort, Path = ServiceNamespace }.Uri);
            connBuilder.SharedAccessKeyName = "HelloHabrSAS";
            connBuilder.SharedAccessKey = "CLoUUuoBgwzJ4502NWGNB4cUIn7IcBOpuB47q53K2So=";
            NamespaceManager namespaceManager = NamespaceManager.CreateFromConnectionString(connBuilder.ToString());
            TopicClient topicClient = TopicClient.CreateFromConnectionString(connBuilder.ToString(), "HelloHabrTopic");
            SubscriptionClient subscriptionClient = SubscriptionClient.CreateFromConnectionString(
                connBuilder.ToString(), "HelloHabrTopic", "HelloHabrSubscription", ReceiveMode.PeekLock);
            BrokeredMessage message = new BrokeredMessage("My Message");
            // Отправка сообщения
            try
            {
                topicClient.Send(new BrokeredMessage("My Message"));
            }
            catch (Exception ex)
            {
                Console.WriteLine(ex.Message);
            }
            Console.WriteLine("Сообщение отправлено");
            // Получение сообщения
            message = subscriptionClient.Receive(TimeSpan.FromSeconds(10));
            if (message != null)
            {
                Console.WriteLine("Body: " + message.GetBody());
                Console.WriteLine("MessageId: " + message.MessageId);
                message.Complete();
                Console.WriteLine("The end of the message.");
            }
            Console.WriteLine("====================================");
            Console.WriteLine("Program ends.");
            Console.ReadLine();
        }
    }
}
Run and make sure that messages are sent and delivered.
I hope my experience in configuring these solutions comes in handy and saves you a bit of time.