Gauss electromagnetic gun on a microcontroller
Hello. In this article, we will consider how to make a Gaussian portable electromagnetic gun assembled using a microcontroller. Well, about the Gauss gun, of course, I got excited, but there is no doubt that this is an electromagnetic gun. This device on the microcontroller was designed to teach beginners how to program microcontrollers using the example of constructing an electromagnetic gun with their own hands. We will analyze some design aspects in the Gaussian electromagnetic gun itself and in the program for the microcontroller.
From the very beginning, you need to determine the diameter and length of the barrel of the gun itself and the material from which it will be made. I used a plastic case with a diameter of 10 mm from under the mercury thermometer, because I was lying around idle. You can use any available material that has non-ferromagnetic properties. This glass, plastic, copper tube, etc. The length of the barrel may depend on the number of used electromagnetic coils. In my case, four electromagnetic coils are used, the barrel length was twenty centimeters.

As for the diameter of the tube used, in the process, the electromagnetic gun showed that it is necessary to take into account the diameter of the barrel relative to the projectile used. Simply put, the diameter of the barrel should not be much larger than the diameter of the projectile used. Ideally, the barrel of an electromagnetic gun should fit under the projectile itself.
The material for creating the shells was the axis from the printer with a diameter of five millimeters. Five blanks 2.5 cm long were made from this material. Although it is also possible to use steel bars, say, from a wire or an electrode - what is there.
It is necessary to pay attention to the weight of the projectile itself. If possible, the weight should be light. My shells were a little heavy.

Before creating this gun, experiments were conducted. An empty paste from the handle was used as a barrel, and a needle as a shell. The needle easily pierced the cover of a magazine mounted near the electromagnetic gun.
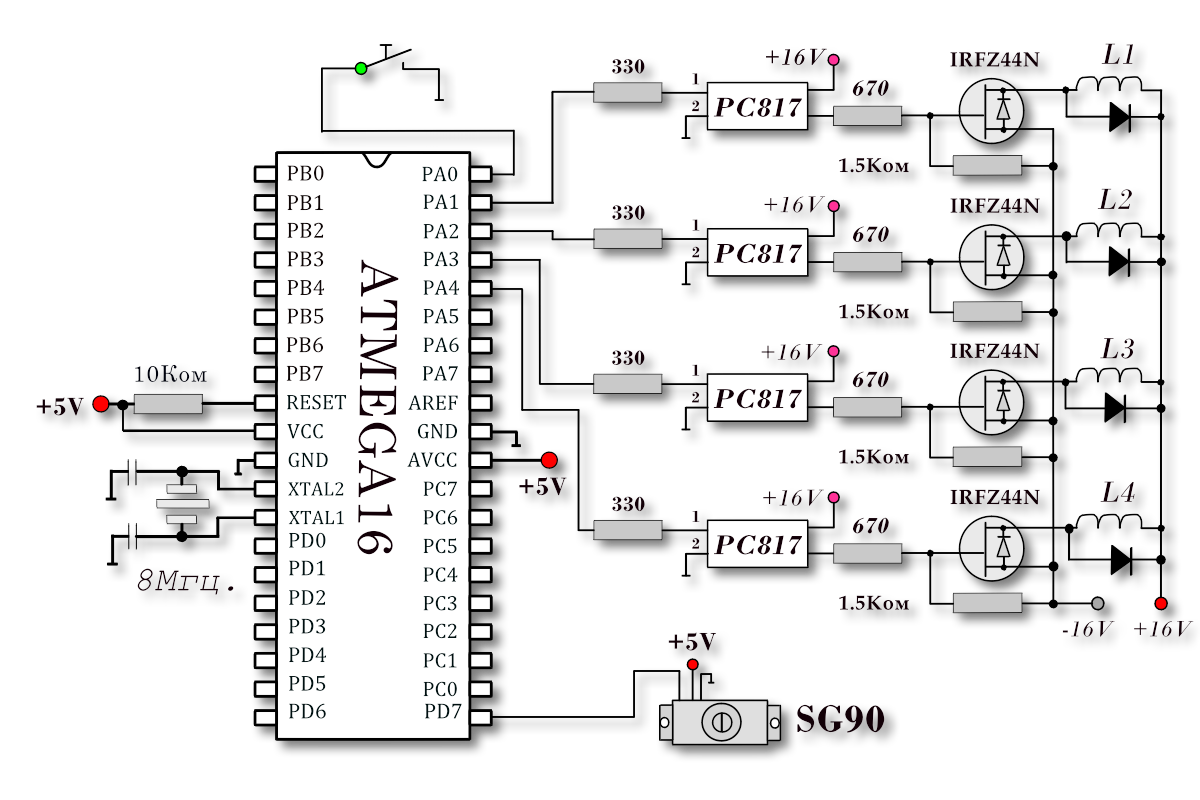
Since the original Gaussian electromagnetic gun is built on the principle of charging a capacitor with a high voltage, of the order of three hundred volts, for safety reasons, beginner radio amateurs should be powered with a low voltage of about twenty volts. Low voltage leads to the fact that the range of the projectile is not very large. But then again, it all depends on the number of electromagnetic coils used. The more electromagnetic coils used, the greater the acceleration of the projectile in the electromagnetic gun. The diameter of the barrel also matters (the smaller the diameter of the barrel, the projectile flies further) and the quality of the winding of the electromagnetic coils themselves. Perhaps, electromagnetic coils are the most basic in the device of an electromagnetic gun, serious attention needs to be paid to this in order to achieve maximum projectile flight.
I will give the parameters of my electromagnetic coils, you may have different ones. The coil is wound with a wire with a diameter of 0.2 mm. The length of the winding layer of the electromagnetic coil is two centimeters and contains six such rows. I did not isolate each new layer, but started winding a new layer onto the previous one. Due to the fact that the electromagnetic coils are powered by low voltage, you need to get the maximum quality factor of the coil. Therefore, we wrap all the turns tightly to each other, turn to turn.

As for the feeder, then special explanations are not needed. Everything was soldered from the waste of foil textolite left over from the production of printed circuit boards. In the figures, everything is displayed in detail. The heart of the feeder is the SG90 servo drive controlled by a microcontroller. You can buy here

The feed rod is made of a steel bar with a diameter of 1.5 mm, an m3 nut is sealed at the end of the rod for coupling with a servo drive. To increase the shoulder, a 1.5 mm diameter copper wire bent at both ends is installed on the rocker of the servo drive.
This simple device, assembled from improvised materials, is enough to feed a shell into the barrel of an electromagnetic gun. The feed rod should completely exit the loading magazine. A cracked brass stand with an inner diameter of 3 mm and a length of 7 mm served as a guide for the feed rod. It was a pity to throw away, and it came in handy, in fact, like pieces of foil textolite.
The program for the atmega16 microcontroller was created in AtmelStudio, and is a completely open project for you. Consider some of the settings in the microcontroller program that you have to make. For the most effective operation of the electromagnetic gun, you will need to adjust the operating time of each electromagnetic coil in the program. Setup is done in order. First, solder the first coil into the circuit, do not connect all the others. Set the time in the program (in milliseconds).
PORTA | = (1 << 1); // coil 1
_delay_ms (350); / / working hours
Flash the microcontroller, and run the program on the microcontroller. The efforts of the coil should be enough to retract the projectile and give initial acceleration. Having achieved the maximum projectile departure, adjusting the operating time of the coil in the microcontroller program, connect the second coil and also adjust in time, achieving even greater projectile range. Accordingly, the first coil remains on.
PORTA | = (1 << 1); // coil 1
_delay_ms (350);
PORTA & = ~ (1 << 1);
PORTA | = (1 << 2); // coil 2
_delay_ms (150);
In this way, you configure the operation of each electromagnetic coil, connecting them in order. As the number of electromagnetic coils in the device of the Gaussian electromagnetic gun increases, the speed and, accordingly, the projectile range should also increase.
This painstaking setup procedure for each coil can be avoided. But for this, it will be necessary to modernize the device of the electromagnetic gun itself, installing sensors between the electromagnetic coils to track the movement of the projectile from one coil to another. Sensors in combination with a microcontroller will not only simplify the setup process, but also increase the range of the projectile. I did not do these bells and whistles and complicate the microcontroller program. The goal was to implement an interesting and uncomplicated project using a microcontroller. How interesting it is, of course, is up to you to judge. Frankly, I was happy as a child, "thrashing" from this device, and the idea of a more serious device on a microcontroller matured. But this is a topic for another article.
Program and scheme - atmel-programme.clan.su/Puhka.zip
From the very beginning, you need to determine the diameter and length of the barrel of the gun itself and the material from which it will be made. I used a plastic case with a diameter of 10 mm from under the mercury thermometer, because I was lying around idle. You can use any available material that has non-ferromagnetic properties. This glass, plastic, copper tube, etc. The length of the barrel may depend on the number of used electromagnetic coils. In my case, four electromagnetic coils are used, the barrel length was twenty centimeters.
As for the diameter of the tube used, in the process, the electromagnetic gun showed that it is necessary to take into account the diameter of the barrel relative to the projectile used. Simply put, the diameter of the barrel should not be much larger than the diameter of the projectile used. Ideally, the barrel of an electromagnetic gun should fit under the projectile itself.
The material for creating the shells was the axis from the printer with a diameter of five millimeters. Five blanks 2.5 cm long were made from this material. Although it is also possible to use steel bars, say, from a wire or an electrode - what is there.
It is necessary to pay attention to the weight of the projectile itself. If possible, the weight should be light. My shells were a little heavy.
Before creating this gun, experiments were conducted. An empty paste from the handle was used as a barrel, and a needle as a shell. The needle easily pierced the cover of a magazine mounted near the electromagnetic gun.
Since the original Gaussian electromagnetic gun is built on the principle of charging a capacitor with a high voltage, of the order of three hundred volts, for safety reasons, beginner radio amateurs should be powered with a low voltage of about twenty volts. Low voltage leads to the fact that the range of the projectile is not very large. But then again, it all depends on the number of electromagnetic coils used. The more electromagnetic coils used, the greater the acceleration of the projectile in the electromagnetic gun. The diameter of the barrel also matters (the smaller the diameter of the barrel, the projectile flies further) and the quality of the winding of the electromagnetic coils themselves. Perhaps, electromagnetic coils are the most basic in the device of an electromagnetic gun, serious attention needs to be paid to this in order to achieve maximum projectile flight.
I will give the parameters of my electromagnetic coils, you may have different ones. The coil is wound with a wire with a diameter of 0.2 mm. The length of the winding layer of the electromagnetic coil is two centimeters and contains six such rows. I did not isolate each new layer, but started winding a new layer onto the previous one. Due to the fact that the electromagnetic coils are powered by low voltage, you need to get the maximum quality factor of the coil. Therefore, we wrap all the turns tightly to each other, turn to turn.
As for the feeder, then special explanations are not needed. Everything was soldered from the waste of foil textolite left over from the production of printed circuit boards. In the figures, everything is displayed in detail. The heart of the feeder is the SG90 servo drive controlled by a microcontroller. You can buy here
The feed rod is made of a steel bar with a diameter of 1.5 mm, an m3 nut is sealed at the end of the rod for coupling with a servo drive. To increase the shoulder, a 1.5 mm diameter copper wire bent at both ends is installed on the rocker of the servo drive.
This simple device, assembled from improvised materials, is enough to feed a shell into the barrel of an electromagnetic gun. The feed rod should completely exit the loading magazine. A cracked brass stand with an inner diameter of 3 mm and a length of 7 mm served as a guide for the feed rod. It was a pity to throw away, and it came in handy, in fact, like pieces of foil textolite.
The program for the atmega16 microcontroller was created in AtmelStudio, and is a completely open project for you. Consider some of the settings in the microcontroller program that you have to make. For the most effective operation of the electromagnetic gun, you will need to adjust the operating time of each electromagnetic coil in the program. Setup is done in order. First, solder the first coil into the circuit, do not connect all the others. Set the time in the program (in milliseconds).
PORTA | = (1 << 1); // coil 1
_delay_ms (350); / / working hours
Flash the microcontroller, and run the program on the microcontroller. The efforts of the coil should be enough to retract the projectile and give initial acceleration. Having achieved the maximum projectile departure, adjusting the operating time of the coil in the microcontroller program, connect the second coil and also adjust in time, achieving even greater projectile range. Accordingly, the first coil remains on.
PORTA | = (1 << 1); // coil 1
_delay_ms (350);
PORTA & = ~ (1 << 1);
PORTA | = (1 << 2); // coil 2
_delay_ms (150);
In this way, you configure the operation of each electromagnetic coil, connecting them in order. As the number of electromagnetic coils in the device of the Gaussian electromagnetic gun increases, the speed and, accordingly, the projectile range should also increase.
This painstaking setup procedure for each coil can be avoided. But for this, it will be necessary to modernize the device of the electromagnetic gun itself, installing sensors between the electromagnetic coils to track the movement of the projectile from one coil to another. Sensors in combination with a microcontroller will not only simplify the setup process, but also increase the range of the projectile. I did not do these bells and whistles and complicate the microcontroller program. The goal was to implement an interesting and uncomplicated project using a microcontroller. How interesting it is, of course, is up to you to judge. Frankly, I was happy as a child, "thrashing" from this device, and the idea of a more serious device on a microcontroller matured. But this is a topic for another article.
Program and scheme - atmel-programme.clan.su/Puhka.zip