We program robots - a free robotic simulator V-REP. First steps

Programming robots is interesting.
Many probably saw Japanese humanoid robots, or the French NAO training robot , the project of the trained Baxter robot manipulator looks interesting . KUKA industrial manipulators from Germany are a classic. Someone is programming conveyor systems (filtering, sorting). Delta robots. There is a whole layer - quadrocopter control / stabilization algorithms. And of course, simple hard workers in stock - Line Follower.
But all this is usually not cheap toys, so access to robots is in specialized laboratories or institutes / schools where they received funding and there are these areas. All other developers (who are interested in robotics) - it remains to look enviously.
Some time ago I came to a rather interesting system - 3D V-REP robosimulator , from the Swiss company Coppelia Robotics.
To my (pleasant) surprise, I found that this system:
- has great functionality (the system has been developed since March 2010)
- completely open-source (laid out in open access in 2013)
- cross-platform - windows, mac, linux (works on Qt)
- has APIs and libraries for working with robots via C / C ++, Python, Java, Lua, Matlab, Octave or Urbi
- free for non-commercial use!
All objects that are programmed in this system - “live” in the real world from the point of view of physical laws - are gravity, you can capture objects, collisions, distance sensors, video sensors, etc.
After working with this system for some time, I decided to tell the readers of the Habr about it.
Yes, and in the picture there is a screenshot from V-REP, and robot models - which you can program and watch the behavior directly on your computer.
Installation
Install this system on the computer in the Download section :
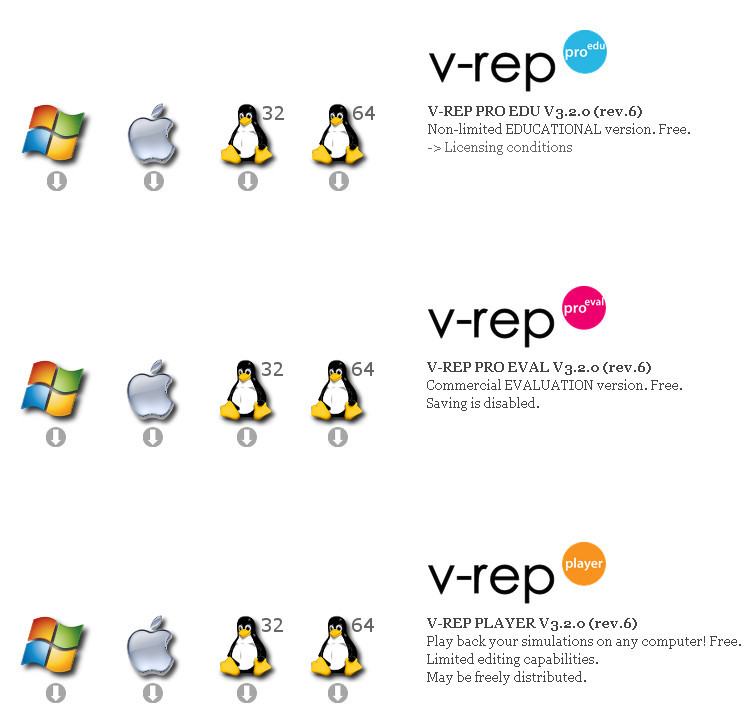
We see three options: educational (EDU), trial (EVAL), and player (player).
A player is a program with which you can play scenes created in the full version (that is, there is no editing ability) - free.
Trial is a fully functional version in which there is no way to save. No licensing restrictions.
Educational is a full-featured package with licensing restrictions; the text of the license can be read here . Its essence is that institutions, schools, hobbyists can use this software for free. While the use is not commercial (but educational).
You and I quite fit the definition of hobbies (because we want to educationally program robots), so we can safely download the EDU PRO version for our operating system.
Currently version 3.2.0, here is a direct link to windows option: V-REP_PRO_EDU_V3_2_0_Setup (98 Mb)
Start
After installation and start, we will see the screen:

Here we see the following objects:
- scene - all the action takes place here, at the moment it is empty (there is only floor)
- on the left we see a block with a model library - on top of the folder, and below it - is displayed contents of the selected folder (selected robots / non-mobile - that is, stationary robots - manipulators)
- then the world
hierarchy is displayed. The hierarchy includes the root object (world) in which all objects are located.
In our example, this:
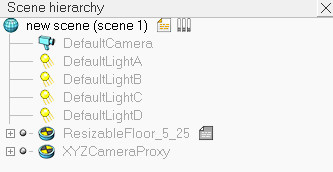
We see light sources, we see an object for the realization of the floor (and this is a solid surface, with a texture), and a group for cameras.
There is a main script object that controls the scene and all objects on it, and each object can have its own script - internal scripts are implemented in the Lua language .
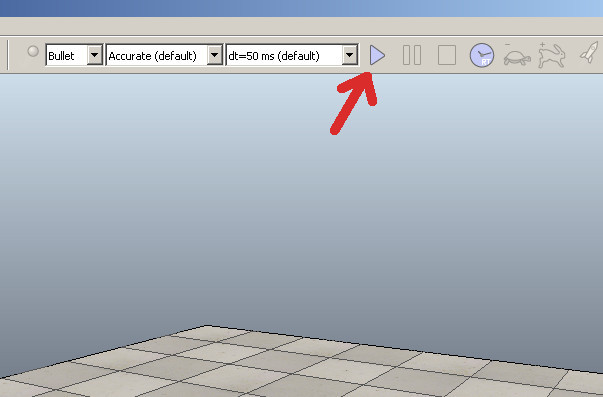
At the top and left we see the toolbar - menu. The most important button is the Play ( Start Simulation ) button - after which the scene simulation starts:
The scenario is as follows:
- we drag objects from the model library using DragAndDrop.
- we correct their location
- we configure scripts
- we start the simulator
- we stop the simulator
We will try something in practice.
Fast start
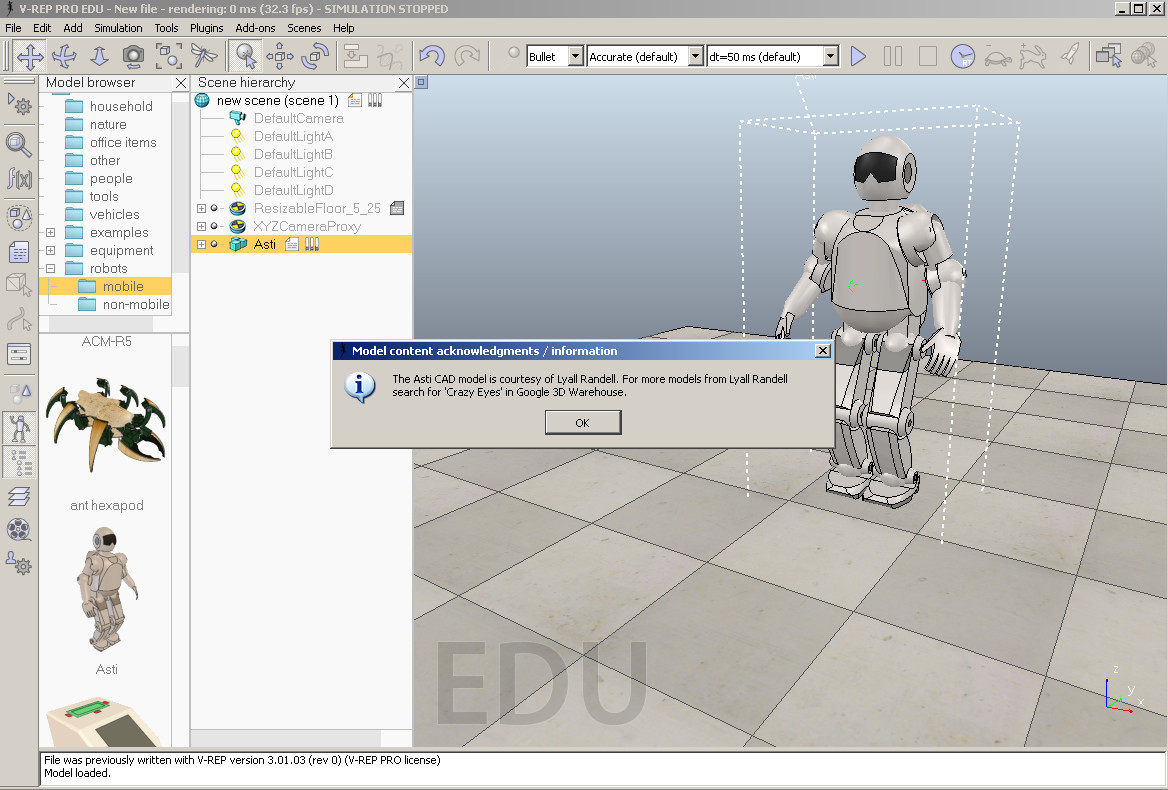
Let's try to revive the robot.
To do this, select the robots / mobile folder on the left and select Ansi in the list, grab it, transfer it to the stage and release it, the robot appears on our scene and information about the author appears:
Now click on Start Simulation and we can see the movement of the robot, and we can control the position of the head, hands (implemented through the Custom User Interface), here's the video: Next, stop the simulation:
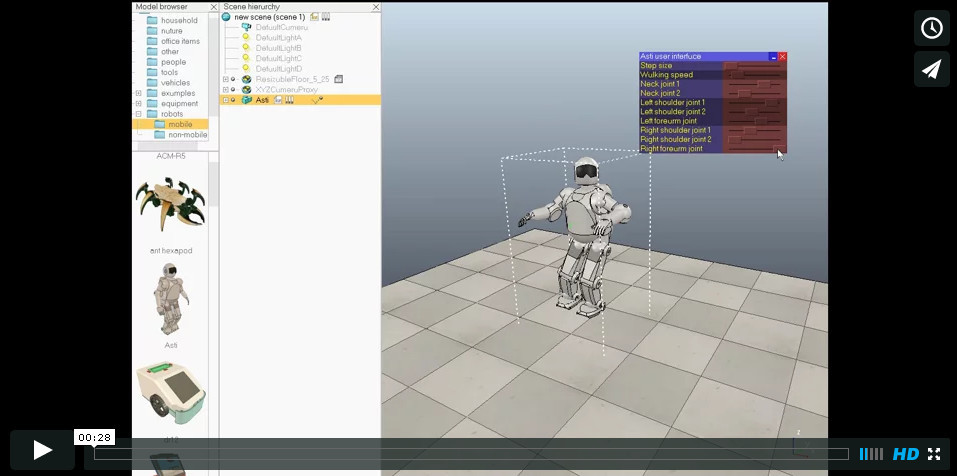

Control script
We can open and see the code that taught the robot to go (controls the autonomous movement of the robot). To do this, on the object hierarchy, opposite the Asti model, double-click on the “file” icon:

Here is the Lua program that implements the movement of the robot:
Asti Robot Motion Control Script
if (sim_call_type==sim_childscriptcall_initialization) then
	asti=simGetObjectHandle("Asti")
	lFoot=simGetObjectHandle("leftFootTarget")
	rFoot=simGetObjectHandle("rightFootTarget")
	lPath=simGetObjectHandle("leftFootPath")
	rPath=simGetObjectHandle("rightFootPath")
	lPathLength=simGetPathLength(lPath)
	rPathLength=simGetPathLength(rPath)
	ui=simGetUIHandle("astiUserInterface")
	simSetUIButtonLabel(ui,0,simGetObjectName(asti).." user interface")
	dist=0
	correction=0.0305
	minVal={0,			-- Step size
			0,			-- Walking speed
			-math.pi/2,	-- Neck 1
			-math.pi/8,	-- Neck 2
			-math.pi/2,	-- Left shoulder 1
			0,			-- Left shoulder 2
			-math.pi/2,	-- Left forearm
			-math.pi/2,	-- Right shoulder 1
			0,			-- Right shoulder 2
			-math.pi/2}	-- Right forearm
	rangeVal={	2,			-- Step size
				0.8,		-- Walking speed
				math.pi,	-- Neck 1
				math.pi/4,	-- Neck 2
				math.pi/2,	-- Left shoulder 1
				math.pi/2,	-- Left shoulder 2
				math.pi/2,	-- Left forearm
				math.pi/2,	-- Right shoulder 1
				math.pi/2,	-- Right shoulder 2
				math.pi/2}	-- Right forearm
	uiSliderIDs={3,4,5,6,7,8,9,10,11,12}
	relativeStepSize=1
	nominalVelocity=0.4
	neckJoints={simGetObjectHandle("neckJoint0"),simGetObjectHandle("neckJoint1")}
	leftArmJoints={simGetObjectHandle("leftArmJoint0"),simGetObjectHandle("leftArmJoint1"),simGetObjectHandle("leftArmJoint2")}
	rightArmJoints={simGetObjectHandle("rightArmJoint0"),simGetObjectHandle("rightArmJoint1"),simGetObjectHandle("rightArmJoint2")}
	-- Now apply current values to the user interface:
	simSetUISlider(ui,uiSliderIDs[1],(relativeStepSize-minVal[1])*1000/rangeVal[1])
	simSetUISlider(ui,uiSliderIDs[2],(nominalVelocity-minVal[2])*1000/rangeVal[2])
	simSetUISlider(ui,uiSliderIDs[3],(simGetJointPosition(neckJoints[1])-minVal[3])*1000/rangeVal[3])
	simSetUISlider(ui,uiSliderIDs[4],(simGetJointPosition(neckJoints[2])-minVal[4])*1000/rangeVal[4])
	simSetUISlider(ui,uiSliderIDs[5],(simGetJointPosition(leftArmJoints[1])-minVal[5])*1000/rangeVal[5])
	simSetUISlider(ui,uiSliderIDs[6],(simGetJointPosition(leftArmJoints[2])-minVal[6])*1000/rangeVal[6])
	simSetUISlider(ui,uiSliderIDs[7],(simGetJointPosition(leftArmJoints[3])-minVal[7])*1000/rangeVal[7])
	simSetUISlider(ui,uiSliderIDs[8],(simGetJointPosition(rightArmJoints[1])-minVal[8])*1000/rangeVal[8])
	simSetUISlider(ui,uiSliderIDs[9],(simGetJointPosition(rightArmJoints[2])-minVal[9])*1000/rangeVal[9])
	simSetUISlider(ui,uiSliderIDs[10],(simGetJointPosition(rightArmJoints[3])-minVal[10])*1000/rangeVal[10])
end
if (sim_call_type==sim_childscriptcall_cleanup) then
end
if (sim_call_type==sim_childscriptcall_actuation) then
	-- Read desired values from the user interface:
	relativeStepSize=minVal[1]+simGetUISlider(ui,uiSliderIDs[1])*rangeVal[1]/1000
	nominalVelocity=minVal[2]+simGetUISlider(ui,uiSliderIDs[2])*rangeVal[2]/1000
	simSetJointTargetPosition(neckJoints[1],minVal[3]+simGetUISlider(ui,uiSliderIDs[3])*rangeVal[3]/1000)
	simSetJointTargetPosition(neckJoints[2],minVal[4]+simGetUISlider(ui,uiSliderIDs[4])*rangeVal[4]/1000)
	simSetJointTargetPosition(leftArmJoints[1],minVal[5]+simGetUISlider(ui,uiSliderIDs[5])*rangeVal[5]/1000)
	simSetJointTargetPosition(leftArmJoints[2],minVal[6]+simGetUISlider(ui,uiSliderIDs[6])*rangeVal[6]/1000)
	simSetJointTargetPosition(leftArmJoints[3],minVal[7]+simGetUISlider(ui,uiSliderIDs[7])*rangeVal[7]/1000)
	simSetJointTargetPosition(rightArmJoints[1],minVal[8]+simGetUISlider(ui,uiSliderIDs[8])*rangeVal[8]/1000)
	simSetJointTargetPosition(rightArmJoints[2],minVal[9]+simGetUISlider(ui,uiSliderIDs[9])*rangeVal[9]/1000)
	simSetJointTargetPosition(rightArmJoints[3],minVal[10]+simGetUISlider(ui,uiSliderIDs[10])*rangeVal[10]/1000)
	-- Get the desired position and orientation of each foot from the paths (you can also use a table of values for that):
	t=simGetSimulationTimeStep()*nominalVelocity
	dist=dist+t
	lPos=simGetPositionOnPath(lPath,dist/lPathLength)
	lOr=simGetOrientationOnPath(lPath,dist/lPathLength)
	p=simGetPathPosition(rPath)
	rPos=simGetPositionOnPath(rPath,(dist+correction)/rPathLength)
	rOr=simGetOrientationOnPath(rPath,(dist+correction)/rPathLength)
	-- Now we have the desired absolute position and orientation for each foot.
	-- Now transform the absolute position/orientation to position/orientation relative to asimo
	-- Then modulate the movement forward/backward with the desired "step size"
	-- Then transform back into absolute position/orientation:
	astiM=simGetObjectMatrix(asti,-1)
	astiMInverse=simGetInvertedMatrix(astiM)
	m=simMultiplyMatrices(astiMInverse,simBuildMatrix(lPos,lOr))
	m[8]=m[8]*relativeStepSize
	m=simMultiplyMatrices(astiM,m)
	lPos={m[4],m[8],m[12]}
	lOr=simGetEulerAnglesFromMatrix(m)
	m=simMultiplyMatrices(astiMInverse,simBuildMatrix(rPos,rOr))
	m[8]=m[8]*relativeStepSize
	m=simMultiplyMatrices(astiM,m)
	rPos={m[4],m[8],m[12]}
	rOr=simGetEulerAnglesFromMatrix(m)
	-- Finally apply the desired positions/orientations to each foot
	-- We simply apply them to two dummy objects that are then handled
	-- by the IK module to automatically calculate all leg joint desired values
	-- Since the leg joints operate in hybrid mode, the IK calculation results
	-- are then automatically applied as the desired values during dynamics calculation
	simSetObjectPosition(lFoot,-1,lPos)
	simSetObjectOrientation(lFoot,-1,lOr)
	simSetObjectPosition(rFoot,-1,rPos)
	simSetObjectOrientation(rFoot,-1,rOr)
end
Other models
You can delete the model - to do this, select it and click on Del. And you can try to see other models in work, some have scripts for battery life.
Mobile robots

Stationary robots (manipulators)

Scene Examples
There are also a large number of examples (scenes) that come immediately with the program. To do this, select "File / Open scenes" in the menu and go to the folder: "V-REP3 / V-REP_PRO_EDU / scenes".
Here are examples of scenes (files with the extension * .ttt):
Sample scene files
2IndustrialRobots.ttt
3DoFHolonomicPathPlanning.ttt
6DoFHolonomicPathPlanning.ttt
BarrettHandPickAndPlace.ttt
blobDetectionWithPickAndPlace.ttt
ConstraintSolverExample.ttt
controlTypeExamples.ttt
an e-puckDemo.ttt
environmentMapping.ttt
externalIkDemo.ttt
fabricationBlocks.ttt
fastClientServerCommunication.ttt
forwardAndInverseKinematics1.ttt
forwardAndInverseKinematics2.ttt
gearMechanism.ttt
genericDialogDemo.ttt
ghostDemo.ttt
ImageProcessingExample.ttt
inverseKinematicsOf144DofManipulator.ttt
jansenMechanism.ttt
katanaRobotWithCableSimulation.ttt
khepera3.ttt
Threaded.ttt-LineTracer
millingMachine.ttt
millingRobot.ttt
motionPlanningAndGraspingDemo.ttt
motionPlanningDemo1.ttt
motionPlanningDemo2.ttt
motionPlanningDemo3.ttt
mouseTestScene.ttt
naturalSelectionAlgo.ttt
NonHolonomicPathPlanning.ttt
objectHandling.ttt
PaintingRobot.ttt
ParallelForwardAndInverseKinematics.ttt
practicalPathPlanningDemo.ttt
proximitySensorDemo.ttt
reflexxesMotionLibraryType4Demo.ttt
robotCollaboration1.ttt
robotCollaboration2.ttt
robotLanguageControl.ttt
rosTopicPublisherAndSubscriber.ttt
SocketAndTubeCommunicationExample.ttt
StripeScanner.ttt
weldingRobot.ttt
wirelessTransmission.ttt
youBotAndHanoiTower.ttt
References
* V-REP main site
* User manual (in English)
* A large number of videos, examples from V-REP
To support the popularization of this interesting system in Russian, a Russian-speaking group on V-REP has been created .
Application in the educational process
In my opinion, V-REP has a good potential for use in educational processes. If you are interested in using the system in the educational process - at a school, institute, in a robotics club, etc. - you can fill out the form . It may be possible to consolidate efforts and make educational Russian-language materials.
Future plans
Of course, this is only a small part of the capabilities of the V-REP system. In the next publication, by example, we consider the creation of a first-person racing simulator task on a robotic machine. Consider the API. Creating objects, setting up the scene and interacting with the user.