Testing content distribution in GlusterFS
I found several articles on the hub about the basic installation and configuration of GlusterFS, but I did not find anything about the types of content distribution that it supports and with which I played for a long time . What will be discussed in this article.
GlusterFS is a very convenient and easy-to-use and easy-to-use distributed file system that works in user space using FUSE technology, i.e. runs on top of the main file system. For installation and configuration we will use the Ubuntu 12.04 OS.
We will configure a cluster of two servers and mount (test) on one client. We have the following settings:
First, for convenience, add all the addresses to the hosts on each machine.
If you use a firewall, you need to open TCP ports 111, 24007-24050 on all machines that act as servers (two, in our case).
All servers need to install gluster-server. At the moment, the latest version is 3.5.2. We will install from ppa repositories.
Now connect to one of the servers and create a cluster.
Check the status:
As you can see, server2 was added to the cluster and its status is Connected. You can also make sure that everything is ok on the second server.
GlusterFS supports 5 types of content distribution combined in volume:
First, we will configure each type of content distribution separately and then mount all 5 volums on the client for tests.
With this setting, the data will be randomly distributed between each folder that is in volume.
Let's create dist1, dist2 packs on the first server, dist3, dist4 on the second server.
Now you can create and start volume.
With this setting, the data will be mirrored (like RAID1) between each folder (server) that is in volume. Of course, the number of folders (servers) included in volume should be a multiple of the replica.
Let's create repl1, repl2 packs on the first server, repl3, repl4 on the second server.
Now you can create and start volume.
In this case, all files will be replicated to all 4 folders. Those. all folders will contain the same content.
With this setting, the files will be divided into parts and each piece will be stored in each of the folders that is included in volume. This type of content distribution is suitable for storing capacitive data with a very large size (video content in good quality, for example). Of course, the number of folders included in volume should be equivalent to the value of stripe. Those. if we have 5 servers, then the file will be divided into 5 parts and each piece of it will be stored on all 5 servers.
Let's create strip1, strip2 packs on the first server, strip3, strip4 on the second server.
Now you can create and start volume.
In this case, on each of the 4 servers (folders) there will be one piece of the uploaded file.
With this setting, the files will be divided into parts and pieces of the files will be distributed in folders and stored in one of them. Of course, the number of folders included in volume should be a multiple of the stripe value. Those. if we have 8 servers and the stripe value is 4, then the files will be divided into 4 parts and stored either on the first 4 servers or on the next 4 servers. Also, if we have 4 servers and stripe is 2, then the files will be divided into 2 parts and stored on the first 2 or on the next 2 servers.
Let's create dist-strip1, dist-strip2 packs on the first server, dist-strip3, dist-strip4 on the second server.
Now you can create and start volume. At the same time, the order of the servers plays a very large role: part of the files will be stored on the first pair of servers (with stripe = 2), or on the first four servers (with stripe = 4), and the content will be distributed between the first and second pair or four and t .P.
With this setting, the data will be randomly distributed between folders and each folder has its own mirror copy. Of course, the number of folders included in volume should be a multiple of the replica value. Those. if we have 4 servers and the replica value is 2, then the files will be distributed on the 2 servers in random order, and the 2 remaining servers will store an identical copy of the content of the first two. If we have 8 servers and replica is 4, then we will have one mirror of 4 servers.
Let's create dist-repl1, dist-repl2 packs on the first server, dist-repl3, dist-repl4 on the second server.
Now you can create and start volume. At the same time, the sequence of servers plays a very large role: the first pair (four) of servers recorded sequentially is one replica. Those. if we have 8 servers and replica is 4, then the first 4 servers will have one identical content, and the second four will have different identical content, etc.
Now let's check what volum we created.
As you can see, we have 5 volums with a different type of content distribution. You can go to the client side.
On all clients, you need to install gluster-client from ppa repositories.
Next, you just need to mount the network folder by the name of the created volum-a. In this case, the IP or domain name of the server does not play a role, i.e. if we have 10 servers added to one cluster, then on the client you can mount the ball using any of 10 IPs, the name volum-a remains the same.
We connect to the client, create a folder for the new disk and mount the distributed volume.
As you can see, we have successfully mounted a new network drive with a size of 30 GB (the total disk size of all servers included in volume). Now create a dozen files.
We look at how the content is distributed across the servers.
As you can see, the files are scattered in all four folders, which were included in the distributed volume.
We connect to the client, create a folder for the new disk and mount the replicated volume.
As you can see, we have successfully mounted a new network drive 7.3 GB in size (the total disk size of all servers included in volume divided by the number of replicas). Now create a dozen files.
We look at how the content is distributed across the servers.
As you can see, the files were mirrored in every folder that was in the replicated volume.
We connect to the client, create a folder for the new disk and mount the striped volume.
As you can see, we have successfully mounted a new network drive with a size of 30 GB (the total disk size of all servers included in volume). Now create a couple of large files and copy to the folder.
As you can see, we have 2 files of 300MB in size in our folder. Now let's see how the content is distributed across the servers.
As you can see, the files were divided into equal parts of 75 MB and scattered across all four folders that were part of the striped volume.
We connect to the client, create a folder for the new disk and mount the distributed striped volume.
As you can see, we have successfully mounted a new network drive with a size of 30 GB (the total disk size of all servers included in volume). Now create a couple of large files and copy to the folder.
As you can see, we have 2 files of 300MB in size in our folder. Now let's see how the content is distributed across the servers.
As you can see, the files were scattered in different folders and divided into equal parts of 150 MB.
We connect to the client, create a folder for the new disk and mount distributed replicated volume.
As you can see, we have successfully mounted a new 15GB network drive (the total disk size of all servers included in volume divided by the number of replicas). Now create a dozen files.
We look at how the content is distributed across the servers.
As you can see, the first server has the same content as the second scattered in folders.
In real conditions, each folder should be a separately mounted disk (not a root file system). You are now familiar with every type of content distribution used by glusterFS.
GlusterFS performs well in local networks with basic settings, if you go to the data centers distributed across countries, you need to configure the settings both on the server side and when mounting on the client, which will be discussed in the next article.
GlusterFS is a very convenient and easy-to-use and easy-to-use distributed file system that works in user space using FUSE technology, i.e. runs on top of the main file system. For installation and configuration we will use the Ubuntu 12.04 OS.
We will configure a cluster of two servers and mount (test) on one client. We have the following settings:
| IP | Hostname | Short name |
| 192.168.1.100 | server1.example.com | server1 |
| 192.168.1.101 | server2.example.com | server2 |
| 192.168.1.102 | client1.example.com | client1 |
1. General settings
First, for convenience, add all the addresses to the hosts on each machine.
root@server1:~# cat /etc/hosts
127.0.0.1       localhost
192.168.1.100   server1.example.com     server1
192.168.1.101   server2.example.com     server2
192.168.1.102   client1.example.com     client1
root@server2:~# cat /etc/hosts
127.0.0.1       localhost
192.168.1.100   server1.example.com     server1
192.168.1.101   server2.example.com     server2
192.168.1.102   client1.example.com     client1
root@client1:~# cat /etc/hosts
127.0.0.1       localhost
192.168.1.100   server1.example.com     server1
192.168.1.101   server2.example.com     server2
192.168.1.102   client1.example.com     client1
If you use a firewall, you need to open TCP ports 111, 24007-24050 on all machines that act as servers (two, in our case).
2. Configuring the server side (cluster)
All servers need to install gluster-server. At the moment, the latest version is 3.5.2. We will install from ppa repositories.
root@server1:~#apt-get install python-software-properties
root@server1:~#add-apt-repository ppa:semiosis/ubuntu-glusterfs-3.5
root@server1:~#apt-get update
root@server1:~#apt-get install glusterfs-server -у
root@server2:~#apt-get install python-software-properties
root@server2:~#add-apt-repository ppa:semiosis/ubuntu-glusterfs-3.5
root@server2:~#apt-get update
root@server2:~# apt-get install glusterfs-server -у
Now connect to one of the servers and create a cluster.
root@server1:~# gluster peer probe server2.example.com
Probe successful
Check the status:
root@server1:~# gluster peer status
Number of Peers: 1
Hostname: server2.example.com
Uuid: 0f3aa4f4-f9dd-4cd2-a7a5-126606fbab33
State: Peer in Cluster (Connected)
As you can see, server2 was added to the cluster and its status is Connected. You can also make sure that everything is ok on the second server.
root@server2:~# gluster peer status
Number of Peers: 1
Hostname: 192.168.1.100
Uuid: ae4e6766-787f-4d0c-8b96-8fc9523ef346
State: Peer in Cluster (Connected)
GlusterFS supports 5 types of content distribution combined in volume:
- Distributed
- Replicated
- Striped (divided in parts)
- Distributed Striped (distributed and divided in parts)
- Distributed Replicated (Distributed and Replicated)
First, we will configure each type of content distribution separately and then mount all 5 volums on the client for tests.
2.1 Setting up distributed volume
With this setting, the data will be randomly distributed between each folder that is in volume.
Let's create dist1, dist2 packs on the first server, dist3, dist4 on the second server.
root@server1:~# mkdir /mnt/dist{1,2}
root@server2:~# mkdir /mnt/dist{3,4}
Now you can create and start volume.
root@server1:~# gluster volume create distributed transport tcp server1:/mnt/dist1 server1:/mnt/dist2 server2:/mnt/dist3 server2:/mnt/dist4 force
Creation of volume distributed has been successful. Please start the volume to access data.
root@server1:~# gluster volume start distributed
Starting volume distributed has been successful
2.2 Configuring replicated volume
With this setting, the data will be mirrored (like RAID1) between each folder (server) that is in volume. Of course, the number of folders (servers) included in volume should be a multiple of the replica.
Let's create repl1, repl2 packs on the first server, repl3, repl4 on the second server.
root@server1:~# mkdir /mnt/repl{1,2}
root@server2:~# mkdir /mnt/repl{3,4}
Now you can create and start volume.
root@server1:~# gluster volume create replicated replica 4 transport tcp server1:/mnt/repl1 server2:/mnt/repl3 server1:/mnt/repl2 server2:/mnt/repl4 force
Multiple bricks of a replicate volume are present on the same server. This setup is not optimal.
Do you still want to continue creating the volume?  (y/n) y
volume create: replicated: success: please start the volume to access data
root@server1:~# gluster volume start replicated
volume start: replicated: success
In this case, all files will be replicated to all 4 folders. Those. all folders will contain the same content.
2.3 Setting striped volume
With this setting, the files will be divided into parts and each piece will be stored in each of the folders that is included in volume. This type of content distribution is suitable for storing capacitive data with a very large size (video content in good quality, for example). Of course, the number of folders included in volume should be equivalent to the value of stripe. Those. if we have 5 servers, then the file will be divided into 5 parts and each piece of it will be stored on all 5 servers.
Let's create strip1, strip2 packs on the first server, strip3, strip4 on the second server.
root@server1:~# mkdir /mnt/strip{1,2}
root@server2:~# mkdir /mnt/strip{3,4}
Now you can create and start volume.
root@server1:~# gluster volume create striped stripe 4 transport tcp server1:/mnt/strip1 server1:/mnt/strip2 server2:/mnt/strip3 server2:/mnt/strip4 force
Creation of volume striped has been successful. Please start the volume to access data.
root@server1:~# gluster volume start striped
Starting volume striped has been successful
In this case, on each of the 4 servers (folders) there will be one piece of the uploaded file.
2.4 Configuring distributed striped volume
With this setting, the files will be divided into parts and pieces of the files will be distributed in folders and stored in one of them. Of course, the number of folders included in volume should be a multiple of the stripe value. Those. if we have 8 servers and the stripe value is 4, then the files will be divided into 4 parts and stored either on the first 4 servers or on the next 4 servers. Also, if we have 4 servers and stripe is 2, then the files will be divided into 2 parts and stored on the first 2 or on the next 2 servers.
Let's create dist-strip1, dist-strip2 packs on the first server, dist-strip3, dist-strip4 on the second server.
root@server1:~# mkdir /mnt/dist-strip{1,2}
root@server2:~# mkdir /mnt/dist-strip{3,4}
Now you can create and start volume. At the same time, the order of the servers plays a very large role: part of the files will be stored on the first pair of servers (with stripe = 2), or on the first four servers (with stripe = 4), and the content will be distributed between the first and second pair or four and t .P.
root@server1:~# gluster volume create distributed-striped stripe 2 transport tcp server1:/mnt/dist-strip1 server2:/mnt/dist-strip3 server1:/mnt/dist-strip2 server2:/mnt/dist-strip4 force
Creation of volume distributed-striped has been successful. Please start the volume to access data.
root@server1:~# gluster volume start distributed-striped
Starting volume distributed-striped has been successful
2.5 Configuring distributed replicated volume
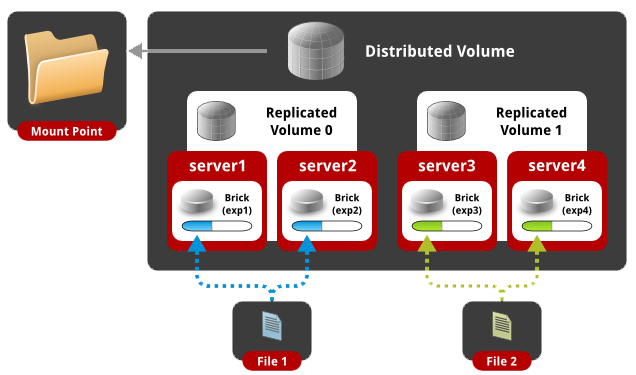
With this setting, the data will be randomly distributed between folders and each folder has its own mirror copy. Of course, the number of folders included in volume should be a multiple of the replica value. Those. if we have 4 servers and the replica value is 2, then the files will be distributed on the 2 servers in random order, and the 2 remaining servers will store an identical copy of the content of the first two. If we have 8 servers and replica is 4, then we will have one mirror of 4 servers.
Let's create dist-repl1, dist-repl2 packs on the first server, dist-repl3, dist-repl4 on the second server.
root@server1:~# mkdir /mnt/dist-repl{1,2}
root@server2:~# mkdir /mnt/dist-repl{3,4}
Now you can create and start volume. At the same time, the sequence of servers plays a very large role: the first pair (four) of servers recorded sequentially is one replica. Those. if we have 8 servers and replica is 4, then the first 4 servers will have one identical content, and the second four will have different identical content, etc.
root@server1:~# gluster volume create distributed-replicated replica 2 transport tcp server1:/mnt/dist-repl1 server2:/mnt/dist-repl3 server1:/mnt/dist-repl2 server2:/mnt/dist-repl4 force
Creation of volume distributed-replicated has been successful. Please start the volume to access data.
root@server1:~# gluster volume start distributed-replicated
Starting volume distributed-replicated has been successful
Now let's check what volum we created.
root@server1:~# gluster volume info
Volume Name: distributed
Type: Distribute
Volume ID: 01622619-fd93-4ee1-85ad-ca8cf1d85f7e
Status: Started
Number of Bricks: 4
Transport-type: tcp
Bricks:
Brick1: server1:/mnt/dist1
Brick2: server1:/mnt/dist2
Brick3: server2:/mnt/dist3
Brick4: server2:/mnt/dist4
Volume Name: replicated
Type: Replicate
Volume ID: 67afcb89-7e5d-4a02-b4ac-0c2de7cd97be
Status: Started
Number of Bricks: 1 x 4 = 4
Transport-type: tcp
Bricks:
Brick1: server1:/mnt/repl1
Brick2: server2:/mnt/repl3
Brick3: server1:/mnt/repl2
Brick4: server2:/mnt/repl4
Volume Name: striped
Type: Stripe
Volume ID: e9ef42bf-8265-4973-85de-4cafd2a68fec
Status: Started
Number of Bricks: 1 x 4 = 4
Transport-type: tcp
Bricks:
Brick1: server1:/mnt/strip1
Brick2: server1:/mnt/strip2
Brick3: server2:/mnt/strip3
Brick4: server2:/mnt/strip4
Volume Name: distributed-striped
Type: Distributed-Stripe
Volume ID: aa70dd67-3ca9-48cb-865b-b10f8ca1ccad
Status: Started
Number of Bricks: 2 x 2 = 4
Transport-type: tcp
Bricks:
Brick1: server1:/mnt/dist-strip1
Brick2: server2:/mnt/dist-strip3
Brick3: server1:/mnt/dist-strip2
Brick4: server2:/mnt/dist-strip4
Volume Name: distributed-replicated
Type: Distributed-Replicate
Volume ID: 59a819c4-6e84-4c49-9e90-23daa59d12ee
Status: Started
Number of Bricks: 2 x 2 = 4
Transport-type: tcp
Bricks:
Brick1: server1:/mnt/dist-repl1
Brick2: server2:/mnt/dist-repl3
Brick3: server1:/mnt/dist-repl2
Brick4: server2:/mnt/dist-repl4
As you can see, we have 5 volums with a different type of content distribution. You can go to the client side.
3. Configuring the client side
On all clients, you need to install gluster-client from ppa repositories.
root@client1:~#apt-get install python-software-properties
root@client1:~#add-apt-repository ppa:semiosis/ubuntu-glusterfs-3.5
root@client1:~#apt-get update
root@client1:~#apt-get install glusterfs-client
Next, you just need to mount the network folder by the name of the created volum-a. In this case, the IP or domain name of the server does not play a role, i.e. if we have 10 servers added to one cluster, then on the client you can mount the ball using any of 10 IPs, the name volum-a remains the same.
3.1 Mounting and test distributed volume
We connect to the client, create a folder for the new disk and mount the distributed volume.
root@client1:~# mkdir /mnt/distrib
root@client1:~# mount.glusterfs server1:/distributed /mnt/distrib/
root@client1:~# df -h
Filesystem            Size  Used Avail Use% Mounted on
/dev/sda1             7.3G  1.5G  5.5G  21% /
udev                  236M  4.0K  236M   1% /dev
tmpfs                  49M  280K   49M   1% /run
none                  5.0M     0  5.0M   0% /run/lock
none                  245M     0  245M   0% /run/shm
server1:/distributed   30G  6.3G   22G  23% /mnt/distrib
As you can see, we have successfully mounted a new network drive with a size of 30 GB (the total disk size of all servers included in volume). Now create a dozen files.
root@client1:~# seq 1 10 | while read line; do echo "This is File${line}" > /mnt/distrib/file${line};done
root@client1:~# ls /mnt/distrib/
file1  file10  file2  file3  file4  file5  file6  file7  file8  file9
We look at how the content is distributed across the servers.
root@server1:~# ls /mnt/dist[0-9]/
/mnt/dist1/:
file10  file3  file4  file9
/mnt/dist2/:
file7
root@server2:~# ls /mnt/dist[0-9]/
/mnt/dist3/:
file1  file2
/mnt/dist4/:
file5  file6  file8
As you can see, the files are scattered in all four folders, which were included in the distributed volume.
3.2 Mounting and test replicated volume
We connect to the client, create a folder for the new disk and mount the replicated volume.
root@client1:~# mkdir /mnt/replica
root@client1:~# mount.glusterfs server1:/replicated /mnt/replica/
root@client1:~# df -h
Filesystem           Size  Used Avail Use% Mounted on
/dev/sda1            7.3G  1.5G  5.5G  21% /
udev                 131M  4.0K  131M   1% /dev
tmpfs                 28M  280K   28M   1% /run
none                 5.0M     0  5.0M   0% /run/lock
none                 140M     0  140M   0% /run/shm
server1:/replicated  7.3G  1.9G  5.1G  28% /mnt/replica
As you can see, we have successfully mounted a new network drive 7.3 GB in size (the total disk size of all servers included in volume divided by the number of replicas). Now create a dozen files.
root@client1:~# seq 1 10 | while read line; do echo "This is File${line}" > /mnt/replica/file${line};done
root@client1:~# ls /mnt/replica/
file1  file10  file2  file3  file4  file5  file6  file7  file8  file9
We look at how the content is distributed across the servers.
root@server1:~# ls /mnt/repl*
/mnt/repl1:
file1  file10  file2  file3  file4  file5  file6  file7  file8  file9
/mnt/repl2:
file1  file10  file2  file3  file4  file5  file6  file7  file8  file9
root@server2:~# ls /mnt/repl*
/mnt/repl3:
file1  file10  file2  file3  file4  file5  file6  file7  file8  file9
/mnt/repl4:
file1  file10  file2  file3  file4  file5  file6  file7  file8  file9
As you can see, the files were mirrored in every folder that was in the replicated volume.
3.3 Mounting and test striped volume
We connect to the client, create a folder for the new disk and mount the striped volume.
root@client1:~# mkdir /mnt/strip
root@client1:~# mount.glusterfs server1:/striped /mnt/strip/
root@client1:~# df -h
Filesystem        Size  Used Avail Use% Mounted on
/dev/sda1         7.3G  1.5G  5.5G  21% /
udev              131M  4.0K  131M   1% /dev
tmpfs              28M  280K   28M   1% /run
none              5.0M     0  5.0M   0% /run/lock
none              140M     0  140M   0% /run/shm
server1:/striped   30G  6.3G   22G  23% /mnt/strip
As you can see, we have successfully mounted a new network drive with a size of 30 GB (the total disk size of all servers included in volume). Now create a couple of large files and copy to the folder.
root@client1:~# dd if=/dev/urandom of=test2.bin bs=30M count=10
root@client1:~# dd if=/dev/urandom of=test1.bin bs=30M count=10
root@client1:~# cp test* /mnt/strip/
root@client1:~# ls -lh /mnt/strip/
total 601M
-rw-r--r-- 1 root root 300M Mar  2 14:13 test1.bin
-rw-r--r-- 1 root root 300M Mar  2 14:13 test2.bin
As you can see, we have 2 files of 300MB in size in our folder. Now let's see how the content is distributed across the servers.
root@server1:~# ls -lh /mnt/strip*
/mnt/strip1:
total 151M
-rw-r--r-- 2 root root  75M Mar  2 14:13 test1.bin
-rw-r--r-- 2 root root  75M Mar  2 14:13 test2.bin
/mnt/strip2:
total 151M
-rw-r--r-- 2 root root  75M Mar  2 14:13 test1.bin
-rw-r--r-- 2 root root  75M Mar  2 14:13 test2.bin
root@server2:~# ls -lh /mnt/strip*
/mnt/strip3:
total 151M
-rw-r--r-- 2 root root  75M Mar  2 14:13 test1.bin
-rw-r--r-- 2 root root  75M Mar  2 14:13 test2.bin
/mnt/strip4:
total 151M
-rw-r--r-- 2 root root  75M Mar  2 14:13 test1.bin
-rw-r--r-- 2 root root  75M Mar  2 14:13 test2.bin
As you can see, the files were divided into equal parts of 75 MB and scattered across all four folders that were part of the striped volume.
3.4 Mounting and test distributed striped volume
We connect to the client, create a folder for the new disk and mount the distributed striped volume.
root@client1:~# mkdir /mnt/distrib-strip
root@client1:~# mount.glusterfs server1:/distributed-striped /mnt/distrib-strip/
root@client1:~# df -h
Filesystem                    Size  Used Avail Use% Mounted on
/dev/sda1                     7.3G  1.8G  5.2G  25% /
udev                          131M  4.0K  131M   1% /dev
tmpfs                          28M  280K   28M   1% /run
none                          5.0M     0  5.0M   0% /run/lock
none                          140M     0  140M   0% /run/shm
server1:/distributed-striped   30G  6.9G   21G  26% /mnt/distrib-strip
As you can see, we have successfully mounted a new network drive with a size of 30 GB (the total disk size of all servers included in volume). Now create a couple of large files and copy to the folder.
root@client1:~# dd if=/dev/urandom of=test2.bin bs=30M count=10
root@client1:~# dd if=/dev/urandom of=test1.bin bs=30M count=10
root@client1:~# cp test* /mnt/distrib-strip/
root@client1:~# ls -lh /mnt/distrib-strip/
total 600M
-rw-r--r-- 1 root root 300M Mar  2 14:35 test1.bin
-rw-r--r-- 1 root root 300M Mar  2 14:34 test2.bin
As you can see, we have 2 files of 300MB in size in our folder. Now let's see how the content is distributed across the servers.
root@server1:~# ls -lh /mnt/dist-strip*
/mnt/dist-strip1:
total 151M
-rw-r--r-- 2 root root 150M Mar  2 14:35 test1.bin
/mnt/dist-strip2:
total 151M
-rw-r--r-- 2 root root 150M Mar  2 14:34 test2.bin
root@server2:~# ls -lh /mnt/dist-strip*
/mnt/dist-strip3:
total 151M
-rw-r--r-- 2 root root 150M Mar  2 14:35 test1.bin
/mnt/dist-strip4:
total 151M
-rw-r--r-- 2 root root 150M Mar  2 14:34 test2.bin
As you can see, the files were scattered in different folders and divided into equal parts of 150 MB.
3.5 Mounting and test distributed replicated volume
We connect to the client, create a folder for the new disk and mount distributed replicated volume.
root@client1:~# mkdir /mnt/distrib-repl
root@client1:~# mount.glusterfs server1:/distributed-replicated /mnt/distrib-repl/
root@client1:~# df -h
Filesystem                       Size  Used Avail Use% Mounted on
/dev/sda1                        7.3G  1.8G  5.1G  27% /
udev                             131M  4.0K  131M   1% /dev
tmpfs                             28M  280K   28M   1% /run
none                             5.0M     0  5.0M   0% /run/lock
none                             140M     0  140M   0% /run/shm
server1:/distributed-replicated   15G  4.4G  9.5G  32% /mnt/distrib-repl
As you can see, we have successfully mounted a new 15GB network drive (the total disk size of all servers included in volume divided by the number of replicas). Now create a dozen files.
root@client1:~# seq 1 10 | while read line; do echo "This is File${line}" > /mnt/distrib-repl/file${line};done
root@client1:~# ls /mnt/distrib-repl/
file1  file10  file2  file3  file4  file5  file6  file7  file8  file9
We look at how the content is distributed across the servers.
root@server1:~# ls /mnt/dist-repl*
/mnt/dist-repl1:
file10  file3  file4  file7  file9
/mnt/dist-repl2:
file1  file2  file5  file6  file8
root@server2:~# ls /mnt/dist-repl*
/mnt/dist-repl3:
file10  file3  file4  file7  file9
/mnt/dist-repl4:
file1  file2  file5  file6  file8
As you can see, the first server has the same content as the second scattered in folders.
4. Conclusion
In real conditions, each folder should be a separately mounted disk (not a root file system). You are now familiar with every type of content distribution used by glusterFS.
GlusterFS performs well in local networks with basic settings, if you go to the data centers distributed across countries, you need to configure the settings both on the server side and when mounting on the client, which will be discussed in the next article.