Mac password cracking with Arduino and OpenCV
How hacked password-protected poppy using Arduino and OpenCV. Based on an article by Brutforsim EFI with Arduino .
It all started as usual - my friend blocked Mac Air, having stolen the account. And if the iPhone can be restored, then the Mac is locked up. Contacting technical support did not lead to anything, the service center offered to unlock for 1000 rubles and 1 day. True, they found a motherboard defect that did not allow them to do this.
After reading an article by Brutforsim EFI with Arduino , we decided to repeat the experience. True, there was no display, but there were two arduins - Uno and Mega2560. And a laptop that is not very sorry for ~ 33 hours to leave to sort out the password. We decided to do a bust with preference and poetesses - let the automatics monitor the bust, and we drink tea.
To begin with - briefly about what we generally decided. This section is for those who do not want to carefully read the article I referred to.
If you have stolen an Apple account, the cracker can block your Mac remotely by setting a four-digit numeric password of your choice. After that, it is impossible to turn on the poppy without entering this password, and this password can be entered in two different places - before entering your account (there are 4 empty one-character input fields closed by asterisks) and when you try to enter UEFI (in this case it is displayed field for entering any number of characters, also closed by asterisks). If you enter the wrong password many times in 4 fields, then the entry is blocked first for 5 minutes, then for 10, and so on for up to an hour. For search it is not very suitable. In the case of UEFI, you can repeat the entry approximately every 12 seconds (a little less, actually). If we calculate the maximum enumeration time, we get 33, (3) hours of enumeration, without taking into account the time for entering characters and “input”. Not deadly, in principle. It seems that Apple has something to think about in terms of security.
However, such negligence in choosing the complexity of the password (or the delay between entries) is just for us.
I note that when entering the correct password, the input is not blocked at all, that is, these ~ 12 seconds are not time to verify the password, but an artificial delay. It seems that you can get somewhere behind this delay and iterate much faster. We didn’t do that, but the idea is interesting.
Everything that happens in this article was legal (because it was made with its poppy), aimed at combating scammers, whose contact information has already gone where it should. The use of the materials of this article for unlawful (as well as legitimate) actions is under no circumstances the responsibility of the author or site. Everything that you do, you do at your own peril and risk. The author or site is not responsible for any damage, direct or indirect, caused by the materials of the article. In short, who did not hide, I am not to blame.
The author of the article “Brutforsim EFI with Arduino” suggested a wonderful way to select a password - Arduino pretends to be a USB keyboard and sequentially tries passwords. I will not repeat all the subtleties of the approach, the link to the article above. I will describe what we decided to do differently and why
We sort through the following scheme:
Data was transferred via USB, became serial, then became keystrokes. There was nothing particularly interesting here, except for the shaken characters. By debugging, it was determined that the characters are lost at the last stage. That is, the character leaves the keyboard, but is not registered in the poppy. Why, it remains a mystery. They did not understand, they just checked that everything had been introduced.
While the poppy is locked, a lock is drawn. Here's one:

Let's look for it using OpenCV! This is such a suitable use for a microscope (actually not).
Surprisingly, OpenCV for .NET wound up with a half-kick and two NuGet packages (OpenCV.NET, OpenCV). Next is some code.
This simple code looks for a lock image on the screen. Finds excellent: The

green rectangle is a castle found. This section did not cause any difficulties. OpenCV was very surprised and pleased.
If we found the lock on the screen, you can look under it for entering a password. This is relatively easy with the usual manipulation of image pixels. Or it would be done if not for the camera. There are two problems. Firstly, the camera resolution was 640 * 480, which is terrible for analysis. Secondly, under unstable lighting, the camera behaved completely unpredictably. Something flashed, something disappeared. The second problem was solved by stable lighting conditions, the first - by reference to pixel sizes and filters.
So, there is a castle, you can find its center and go down until we meet two peaks of brightness.

The figure shows the brightness of the pixels under the lock.
Having found two maxima at a sufficient distance, you can take the center between them and go left (we believe that the password entry field is horizontal). When they found a bright pixel, either the input field ended, or stumbled upon an asterisk.

Entry field. Green - lock frame. White is the down line along which we are looking for two highs. Red - maximums found and the first bright pixel in the center left.
Now, if the first bright pixel on the left is enough “left”, then the input field is empty. If enough "right", then 4 characters are entered. Calibration is needed, however.
During calibration, the position of the bright pixel was searched for with an empty input field, then 4 characters were entered, and the position of the bright pixel was searched. These values were saved and further used as reference.
This concludes the part on working with the image, and indeed it's time to move on to the results.

No lock found! After 33 hours of operation, the password was selected. Despite randomization, the password at number 35 from the end turned out to be correct. The password value was 2605 . The probability of this event was 0.35%.

Used in the article:
Apple Mac Air
Lenovo Thinkpad T510
Arduino Uno (compatible)
Arduino Mega 2560 (compatible)
Literature:
Brutforsim EFI with Arduino - this is all about working with Arduino as with a keyboard and the principle of poppy blocking. Thanks to the author!
Of. Arduino site
Of. OpenCV Website
Code. Warning, the code is terrible. It is written ad hoc and contains traces of experimentation. In addition, it is tied to the dimensions of my camera, so modification may be required.
You can do anything with the code if it is not prohibited by law.
History
It all started as usual - my friend blocked Mac Air, having stolen the account. And if the iPhone can be restored, then the Mac is locked up. Contacting technical support did not lead to anything, the service center offered to unlock for 1000 rubles and 1 day. True, they found a motherboard defect that did not allow them to do this.
After reading an article by Brutforsim EFI with Arduino , we decided to repeat the experience. True, there was no display, but there were two arduins - Uno and Mega2560. And a laptop that is not very sorry for ~ 33 hours to leave to sort out the password. We decided to do a bust with preference and poetesses - let the automatics monitor the bust, and we drink tea.
Description of the problem
To begin with - briefly about what we generally decided. This section is for those who do not want to carefully read the article I referred to.
If you have stolen an Apple account, the cracker can block your Mac remotely by setting a four-digit numeric password of your choice. After that, it is impossible to turn on the poppy without entering this password, and this password can be entered in two different places - before entering your account (there are 4 empty one-character input fields closed by asterisks) and when you try to enter UEFI (in this case it is displayed field for entering any number of characters, also closed by asterisks). If you enter the wrong password many times in 4 fields, then the entry is blocked first for 5 minutes, then for 10, and so on for up to an hour. For search it is not very suitable. In the case of UEFI, you can repeat the entry approximately every 12 seconds (a little less, actually). If we calculate the maximum enumeration time, we get 33, (3) hours of enumeration, without taking into account the time for entering characters and “input”. Not deadly, in principle. It seems that Apple has something to think about in terms of security.
However, such negligence in choosing the complexity of the password (or the delay between entries) is just for us.
I note that when entering the correct password, the input is not blocked at all, that is, these ~ 12 seconds are not time to verify the password, but an artificial delay. It seems that you can get somewhere behind this delay and iterate much faster. We didn’t do that, but the idea is interesting.
Disclaimer
Everything that happens in this article was legal (because it was made with its poppy), aimed at combating scammers, whose contact information has already gone where it should. The use of the materials of this article for unlawful (as well as legitimate) actions is under no circumstances the responsibility of the author or site. Everything that you do, you do at your own peril and risk. The author or site is not responsible for any damage, direct or indirect, caused by the materials of the article. In short, who did not hide, I am not to blame.
How to sort it out?
The author of the article “Brutforsim EFI with Arduino” suggested a wonderful way to select a password - Arduino pretends to be a USB keyboard and sequentially tries passwords. I will not repeat all the subtleties of the approach, the link to the article above. I will describe what we decided to do differently and why
- Use the computer constantly. We did not have a display, so there was nothing to write a log of what was introduced. Therefore the computer will remember what was entered
- Recognize the image on a poppy monitor. It seemed to us relatively simple to check whether the poppy has been hacked so far, and enter passwords only if it is not hacked. Anyway, the computer is in use.
- Check that exactly four characters are entered. This was the most unexpected change for us. It was found that sometimes a bunch of computer - arduino - arduino - poppy did not enter all the characters. Sometimes input was skipped, and it was not very scary (you can add 3-4 entries after the password, they do not interfere). But sometimes password characters were skipped. Why is the mystery. We decided to look at the picture and make sure that all the characters are entered. If not, repeat the entry.
- Iterate over passwords in random order. Passwords in the article were sorted from 0000 to 9999, we did not like it. Most likely, the attacker chose a password that is far from both 0000 and 9999, so that the attacker would suffer. Therefore, we decided to do a randomized search. What a cruel joke it played with us, read on.
Let's get to the point!
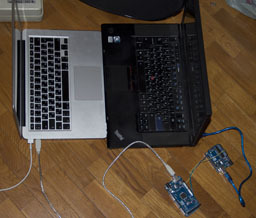
We sort through the following scheme:
- The computer generates a list of passwords for brute force
- The computer checks that the poppy is still blocked
- The computer sends the next password to the Arduine Uno, which, in fact, is used as a USB <-> SERIAL adapter and has a simple program that does nothing
- With Uno, Mega reads data on Serial1. That is why they used the order Uno -> Mega, and not vice versa
- Mega enters data into the poppy, considering itself a keyboard.
- The computer checks that 4 characters are entered on the screen. If not, the password is marked as not entered
- In the same way, press input
- While the password field is not empty, we do nothing
- Once the input field is empty, go to the second step.
Data transfer
Data was transferred via USB, became serial, then became keystrokes. There was nothing particularly interesting here, except for the shaken characters. By debugging, it was determined that the characters are lost at the last stage. That is, the character leaves the keyboard, but is not registered in the poppy. Why, it remains a mystery. They did not understand, they just checked that everything had been introduced.
Lock recognition
While the poppy is locked, a lock is drawn. Here's one:
Let's look for it using OpenCV! This is such a suitable use for a microscope (actually not).
Surprisingly, OpenCV for .NET wound up with a half-kick and two NuGet packages (OpenCV.NET, OpenCV). Next is some code.
lck = CV.LoadImage("D:\\mac-unlock\\lock.png", LoadImageFlags.Unchanged); //Load lock image file
Capture camera = Capture.CreateCameraCapture(-1); //Create camera object to capture image. Don't care about device index as the notebook has 1 camera device
var img = camera.RetrieveFrame(); //get camera image
IplImage res = new IplImage(new OpenCV.Net.Size(img.Width - tpl.Width + 1, img.Height - tpl.Height + 1), IplDepth.F32, 1); //Create image for matching results
OpenCV.Net.CV.MatchTemplate(img, lck, res, TemplateMatchingMethod.CorrelationCoefficientNormed); //Find lock image in camera image
double min, max;
OpenCV.Net.Point minloc;
OpenCV.Net.Point maxloc;
CV.MinMaxLoc(res, out min, out max, out minloc, out maxloc);
if (max < 0.88) //No lock image on the screen! Wow!
...
This simple code looks for a lock image on the screen. Finds excellent: The
green rectangle is a castle found. This section did not cause any difficulties. OpenCV was very surprised and pleased.
Password field
If we found the lock on the screen, you can look under it for entering a password. This is relatively easy with the usual manipulation of image pixels. Or it would be done if not for the camera. There are two problems. Firstly, the camera resolution was 640 * 480, which is terrible for analysis. Secondly, under unstable lighting, the camera behaved completely unpredictably. Something flashed, something disappeared. The second problem was solved by stable lighting conditions, the first - by reference to pixel sizes and filters.
So, there is a castle, you can find its center and go down until we meet two peaks of brightness.
The figure shows the brightness of the pixels under the lock.
Having found two maxima at a sufficient distance, you can take the center between them and go left (we believe that the password entry field is horizontal). When they found a bright pixel, either the input field ended, or stumbled upon an asterisk.
Entry field. Green - lock frame. White is the down line along which we are looking for two highs. Red - maximums found and the first bright pixel in the center left.
Now, if the first bright pixel on the left is enough “left”, then the input field is empty. If enough "right", then 4 characters are entered. Calibration is needed, however.
During calibration, the position of the bright pixel was searched for with an empty input field, then 4 characters were entered, and the position of the bright pixel was searched. These values were saved and further used as reference.
This concludes the part on working with the image, and indeed it's time to move on to the results.
results
No lock found! After 33 hours of operation, the password was selected. Despite randomization, the password at number 35 from the end turned out to be correct. The password value was 2605 . The probability of this event was 0.35%.
Literature, equipment and code
Used in the article:
Apple Mac Air
Lenovo Thinkpad T510
Arduino Uno (compatible)
Arduino Mega 2560 (compatible)
Literature:
Brutforsim EFI with Arduino - this is all about working with Arduino as with a keyboard and the principle of poppy blocking. Thanks to the author!
Of. Arduino site
Of. OpenCV Website
Code. Warning, the code is terrible. It is written ad hoc and contains traces of experimentation. In addition, it is tied to the dimensions of my camera, so modification may be required.
You can do anything with the code if it is not prohibited by law.