Robot on RaspberryPi, Arduino and RaspiCam + OpenCV. Part 1 Overview
- Tutorial
Very often articles appear on the hub: how to use the Raspberry Pi as a media center, a mobile video camera, a remote web camera, and ... that's all. It is very strange that in such a big IT party - there is quite a bit of information about how to program it and use a single-board computer where it is really quite useful - in any embedded systems where there are limitations in size and cost, but there is also a need for performance . In several articles I will try to describe using an example of creating a mobile wheeled robot with computer vision - how you can use a raspberry to create robots (pieces with intelligence on board, and not web-controlled machines with a web camera).
It was always interesting to program something mechanical -you feel like God (like most programmers) - you breathe a soul into a bunch of details. Probably everyone remembers that childhood joy from the first blinking of an LED, a moving servo, etc. - when he did something that can be touched, that lives, moves , and not a php website .
In many of his creations, and especially robots, a person always tries to repeat himself, or part of his functions. We get 80% of the information about the world through vision - so computer vision, in my opinion, is one of the fundamental areas of knowledge in robotics.

I started studying it by reading academic papers on algorithms in parallel with the development of the OpenCV computer vision library in C ++ (in the case of Raspberry - Python) - knowing the principles of the algorithms will help you assess the complexity and feasibility of the task before it even starts, as well as optimize the algorithms in critical places. Even if you use mainly library functions - they are well optimized, and it is unlikely that you will write better from scratch - you will be able to optimize some parameters that slightly affect the solution of your problem in a particular case, but significantly affect its speed - in generally returning to the holivar - “does a programmer need mathematics” - In this case, I need it, so I advise you to strain a little gyrus and understand at least superficially the operation of the algorithms.
It will also be useful to at least superficially study the Theory of Automatic Control - instead of describing its capabilities - I suggest just watching the next video (BTW - half of his team is Russian)
It is unlikely that you will have 1 in 1 the same details at hand that I have, if you want to repeat it - therefore I will describe the general concept, and you can see for yourself.
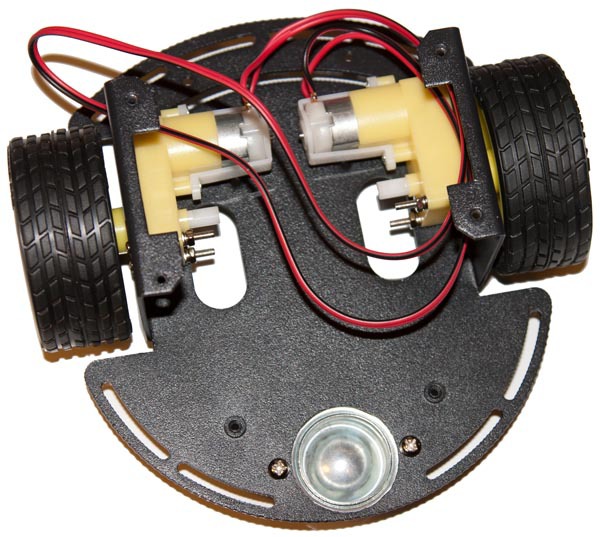
The mechanical basis of the robot - a two-wheeled one with a differential drive - is classic, in general, for the first robotic experiments - it has 2 independent wheels and its movement is controlled exclusively by speeds and the direction of their rotation (like quadcopter propellers). In addition to the actual wheels, there is a ball / wheel support, in advanced systems - encoders for feedback and monitoring the current speed of the engines, which allows more efficient control of the engines.
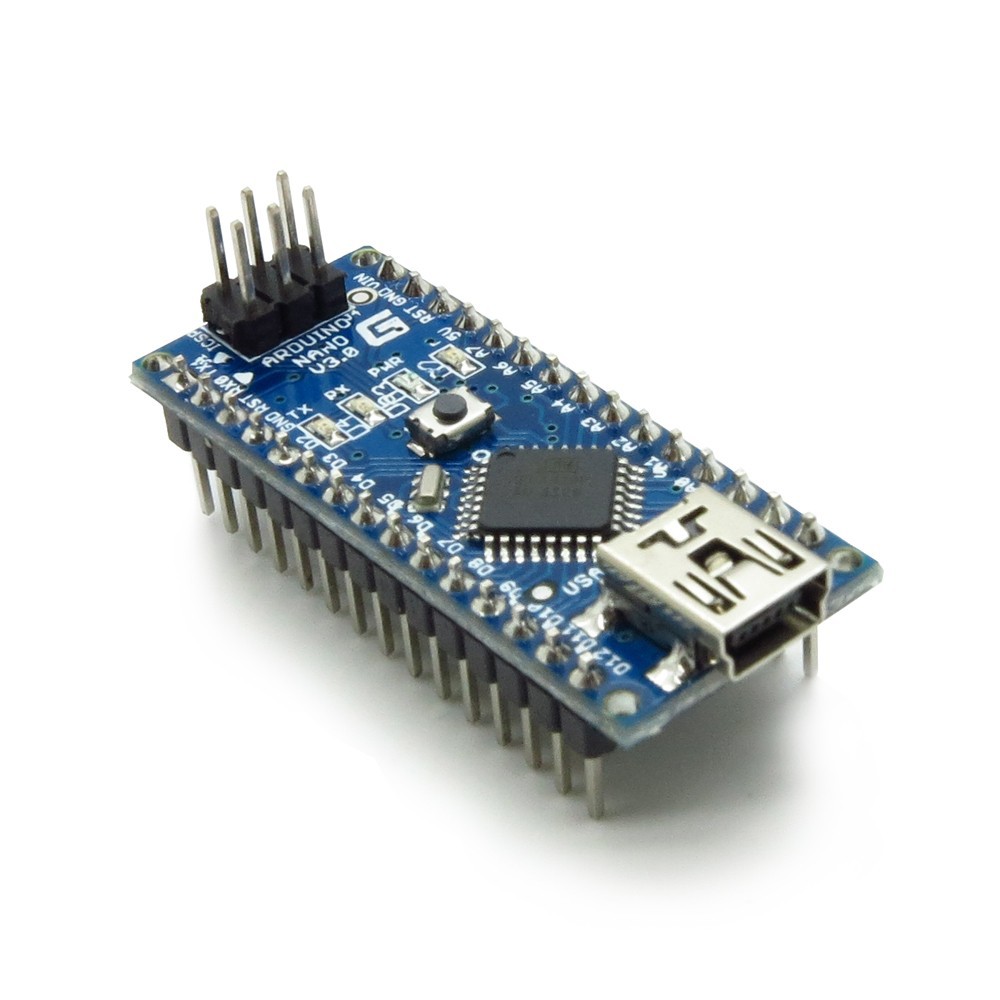
You can use any microcontroller as an engine controller, I use an Arduino nano - because it just came to hand.
Perhaps the question arises - why not manage directly with Raspberry? The fact is that the operating system has a much longer quantum of time than the microcontroller, in addition, there are no hardware PWMov, plus, if we want to improve motor control using feedback and Control Theory - this will require computational costs and a faster reaction - therefore the motor control part and the brain of the robot are separated - arduino simply receives a UART command - at what speeds and directions the brain would I wanted the engines to spin - how this will be achieved - simply by turning on the PWM with the desired duty cycle or tricky control, when we first apply voltage more than the setpoint, spin the engine, and then align it - thus speeding up the engine to the desired speed - all this is the concern of the engine controller, not Raspberry - since this is generally a task of a much tougher time - an order of magnitude - two less than Raspberry allows, and indeed similar systems.
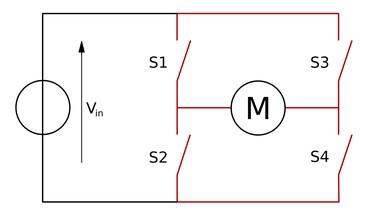
Just an arduino is not enough for the motors to spin - the current supplied by the foot is too small - if we put a winding of a motor that requires a current of the order of amperes on a small output transistor of the controller foot - we just arrange a short circuit - lock the key on itself and most likely it will just exit building - so we need a more powerful switch that allows us to pass a large current through ourselves - if we need to turn the motor in one direction - in general, we need only one transistor, but if we want to turn in different ones - we already have them Dreghood 4 - such a scheme is called H - bridge - closing the diagonal keys closed other diagonal - we can change the direction of the current in the motor.
And such a scheme is necessary for each wheel. Fortunately, nowadays there is no need to assemble it - it is implemented in the form of integrated circuits, of which there are a great many - so any one that can control the current that your motor needs is suitable. I’m using this two-channel one from pololu:
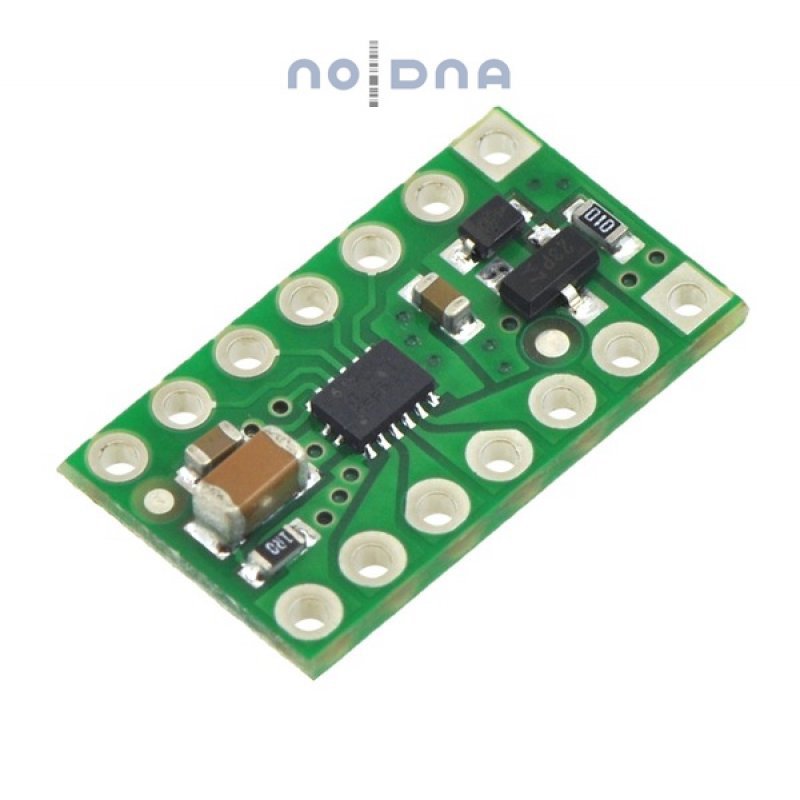
There is also a great variety of various shields for arduin - with the help of Google you can easily find them on request "arduino motor driver". The connection scheme is also usually provided by the manufacturer or users of various forums - the seeker will find it. The microcircuit has 2 power supplies - one which is supplied to the motors from a powerful current source - for example, 7.2V Li-Pol batteries, the other - the input logic stage power - Arduino 5V, there are also inputs that control the direction of rotation of each channel and the Enable input by supplying which PWM signal we can adjust the speed of the motor. There may be various configurations depending on the shield, but the main conclusions are as follows.
In general, by connecting Arduino in this way, the engine driver, motors and battery (or just some kind of current source on a long wire), you can already start playing with motor control. To receive commands from Raspberry, you will need to implement the UART line reception and its parsing - you can come up with a protocol for whatever your heart desires. the above - the main parts of almost any wheeled robot - the options begin already further - you can generally drive into computer vision and make the robot purely on an Arduino, which, for example, travels along a line, bypasses obstacles using distance sensors, etc.

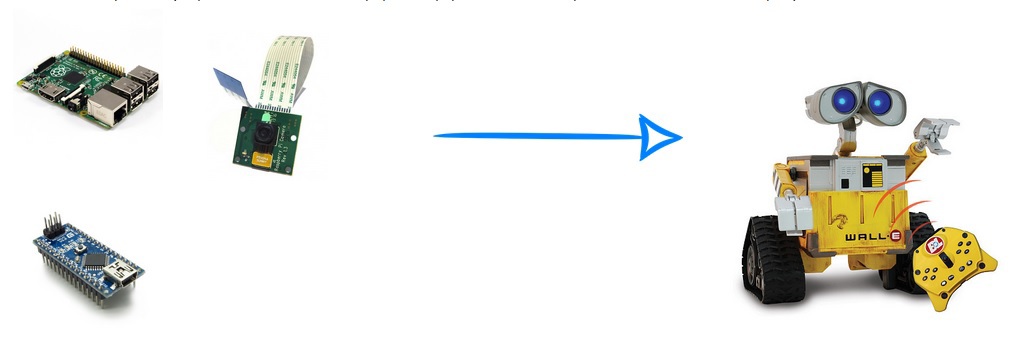
My task is to make a somewhat more intelligent platform for the study of computer vision and control theory - so the next element of the system will be a single-board computer Raspberry Pi B + in view of its low price, prevalence and accessibility of information. Python interpreter is included in the Raspbian assembly - so I wrote a program for the robot on it
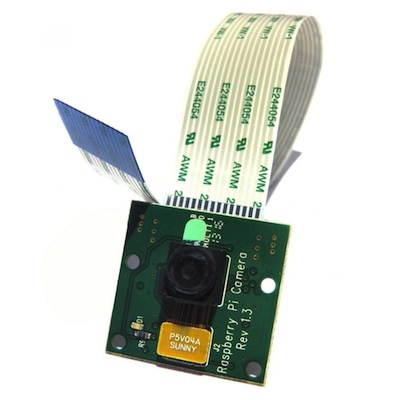
In general, you can use any webcam as a camera (which I did at first) - I use Raspicam - it is small, light, has a separate port for connecting it, a wide viewing angle is a good driver and 90 fps in VGA resolution.
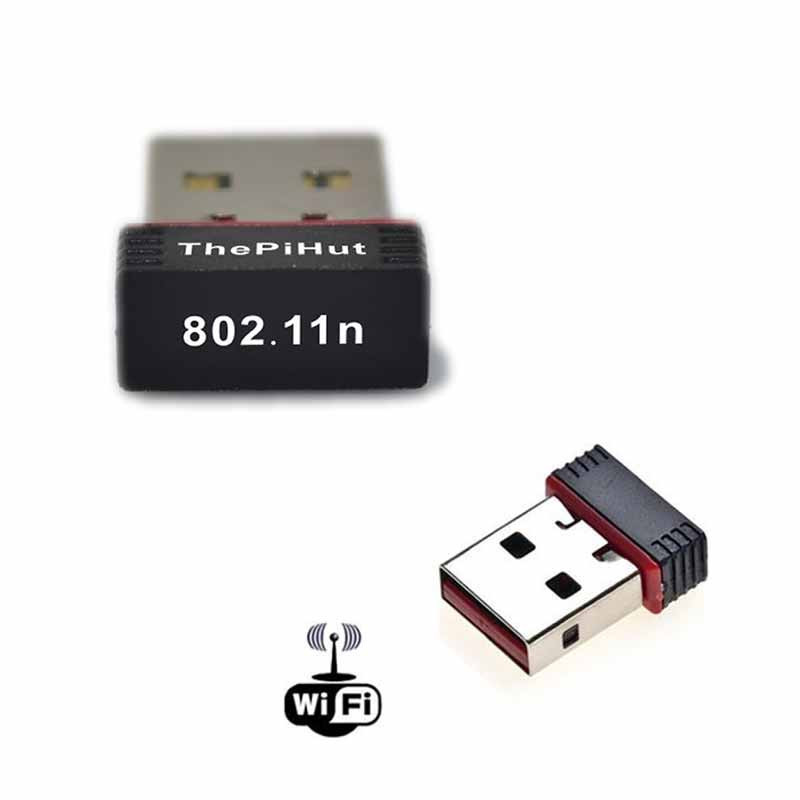
For debugging, I use a USB Wifi whistle, connecting to Raspberry via remote desktop via SSH. Also, in general, you can use any, for the initial setup, you can generally use an Ethernet cable and SSH
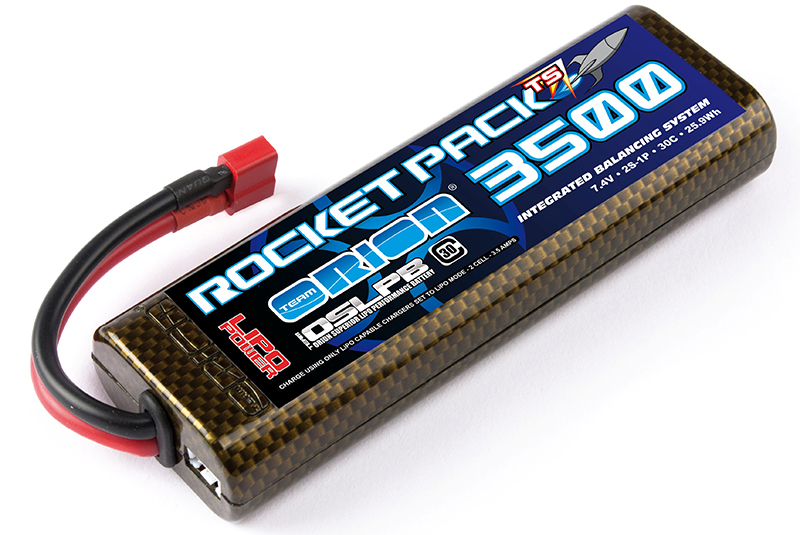
Battery - lithium polymer from 2Ah to 7.2V rated voltage + charging.
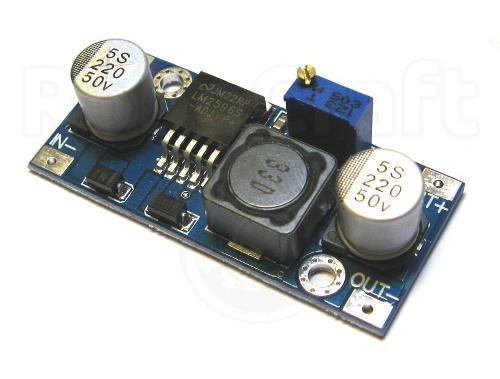
A step-down DC-DC converter - our battery delivers from 8.4 to 6V - we can supply this voltage directly to the engines through a driver chip, but Raspberry and Arduino require a 5V power supply to supply power - according to Raspberry Pi documentation, a 5V source capable of delivering at least 800mA is required - you can of course lower the voltage from the battery to 5V using a linear stabilizer, but at such currents it will heat up and use the battery power inefficiently, so I recommend using a pulsed step-down DC-DC converter - from it I have nourished and Raspberry and Arduino
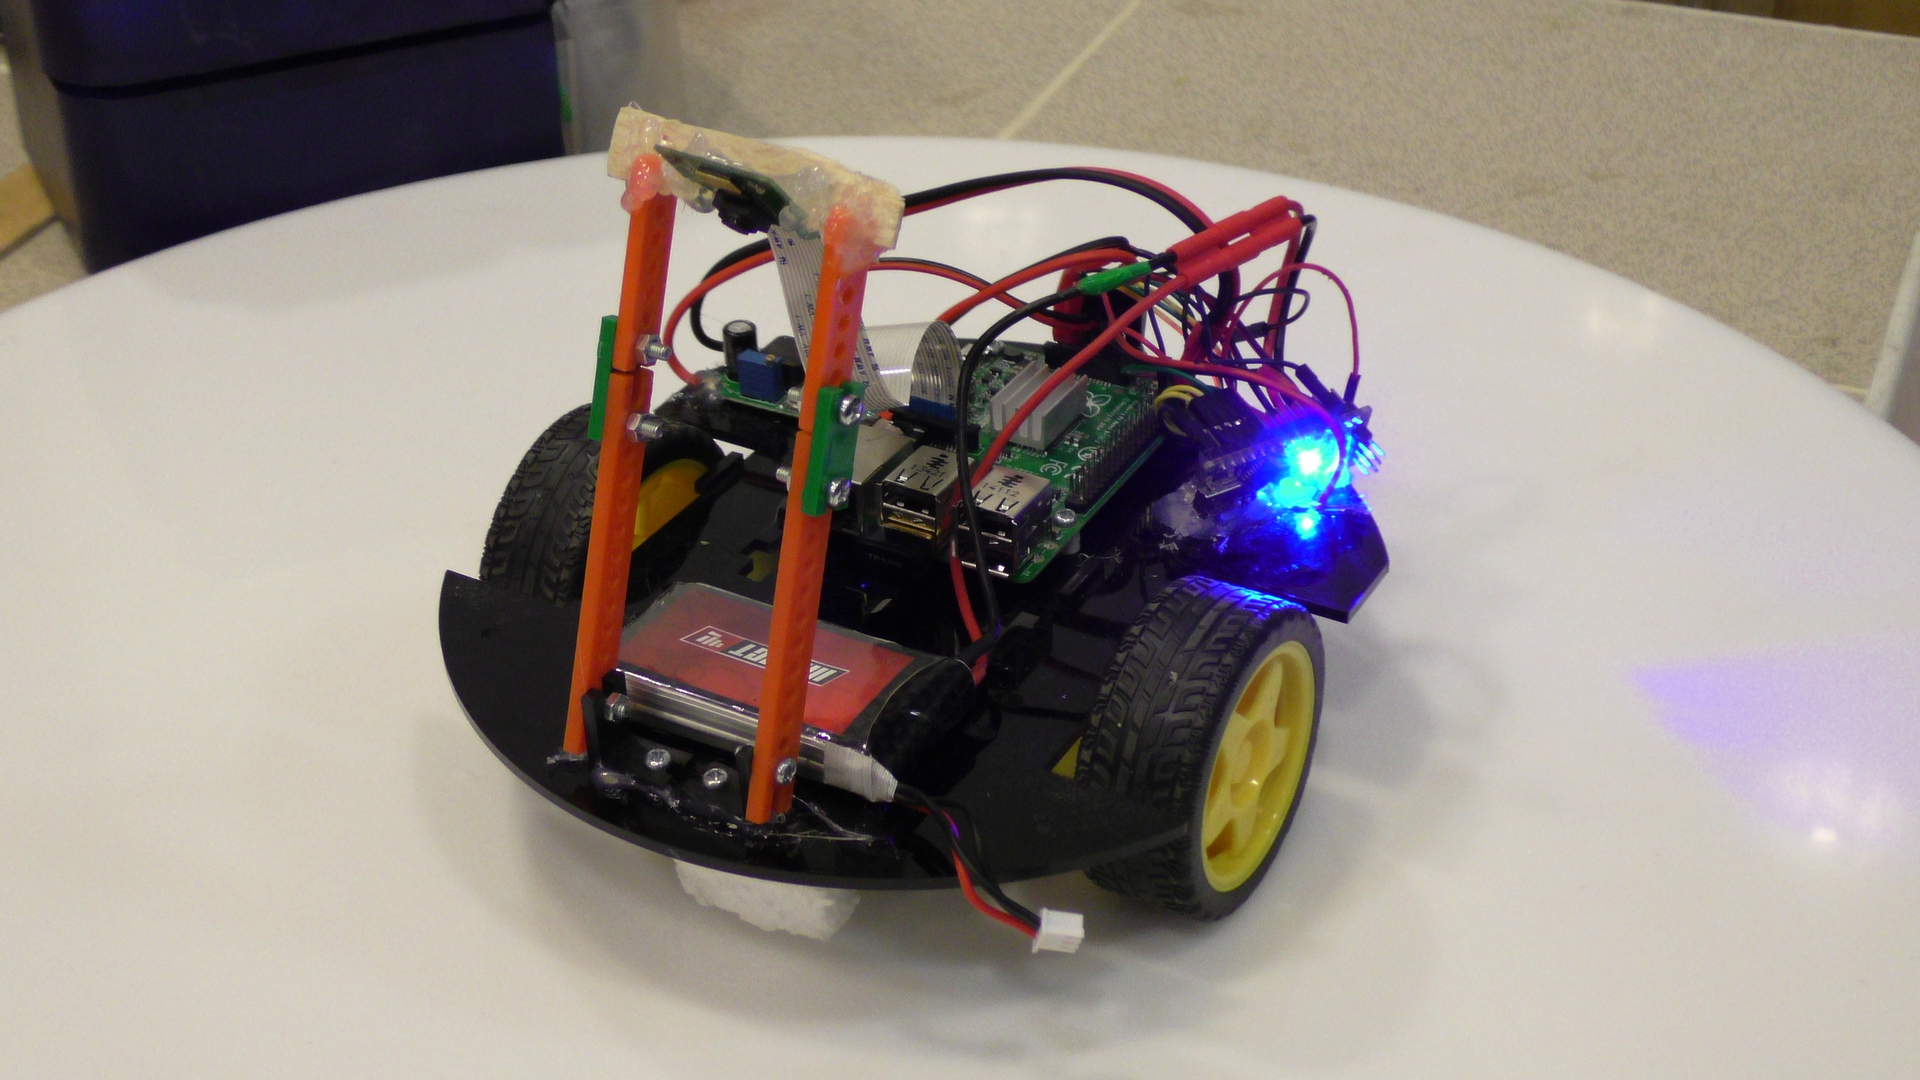
own photo my nanotech robot and a couple of videos of his ride on different tracks competitive as a demonstration:
Line pros (dashed)
Thin line with sharp turns (Euro)
In general, the review article is finished - he talked about the main tools used, then it will be more specific, namely:
1.
Introduction 2. Initial setup of Raspberry Pi + Wifi debugging
3. Getting started with OpenCV, Raspicam in Python
4. Robot control, PID regulator, examples
Questions, comments, additions and suggestions for the following articles leave in the comments, slips and other - in PM
Introduction
It was always interesting to program something mechanical -
In many of his creations, and especially robots, a person always tries to repeat himself, or part of his functions. We get 80% of the information about the world through vision - so computer vision, in my opinion, is one of the fundamental areas of knowledge in robotics.
I started studying it by reading academic papers on algorithms in parallel with the development of the OpenCV computer vision library in C ++ (in the case of Raspberry - Python) - knowing the principles of the algorithms will help you assess the complexity and feasibility of the task before it even starts, as well as optimize the algorithms in critical places. Even if you use mainly library functions - they are well optimized, and it is unlikely that you will write better from scratch - you will be able to optimize some parameters that slightly affect the solution of your problem in a particular case, but significantly affect its speed - in generally returning to the holivar - “does a programmer need mathematics” - In this case, I need it, so I advise you to strain a little gyrus and understand at least superficially the operation of the algorithms.
It will also be useful to at least superficially study the Theory of Automatic Control - instead of describing its capabilities - I suggest just watching the next video (BTW - half of his team is Russian)
Robot parts
It is unlikely that you will have 1 in 1 the same details at hand that I have, if you want to repeat it - therefore I will describe the general concept, and you can see for yourself.
Mechanics
The mechanical basis of the robot - a two-wheeled one with a differential drive - is classic, in general, for the first robotic experiments - it has 2 independent wheels and its movement is controlled exclusively by speeds and the direction of their rotation (like quadcopter propellers). In addition to the actual wheels, there is a ball / wheel support, in advanced systems - encoders for feedback and monitoring the current speed of the engines, which allows more efficient control of the engines.
Engine controller
You can use any microcontroller as an engine controller, I use an Arduino nano - because it just came to hand.
Perhaps the question arises - why not manage directly with Raspberry? The fact is that the operating system has a much longer quantum of time than the microcontroller, in addition, there are no hardware PWMov, plus, if we want to improve motor control using feedback and Control Theory - this will require computational costs and a faster reaction - therefore the motor control part and the brain of the robot are separated - arduino simply receives a UART command - at what speeds and directions the brain would I wanted the engines to spin - how this will be achieved - simply by turning on the PWM with the desired duty cycle or tricky control, when we first apply voltage more than the setpoint, spin the engine, and then align it - thus speeding up the engine to the desired speed - all this is the concern of the engine controller, not Raspberry - since this is generally a task of a much tougher time - an order of magnitude - two less than Raspberry allows, and indeed similar systems.
Engine driver
Just an arduino is not enough for the motors to spin - the current supplied by the foot is too small - if we put a winding of a motor that requires a current of the order of amperes on a small output transistor of the controller foot - we just arrange a short circuit - lock the key on itself and most likely it will just exit building - so we need a more powerful switch that allows us to pass a large current through ourselves - if we need to turn the motor in one direction - in general, we need only one transistor, but if we want to turn in different ones - we already have them Dreghood 4 - such a scheme is called H - bridge - closing the diagonal keys closed other diagonal - we can change the direction of the current in the motor.
And such a scheme is necessary for each wheel. Fortunately, nowadays there is no need to assemble it - it is implemented in the form of integrated circuits, of which there are a great many - so any one that can control the current that your motor needs is suitable. I’m using this two-channel one from pololu:
There is also a great variety of various shields for arduin - with the help of Google you can easily find them on request "arduino motor driver". The connection scheme is also usually provided by the manufacturer or users of various forums - the seeker will find it. The microcircuit has 2 power supplies - one which is supplied to the motors from a powerful current source - for example, 7.2V Li-Pol batteries, the other - the input logic stage power - Arduino 5V, there are also inputs that control the direction of rotation of each channel and the Enable input by supplying which PWM signal we can adjust the speed of the motor. There may be various configurations depending on the shield, but the main conclusions are as follows.
In general, by connecting Arduino in this way, the engine driver, motors and battery (or just some kind of current source on a long wire), you can already start playing with motor control. To receive commands from Raspberry, you will need to implement the UART line reception and its parsing - you can come up with a protocol for whatever your heart desires. the above - the main parts of almost any wheeled robot - the options begin already further - you can generally drive into computer vision and make the robot purely on an Arduino, which, for example, travels along a line, bypasses obstacles using distance sensors, etc.
Main controller
My task is to make a somewhat more intelligent platform for the study of computer vision and control theory - so the next element of the system will be a single-board computer Raspberry Pi B + in view of its low price, prevalence and accessibility of information. Python interpreter is included in the Raspbian assembly - so I wrote a program for the robot on it
Camera
In general, you can use any webcam as a camera (which I did at first) - I use Raspicam - it is small, light, has a separate port for connecting it, a wide viewing angle is a good driver and 90 fps in VGA resolution.
Debugging tool
For debugging, I use a USB Wifi whistle, connecting to Raspberry via remote desktop via SSH. Also, in general, you can use any, for the initial setup, you can generally use an Ethernet cable and SSH
Supply system
Battery - lithium polymer from 2Ah to 7.2V rated voltage + charging.
A step-down DC-DC converter - our battery delivers from 8.4 to 6V - we can supply this voltage directly to the engines through a driver chip, but Raspberry and Arduino require a 5V power supply to supply power - according to Raspberry Pi documentation, a 5V source capable of delivering at least 800mA is required - you can of course lower the voltage from the battery to 5V using a linear stabilizer, but at such currents it will heat up and use the battery power inefficiently, so I recommend using a pulsed step-down DC-DC converter - from it I have nourished and Raspberry and Arduino
own photo my nanotech robot and a couple of videos of his ride on different tracks competitive as a demonstration:
Line pros (dashed)
Thin line with sharp turns (Euro)
In general, the review article is finished - he talked about the main tools used, then it will be more specific, namely:
1.
Introduction 2. Initial setup of Raspberry Pi + Wifi debugging
3. Getting started with OpenCV, Raspicam in Python
4. Robot control, PID regulator, examples
Questions, comments, additions and suggestions for the following articles leave in the comments, slips and other - in PM