Surface mount: stencil and reflow oven at home

When you start looking for opportunities to sell a small batch of your own electronic devices, you find that you can solve this problem without getting up from your chair. For example, this is how the Seeed service works , organizing not only production, but also the sale of your devices. If you are not sure whether there will be demand, or simply want to save, then the best option, in my opinion, would be to order printed circuit boards somewhere in China, and leave the installation of surface ( SMD ) components at home. I want to tell you how to significantly accelerate surface mounting with homemade stencils and an improvised reflow oven.
Making a stencil
 A stencil (eng. Stencil ) in the context of surface mounting is a thin plate with holes cut out under the contact pads. It is superimposed on a printed circuit board and smeared with solder paste using a spatula. Next, the stencil is removed, and an even layer of solder paste remains on the contact pads.
An example of using a stencil from EEVblog
Typically, stencils are cut out of steel or plastic, but this can be expensive in small batches. For example, when ordering 5x5 cm boards, I was offered to make a stencil for $ 25. I'm going to tell you how to make a stencil from an aluminum can in half an hour using LUT !
 Cut a rectangle from a beer can, align it with a hot iron. Do not worry that concavity cannot be completely eliminated - when applying the stencil to the board, we will press it with office clothespins!
- We clean the inside of the rectangle with fine sandpaper to remove the protective layer. Some people write that they remove the top layer with caustic soda. Acetone acts on some types of cans after being heated with an iron. But generally this is done in an emery cloth
- We print the negative with a laser printer on special paper for toner transfer (eng. Toner transfer paper ). This paper completely gives up its toner in one (!) Laminator pass, surprisingly cheap, does not require deoxidation in water, and can be removed immediately after toner transfer
 We attach the negative to the side of the rectangle that has been cleaned and rubbed with alcohol using a kapton adhesive tape . Its peculiarity is that it withstands high temperatures, while maintaining adhesive properties. It greatly simplifies the manufacture of double-sided boards, when you need to accurately fix the paper in front of pre-made holes
 Pass the resulting sandwich through the laminator (once), remove the paper. The toner from the paper completely went over to the rectangle. In order not to etch holes through random scratches, we seal the workpiece with adhesive tape on both sides, except for the piece that needs to be etched. Probably, instead of a laminator, you can use a hot iron, as is usually done in LUT, but a laminator is still more convenient.
 We corrode in a waste (after copper weed ) solution of ferric chloride. This solution is a mixture of ferric chloride and copper chloride. According to my observations, such a mixture interacts with aluminum much more rapidly than a pure solution of ferric chloride. When etching, brush off the resulting brown coating with a soft brush and periodically check if it is time to get our stencil (so as not to over-etch!)
 We remove the tape, cut the stencil to the size of the board. If scraps of the protective layer of the can are visible in the windows of the stencil, they can be removed with the sticky side of the tape
- The stencil is pressed to the board with paper clips, toner down. As a spatula, you can use a plastic card or cardboard. After use, do not forget to wipe with alcohol and a stencil and a spatula to clean them of adhering paste
Make oven
A little about the temperature profile
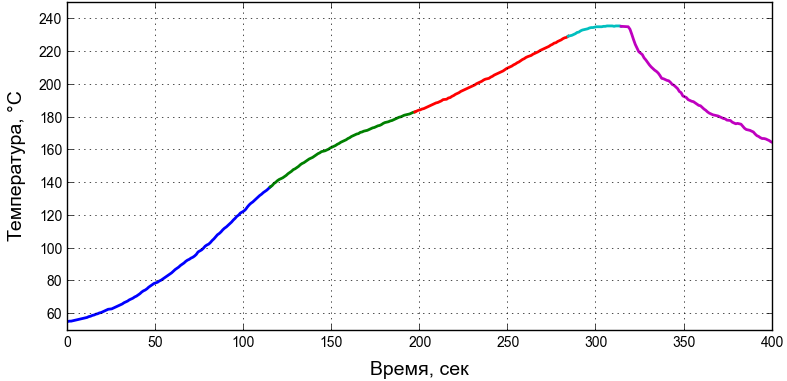
Правильное оплавление паяльной пасты требует соблюдения ее температурного профиля. Например, профиль для бессвинцовой паяльной пасты может быть таким (из википедии):

Быстрый нагрев до 150 °C, томление 1 — 2 минуты, быстрый нагрев до 230 °C, оплавление 30 секунд, охлаждение. Смысл всех этих температурных зон в том, что они инициируют процессы, необходимые для образования надежных контактов без лишнего перегрева компонентов. В одной зоне активизируется флюс, в другой расплавление припоя. Существует промышленный стандартJ-STD-20 , описывающий рекомендуемые параметры каждой зоны.
Быстрый нагрев до 150 °C, томление 1 — 2 минуты, быстрый нагрев до 230 °C, оплавление 30 секунд, охлаждение. Смысл всех этих температурных зон в том, что они инициируют процессы, необходимые для образования надежных контактов без лишнего перегрева компонентов. В одной зоне активизируется флюс, в другой расплавление припоя. Существует промышленный стандарт
In general, the cheapest and easiest way to reflow solder paste is this:
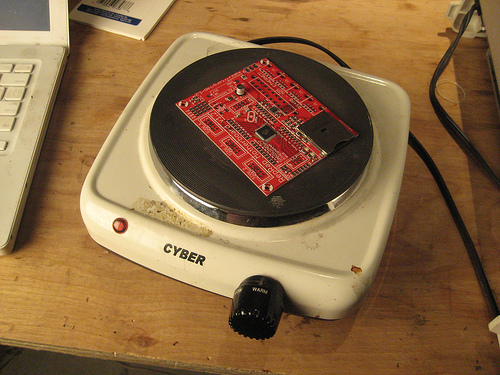
They say that a pan will do.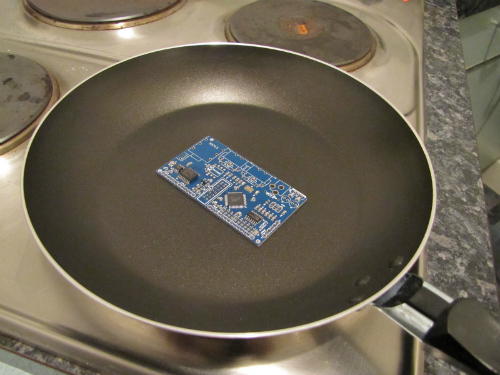
You can also use a hot air gun to melt the solder paste, blowing out individual components or areas until the paste melts and makes contact. I actively used this method for my devices, but it was a long time, leading to unreliable contacts and overheating of elements. For example, passive elements could change their values within 5-10%! This became especially true after the transition to lead-free solder paste, which requires a higher temperature for reflow.
And it turns out that people on the Internet have long learned to remodel cheap electric oven in good reflow oven (Eng. Reflow oven ) to the correct temperature profile. I also decided to follow their example and tell you what happened.
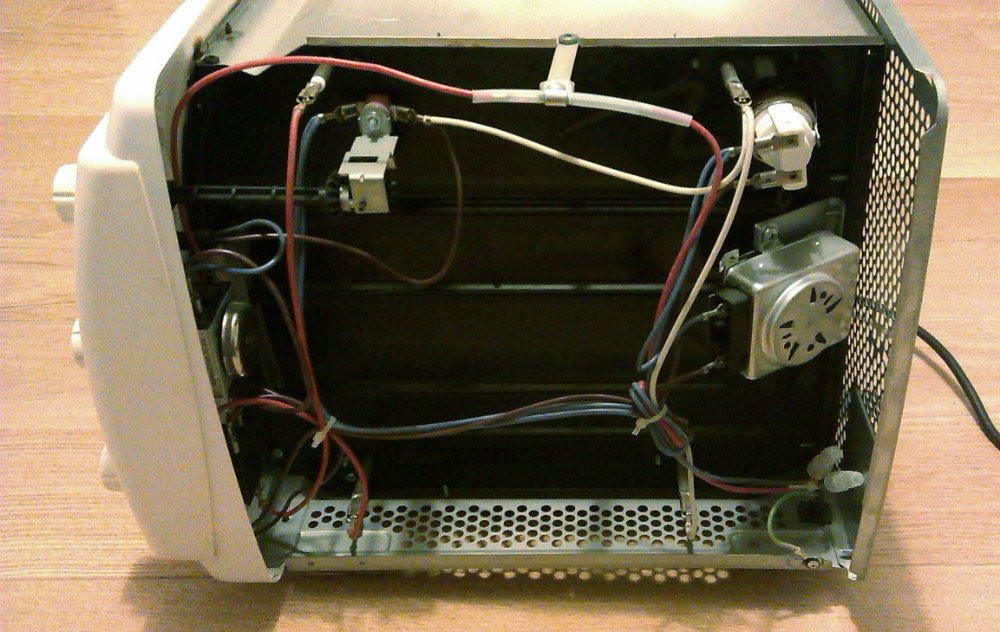
I began by monitoring the bulletin board for the sale of used electric ovens. After some time, an announcement appeared about the sale of DeLonghi with a capacity of 2.2 kW with two heating elements for only $ 30. However, later it turned out that the heating elements were spoiled during operation and emitted 300 W less heat.

Opening the case, I found that everything is very well organized inside, and it will be easy to connect to the heating elements.
To control the heating elements, I took the cheapest solid-state relays (English solid-state relay, SSR ) with optical isolation at 25A, at $ 3 apiece.

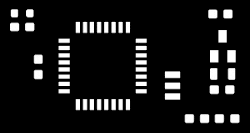
I chose ControLeo as the controller , buying it for $ 60 along with a thermocouple and shipping from the USA. The device came in the form of a set, which still had to be soldered, drilled, assembled:
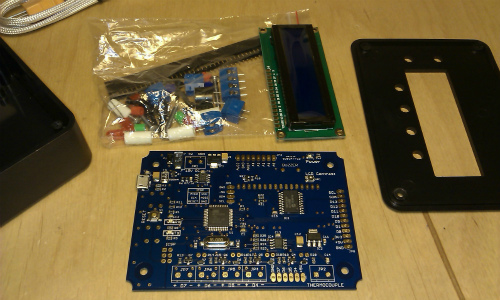
The controller has a two-line LCD screen, two control buttons and four + 5V relay outputs. The program code is open and can be uploaded to the device via USB and Arduino IDE. Through the control buttons, a menu is implemented with the ability to configure and test the outputs, as well as start the reflow process. Settings are saved in read-only memory. In addition, when they are changed, a training mode is launched in which the controller adjusts the on / off time of the relay to meet the requirements of the industry standard flashing
Controller operation example
According to the standard, the heating rate of the reflow oven must be at least
- He insulated the furnace with basalt wool blocks wrapped in foil (so as not to breathe microscopic basalt dust)
- I added a new TEN for 800 W - it turns out that they are very easy to buy on the economic market, just tell me the size!
- He turned the stove upside down (!), As large heat losses went through the slit of the glass door

Thus, the stove worked. After several experiments, I came to the conclusion that the boards can be placed directly on the metal grill attached to the stove, and the thermocouple should be placed above the board, fixing the wire with a paper clip. Tests showed that the change in the values of passive elements is minimal. In general, the oven is ready - take the bake!